MyG37.com | G35Driver.com | My350Z.com | ZDriver.com
 
Show Your Support Become A Premier Member


Go Back   G35Driver > Technical (Do It Yourself) > Brakes & Suspension (DIY)
New! Use your Facebook, Google, AIM & Yahoo accounts to securely log into this site, click logo to login  

Welcome to G35Driver.com!
Welcome to G35Driver.com.

You are currently viewing our forum as a guest, which gives you limited access to view most discussions and access our other features. By joining our community, at no cost, you will have access to post topics, communicate privately with other members (PM), respond to polls, upload content and access many other special features. Registration is free, fast and simple, join G35Driver.com community today!


Reply
 
Thread Tools Rate Thread Display Modes
  #1  
Old 02-04-2007, 04:49 AM
accordfreak's Avatar
Registered User
 
Join Date: Jun 2003
Posts: 3,012
iTrader: (11)
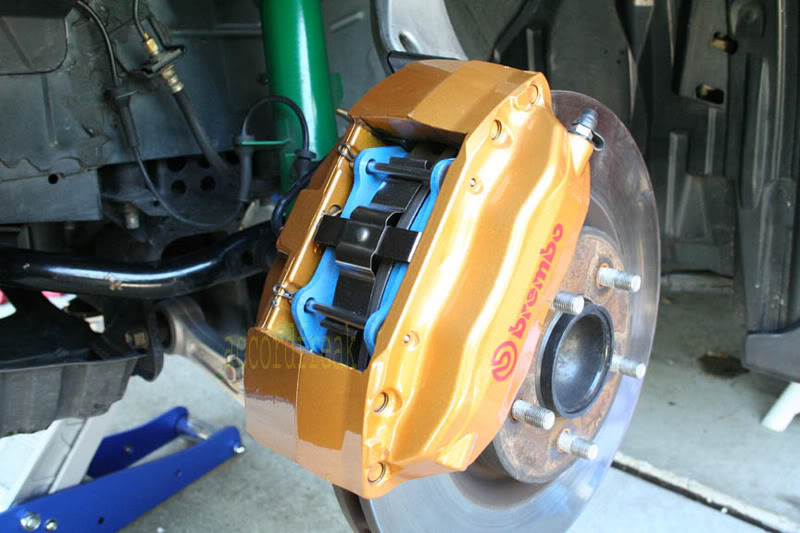
replacing your Brembo pads

Brought to you by 'dothemath'

My Brembo Pad Replacement

making this thread in here will help me find references faster.
__________________
tb g35 cpe 06 headlight mod..... http://www.g35driver.com/forums/showthread.php?t=103689 BLUE LED conversion: http://g35driver.com/forums/lighting/39381-stage-4-done-blue-ac-compass-temp-display.html.................................................. ..."NO [U R L], NO [I M G], only 1 line" ........................
Reply With Quote
  #2  
Old 02-04-2007, 05:09 PM
Registered User
 
Join Date: Aug 2004
Location: Los Angeles / San Jose
Posts: 1,749
iTrader: (8)
Send a message via AIM to Alan
Quote:
Originally Posted by dothemath


Ice Pick to push out the pins after removing cottar pins


Push back pads with towel and large pliers


Remove shims


Watch brake fluid level


Clean parts


Apply brake squeal reducer on back of pads and shims and insert after 10 minutes


Cottar pin


Place spring and insert second pin and cottar


Done


Move to the back...but now the pins come towards you


Use 130 or so grit to sand the rust from the hubs where the wheels make contact and clean the old brake material off of the rotors...per instructions on hawk hps sight. Now bed your pads per manufactures directions. Mine were approx 8 moderate force stops from 35 and 2-3 hard stops from 45, then let brakes cool.
asdf
__________________
Reply With Quote
  #3  
Old 02-07-2007, 07:55 PM
Cali Event Coordinator
 
Join Date: May 2003
Location: San Francisco, Burlingame, and Hayward Area...!!!
Posts: 1,691
iTrader: (0)
Send a message via AIM to GYAL8R Send a message via MSN to GYAL8R Send a message via Yahoo to GYAL8R
nice instructions...too bad my lazy azz won't do it.
i just got my drilled slotted rotors and hawk racing pads today...

$100.00 labor...

nice job...!!!

how about posting "rotor" DIY?

bobs
Reply With Quote
  #4  
Old 02-08-2007, 02:16 PM
Registered User
 
Join Date: Aug 2002
Location: Bay Area
Posts: 542
iTrader: (2)
Make sure they bleed your brakelines as well
Reply With Quote
  #5  
Old 02-08-2007, 04:33 PM
Vortech Test Pilot
 
Join Date: Apr 2004
Location: GA
Posts: 1,813
iTrader: (0)
Cool

Quote:
Originally Posted by SagiSRP
Make sure they bleed your brakelines as well

Why do you say that???

You didn't open up the system so no air could get in.

Make sure you properly bed the pads in......and you really should flush and bleed the entire system at the same time you change the pads.
__________________
996 C4S '03 G35 6MT - Vortech'ed - SOLD

Last edited by Brando; 02-08-2007 at 04:35 PM.
Reply With Quote
  #6  
Old 04-14-2007, 02:21 PM
Registered User
 
Join Date: Apr 2005
Posts: 134
iTrader: (0)
a rotor diy would be nice, and put the towel on both sides of the caliper, so you dont chip the paint off like the pictures above.
Reply With Quote
  #7  
Old 08-28-2007, 01:46 PM
Registered User
 
Join Date: Nov 2004
Location: NY, NY
Posts: 1,121
iTrader: (10)
removing the rotors are easy. just remove the two 21 or 22mm bolts and remove the 10mm bolt holding the brake line onto the knuckle, then remove caliper upwards. may take some force.

Another way to compress pistons without risking damage to caliper paint is to kep the pads and place, insert long durable flat head screw driver in between pad and rotor and pry. a lot easier also because you will be compressing 2 pistons at a time versus 1. when compressing pistons if you compress them too fast, the opposite piston will tend to come back out so go slowly. slow and steady wins the race.
Reply With Quote
  #8  
Old 08-28-2007, 02:03 PM
Chamoru671's Avatar
Fokai "Since ever Since"
2004 Infiniti G35
 
Join Date: Feb 2007
Location: Florida/Guam
Posts: 509
iTrader: (38)
Send a message via AIM to Chamoru671
So what type of brake pads did you use?
__________________
ボディを排出しなさい。 心は進む。 精神を培いなさい。
Florida G Club||SFL G Club
Reply With Quote
  #9  
Old 09-23-2007, 11:38 PM
DrrSeuss's Avatar
Premier Member
 
Join Date: Apr 2007
Location: Miami, FL
Posts: 529
iTrader: (11)
Send a message via AIM to DrrSeuss
Just changed my front and rear pads with Hawks with this DIY. Great write up!
__________________
Brilliant Silver G35c 6MT
Reply With Quote
  #10  
Old 09-24-2007, 02:30 AM
accordfreak's Avatar
Registered User
 
Join Date: Jun 2003
Posts: 3,012
iTrader: (11)
I just changed mine to Endless Vita Nuova. Great street pads, better than stock, low dust, works great in the rain, and doesn't squeek (given you've bed them correctly).

__________________
tb g35 cpe 06 headlight mod..... http://www.g35driver.com/forums/showthread.php?t=103689 BLUE LED conversion: http://g35driver.com/forums/showthread.php?t=39381.................................................. ..."NO [U R L], NO [I M G], only 1 line" ........................
Reply With Quote
  #11  
Old 09-24-2007, 02:33 AM
rookie's Avatar
SPONSOR
 
Join Date: Mar 2006
Location: OC
Posts: 3,423
iTrader: (19)
So did you find the thread faster? I thought that was funny.
__________________


| CNC | P-Factor | Falken Tire | Amsoil | Meguiars |
Reply With Quote
  #12  
Old 09-24-2007, 02:35 AM
accordfreak's Avatar
Registered User
 
Join Date: Jun 2003
Posts: 3,012
iTrader: (11)
I acutally did. hahaha i remembered i reposted it here
__________________
tb g35 cpe 06 headlight mod..... http://www.g35driver.com/forums/showthread.php?t=103689 BLUE LED conversion: http://g35driver.com/forums/showthread.php?t=39381.................................................. ..."NO [U R L], NO [I M G], only 1 line" ........................
Reply With Quote
  #13  
Old 11-23-2007, 08:58 PM
Registered User
 
Join Date: Nov 2007
Posts: 16
iTrader: (0)
I hear from my mechanic that you have to re-machine the rotors, if you are changing new pads , but not rotors.


do I have to do this?
Reply With Quote
  #14  
Old 01-28-2008, 04:41 PM
Registered User
 
Join Date: Apr 2005
Posts: 24
iTrader: (0)
Thanks for the DIY...did my brakes this week and went pretty smooth except taking off the rotors. They wouldn't budge even after I hit a few times with a rubber mallet. Finally came off after spraying something to loosen bolts and screwing in the little bolt that initially came on my rotor to pop it loose.
Reply With Quote
  #15  
Old 01-29-2008, 04:05 PM
Registered User
 
Join Date: Mar 2006
Location: 630/773
Posts: 439
iTrader: (0)
Send a message via AIM to Steel Blue
I assume this is the same way to change breaks on non-Brembo?
Reply With Quote
Reply

Tags
bleeder, brake, brakes, brembo, caliper, change, changing, kit, pad, pads, repair, replace, replacing, screw, squeal


Thread Tools
Display Modes Rate This Thread
Rate This Thread:

Posting Rules
You may not post new threads
You may not post replies
You may not post attachments
You may not edit your posts

BB code is On
Smilies are On
[IMG] code is On
HTML code is Off
Trackbacks are Off
Pingbacks are On
Refbacks are Off
Forum Jump


All times are GMT -4. The time now is 08:04 AM.

G35Driver - Archive - Top

Powered by vBulletin® Version 3.7.4
Copyright ©2000 - 2009, Jelsoft Enterprises Ltd.
SEO by vBSEO 3.2.0
Copyright ©2002 - 2008, G35DRIVER.COM All Rights Reserved.
Advertising - Terms of Service - Privacy Policy - JOBS


MyG37.com | My350Z.com | ZDriver.com | G35Driver.com