DIY: 03-06 G35x AWD Front wheel bearings

#61
 04-11-2014, 12:43 PM


I've actually measured the runout prior to pressing the used hub in. I agree that it would be a bad thing. The first one was OK when I measured. I'll do the same here when i get that bit off.
#62
04-11-2014, 12:50 PM
Useless info here, but i was curious as to how these bearings are constructed
I pulled the bearing apart to try and get a sense of why it failed. Before i pressed the hub out, I noted that the bearing was rough to turn, and moved in and out slightly. After pressed the hub out, the rear race definitely moved in and out a hell of a lot more.
So i pressed the rear race out just to have a peek.
The bearing is pretty simple. There's a main housing, 2 rows of ball bearings held in a plastic clip, and the front and rear inner race that the hub presses through.
Both the front and rear inner race have a little lip that presses over the ball bearings. The smudges are grease. No galling on the ball bearing surfaces on the races
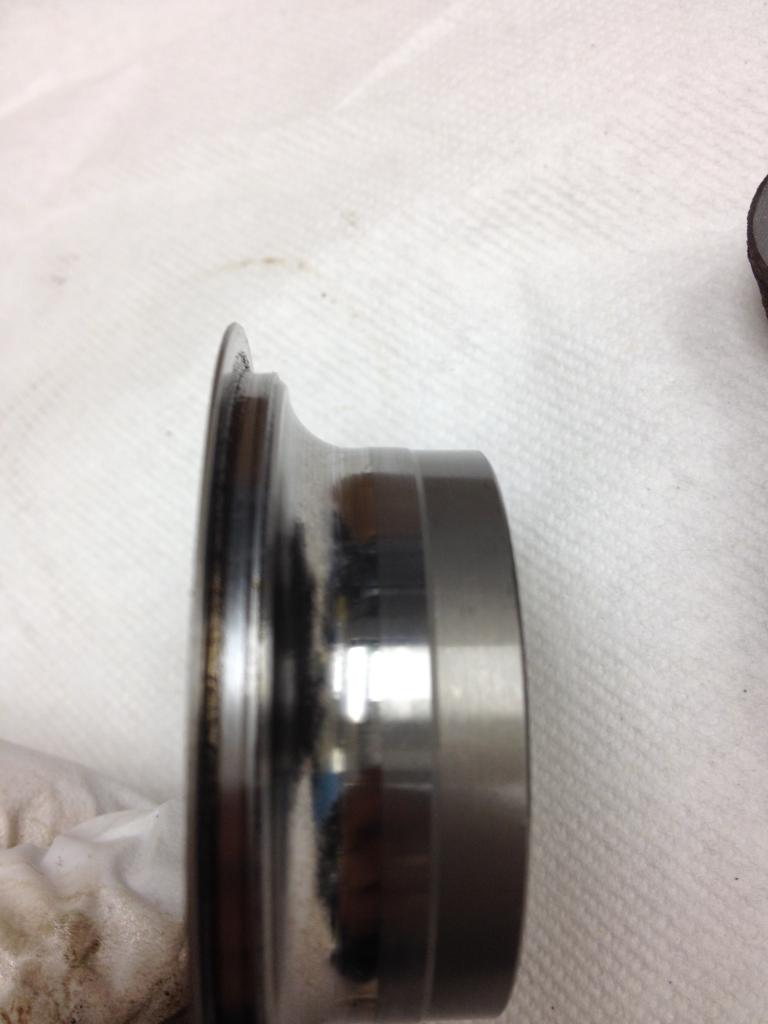

These didn't look worn to me really.
There are two rows of ball bearings inside held in place by a plastic retainer
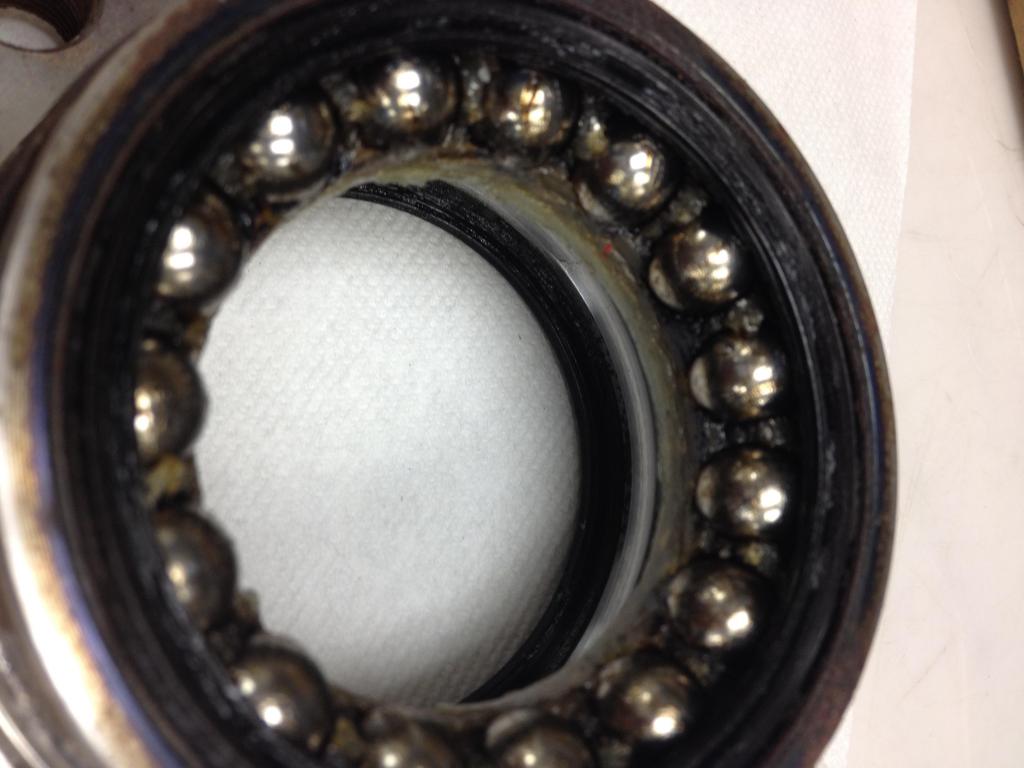
None of the ***** looked significantly galled. They all rolled smoothly
I'll remove the ***** and clean the housing and see if the track that the ***** roll has been enlarged. It almost seems like the rear of the bearing got loose and rough.
Again, this doesn't really show us anything much here. Just figured i'd take a peek inside and see if i could find anything blatently wrong. I'll prob poke around a bit more before trashing this bearing.
I pulled the bearing apart to try and get a sense of why it failed. Before i pressed the hub out, I noted that the bearing was rough to turn, and moved in and out slightly. After pressed the hub out, the rear race definitely moved in and out a hell of a lot more.
So i pressed the rear race out just to have a peek.
The bearing is pretty simple. There's a main housing, 2 rows of ball bearings held in a plastic clip, and the front and rear inner race that the hub presses through.
Both the front and rear inner race have a little lip that presses over the ball bearings. The smudges are grease. No galling on the ball bearing surfaces on the races
These didn't look worn to me really.
There are two rows of ball bearings inside held in place by a plastic retainer
None of the ***** looked significantly galled. They all rolled smoothly
I'll remove the ***** and clean the housing and see if the track that the ***** roll has been enlarged. It almost seems like the rear of the bearing got loose and rough.
Again, this doesn't really show us anything much here. Just figured i'd take a peek inside and see if i could find anything blatently wrong. I'll prob poke around a bit more before trashing this bearing.
Last edited by Mustang5L5; 04-11-2014 at 01:07 PM.
The following users liked this post:
higgs (08-11-2021)
#63
04-14-2014, 10:17 AM
After digging around a bit more, i found some more clues as to the reason of failing.
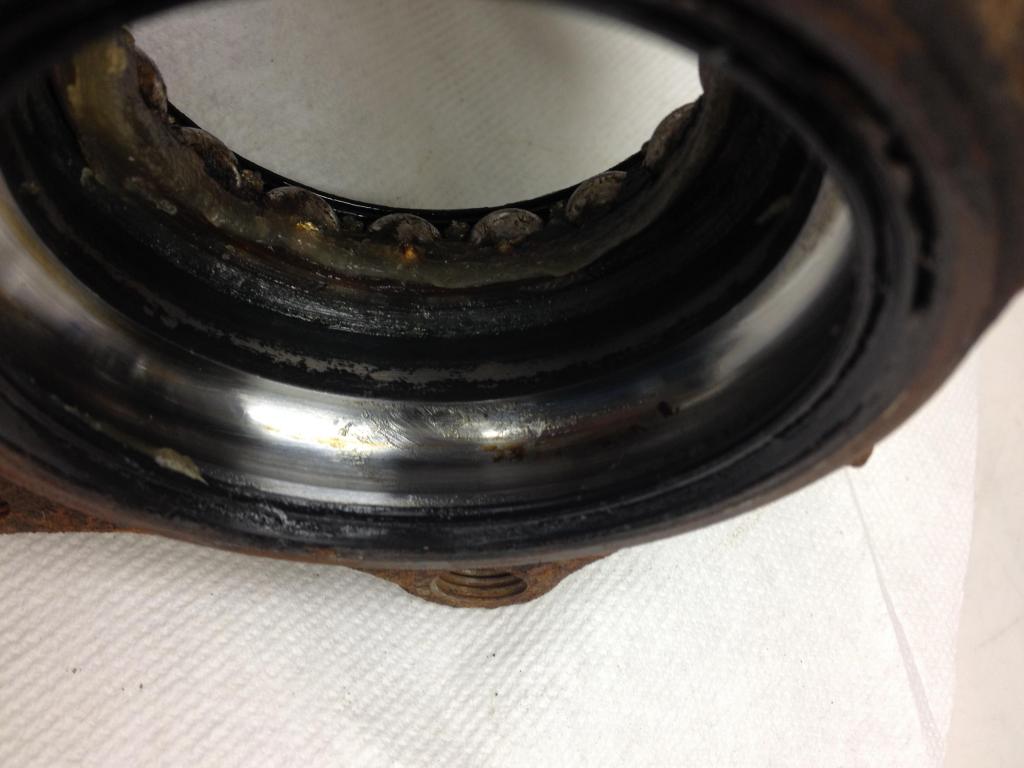
Discovered that the inner bearing track was showing signs of galling, with obvious damage here

This was on the driver's side, and the way the bearing mounts, would put this damage at the 1 o'clock position.
I also discovered that the grease here was pretty black and looked like it showed signs of heat, and also discovered some heat discoloration on the backside of the bearing under the gasket seal.
Grease in the front portion was yellow and looked new. Big contrast to the heat affected grease at the rear.
Galling is usually caused by 2 things: Excessive heat, and/or extreme point contact.
Only way I could see excessive pressure ona single point is if the axle nut loosened up slightly and allowed for some play. So i'm going to retorque the axle nuts and see if this is the case. I went to the upper limit of the spec, so after 1000 miles i can recheck.
Also, for the next bearing, i will consider disassembling the bearing and replacing the OEM grease with a better, high-temp grease as well as this link shows
http://www.nicoclub.com/archives/rep...-bearings.html
Discovered that the inner bearing track was showing signs of galling, with obvious damage here
This was on the driver's side, and the way the bearing mounts, would put this damage at the 1 o'clock position.
I also discovered that the grease here was pretty black and looked like it showed signs of heat, and also discovered some heat discoloration on the backside of the bearing under the gasket seal.
Grease in the front portion was yellow and looked new. Big contrast to the heat affected grease at the rear.
Galling is usually caused by 2 things: Excessive heat, and/or extreme point contact.
Only way I could see excessive pressure ona single point is if the axle nut loosened up slightly and allowed for some play. So i'm going to retorque the axle nuts and see if this is the case. I went to the upper limit of the spec, so after 1000 miles i can recheck.
Also, for the next bearing, i will consider disassembling the bearing and replacing the OEM grease with a better, high-temp grease as well as this link shows
http://www.nicoclub.com/archives/rep...-bearings.html
The following users liked this post:
higgs (08-11-2021)
#64
05-03-2014, 09:11 AM

Second time I've referred to this thread. Very helpful. Doing it yourself is worth the trouble imo vs. paying a garage $500-$600. Wishing now I would have bit the bullet and done both bearings at once.Second one started to go out within 4 months of the first.
There seem to be more options with bearing now, but, are there any after market hubs available or complete assemblies other than ebay??? I've been told the moog product is a direct replacement, but thought I saw in fine print that it was just the bearing module.
Thanks again to the OP for a very infomative post!
There is a way without having to press out old bearing. Just remove assembly as shown and place between boards or small hobby vise. Next reinsert bearing module screws several turns to engage. Then place only socket over bolts and systematically tap each one in a criss-cross pattern. Bearing will come loose and drop out. You dont need a slide hammer or press to do this job.
Last edited by rodmGluv; 05-03-2014 at 02:56 PM.
The following users liked this post:
Mustang5L5 (05-05-2014)
#65
05-05-2014, 09:12 AM
There is a way without having to press out old bearing. Just remove assembly as shown and place between boards or small hobby vise. Next reinsert bearing module screws several turns to engage. Then place only socket over bolts and systematically tap each one in a criss-cross pattern. Bearing will come loose and drop out. You dont need a slide hammer or press to do this job.

Haven't found a source for hubs other than OEM yet though. COuple guys on Ebay sell them pressed into bearings, but they don't state who the maker of the bearing is. I'm rather selective of parts, so i didn't buy this.
Bearings....a lot more choices these days for sure
#66
05-10-2014, 11:07 AM

#67
06-15-2014, 11:20 AM
Thanks for the thorough write up Mustang, I'll be doing my front left bearing sometime in the next month or so. I upgraded my 05x rotors and calipers to an 06 setup yesterday, and my mechanic friend immediately noticed a bearing noise. It had been somewhat muffled for the last 8 months with snow tires and the noisy brakes. I'm going to send him the link to this thread.

#69
06-16-2014, 03:32 PM
Didn't see this til now. Did you get it done? If not, i can find out, but I think i just grabbed various peices of rod stock I had laying around. Was a standard diameter like 2.5" or something
#70
06-17-2014, 01:22 PM
That's what I did on my 3rd bearing. Didn't use the press at all. Tapped the bearing bolts in a X-pattern and it came right out.
Haven't found a source for hubs other than OEM yet though. COuple guys on Ebay sell them pressed into bearings, but they don't state who the maker of the bearing is. I'm rather selective of parts, so i didn't buy this.
Bearings....a lot more choices these days for sure
Haven't found a source for hubs other than OEM yet though. COuple guys on Ebay sell them pressed into bearings, but they don't state who the maker of the bearing is. I'm rather selective of parts, so i didn't buy this.
Bearings....a lot more choices these days for sure
Are you saying if you buy the bearing and hub pressed together you don't need a press or a slide hammer to do the job? OR are you saying you do not need a press to get a new bearing into the old hub? If that's the case please re-explain it in further detail.
OP
It would be great if next time someone does the job they could record what they used for rounds to get the bearing out the right way because that is what I spent a lot of my time trying to figure out before finally just bringing it to pep-boys to be pressed.
#71
06-17-2014, 02:39 PM
Now, removing the old bearing from the knuckle is what I was referring to when i said that I suceeded in doing it without a press. What i did was loosen all 4 bearing screws, but leave them threaded in with maybe 1/4" gap. I braced the knuckle on two peices of wood and then used a 1" aluminum bar (to avoid damaging the bolt heads) to hammed the bolts from the backside. I went around in a circle and in a couple mins the bearing was loose from the knuckle and i could remove it.
SInce i didn't need the hub, i installed the new bearing by placing it in the correct spot, threading the bolts in, and tightening them up in an X-pattern and torquing to spec.
Pressing the hub into the bearing?
Or pressing the bearing out of the knuckle?
#72
06-18-2014, 01:10 PM
I pressed the hub into the bearing, but there are vendors on ebay that sell them pre-pressed. You need a press here. It's the proper tool to use and the best way to properly seat the hub in the bearing without any damage.
Now, removing the old bearing from the knuckle is what I was referring to when i said that I suceeded in doing it without a press. What i did was loosen all 4 bearing screws, but leave them threaded in with maybe 1/4" gap. I braced the knuckle on two peices of wood and then used a 1" aluminum bar (to avoid damaging the bolt heads) to hammed the bolts from the backside. I went around in a circle and in a couple mins the bearing was loose from the knuckle and i could remove it.
SInce i didn't need the hub, i installed the new bearing by placing it in the correct spot, threading the bolts in, and tightening them up in an X-pattern and torquing to spec.
For which part? I still have the ones I used.
Pressing the hub into the bearing?
Or pressing the bearing out of the knuckle?
Bearing and hub! I would use a slide hammer or the method you described above to get the bearing/hub assembly out of the knuckle to avoid removing more of the suspension than necessary.
If you still have the rounds, definitely post up the diameters and lengths and what they are used for.That is the one thing I had to wait until I had the car apart to figure out. I did not have time to find the rounds the day I was doing the job but if I knew ahead of time I could have had it all together and avoided a pep-boys trip to have the bearing pressed out/in of the hub. Thanks!
P.S Since we're all AWD guys does anybody know the exact difference between the RWD and AWD compression rod? I have read that the difference was the ball joint would interfere with the front CV boot so they re-designed it smaller, if this is the case I can buy the RWD one since I no longer have AWD. If there is more to it than that, I'll waste my money on wrong parts...
#73
06-18-2014, 03:25 PM
It is possible that the first bearing i did was stuck more than the other one i recently did where I took the knuckle off, but honestly it took maybe 2 hours start to finish for me to do this job (the 3rd time around) so it wasn't a huge deal.
If you can rent a slide hammer, and try it..go for it. I even bought the right size bearing puller to put on the slide hammer and insert behind the bearing to whack it out. Didn't work out well for me

#74
06-18-2014, 03:42 PM
[QUOTE=Mustang5L5;6913658]I tried that. Wouldn't budge. I whacked away for some time with the slide hammer and it wouldn't come out at all.
It is possible that the first bearing i did was stuck more than the other one i recently did where I took the knuckle off, but honestly it took maybe 2 hours start to finish for me to do this job (the 3rd time around) so it wasn't a huge deal.
If you can rent a slide hammer, and try it..go for it. I even bought the right size bearing puller to put on the slide hammer and insert behind the bearing to whack it out. Didn't work out well for me[/QUOTE
This step is what got me on one of my bearing installs (I'm on #8) I couldn't get the assembly out of the knuckle in the rear. If a slide hammer didn't work you need more force ie a press. Removing the rear spindle is a pain in the ***, I had to drop $650 at the dealer to complete the last step after I put it all back together. It started raining that day so I said screw this.
When you tried the slide hammer you had it sitting in PB blaster over night? I'm upset my fail safe plan didn't work for you, so it won't for me either in the future!
It is possible that the first bearing i did was stuck more than the other one i recently did where I took the knuckle off, but honestly it took maybe 2 hours start to finish for me to do this job (the 3rd time around) so it wasn't a huge deal.
If you can rent a slide hammer, and try it..go for it. I even bought the right size bearing puller to put on the slide hammer and insert behind the bearing to whack it out. Didn't work out well for me
[/QUOTEThis step is what got me on one of my bearing installs (I'm on #8) I couldn't get the assembly out of the knuckle in the rear. If a slide hammer didn't work you need more force ie a press. Removing the rear spindle is a pain in the ***, I had to drop $650 at the dealer to complete the last step after I put it all back together. It started raining that day so I said screw this.
When you tried the slide hammer you had it sitting in PB blaster over night? I'm upset my fail safe plan didn't work for you, so it won't for me either in the future!
#75
06-19-2014, 11:50 AM
This step is what got me on one of my bearing installs (I'm on #8) I couldn't get the assembly out of the knuckle in the rear. If a slide hammer didn't work you need more force ie a press. Removing the rear spindle is a pain in the ***, I had to drop $650 at the dealer to complete the last step after I put it all back together. It started raining that day so I said screw this.
When you tried the slide hammer you had it sitting in PB blaster over night? I'm upset my fail safe plan didn't work for you, so it won't for me either in the future!
When you tried the slide hammer you had it sitting in PB blaster over night? I'm upset my fail safe plan didn't work for you, so it won't for me either in the future!
When i reinstalled the bearing, i used a lot of anti-seize, so the next time i replaced that same bearing (70K miles later) i was able to get it out by hitting the bolts from the backside. It took some time and some good whacks, but it slowly moved and popped out.