When you click on links to various merchants on this site and make a purchase, this can result in this site earning a commission. Affiliate programs and affiliations include, but are not limited to, the eBay Partner Network.
Did you use a wire brush to get all the rust off the face where the new rotor will sit? Most people get an attachment for a drill to do this. You want that rotor to sit nice and flush
I am having the same hard time getting my rear rotors off. I will try to do as you did. They seemed to be really stuck on there. Thanks for the pictures. It helps to see what's behind the rotor.
I am having the same hard time getting my rear rotors off. I will try to do as you did. They seemed to be really stuck on there. Thanks for the pictures. It helps to see what's behind the rotor.
You'll get it dont give up! I worked on mine for 4 hours before I get them unstuck but once it got free it was like busting a nice load. Felt great
I just changed the brakes on my 04 and had issues taking off the rears as well.
Adjusting the ebrake "cog" down to loosen the brake shoes did the trick for me. It didn't instantly get them off, they still required a lot of pb blaster and quite a few 22 oz hammer blows but eventually came off. Took a few hours, not gonna lie.
Got everything replaced and my ebrake was A LOT better after I adjusted them.
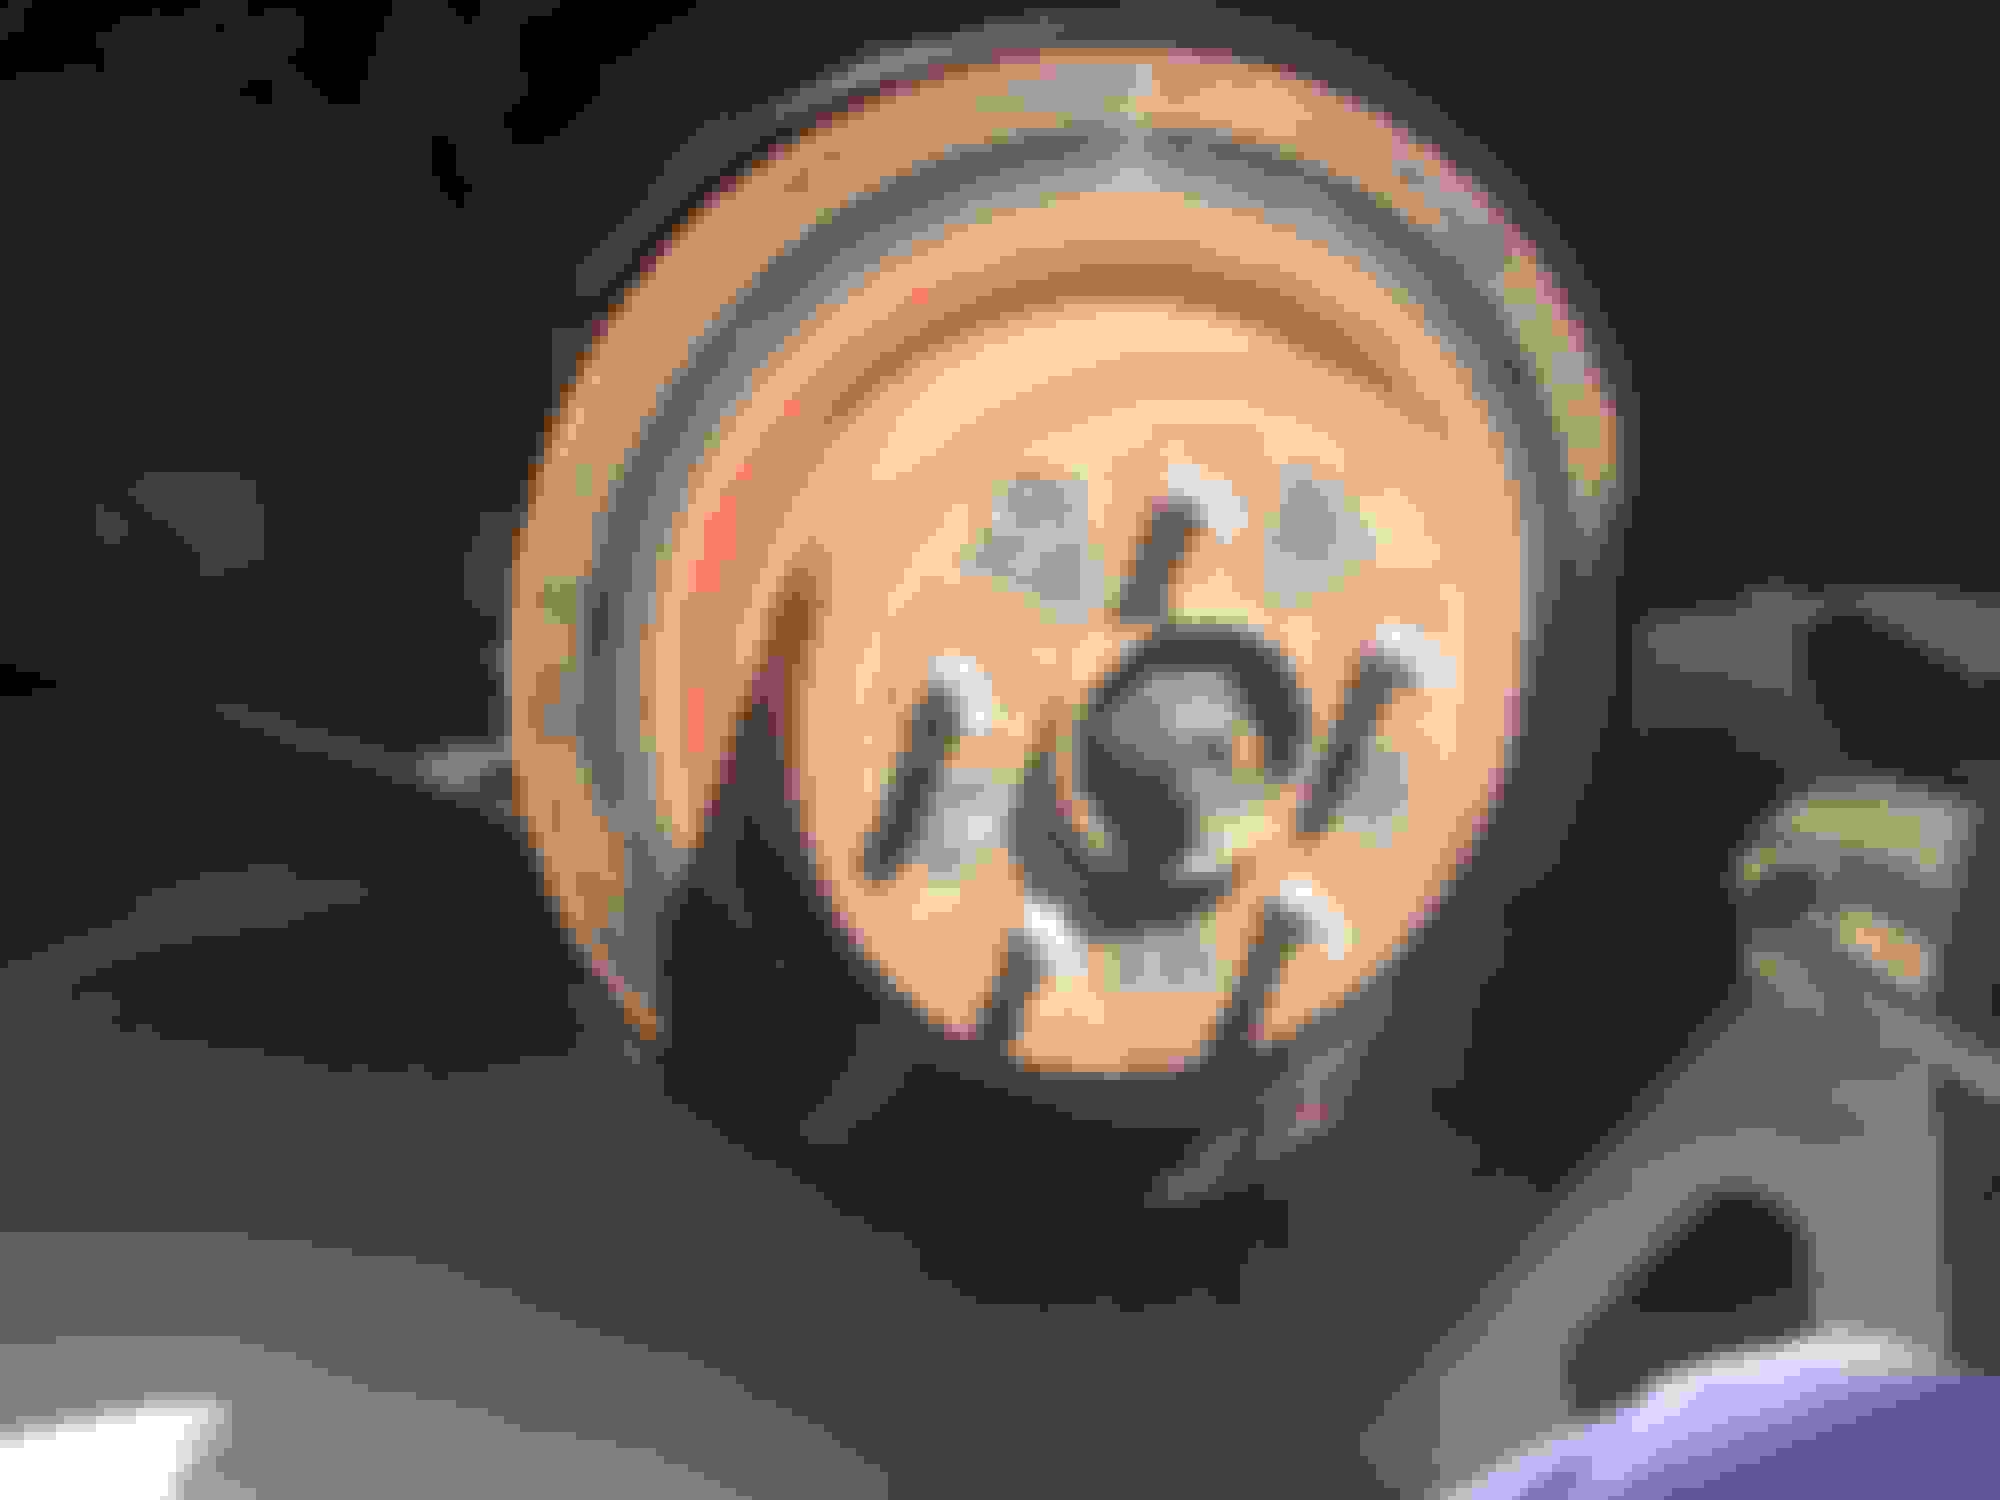
The parking brake might not be on but the parking brake shoes may be holding the rotor on. Remove the little rubber grommet/stopper thingy from the face of the rotor. Move the hole to the 12 o'clock position. Look inside the hole with a light. You will see a little 'star wheelie' thingy. Take a screwdriver and rotate it down. This will release the tension on the shoes. The rotors could also be rusted on at the hub. Spray some WD-40 on around that area if it looks like it is rusted. I'll post a pick of my rear rotors off to show you what the 'star wheelie' thing looks like.
This!!! No need to bang on it with a hammer/mallet! Other than a few times to brake up any debris.
Edit: here's the diagram from the repair manual
Last edited by Heytheremr2; 10-21-2014 at 09:51 PM.
So, there is a MUCH easier way to get a stuck rotor off. After yelling at my right rear rotor for an hour or so, I did some research and found this method - took about five minutes to get the rotor off.
This is for REAR brakes only. The front rotors on my 06 coupe came with a small bolt (12mm?) and spacer screwed into the rotor, from the factory. You can use that to push the front rotor off. Remove the bolt, remove the spacer, screw the bolt back into the rotor and it will push the rotor off. (They didn't do this on the rears because the e-brake assembly behind the hat doesn't really leave anything to push on.)
The short version: put a bolt through one of the two caliper bracket bolt holes in the hub, a nut on the other side (between the hub and the rotor), and tighten the bolt into the nut until it touches the rotor. Continue tightening, so that the bolt presses the rotor off. Do this in steps, moving the rotor 90* every now and then, so that you don't warp the rotor or otherwise damage it. If it's getting really tight and not moving, back off and rotate 180 degrees and try again. It takes some pressure, but you don't want to snap the bolt.
The Long Version:
1. Make sure the car is out of gear (I have a manual, people with autos are on their own), and the parking brake is completely disengaged. You should be able to turn the wheel by hand.
2. If you can't turn the wheel, the parking brake is most likely still engaged (or you have an auto and it's not in neutral.) You can adjust it by turning the rotor so that the extra hole is about at 12 o'clock position. (Though, you have to be able to rotate the rotor to do this, so... good luck!) That's already covered in this thread, so I won't go into it. However - to LOOSEN the brake, you need to move the teeth on the adjustment gear UP, not DOWN. Saying clockwise/counterclockwise/in/out makes little sense when all you can see is the side of the thing and have no idea what the internal structure looks like. If you can turn the rotor by hand, your parking brake does not need to be adjusted!
3. Remove the caliper from the bracket and set it on an extra jack stand, so that it's not hanging by the hose and you don't have to deal with bungee cord silliness.
4. Remove the caliper bracket.
Interesting part starts here
5. Get a large bolt - say 1/4" x 3"-4" or so - and a matching nut. A longer bolt will also work, it just needs to be able to reach through the hole and touch the surface of the rotor.
6. Put the bolt through one of the caliper bracket bolt holes in the hub, and the nut on the other side, so that the arrangement is
rotor - nut - hub - bolt - ratchet.
7. Tighten the bolt into the nut until the end of the bolt touches the rotor. You'll probably have to keep a wrench on the nut while tightening the bolt.
8. Give the bolt a few twists, until you see the rotor move a mm or so, or until it's getting too tight. It may take a few revolutions to loosen things up sufficiently, and you don't want to snap the bolt or bend anything in the hub. You may hear the rotor pop before you see it move. If so, that's fine - stop tightening and move to the next step. You don't want to get the rotor too far off axis on one side.
9. Loosen the bolt until the rotor spins freely.
10. Rotate the rotor about 90 degrees.
11. Tighten the bolt again until the rotor moves slightly outward along the studs. Again, if it's getting so tight that you think you're going to break something, loosen it up, rotate 90* and try again in another spot.
12. Go to step 9.
13. Repeat until the rotor pops loose.
This took me about 5 minutes to get the rotor off.
Rear rotor - STUCK
After removing caliper and bracket, this is the hole where you'll insert the bolt to push the rotor off.
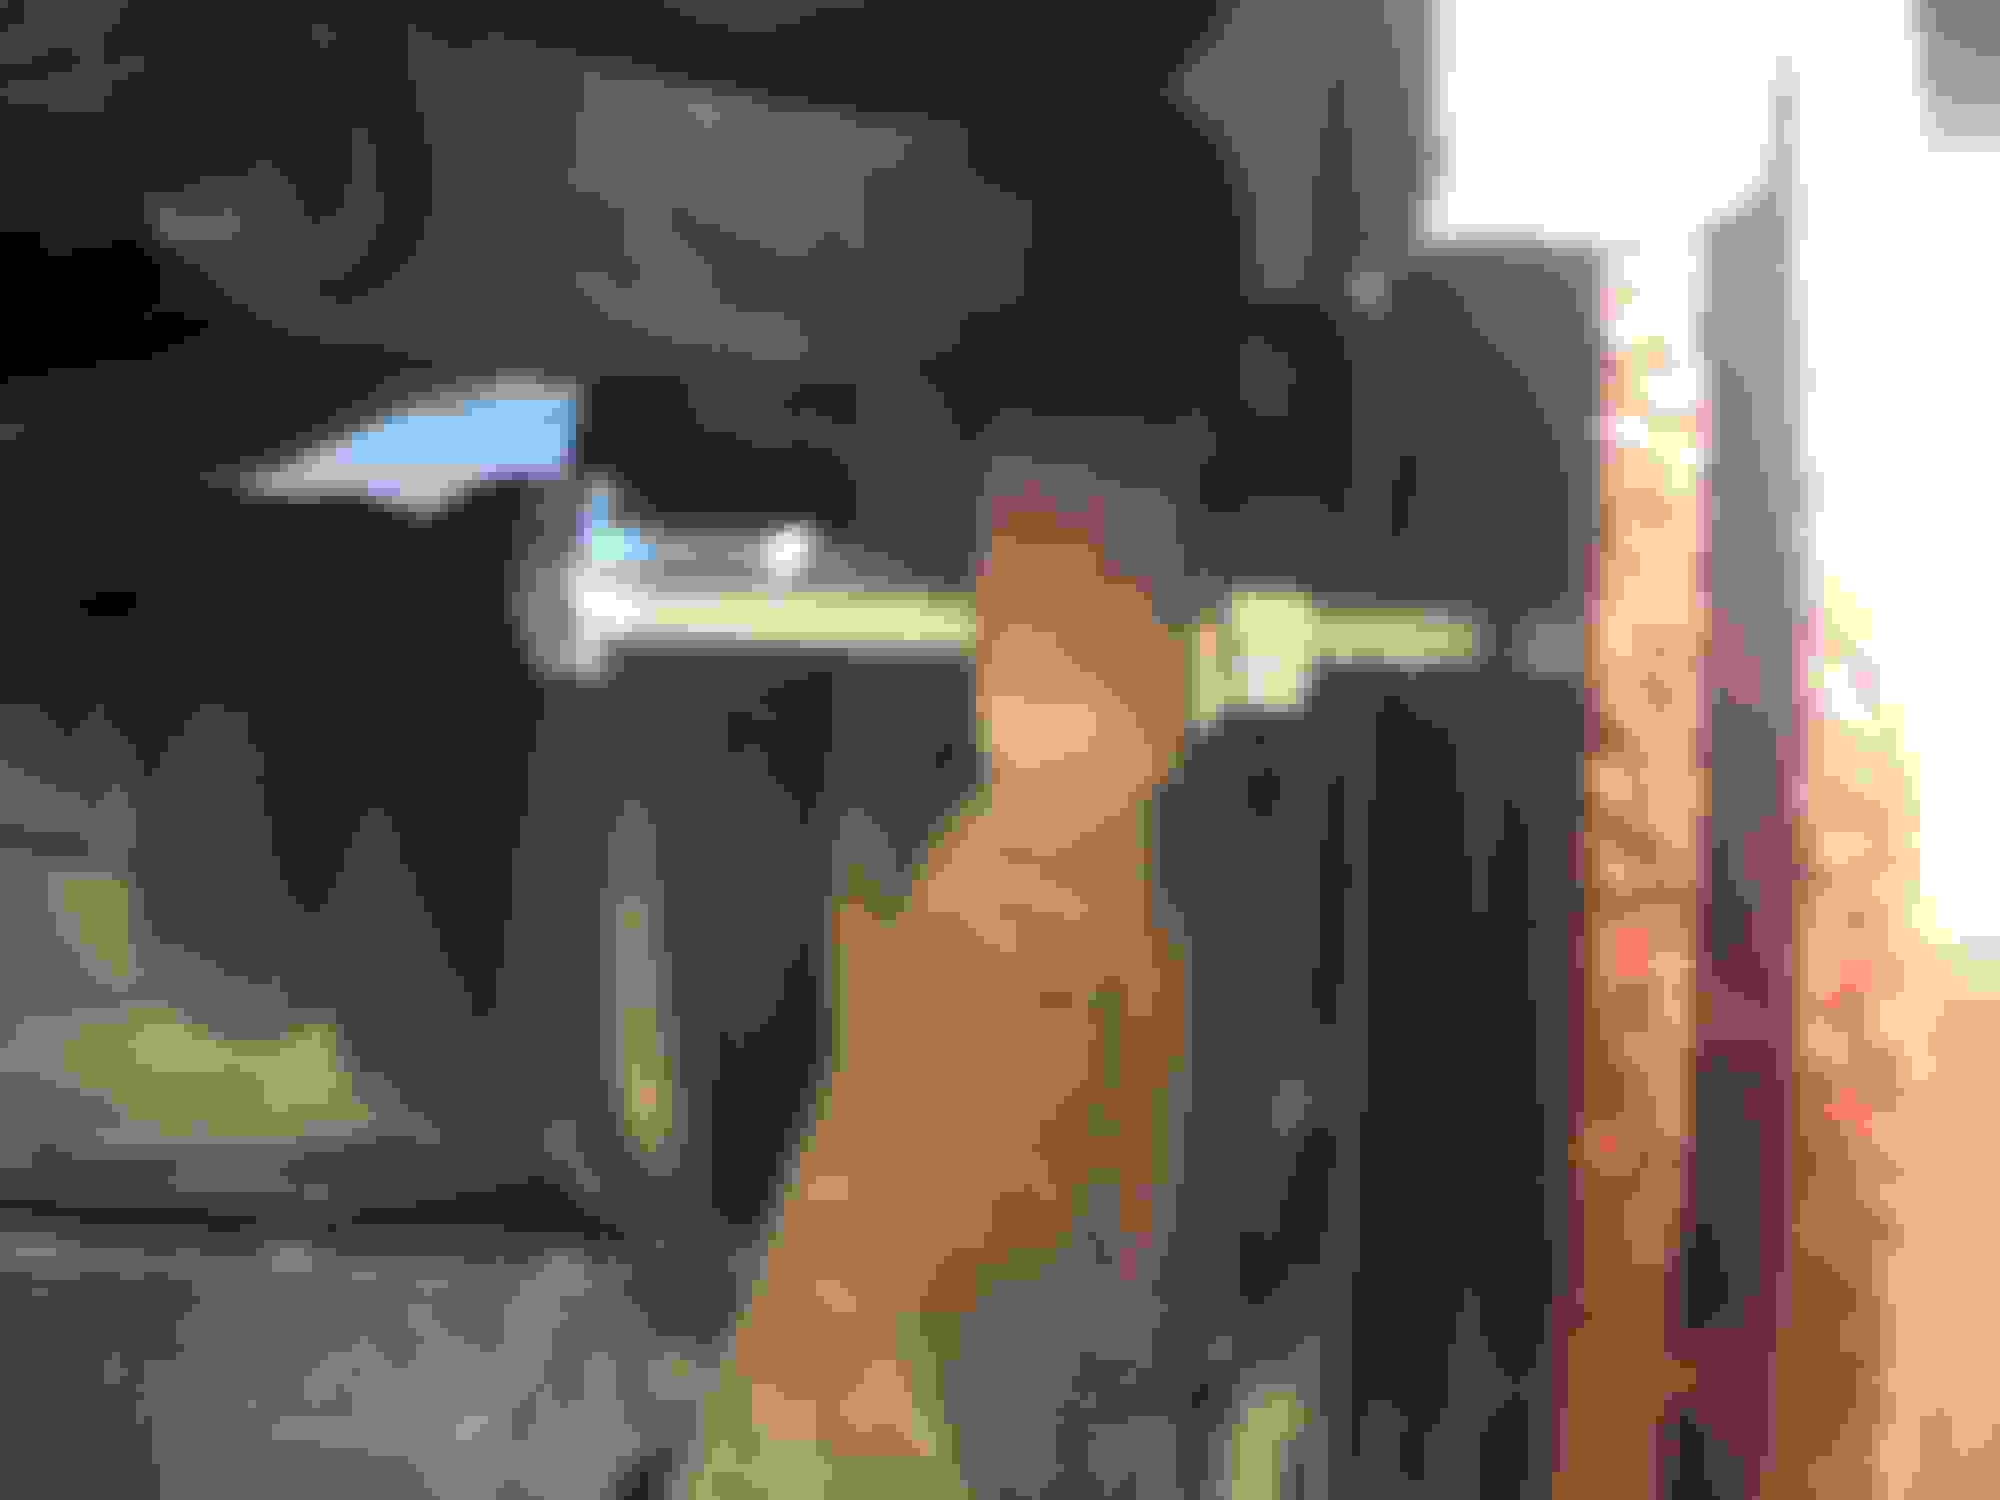
Nut and bolt loosely placed. Not that the bolt is between the hub and the rotor. I used a flanged nut because that's what was in my box o' spare bolts, but it doesn't really matter.
Bolt hand-tightened.
Using a ratchet and a wrench to tighten the bolt. Keeping the nut from spinning causes the bolt to push against the rotor.
Rotor popped off, bolt still in place.
Warning
BE CAREFUL: When the rotor comes off, it may actually pop off of the studs and land on your inevitably (and unwisely) flip-flop clad feet! Ask me how I know!
If you're re-using your rotors - I wasn't - be careful not to damage them. You can put something like a small piece of wood between the bolt and the rotor to distribute the pressure if necessary. But, honestly, a small ding in your rotor is unlikely to ever cause you any grief.
So, there is a MUCH easier way to get a stuck rotor off. After yelling at my right rear rotor for an hour or so, I did some research and found this method - took about five minutes to get the rotor off.
I was going to post the same method, but your post is much better and has pictures. Here's a masterful MSPaint drawing I made for another forum c:
I was going to post the same method, but your post is much better and has pictures. Here's a masterful MSPaint drawing I made for another forum c:
Nice artwork! I think the forum should have a wiki or something where we could post this stuff for more effective searching / visibility. We had something like that on TwinTurbo.net years ago when I had my 300ZXTT. It really came in handy.
 04-06-2007, 02:25 AM


 Thank you Raygun!!! This is a great trick. No hammering, no cursing, takes one minute.


 I think the forum should have a wiki or something where we could post this stuff for more effective searching / visibility. We had something like that on TwinTurbo.net years ago when I had my 300ZXTT. It really came in handy.
