***update on my MAZDA flip key FOB mod. alternative to nissan key fob.

#17
 09-06-2006, 03:00 PM

Join Date: Apr 2003
Location: Hamilton, NJ
Posts: 1,080
Likes: 0
Received 0 Likes
on
0 Posts
#18
09-06-2006, 03:19 PM

Originally Posted by accordfreak
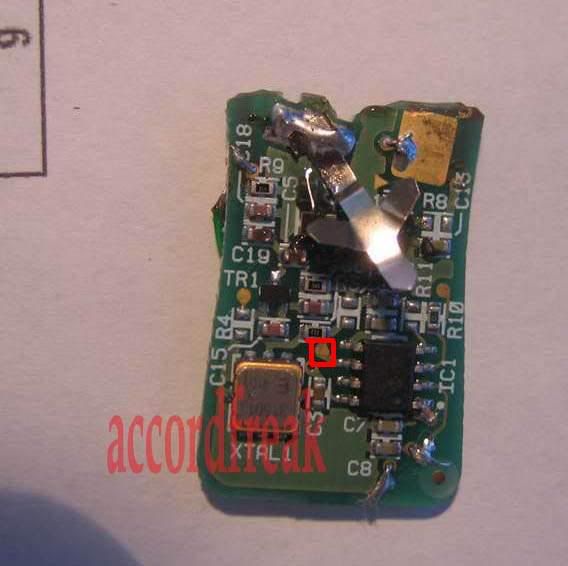
well i finally got around to it. It looks like a hack job, but it works so far....
I basically did what the canadian guy did.. Well almost since he never posted pictures of what it looks like. I have one last hurdle to overcome.. The most important part.. BUTTONS. haha I was planing to do it oem style but it doesn't really work out. I tested out the remote with the wires connected and it works fine.. I just need to 4 freakin buttons that would work with this. Any ideas??? Now that i'm helping you guys out with DIYs, you have to help me out!
I basically did what the canadian guy did.. Well almost since he never posted pictures of what it looks like. I have one last hurdle to overcome.. The most important part.. BUTTONS. haha I was planing to do it oem style but it doesn't really work out. I tested out the remote with the wires connected and it works fine.. I just need to 4 freakin buttons that would work with this. Any ideas??? Now that i'm helping you guys out with DIYs, you have to help me out!
Does the button have to have only 2 legs because I found a couple buttons like the one on the Mazda key but it has 4 poles.
#19
09-06-2006, 03:32 PM

thanks for all comments everyone. It keep me more motivated 
wow thanks for the find! I thought that screw was just to take out the rotating part of the key. less work for me hehe thanks.
oscottio- if you find the buttons that can be used that would be great. I want to finish this up asap.
kidfuzion- I wish I knew more about electronics but I'm not sure as to how the 4 prong button works. It would be best if it had 2 prongs. I tried testing it with the original mazda buttons but it didn't work. I was researching and I believe a couple of the legs are for ground. Let us know if you can locate some 2 legged buttons. thanks!
Originally Posted by bb319675
Awesome job bro, just fyi the mazda key has the exact chip we do and is located on the other half of the fob...the half that holds the actual key, you have to take the screw out under the emblem and open the fob to get to it. You can pop it out and pop ours in(if you feel like it)
Nice job man, I'll have to try your DYI when I get a magnafying glass and some free time. Thanks for figuring it all out for us.
Nice job man, I'll have to try your DYI when I get a magnafying glass and some free time. Thanks for figuring it all out for us.
wow thanks for the find! I thought that screw was just to take out the rotating part of the key. less work for me hehe thanks.
oscottio- if you find the buttons that can be used that would be great. I want to finish this up asap.
kidfuzion- I wish I knew more about electronics but I'm not sure as to how the 4 prong button works. It would be best if it had 2 prongs. I tried testing it with the original mazda buttons but it didn't work. I was researching and I believe a couple of the legs are for ground. Let us know if you can locate some 2 legged buttons. thanks!
#20
09-06-2006, 04:12 PM

#21
09-06-2006, 05:12 PM
#22
09-06-2006, 06:31 PM

accordfreak, why don't you reuse mazda board? Is there no room to fit the mazda board and our G board? What I did with the Jetta keyfob was to route the circuit onto the G board from the Jetta board. This way you can reuse all the buttons on Jetta keyfob. The Jetta keyfob had all the buttons for our G(Lock, Unlock, Trunk, and Panic) I see that the mazda key fob is slimmer than the Jetta keyfob so you might not be able to squeeze two boards into the Mazda housing after all.
#23
09-06-2006, 10:03 PM
#24
09-06-2006, 10:46 PM
KIDfuzion!! you did it! you're the man! I tested the way you mentioned and it works! NO NEED TO BUY ANYTHING ELSE!! whoo hoo! a million thanks!! so yes the mazda buttons works.. connect one wire up top of the button and one on the bottom.
button - wire on bottom _ _ _ _=O=----- wire on top.
for materials all I bought was 30 gauge wire, and the mazda remote. a whooping total of 45 dollars for this!
MORE PICTURES TO COME TONIGHT.
so yes the mazda buttons works.. connect one wire up top of the button and one on the bottom.button - wire on bottom _ _ _ _=O=----- wire on top.
for materials all I bought was 30 gauge wire, and the mazda remote. a whooping total of 45 dollars for this!
MORE PICTURES TO COME TONIGHT.
#25
09-07-2006, 02:44 AM
updated final pic of the board on my first post. all done..everything works. just need to get the key cut. thanks everyone!
JD2k1- I thought about using both boards but the boards wouldn't fit. Any part I shave on the mazda casing, I would'n't be able to put back together. btw do you have any idea on how to wire an LED to light up when a button is pushed?
JD2k1- I thought about using both boards but the boards wouldn't fit. Any part I shave on the mazda casing, I would'n't be able to put back together. btw do you have any idea on how to wire an LED to light up when a button is pushed?
Last edited by accordfreak; 09-07-2006 at 02:46 AM.
#26
09-07-2006, 02:57 AM
You did cut off the antenna when you cut off the battery. You may want to extend the green wire that is going straight across the board, it would probably work better if it was angled up like the orignal antenna. You may want to do what the other guy did and use some silver antenna wire to get better reception.

#28
09-07-2006, 03:06 AM

Join Date: Nov 2005
Location: OC - Orange
Posts: 764
Likes: 0
Received 0 Likes
on
0 Posts
#29
09-07-2006, 04:32 AM
Originally Posted by accordfreak
updated final pic of the board on my first post. all done..everything works. just need to get the key cut. thanks everyone!
JD2k1- I thought about using both boards but the boards wouldn't fit. Any part I shave on the mazda casing, I would'n't be able to put back together. btw do you have any idea on how to wire an LED to light up when a button is pushed?
JD2k1- I thought about using both boards but the boards wouldn't fit. Any part I shave on the mazda casing, I would'n't be able to put back together. btw do you have any idea on how to wire an LED to light up when a button is pushed?
Last edited by KiDFuZioN; 09-07-2006 at 04:36 AM.
#30
09-07-2006, 07:52 AM


