When you click on links to various merchants on this site and make a purchase, this can result in this site earning a commission. Affiliate programs and affiliations include, but are not limited to, the eBay Partner Network.
So been reading up on people with fuel gauge problems and I don't seem to have a solution for this. At this point its time to replace an item and well they are pricey.
Here it goes....
This is on my 2005 AWD sedan, currently with 86k miles. I keep detailed MPG logs and know i'm about 300miles per tank before i have to fill up with 15-17 gallons of fuel.
About 10k miles ago, i noticed that my fuel gauge while driving would slowly increase or decrease. Normally this would happen when i'm near 1/4 of a tank. By that time i should be in the 200-300 miles driven, it would slowly go up to half way and normally stop at 3/4 tank. A few key cycles and it would go back. This would happen randomly at stop lights and etc. It slowly got more and more common to a point where my normal day would be start car with 1/4 tank of gas, drive 10 miles to work and end up with 3/4 tank of gas. I saw the DIY cleaning of the sensors in the fuel tank. I cleaned it, it had a lot of dirty stuff as most people posted. NO DICE. It did get a little better but not much more. It knew when i filled up all the way. FULL TANK was always full tank.
About 2k miles ago all hell went loose. My fuel gauge only works from FULL to 3/4 now. It would never go any lower. I figured the sensor was stuck up, pulled out both units and NOTHING was binding. Then i remembered if it was stuck, then it would be stuck at the same location, this wasn't the problem. It moved from FULL to 3/4 give or take.
So now i'm kinda stuck here. Been reading around, i know there was a recall on my 03-04 M45 for the fuel gauge and the replacement was to replace the gauge cluster. I also seen on some postings here it was a suggestion option, all cars were under warranty so it was of no cost. It seems the common replacement was to replace both fuel units.
Pretty much is there anything I overlooked? Should i try something else? Replace the cluster or the fuel units? Driver's unit is like $75-100 and Pass side is $375-425
----------------
Cliff notes.
Fuel gauge has mind of its own. Doesn't read right. I know for the fact i should have 1/4 tank of gas it will read 3/4. As time went on, now it only reads from FULL to 3/4 and nothing lower. Cleaned both fuel units inside tank TWICE and still have problem. Considering gauge cluster to be issue.
So I have used two different people on eBay (the one in NJ mentioned above and the one in Texas) to fix a cluster and both did not do a very satisfactory job in my opinion and I have found that the solution to fix this problem and some other problems like dim led lights (very common with the odometer LCD display) are quite simple if you know how to carefully remove the cluster from the car, disassemble it correctly and have decent soldering skills, which neither of the other guys seem to possess, in my opinion after inspecting their work. I also don't like people taking advantage of other people's troubles and pains when they know the fix, but will not share it with the thousands if not 100 of thousands G35 owners having the exact same problem because Infiniti / Nissan had obvious manufacturing problems with their clusters. I will not go into the details about their work, but I can tell you based on my experience that both did not seem to know their way around the G35 cluster as you would expect and based on their claims within their postings. If you want to tackle this on your own read on because I will tell you the exact resistor contacts that you should inspect and re-solder. I am not going to go through all the specifics on how to remove the cluster from the car or disassemble the cluster because there are videos out there that already cover those two items. I am going to show you the cluster's circuit board and the soldering locations. A few notes first though, you will need the following tools before you get started:
phillips screwdriver (used to disassemble the cluster)
fine flat trim tool to separate the plastic gauge material from the board (flat head screw driver will work also if you are careful)
good soldering iron with a very small tip (and steady hands)
a magnifying glass because the soldering points are very small at least the led odometer ones are.
So here's the moment you have all been waiting for so lets get right to the point.
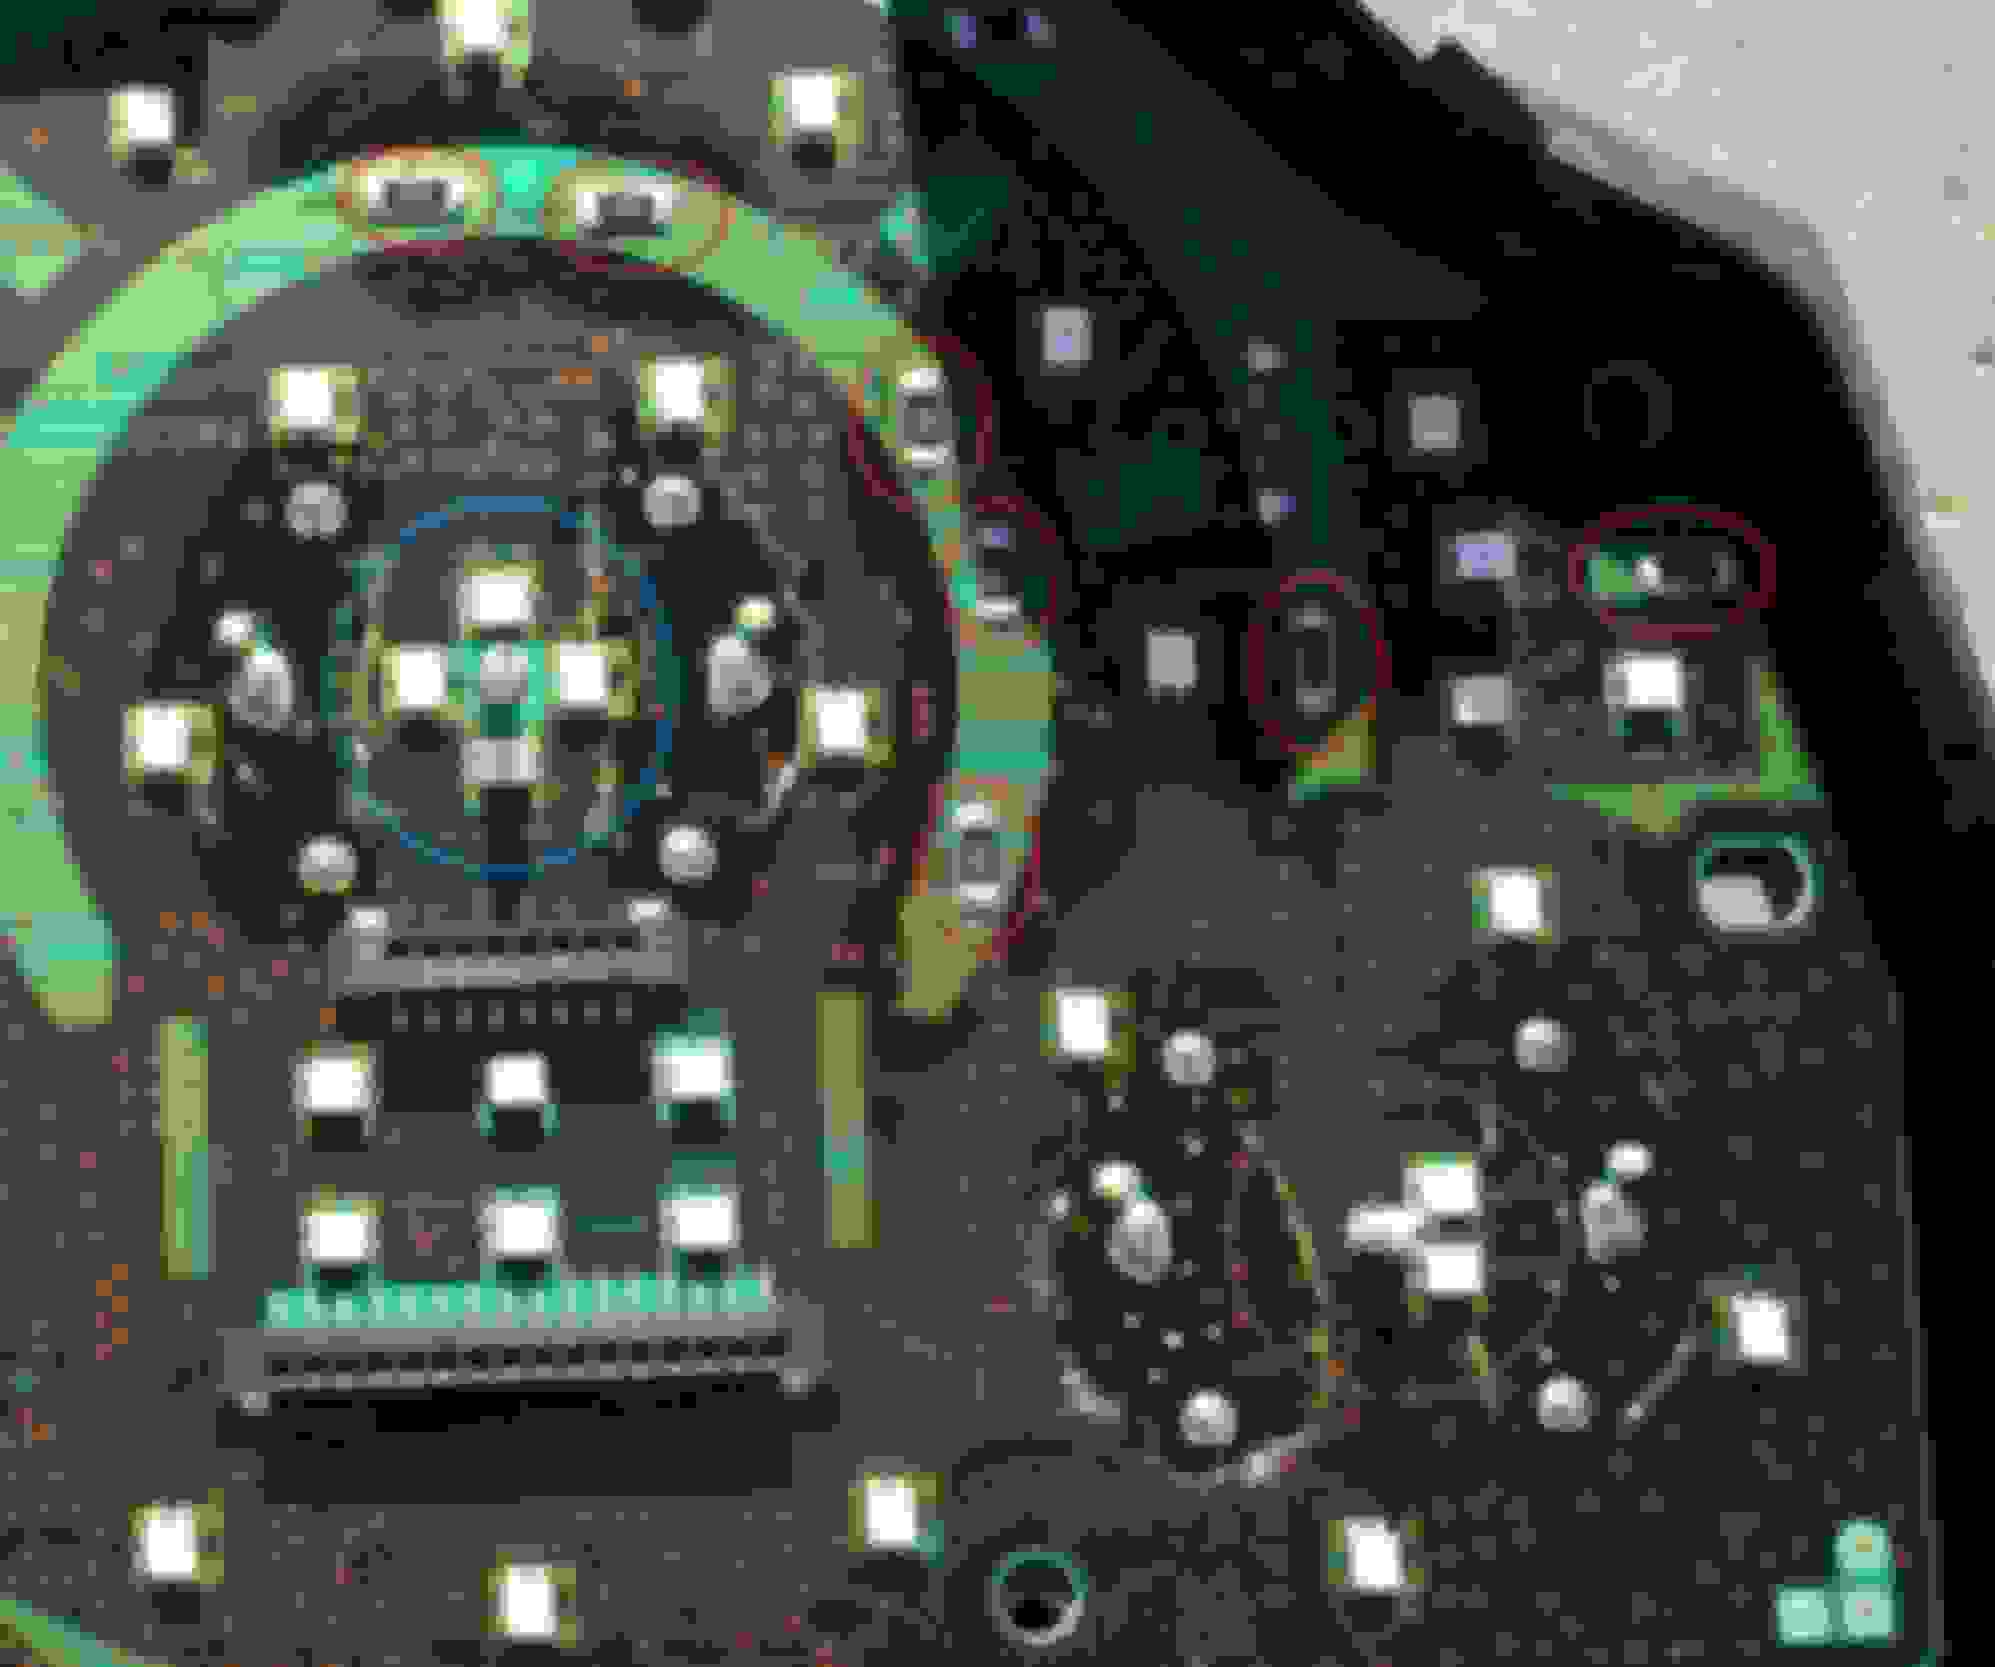
Here's a picture of the front right side of the cluster board (2006 G35). All the points circled in red show the resistors where the solder joints can go bad and separate from the board causing the erratic problems with the fuel gauge. As a reference I have circled the MPH gauge motor in blue and the fuel gauge motor in purple.So there you have it, very simple and easy, but not for the faint of heart because you can easily ruin a cluster if you do not have the proper patience and skills.
So now lets get to the led lights for the odometer display issues - dimming, flickering, or just completely not working.
This is the back left side of the board, which is a little bit easier to get to because you do not need to remove the two LCD displays to fix it. On the back side of the board on the bottom left side where you see the pins from the odometer LCD display sticking through you will see a lot of small (smaller than the front side shown above for the fuel gauge fix) resistors that need to be re-soldered to fix the cold joints. All the resistors in the red rectangle should be re-soldered if your odometer display is not lit up like it should be.
Soldering hints: Because one side of the resistor may not be attached (the very problem described here), it is possible for the resistor to move / shift while trying to re-solder it. It is best to apply light pressure and maybe even hold the resistor with a small tool that would not damage the resistor while trying to solder the first side you are working on. This happened to me twice while I was repairing a board so I started to hold them in place when re-soldering the first side. It shouldn't happened on the second side because your new soldering joint (if done correctly) will hold it in place.
After you are done, you and your G35 will be able to enjoy the good life again.
If you need the proper method for disassembling the cluster, let me know so you don't end up doing stupid things like the person in Texas who thinks you have to drill through the plastic to remove the screw underneath it. like in the following picture: It may be hard to see in the picture, but it is quite obvious when looking at it directly. He drilled through the plastic cover to unscrew the screw underneath it. This is not necessary because you should remove the whole plastic display piece then you unscrew the screws to get to the board. He obviously was clueless on how to work on the G35 cluster. He then covers the hole with black electrical tape like that is professional work, not. Please don't do stupid things like this idiot.
I hope you enjoyed this post and good luck, if you decide to tackle this on your own. I spent way too many hours and money trying to research and fix this problem so I thought I would share it so you wouldn't have to go through the same thing I went through.
Last edited by Riche; 02-22-2018 at 08:32 PM.
Reason: Added the hint
Move the float with by hand and see if the needle on the gauge moves. The float is what tells the gauge how much gas u have. Mine would act funny as it got close to 1/4. I dont have the car anymore though.
Move the float with by hand and see if the needle on the gauge moves. The float is what tells the gauge how much gas u have. Mine would act funny as it got close to 1/4. I dont have the car anymore though.
Wouldn't i get splashed with the fuel pump primed with the key ON? Now that i think about, its not a bad idea. Someone also mentioned to check the resistance on the wires, kinda like watching the gauge. I'll look into this.
Something similar happened to me, but mine still kinda worked.
My guage has always acted kinda funny, going up and down a little bit and whatever, but at least it was consistent in where/how it did this. Then one day I reset the comp (battery disconnect method) and it just screwed it all up. It would be fine down to a half a tank then just stay there no matter how long I drove, then just drop to empty out of no where. After a couple tanks of gas, this somehow corrected itself and now it works more perfectly than it ever has. Completely accurate, linear and consistent.
Basically, I think the things just a piece of crap and its gonna do what it wants regardless of your efforts.
Well, we had '05 and '06 Gs and I ended up replacing both car's fuel level senders around 60k as they were causing the gauges to read erratically.
For me (beginner) it was a fairly elaborate operation, and working with gasoline isn't fun, but it fixed the problem. I bought new replacement units, both sides, the one on the fuel pump snaps onto the unit.
I was surprised to realize that the system is simply live electrical wiring operating in gasoline (yikes!) and the sender's "sweepers" are actually open and exposed and certainly bound to collect contamination over the years and fail as we are all experiencing. The gauge in the dash simply interprets the signals from both senders to determine how much gas you have left, but if either one sends bogus signals it can't do it's job.
All this to say odds are 2:1 that the senders (2) are the problem not the gauge (1). Cleaning them is at best a temporary situation as the gasoline is not only contaminating the contacts but probably working as a solvent and removing the metal etchings of these sweepers to the point where they just can't do their jobs. Would have made more sense if the actual sweepers were up above the seals somehow but ... no.
Cool. I am going to be replacing mine hopefully next week. I have a pretty sick extended warranty so I am going to take it to the Stealership. to get fixed...
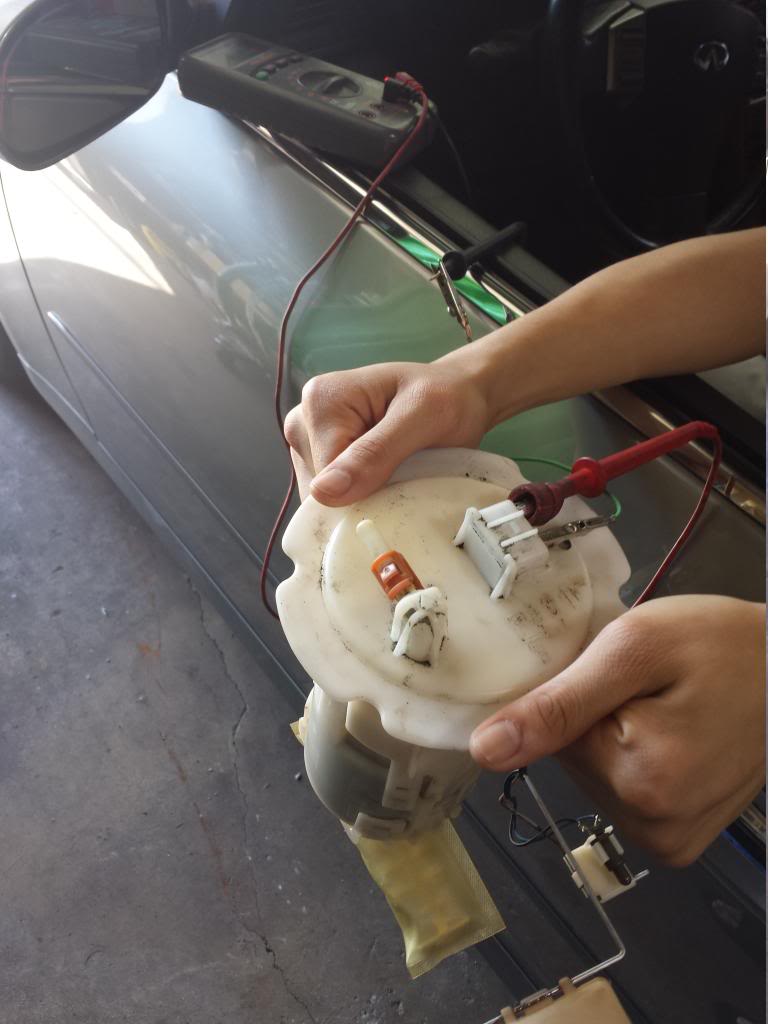
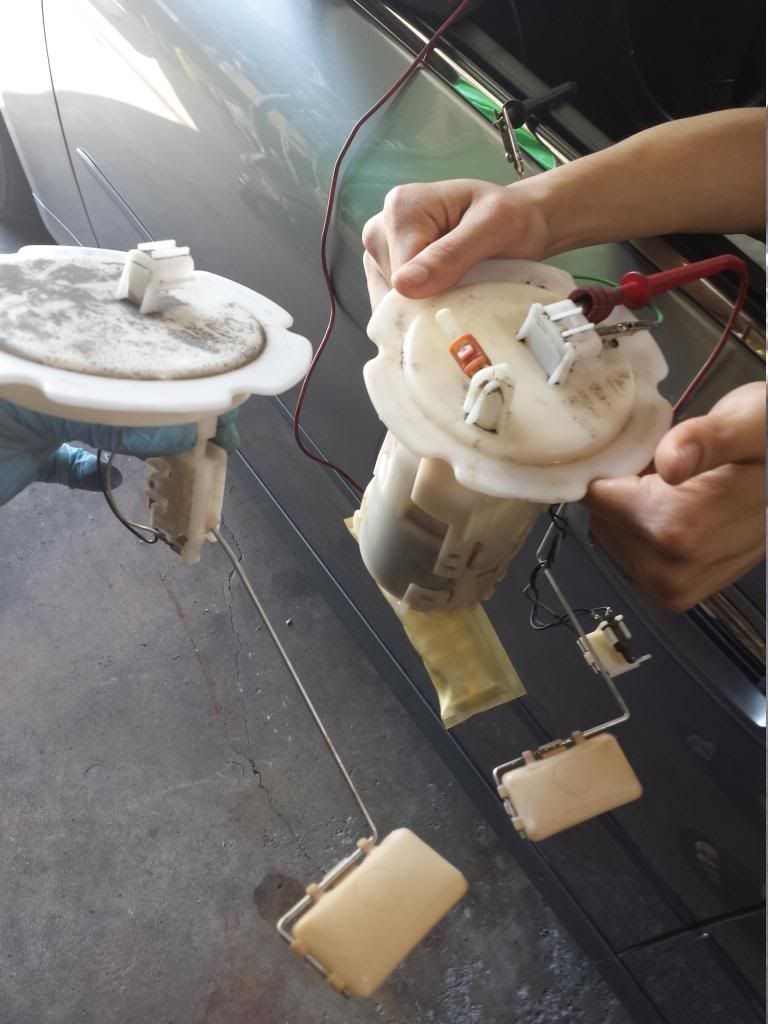
So i had time today to do the work. I took some pictures but i'll post later, its nothing special.
I'm posting my findings hoping that some of you guys are more technical and see something that i dont. Because i dont know which one is bad or are they both junk.
So Both units pulled out of the car, placed at EMPTY position ( all the way down) the fuel gauge shows HALF. Placed at FULL position, fuel gauge shows FULL.
If either are disconnected gauge will drop to EMPTY. So i both are working to some degree and they work together.
Now more technical. I ohmed everything out, This is where it gets interesting.
- both at full read out 4ohms.
- about half way both read about 20-25 ohms.
- Now the sender at empty reads 45ohm
- fuel pump at empty reads 80ohms and is very sensitive from empty to 1/4.
Anything stand out to you guys?
ALSO.... Anyone know if the fuel pump for the coupes are the same for the sedans. If the years are all the same. Every infiniti dealership online site ive been to only lists 05 coupe fuel pumps. The aftermarket states coupe as well.
I don't recall what the resistance readings should be but based on your description I'd say the fuel pump side is toast. I'd still suggest replacing both sides while you're in there. Same type of part, same age, same exposure to gas, likely to both fail at a similar time... My opinion anyway.
I believe what you want are the first two items listed here: http://www.infinitipartsonline.com/?...ch_in=all&pg=0
(Choose year, model, trim...)(reference number on diagram is not correct)
Those are the senders only, not including the fuel pump. The one on that side snaps onto the bottom of the pump. There are DYIs here somewhere for these bits, and you can get your own service manual here: http://www.nicoclub.com/FSM/G35/Sedan/2005_G35_Sedan/
with more details on removal and replacement. ("fl.pdf" is the fuel system book).
You're also supposed to discard and replace the blue O-rings whenever you pull those pieces, being careful not to get any gas on them...
I'm going to call that dealership to see if thats the right part. I haven't talked to a dealership yet to see if i can just get the sender by itself.
So the sender, the arm and the float is all one unit as i see it. I know i dont need the fuel pump. The unit on the driver side i can order as a whole assembly because its under $100 as a unit from most places i see.
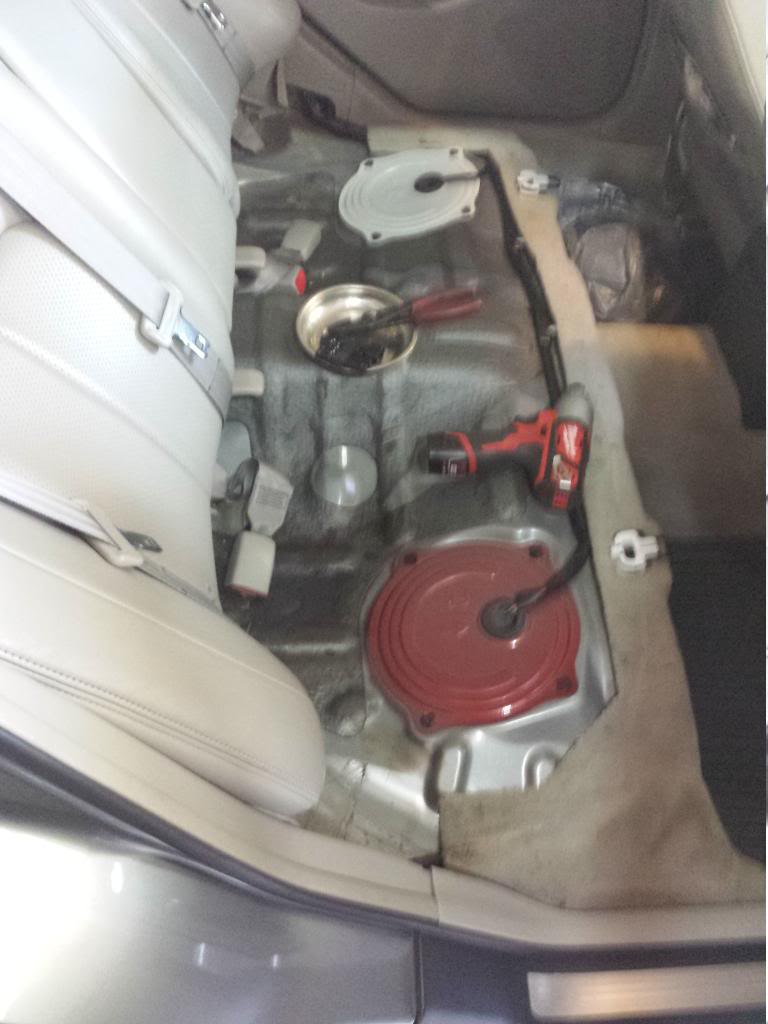
Here are some pictures for anyone interested in doing this work.
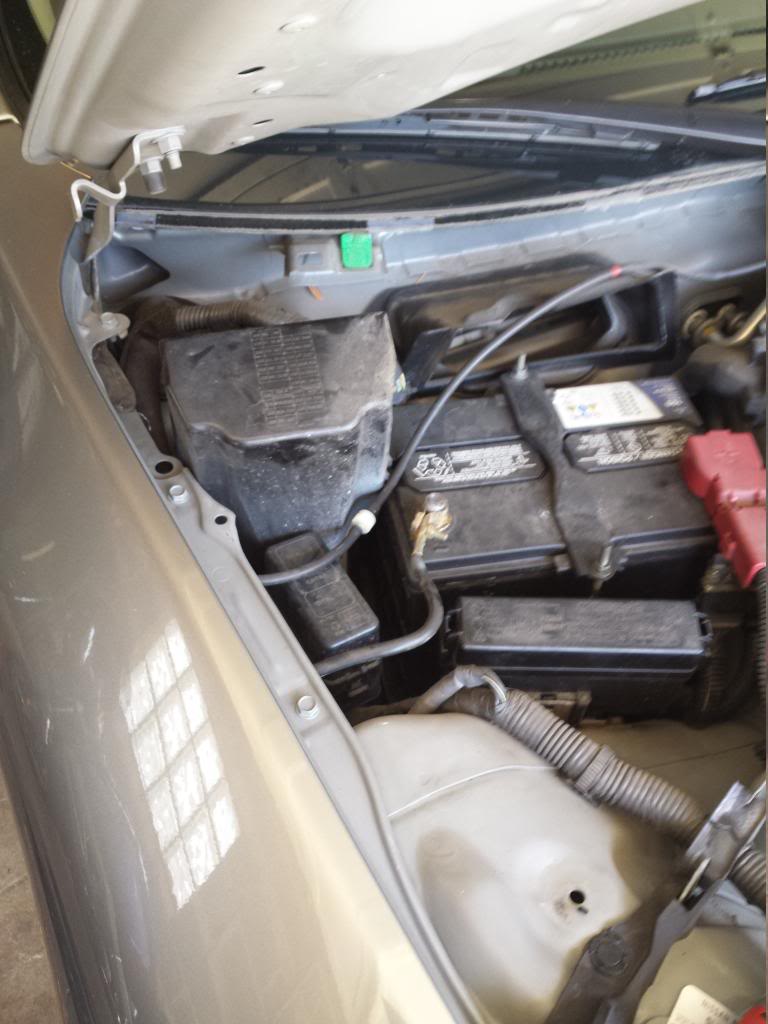
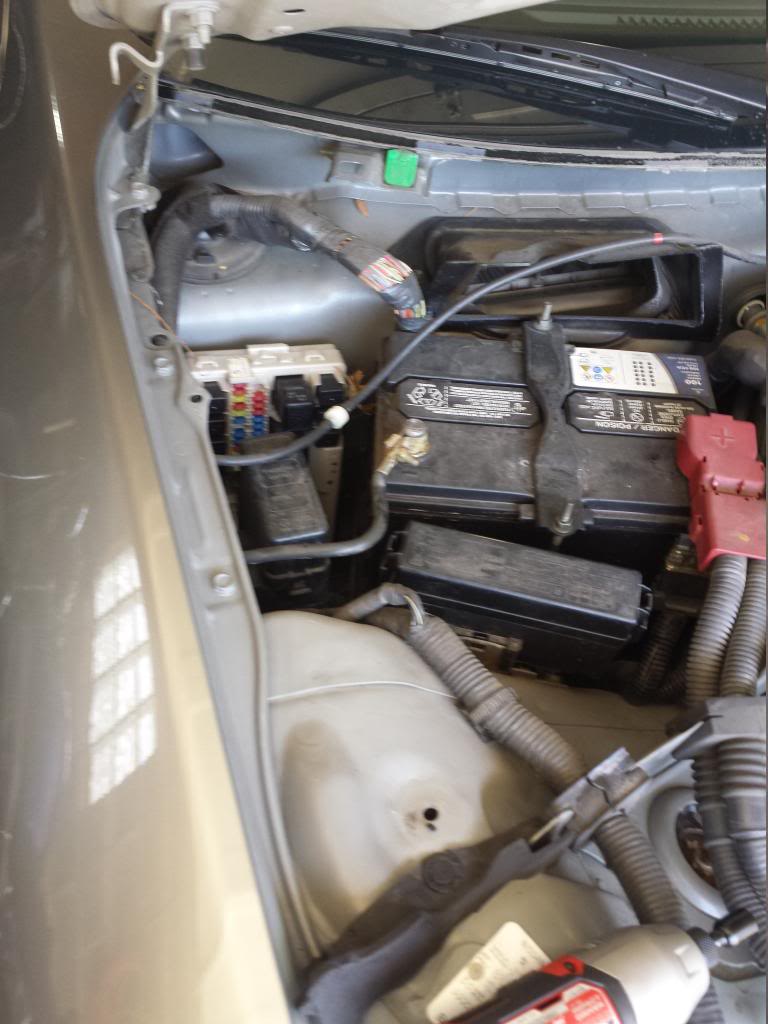
To get to your FUEL PUMP FUSE. You gotta pull off the covers of your battery box. About 8 push clips.
Pull the cover off to expose this. The fuse is a 15A on the driver side row first one. I already pulled it in this picture its right over the 3 red 10A.
Pull your rear bottom seat cushion out. 2 pull tabs.
4 flat plastic tabs, you can use pliers or a screwdriver. And then 6- 8mm bolts to remove to get the cover off. unclip the harness and fuel line ( this one can spray fuel) And pull the pump out
Then you can measure out the resistance if you want or just replace.
Driver side level sensor on the LEFT and fuel pump assembly on my right.
So i called and confirm those are the correct parts. I also asked how often do they replace both and they say rarely. Its normally one or the other.
So here is another thing i found. I got a hold of alldata to give me the specs on the level senders and they are correct. The driver side at empty should be 40 ohms and the pass side at empty should give me 80ohms. So really i have nothing to go by.
 06-02-2014, 03:30 PM