DIY 03-04 Vanity Light Upgrade
#1
 08-29-2014, 03:17 PM


DIY 03-04 Vanity Light Upgrade
Hey Guys, While im still a Noob about G35's, I love me a good project. While changing all my lighting over to LED everything went perfect until I got to the vanity lights...WTF! While searching on a few forums on how I could go about fixing this Dated setup Nissan decided to go with, I came across a couple half complete DIY which were ok but not the greatest in detail, which is why I decided to create my own DIY to fix the Crappy dated yellow looking lights that make my wife look like she has Jaundice when looking in the mirror...and here it is.
WARNING DO THIS AT YOUR OWN RISK!!!! NOT RESPONSIBLE FOR YOUR INABILITY TO FOLLOW INSTRUCTION OR USE A SOLDERING IRON!!!
Difficulty 1-10: I'd say this rates a 7 as soldering is required
If you found this helpful dont forget to Rep Me!! Thanks!
Tools and Supplies:
-Needle nose pliers
-Wire strippers
-Small flat head screwdriver
-Soldering iron
-.032" 60/40 Rosin Core Solder or something close
-Desoldering Braid
-24-26 Gauge Wire (I used small speaker wire as that's what I had lying around)
-LED's I used 2 bulb Bright White LED's
The first few steps don't have pictures, if you cant figure out how to do them you shouldn't be doing this DIY!!
-First, disconnect Negative terminal on battery
-Fold down Sun Visor and open cover to expose the mirror and light
-If the light comes on you didn't follow the first step and you fail at life...go back and disconnect the Battery.
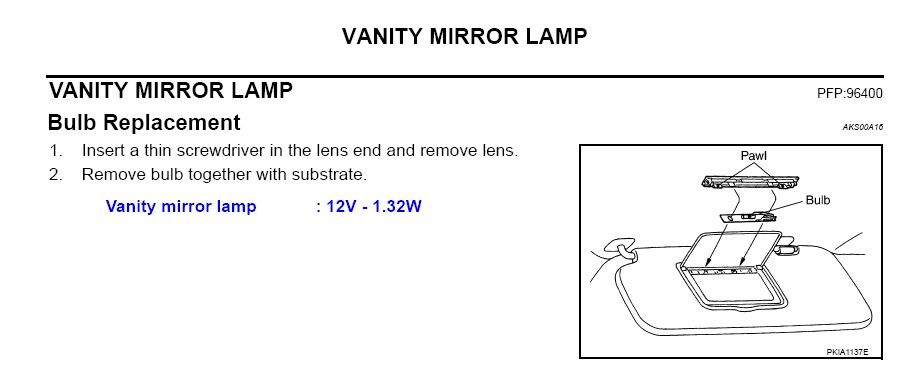
-Use the small flathead screwdriver to carefully pop the outer cover off to expose the vanity light bulb and Substrate as nissan calls it.
-Once exposed, CAREFULLY lift up on the tab that is right above the bulb to release the Substrate and Bulb and pull the assembly out.
-If you made it this far congrats now for the fun part!
Next:
-Heat your soldering iron up
You should now have a piece that looks like this

First we need to remove that old crappy yellow bulb, use your wire strippers and snip the small wire on both ends to release the bulb, throw that bish away.


Now that the bulb is gone turn the Substrate over, you will now need to find where the two pieces of wire that are left from where you snipped the light bulb off run through and desolder them, to open the holes back up for the new wires to run through.

Take your Desoldering Braid and Soldering Iron and desolder where the wires are until the holes are exposed. you may have to use your needle nose pliers to pull the remaining wire out of each hole.

Now that the holes are open, take about an inch of your new wire (strip it if you need to) put a 90* bend in it at one end and put it through one of the holes.


Next take your Soldering Iron and solder the wire back in place. Do this to both sides, one side at a time!

It should look like this when your done.

Next Flip the Substrate back over and straighten the wires out. Take your LED bulb and with the needle nose pliers gently pull the end caps off, exposing the holes on the LED Board. Place the wires through the holes on the new LED Board. Push the LED down the wire until it is flat up against the substrate. Note: the holes dont line up exactly, so move the LED as close to center as possible.


WARNING DO THIS AT YOUR OWN RISK!!!! NOT RESPONSIBLE FOR YOUR INABILITY TO FOLLOW INSTRUCTION OR USE A SOLDERING IRON!!!
Difficulty 1-10: I'd say this rates a 7 as soldering is required
If you found this helpful dont forget to Rep Me!! Thanks!
Tools and Supplies:
-Needle nose pliers
-Wire strippers
-Small flat head screwdriver
-Soldering iron
-.032" 60/40 Rosin Core Solder or something close
-Desoldering Braid
-24-26 Gauge Wire (I used small speaker wire as that's what I had lying around)
-LED's I used 2 bulb Bright White LED's
The first few steps don't have pictures, if you cant figure out how to do them you shouldn't be doing this DIY!!
-First, disconnect Negative terminal on battery
-Fold down Sun Visor and open cover to expose the mirror and light
-If the light comes on you didn't follow the first step and you fail at life...go back and disconnect the Battery.
-Use the small flathead screwdriver to carefully pop the outer cover off to expose the vanity light bulb and Substrate as nissan calls it.
-Once exposed, CAREFULLY lift up on the tab that is right above the bulb to release the Substrate and Bulb and pull the assembly out.
-If you made it this far congrats now for the fun part!
Next:
-Heat your soldering iron up
You should now have a piece that looks like this
First we need to remove that old crappy yellow bulb, use your wire strippers and snip the small wire on both ends to release the bulb, throw that bish away.
Now that the bulb is gone turn the Substrate over, you will now need to find where the two pieces of wire that are left from where you snipped the light bulb off run through and desolder them, to open the holes back up for the new wires to run through.
Take your Desoldering Braid and Soldering Iron and desolder where the wires are until the holes are exposed. you may have to use your needle nose pliers to pull the remaining wire out of each hole.
Now that the holes are open, take about an inch of your new wire (strip it if you need to) put a 90* bend in it at one end and put it through one of the holes.
Next take your Soldering Iron and solder the wire back in place. Do this to both sides, one side at a time!
It should look like this when your done.
Next Flip the Substrate back over and straighten the wires out. Take your LED bulb and with the needle nose pliers gently pull the end caps off, exposing the holes on the LED Board. Place the wires through the holes on the new LED Board. Push the LED down the wire until it is flat up against the substrate. Note: the holes dont line up exactly, so move the LED as close to center as possible.
Last edited by G35sixMT; 08-29-2014 at 03:36 PM.
#2
08-29-2014, 03:19 PM
Once aligned Take your Soldering Iron and Solder the two Wires to the LED Board. Snip off the extra wire.


The Hard Part is OVER!!!
Take your new modified LED Substrate and Re install it into your car Remember BE CAREFUL NOT TO BREAK OFF THE TAB at the top!! Reconnect your Battery, Test to make sure it works and replace the outer cover and enjoy your new Blinding White Lighting!!
Before and After

The Hard Part is OVER!!!
Take your new modified LED Substrate and Re install it into your car Remember BE CAREFUL NOT TO BREAK OFF THE TAB at the top!! Reconnect your Battery, Test to make sure it works and replace the outer cover and enjoy your new Blinding White Lighting!!
Before and After
Last edited by G35sixMT; 08-29-2014 at 03:37 PM.
The following users liked this post:
Hotdawwgman (10-02-2014)
#3
08-29-2014, 03:34 PM

The following 2 users liked this post by Andy168:
Hotdawwgman (10-02-2014),
Urbanengineer (08-29-2014)

Thread
Thread Starter
Forum
Replies
Last Post
Daniel k.
New Members Check In
13
11-03-2015 09:52 AM