DIY: LCD Removal
#1
 03-26-2009, 02:24 PM


DIY: LCD Removal
LCD screen protectors will be available soon, so I thought I would start by creating a DIY on how the LCD comes out.
The only tool needed is a phillips screwdriver. Complete removal should take about 5-10 minutes.
Note: Do not power up the car while any electrical connectors are disconnected. Doing so may trigger error light(s).
If you have a 6MT, go to post #22
If you have a 5AT or 7AT
Pull shifter boot down to expose retention clip:

Remove **** by spreading retaining clip apart and slide it out. It does not need to be completely removed:

Lift the shifter trim piece out by pulling up as shown. No need pry on it with any tools. If needed, the shift lever can be moved to “D” to provide more clearance by reaching under the trim piece and pressing down on the shifter release:

Remove A/V trim piece by removing the two screws at the bottom on each side:

The A/V trim piece is hooked into the LCD bezel on top. Pull down slightly to unhook it:

Disconnect the cables and put the trim piece aside:

Remove the LCD bezel by removing the two screws at the bottom on each side:

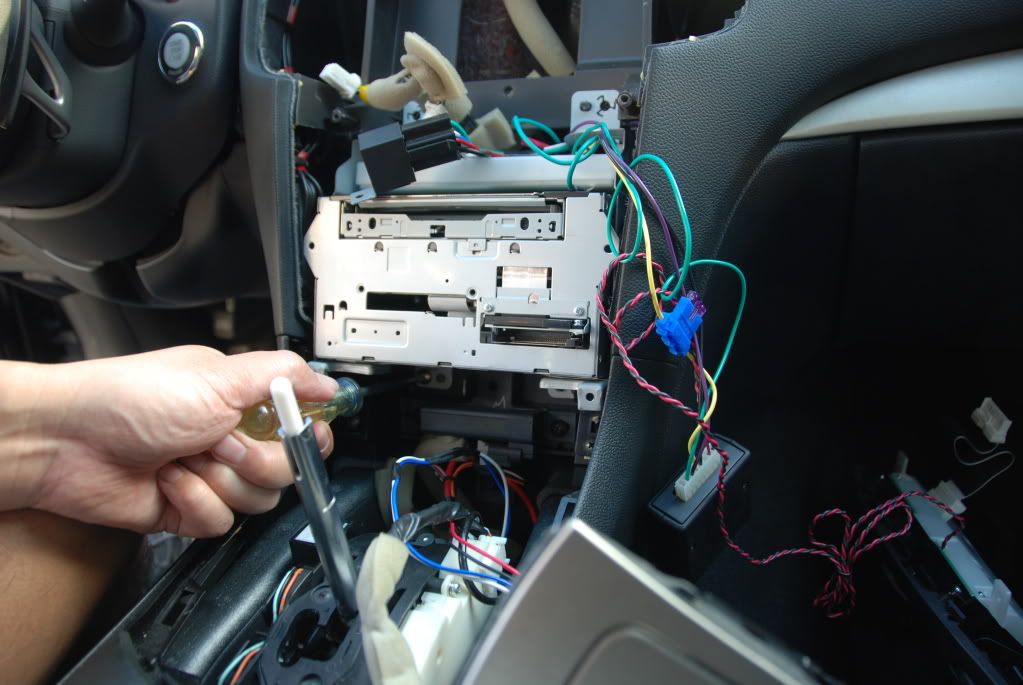
Slide the bezel forward and disconnect the ribbon cable to the A/V control ****:

Remove the LCD by removing the two screws at the bottom on each side:

The LCD is hooked at the top. Remove by pulling out the bottom to clear the alignment pins, then down to unhook the LCD panel:

Remove the connector(s) behind the LCD panel and your LCD should be out:

The only tool needed is a phillips screwdriver. Complete removal should take about 5-10 minutes.
Note: Do not power up the car while any electrical connectors are disconnected. Doing so may trigger error light(s).
If you have a 6MT, go to post #22
If you have a 5AT or 7AT
Pull shifter boot down to expose retention clip:
Remove **** by spreading retaining clip apart and slide it out. It does not need to be completely removed:
Lift the shifter trim piece out by pulling up as shown. No need pry on it with any tools. If needed, the shift lever can be moved to “D” to provide more clearance by reaching under the trim piece and pressing down on the shifter release:
Remove A/V trim piece by removing the two screws at the bottom on each side:
The A/V trim piece is hooked into the LCD bezel on top. Pull down slightly to unhook it:
Disconnect the cables and put the trim piece aside:
Remove the LCD bezel by removing the two screws at the bottom on each side:
Slide the bezel forward and disconnect the ribbon cable to the A/V control ****:
Remove the LCD by removing the two screws at the bottom on each side:
The LCD is hooked at the top. Remove by pulling out the bottom to clear the alignment pins, then down to unhook the LCD panel:
Remove the connector(s) behind the LCD panel and your LCD should be out:
Last edited by terrycs; 01-23-2018 at 04:10 PM.
#3
03-29-2009, 10:22 AM
#4
03-29-2009, 11:51 AM

^yep you would do this to put a thin film to protect the LCD screen (obviously this is more useful to those with the navi package)...or it's a nice DIY just in case if you want to swap out the monitor itself too

#6
03-30-2009, 12:26 AM
On a side note ... two more screws under the A/V unit is all that's left to take out the A/V unit itself:
#7
03-30-2009, 01:42 AM

Trending Topics


#13
03-31-2009, 10:04 AM
 For everyone else, this will not be an issue.

#15
06-15-2009, 10:48 PM