DIY: LED Front Turn Signal Blinkers
#1
 08-22-2009, 02:29 PM

DIY: LED Front Turn Signal Blinkers
So I got these front turn signal blinkers and hyperblink load resistors from V-led:
http://www.v-leds.com/Exterior-LED/P...10365-1-2.html
http://www.v-leds.com/BlinkerWarning...83296-1-3.html
And two days later (across the country and for cheapest shipping option ) this is what shows up (OK the one dollar bill wasnt in there)....
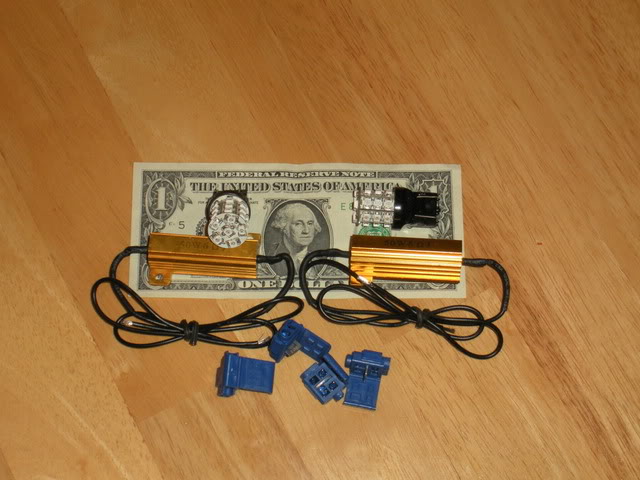
When I tried the install one of the blue splice connectors in the kit it didn't make a solid connection with the blinker lead so I stopped at radio shack and picked up these so there was less of a chance that the connections would go bad down the road:
http://www.radioshack.com/product/in...5&tab=features
Now on to the install.....
First I removed the airbox. If you have never done this (like me) its simple:
1) unscrew the bolt (10mm socket) holding it to the bracket in the left of this photo (red arrow).
2) loosen the hose clamp (flathead, green arrow)
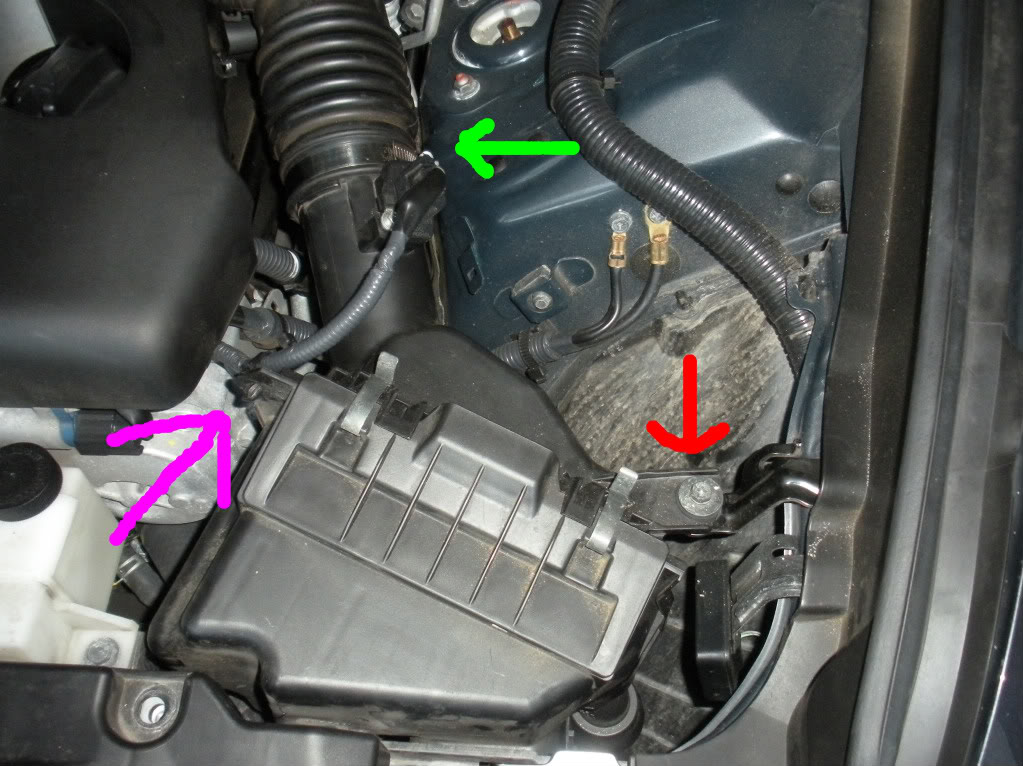
3) disconnect the MAF sensor cable by squeezing the left and right side of the quick release and wiggle through the back (purple arrow above).
Pull the intake hose off the back and the airbox will lift up with a little wiggling. Place up and out of the way somewhere (MAF sensor cable still attached).
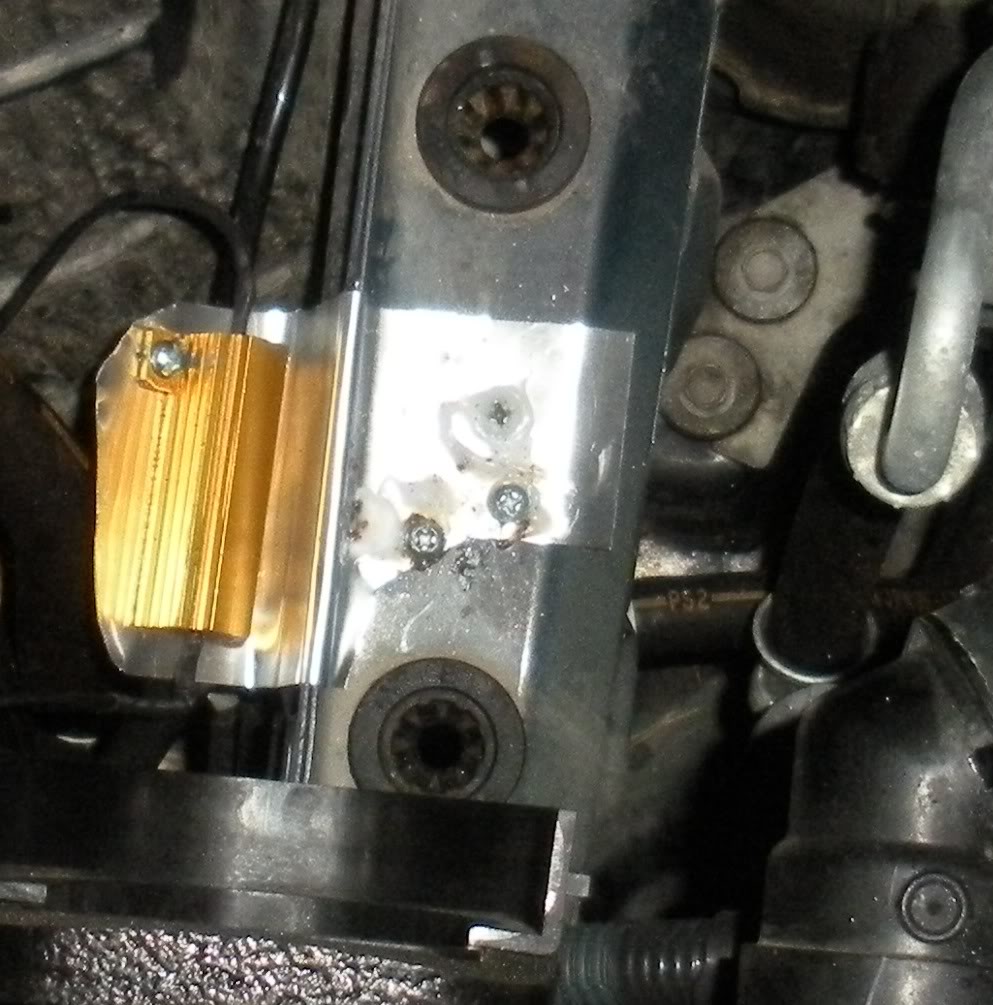
Next, its time to find a spot for the resistors. With the length of the leads and the small amount of realestate I went with fab'ing up a bracket made of an aluminum flashing shingle (less than $1 at the local hardware store). But you might be able to get away with connecting them on the rail directly below where the airbox comes out (here, blue "rail"):
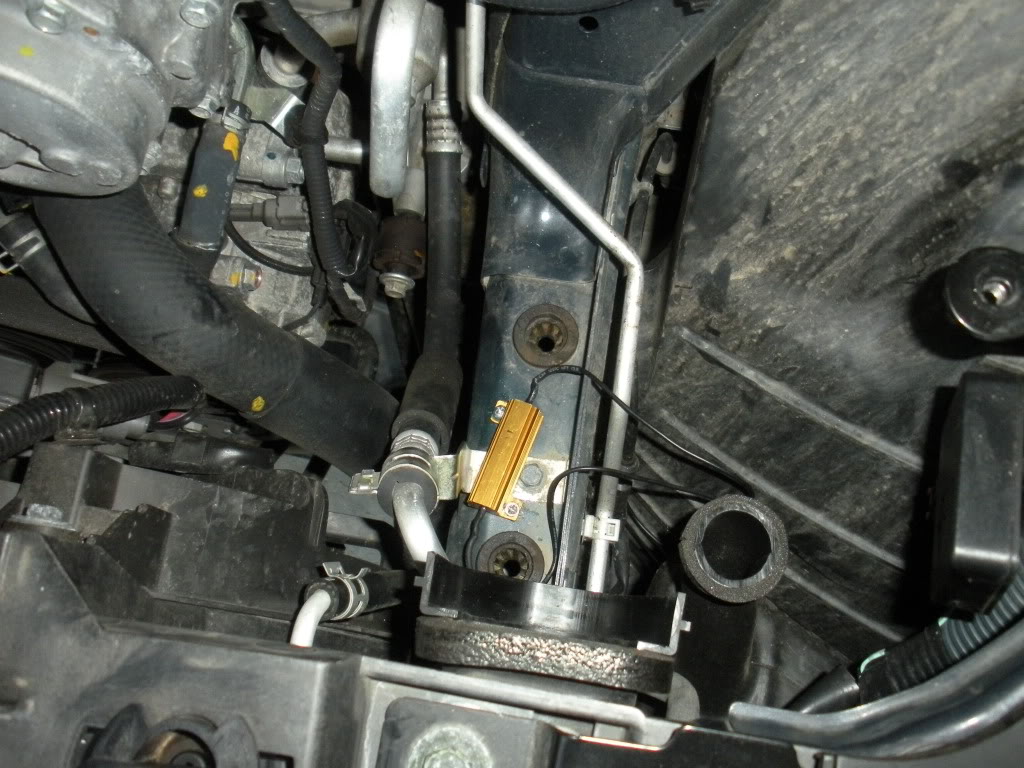
I tried it here first, and the lead was just long enough for me to plug the bulb back in, which I was not comfortable with. To get a couple of inches closer I used the bracket.
If you want to go the bracket route, just split the shingle in half to make two sheets (one for each passenger and driver side blinker resistors), shaped the shingle around the rail, attached the resistor to the bracket with some small nuts and bolts, and adding loc-tite to hold them in place. Here is the shaped bracket and resistor:

I placed some silicon caulk on the rail under where the bracket is going to go to add a little vibration damping (probably overkill, but while I am there and had the caulk around, I did it). Then attached the bracket to the rail with some self tapping screws (still pre-drilled some holes to help the self tappers grab a hold quicker). I put some caulk back on top of the screws to keep them from backing out (again overkill, but its my middle name). Attached it looks like this:
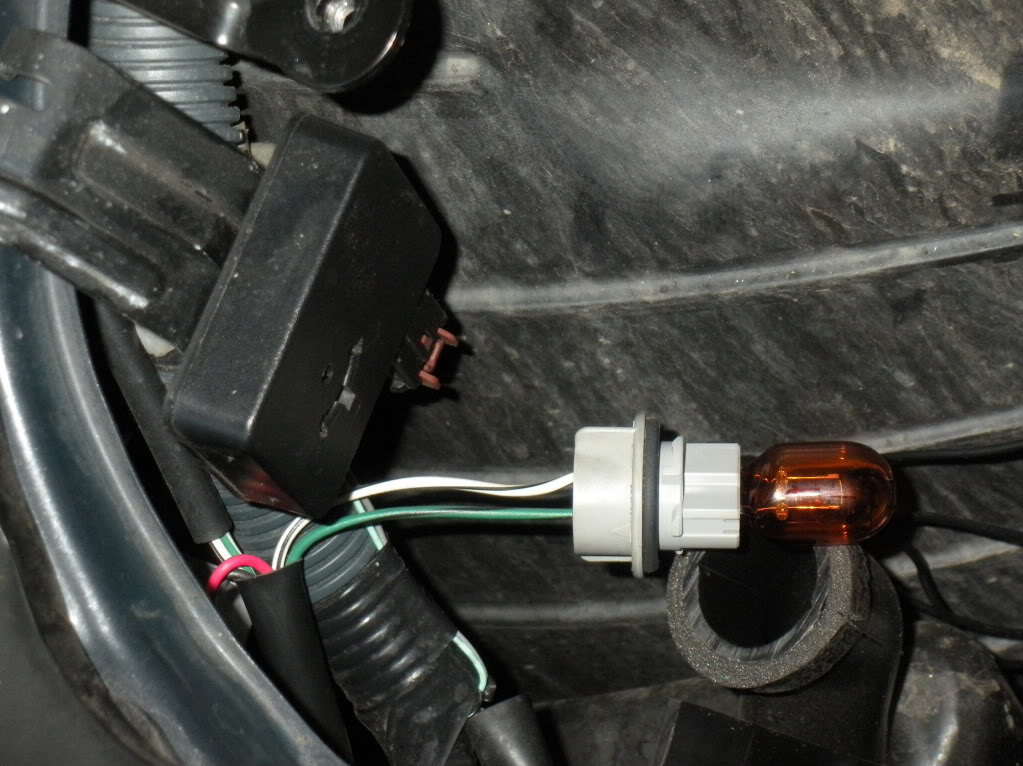
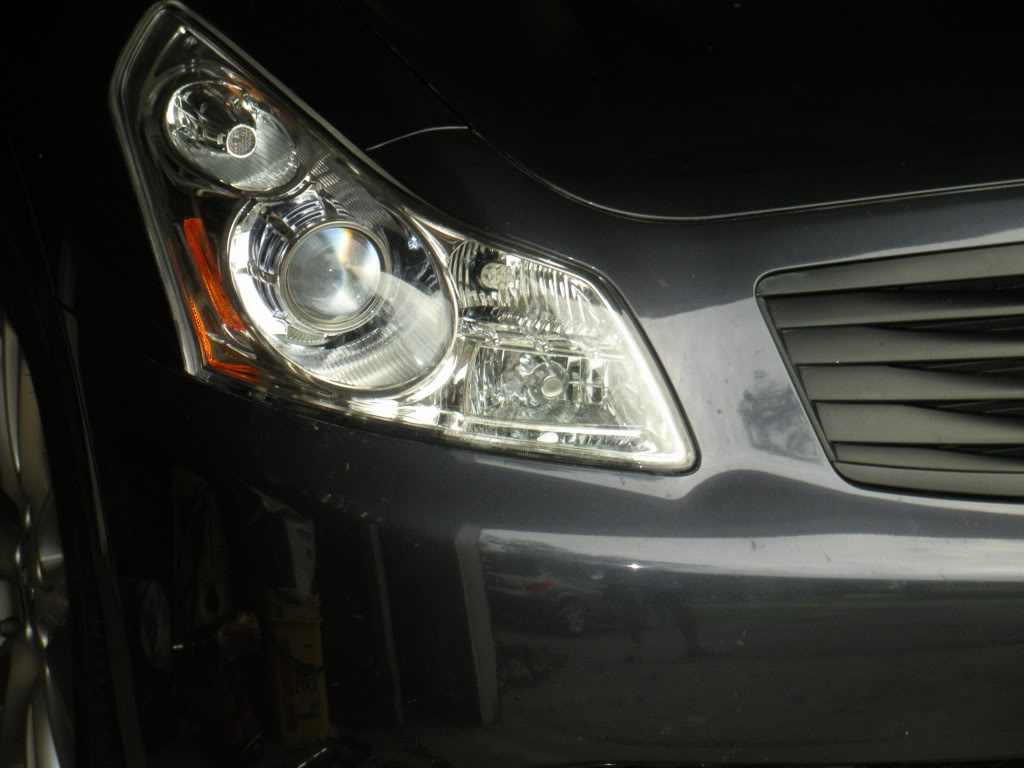
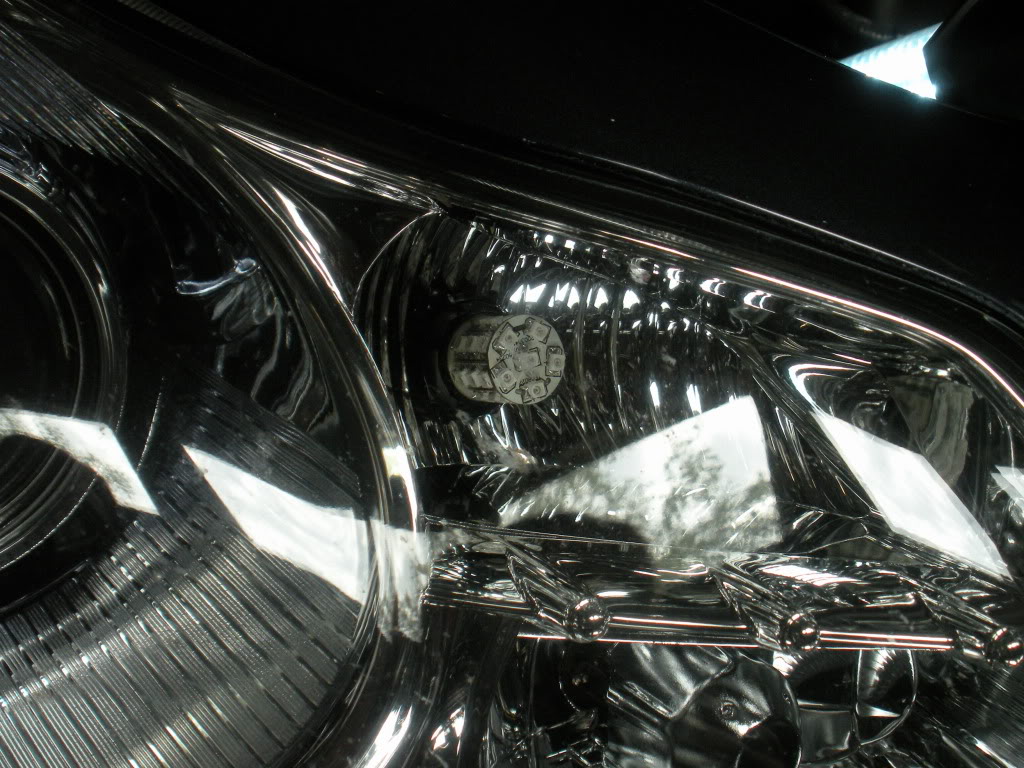
Now pull out the blinker bulb. Grab the back of the bulb holder and spin until it releases from the reflector. Pull out and you have this:
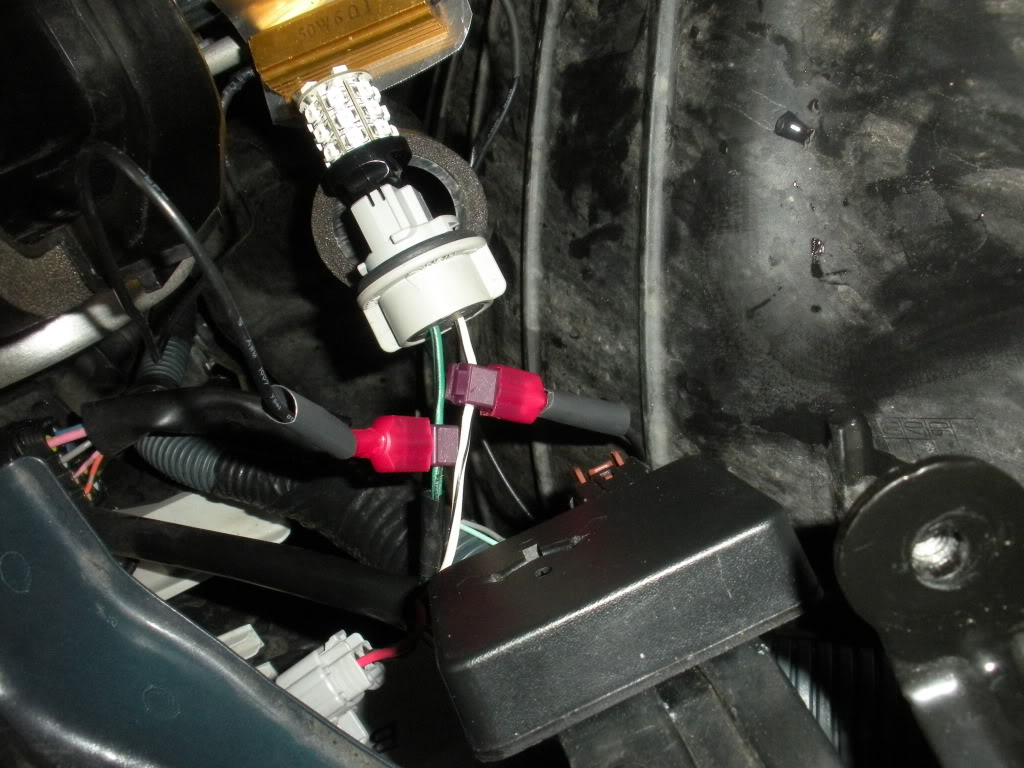
Pull out oem bulb, replace with LED bulb, and using the quick taps attach one lead from the resistor to one of the lines coming out of the bulb holder (I know there is a better word for this, right). Then attach the other lead to the other line coming out of the holder. You should have something that looks like this:
Now put on your four ways to insure you have power to the bulb. The bulbs can be plugged in two orientations, but only power up in one. If they don't look like this with your four ways on pull the bulb and rotate.
http://s534.photobucket.com/albums/e...ent=Movie1.flv
Next, turn off your four ways, put your ignition to on, and put on the blinker, it should blink at the same rate as your four ways, if it is blinking faster (hyperblinking) your resistor is not connected properly.
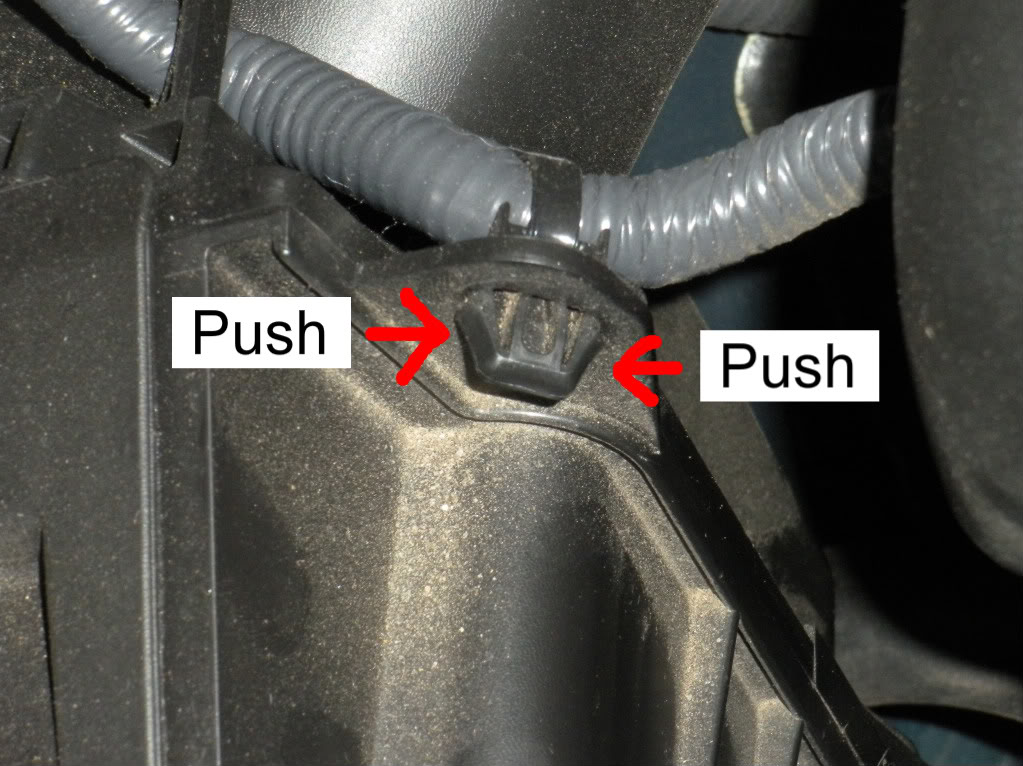
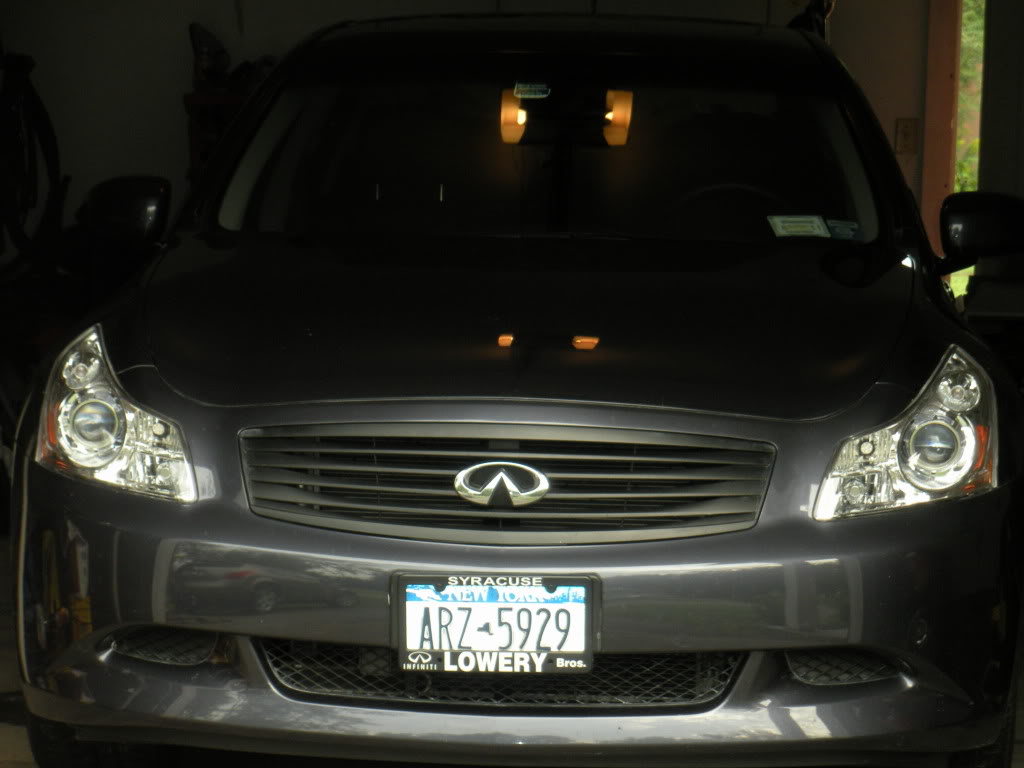
If everything is working good install the bulb holder back into the reflector (insert/rotate). Get your airbox back in, insure the side and front tubes are back over the air feed tubes that they came off of. This takes a little fiddling but once it is in the right place you'll know it. Also when tightening the hose clamp on the back side of the airbox, there is a hole in the clamp that a rubber nub goes through to hold it in place I guess. If you dont get the clamp over the nub probably not a big deal, but it is easy enough to over look, and just as easy to install the right way so I suggest you do. I think that is it. And now its time for the final pics & vids.
Before
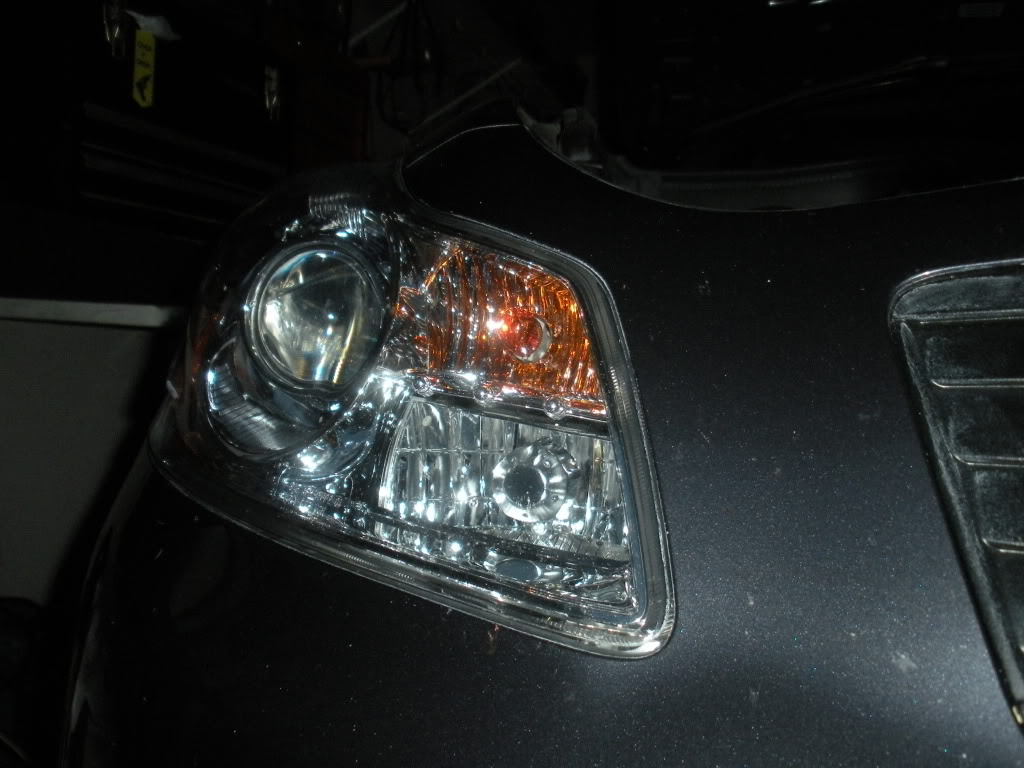
After
After Close
After Far
50/50 (LED Driver Side)
http://s534.photobucket.com/albums/e...ent=Movie3.flv
100%
http://s534.photobucket.com/albums/e...ent=Movie2.flv
I think thats it, any questions?
G'luck!
http://www.v-leds.com/Exterior-LED/P...10365-1-2.html
http://www.v-leds.com/BlinkerWarning...83296-1-3.html
And two days later (across the country and for cheapest shipping option
) this is what shows up (OK the one dollar bill wasnt in there)....When I tried the install one of the blue splice connectors in the kit it didn't make a solid connection with the blinker lead so I stopped at radio shack and picked up these so there was less of a chance that the connections would go bad down the road:
http://www.radioshack.com/product/in...5&tab=features
Now on to the install.....
First I removed the airbox. If you have never done this (like me) its simple:
1) unscrew the bolt (10mm socket) holding it to the bracket in the left of this photo (red arrow).
2) loosen the hose clamp (flathead, green arrow)
3) disconnect the MAF sensor cable by squeezing the left and right side of the quick release and wiggle through the back (purple arrow above).
Pull the intake hose off the back and the airbox will lift up with a little wiggling. Place up and out of the way somewhere (MAF sensor cable still attached).
Next, its time to find a spot for the resistors. With the length of the leads and the small amount of realestate I went with fab'ing up a bracket made of an aluminum flashing shingle (less than $1 at the local hardware store). But you might be able to get away with connecting them on the rail directly below where the airbox comes out (here, blue "rail"):
I tried it here first, and the lead was just long enough for me to plug the bulb back in, which I was not comfortable with. To get a couple of inches closer I used the bracket.
If you want to go the bracket route, just split the shingle in half to make two sheets (one for each passenger and driver side blinker resistors), shaped the shingle around the rail, attached the resistor to the bracket with some small nuts and bolts, and adding loc-tite to hold them in place. Here is the shaped bracket and resistor:
I placed some silicon caulk on the rail under where the bracket is going to go to add a little vibration damping (probably overkill, but while I am there and had the caulk around, I did it). Then attached the bracket to the rail with some self tapping screws (still pre-drilled some holes to help the self tappers grab a hold quicker). I put some caulk back on top of the screws to keep them from backing out (again overkill, but its my middle name). Attached it looks like this:
Now pull out the blinker bulb. Grab the back of the bulb holder and spin until it releases from the reflector. Pull out and you have this:
Pull out oem bulb, replace with LED bulb, and using the quick taps attach one lead from the resistor to one of the lines coming out of the bulb holder (I know there is a better word for this, right). Then attach the other lead to the other line coming out of the holder. You should have something that looks like this:
Now put on your four ways to insure you have power to the bulb. The bulbs can be plugged in two orientations, but only power up in one. If they don't look like this with your four ways on pull the bulb and rotate.
http://s534.photobucket.com/albums/e...ent=Movie1.flv
Next, turn off your four ways, put your ignition to on, and put on the blinker, it should blink at the same rate as your four ways, if it is blinking faster (hyperblinking) your resistor is not connected properly.
If everything is working good install the bulb holder back into the reflector (insert/rotate). Get your airbox back in, insure the side and front tubes are back over the air feed tubes that they came off of. This takes a little fiddling but once it is in the right place you'll know it. Also when tightening the hose clamp on the back side of the airbox, there is a hole in the clamp that a rubber nub goes through to hold it in place I guess. If you dont get the clamp over the nub probably not a big deal, but it is easy enough to over look, and just as easy to install the right way so I suggest you do. I think that is it. And now its time for the final pics & vids.
Before
After
After Close
After Far
50/50 (LED Driver Side)
http://s534.photobucket.com/albums/e...ent=Movie3.flv
100%
http://s534.photobucket.com/albums/e...ent=Movie2.flv
I think thats it, any questions?
G'luck!
#2
08-22-2009, 06:08 PM

Registered User

#5
08-23-2009, 07:34 AM

Why would you use that, is it better or just quicker? The nuts and bolts way takes about 3 minutes each. In normal "I am turning on this road" blinker mode the resistors dont have time to heat up, but if you have the blinker on for awhile they get pretty hot like "I am stuck in traffic, or I got a flat and I am pulled over", these resistors get pretty hot. I am not sure how much the adhesive could hold, but I wouldn't want to take that chance.
#7
08-26-2009, 12:27 PM


Trending Topics

#9
09-17-2009, 09:14 PM
im a retail seller for vleds and lets just say i went with alot of "other" leds and found them to be shet.. they dont last long.... vleds however, is still made in china, but way better quality then others.. thats why we're a little more pricey then the other guys. my friends have all bought cheap leds locally for half of what i sell my vleds for but they ALL ended up buying from me and tossing out the old ones.. of course, you have to understand that once in awhile you may get a defective led.. which is no problem.. vleds replaces them. and so do i so questions asked.. let me know if you guys need the best leds ever made..

#11
10-03-2009, 06:34 PM
I knew going into this change the LEDs would be slightly less bright than incandescent, but they are plenty fine for a signal light. They may have brighter LEDS out there, but I wouldn't bother with it. The driving lights are the only lights I'd consider going brighter, but even then the headlights are bright enough to show the way.
#12
02-05-2010, 10:41 PM
Thanks Mr.
Why would you use that, is it better or just quicker? The nuts and bolts way takes about 3 minutes each. In normal "I am turning on this road" blinker mode the resistors dont have time to heat up, but if you have the blinker on for awhile they get pretty hot like "I am stuck in traffic, or I got a flat and I am pulled over", these resistors get pretty hot. I am not sure how much the adhesive could hold, but I wouldn't want to take that chance.
Why would you use that, is it better or just quicker? The nuts and bolts way takes about 3 minutes each. In normal "I am turning on this road" blinker mode the resistors dont have time to heat up, but if you have the blinker on for awhile they get pretty hot like "I am stuck in traffic, or I got a flat and I am pulled over", these resistors get pretty hot. I am not sure how much the adhesive could hold, but I wouldn't want to take that chance.
Adhesive tape would not be good. The whole point of the chassis wirewound resistor is to heatsink it to something metallic. If you put adhesive tape on there, you get no heat transfer between resistor and your car chassis.
#13
02-08-2010, 05:02 PM

thanks for the video. i was thinking about what you did. your video helped out my decision. what i am looking for is white or clear bulbs/ leds that are as bright or brighter than the stock bulbs.
i tried many leds and the chrome sylvania bulbs and non were even close to stock brightness. until then im leaving the stock ones in.
i tried many leds and the chrome sylvania bulbs and non were even close to stock brightness. until then im leaving the stock ones in.
#14
02-09-2010, 09:59 PM
Sure NP, looks like vled sells high power white LEDs:
http://www.v-leds.com/Exterior-LED/T...02215-1-2.html
U should make sure you can return them for refund if your not sure you'll like 'em. I did not use the high power ambers available in case that helps.
http://www.v-leds.com/Exterior-LED/T...02215-1-2.html
U should make sure you can return them for refund if your not sure you'll like 'em. I did not use the high power ambers available in case that helps.
#15
03-08-2010, 07:34 AM

Registered User
Nice Work ! Looks like you got a higher model G....I got an 03 an was thinkin about puttin switchback leds in.but im finding out that i gotta switch from the standard 7440 bulb to a 7443 bulb,PURCHASE a 7443 bulb socket an then make some modifications to get it to fit into the turn signal housing ? IS THIS TRUE ? and if I switch from halogen to LED would i have to deal with hyperblinking ? ANY HELP IS APPRECIATED ! THANKS