DIY: Remove Gas Pump to Clean Sending Unit & Clear P0463 Code
#1
 09-27-2015, 11:03 AM


DIY: Remove Gas Pump to Clean Sending Unit & Clear P0463 Code
This is going to be a quick DIY for pulling your gas pump in the event that you need to replace it, clear the P0463 code or to clean the sending unit when your gas gauge doesn't go to "F" anymore when you fill up. Some of you may know that I ran into the P0463 code a few weeks ago and couldn't get the car to start for a few hours. I poked around the other sites and ended up pulling the gas pump so I could clean the sending unit contacts. It worked like a charm although my gas gauge still doesn't go all the way to F when I fill up but i'm going to pull both units and clean everything again today with some solvent.
There are two sending units in the 08 G35. The sending unit/gas pump combo is under the rear passenger seat and the secondary sending unit (no pump, just a float arm) is under the rear driver side seat. Removing the seat is easy, just pull the release in the middle of the passenger and driver side cushion on each side where the cushion meets the car body (there are other posts out there for this). You could pull both, have them cleaned and replaced in about 45 minutes the first time you do it.
You'll need a wrench to disconnect the battery, a long phillips head screwdriver for the screws holding the pump down, a small flathead for removing the gas line and removing the cover from the sending unit and i'd recommend a 8mm socket with a 1/4" drive in case the screws holding the pump down have corrosion and you can't use the screwdriver (I had a few like this). Additionally you'll want some paper towels, a pot or pan that you don't care about getting gasoline in, and something to lay on the carpet in the car since you'll probably spill gas on it.
And as always, I take no responsibility for anything you choose to do to your vehicle. If you don't think you have the abilities to do this task then call a friend or bite the bullet and use a mechanic.
Here we go...
Step 1: Remove rear seat
Step 2: Remove the protective cover under the seat. There are four black little retention clips/tabs which you can turn using a phillips head screwdriver. Take note of the direction arrow on the clip. If you turn it the wrong way you'll ruin it (like I did...womp womp). This picture is of the driver's side but the passenger side looks just the same.
Step 2: Remove cover and disconnect electrical harness. It's a standard "squeeze and pull". I've already removed it in the photo. You'll see that there's a lot of dirt. I'd clean it to prevent it from getting into the gas tank.
Step 3: Unclip the outgoing gas line. You'll probably get a quarter cup of gas leaking out when you do, that's normal. Just bring paper towels. There are two translucent clips in the circle. Just push the connector in, squeeze them and pull the line back.
Step 4: Remove the screw-head bolts holding the pump down. If you can't remove them with a screwdriver use an 8mm socket.
Step 5: Pull the pump up. Be gentle because you don't want to bend the float arm for the sending unit. Disconnect the second gas line. You'll have to do this by gently prying the connector off the tabs with a flathead screwdriver. DO NOT break the tabs ha ha. It's not hard to remove but i'd imagine it's easy to ruin.
Step 6: Carefully remove the pump. You'll have to maneuver it a little to get the float arm out. Just go slow and watch what you're doing. You're going to drip gas all over. It's inevitable.
Step 7: Remove the cover to the sending unit on the pump. There are a few plastic tabs to squeeze. Just be gentle with them.
You'll see the sending unit contacts. They're probably filthy.
Step 8: Grab a Q-tip and clean those bad boys up.
See the difference?
Now just replace the sending unit cover (I forgot when I did it ha ha) and reassemble in the reverse order. If you choose to do the driver's side the process is the same, the only difference is there are no gas lines attached to that one. When you restart the car it may take an extra few seconds since all the gas leaked out of the line, this is normal so don't worry.
Enjoy!
- Bob
There are two sending units in the 08 G35. The sending unit/gas pump combo is under the rear passenger seat and the secondary sending unit (no pump, just a float arm) is under the rear driver side seat. Removing the seat is easy, just pull the release in the middle of the passenger and driver side cushion on each side where the cushion meets the car body (there are other posts out there for this). You could pull both, have them cleaned and replaced in about 45 minutes the first time you do it.
You'll need a wrench to disconnect the battery, a long phillips head screwdriver for the screws holding the pump down, a small flathead for removing the gas line and removing the cover from the sending unit and i'd recommend a 8mm socket with a 1/4" drive in case the screws holding the pump down have corrosion and you can't use the screwdriver (I had a few like this). Additionally you'll want some paper towels, a pot or pan that you don't care about getting gasoline in, and something to lay on the carpet in the car since you'll probably spill gas on it.
And as always, I take no responsibility for anything you choose to do to your vehicle. If you don't think you have the abilities to do this task then call a friend or bite the bullet and use a mechanic.
Here we go...
Step 1: Remove rear seat
Step 2: Remove the protective cover under the seat. There are four black little retention clips/tabs which you can turn using a phillips head screwdriver. Take note of the direction arrow on the clip. If you turn it the wrong way you'll ruin it (like I did...womp womp). This picture is of the driver's side but the passenger side looks just the same.

Step 2: Remove cover and disconnect electrical harness. It's a standard "squeeze and pull". I've already removed it in the photo. You'll see that there's a lot of dirt. I'd clean it to prevent it from getting into the gas tank.


Step 3: Unclip the outgoing gas line. You'll probably get a quarter cup of gas leaking out when you do, that's normal. Just bring paper towels. There are two translucent clips in the circle. Just push the connector in, squeeze them and pull the line back.

Step 4: Remove the screw-head bolts holding the pump down. If you can't remove them with a screwdriver use an 8mm socket.
Step 5: Pull the pump up. Be gentle because you don't want to bend the float arm for the sending unit. Disconnect the second gas line. You'll have to do this by gently prying the connector off the tabs with a flathead screwdriver. DO NOT break the tabs ha ha. It's not hard to remove but i'd imagine it's easy to ruin.

Step 6: Carefully remove the pump. You'll have to maneuver it a little to get the float arm out. Just go slow and watch what you're doing. You're going to drip gas all over. It's inevitable.
Step 7: Remove the cover to the sending unit on the pump. There are a few plastic tabs to squeeze. Just be gentle with them.

You'll see the sending unit contacts. They're probably filthy.

Step 8: Grab a Q-tip and clean those bad boys up.

See the difference?

Now just replace the sending unit cover (I forgot when I did it ha ha) and reassemble in the reverse order. If you choose to do the driver's side the process is the same, the only difference is there are no gas lines attached to that one. When you restart the car it may take an extra few seconds since all the gas leaked out of the line, this is normal so don't worry.
Enjoy!
- Bob
Last edited by RemmyZero; 09-27-2015 at 06:34 PM.
The following 3 users liked this post by RemmyZero:

#3
10-01-2015, 06:46 AM
I haven't filled up yet since I did this again the other day but when I cleaned everything again I definitely took more "gunk" off with the q-tips and some Berryman B12. I'll probably fill up tomorrow. I was only a couple hairs off from "F" when I would fill up so in reality not a big deal, it just annoys me ha ha.
#4
10-05-2015, 09:17 AM
So when this all began my issue was with the P0463 code (which prevented the car from starting) and my gas gauge would not go up to full when I would fill it up (it would get to just below the first hash-mark below the "F"). After cleaning the code hasn't reappeared but my gas gauge still doesn't go to "F" but it will rise to the point where the needle is just barely touching the "F" mark so that's good enough for me. Down the road i'll replace both sending units but for now i've avoided the unnecessary cost, which is fine with me 
#5
02-07-2016, 06:10 PM

Bumping the fuel gauge threads I used as reference:
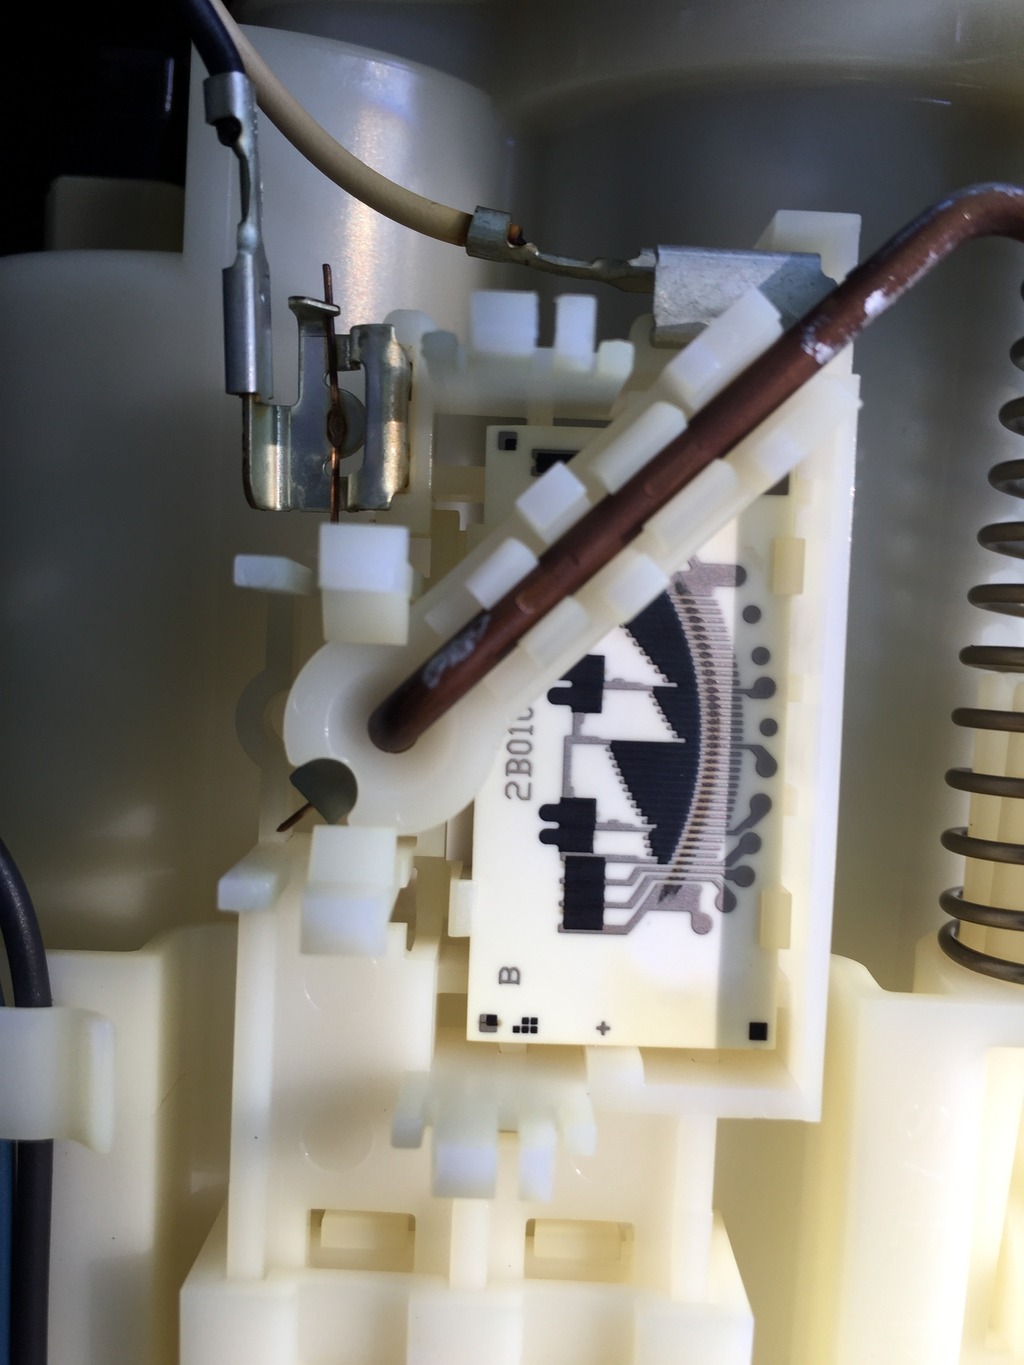
I discovered my problem: On the float armature, there is a thin copper bracket/wire that sits behind the armature bracket and it is this copper bracket/wire that makes contact with the "piano board" that reads and sends the fuel level to the gauge. This bracket/wire has a thin copper wire that spools around the armature pivot point before threading through the armature bracket housing to where it is soldered.
My problem was two fold: 1. the copper bracket/wire was bent enough that it wasn't making full contact throughout the entire range of motion. 2. the spool of copper wiring from the bracket/wire was getting bound up on the armature mount housing and prevented the arm from moving. This somehow occurred while I was cleaning the circuit board and put it back into the tank.
So I tinkered with the copper bracket/wire by gently (I MEAN GENTLY!) bending and prying the bracket using fine tools such as picks and miniature need nose pliers until the contact point on the tip of the bracket/wire made strong contact with "piano board" throughout the entire range of motion. I then fiddled with the armature mounting point and bracket, seating, moving and reseating the armature arm mount until I could not feel anything binding up via the copper coil and there was no resistance to the armature arm moving throughout the range of motion.
I put it all back together and turned the car on to immediately see a working gas gauge. This fixed my non-working gauge immediately and fixed my P0463 code.
#6
08-07-2017, 08:35 PM

This is going to be a quick DIY for pulling your gas pump in the event that you need to replace it, clear the P0463 code or to clean the sending unit when your gas gauge doesn't go to "F" anymore when you fill up. Some of you may know that I ran into the P0463 code a few weeks ago and couldn't get the car to start for a few hours. I poked around the other sites and ended up pulling the gas pump so I could clean the sending unit contacts. It worked like a charm although my gas gauge still doesn't go all the way to F when I fill up but i'm going to pull both units and clean everything again today with some solvent.
There are two sending units in the 08 G35. The sending unit/gas pump combo is under the rear passenger seat and the secondary sending unit (no pump, just a float arm) is under the rear driver side seat. Removing the seat is easy, just pull the release in the middle of the passenger and driver side cushion on each side where the cushion meets the car body (there are other posts out there for this). You could pull both, have them cleaned and replaced in about 45 minutes the first time you do it.
You'll need a wrench to disconnect the battery, a long phillips head screwdriver for the screws holding the pump down, a small flathead for removing the gas line and removing the cover from the sending unit and i'd recommend a 8mm socket with a 1/4" drive in case the screws holding the pump down have corrosion and you can't use the screwdriver (I had a few like this). Additionally you'll want some paper towels, a pot or pan that you don't care about getting gasoline in, and something to lay on the carpet in the car since you'll probably spill gas on it.
And as always, I take no responsibility for anything you choose to do to your vehicle. If you don't think you have the abilities to do this task then call a friend or bite the bullet and use a mechanic.
Here we go...
Step 1: Remove rear seat
Step 2: Remove the protective cover under the seat. There are four black little retention clips/tabs which you can turn using a phillips head screwdriver. Take note of the direction arrow on the clip. If you turn it the wrong way you'll ruin it (like I did...womp womp). This picture is of the driver's side but the passenger side looks just the same.
Attachment 182155
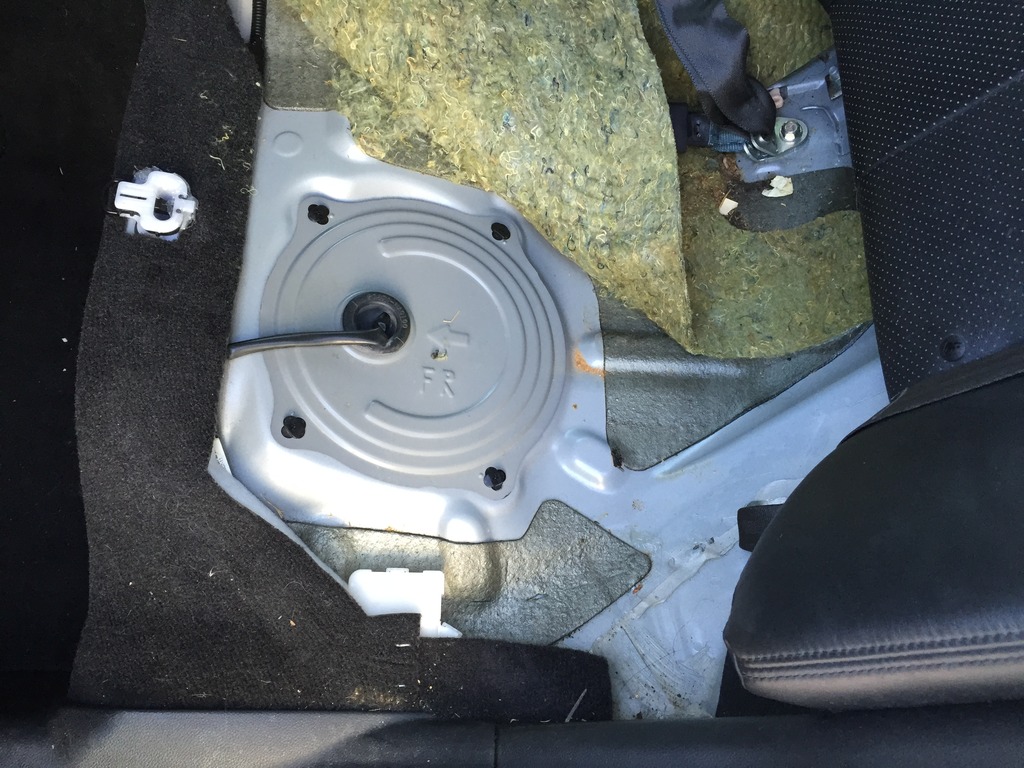
Step 2: Remove cover and disconnect electrical harness. It's a standard "squeeze and pull". I've already removed it in the photo. You'll see that there's a lot of dirt. I'd clean it to prevent it from getting into the gas tank.
Attachment 182156
Attachment 182157
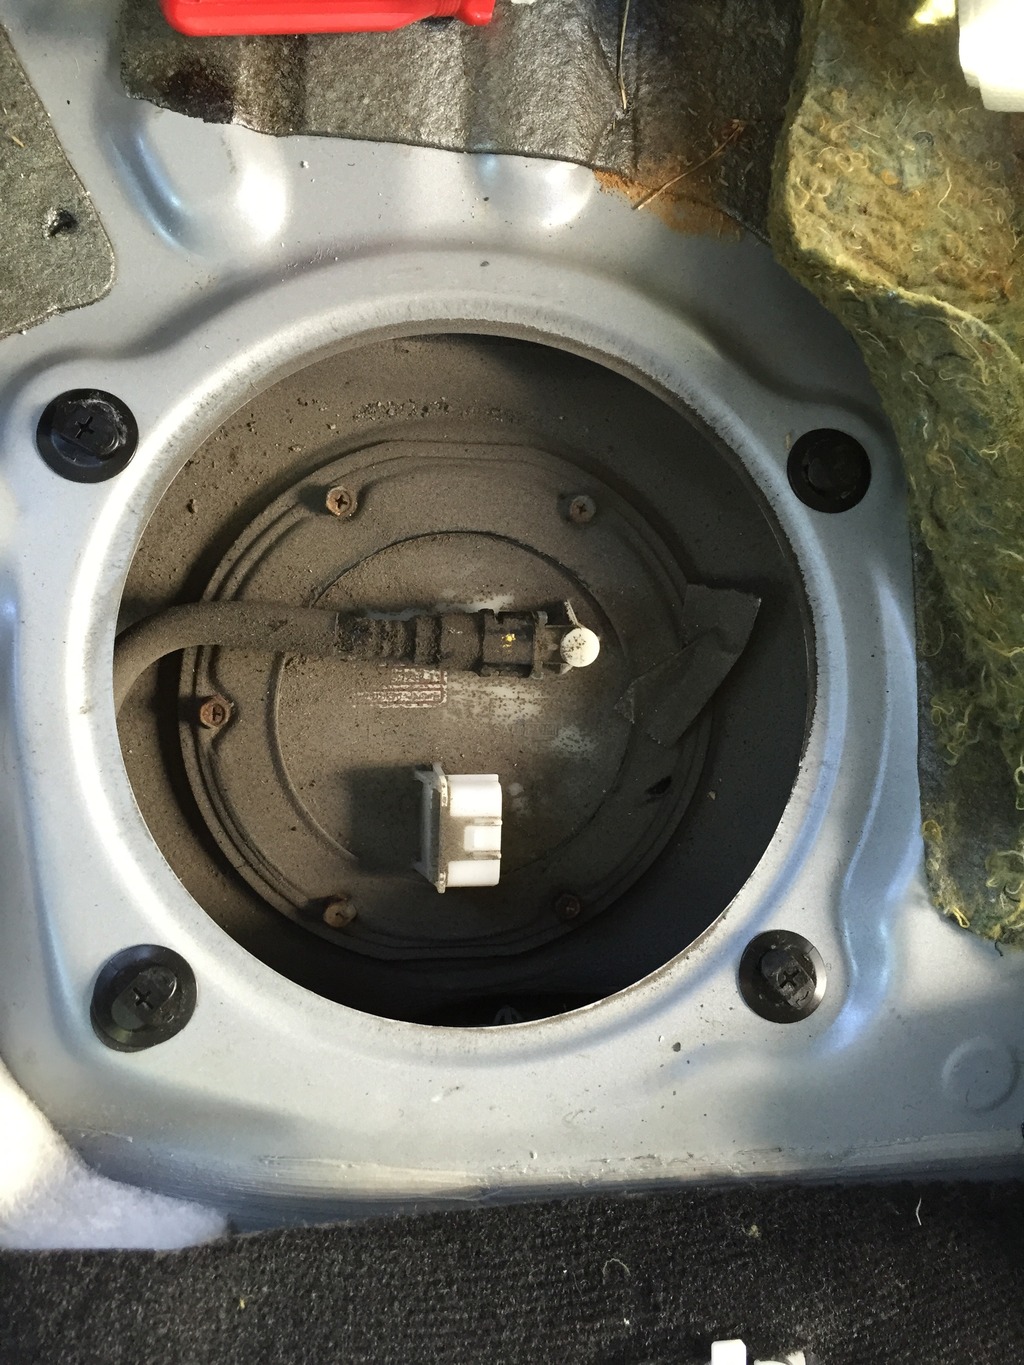
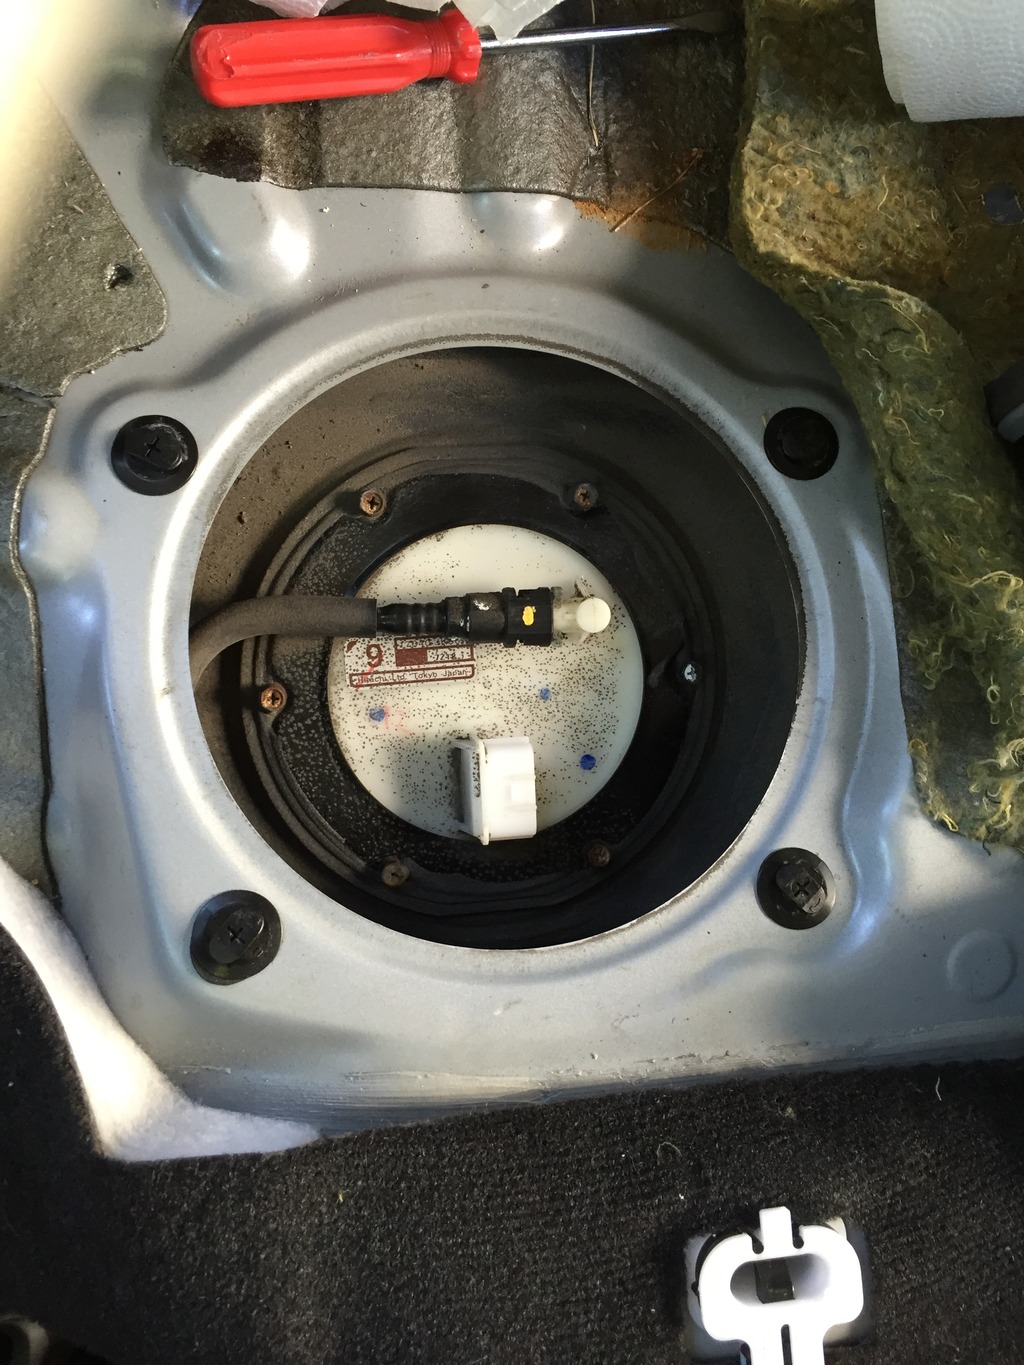
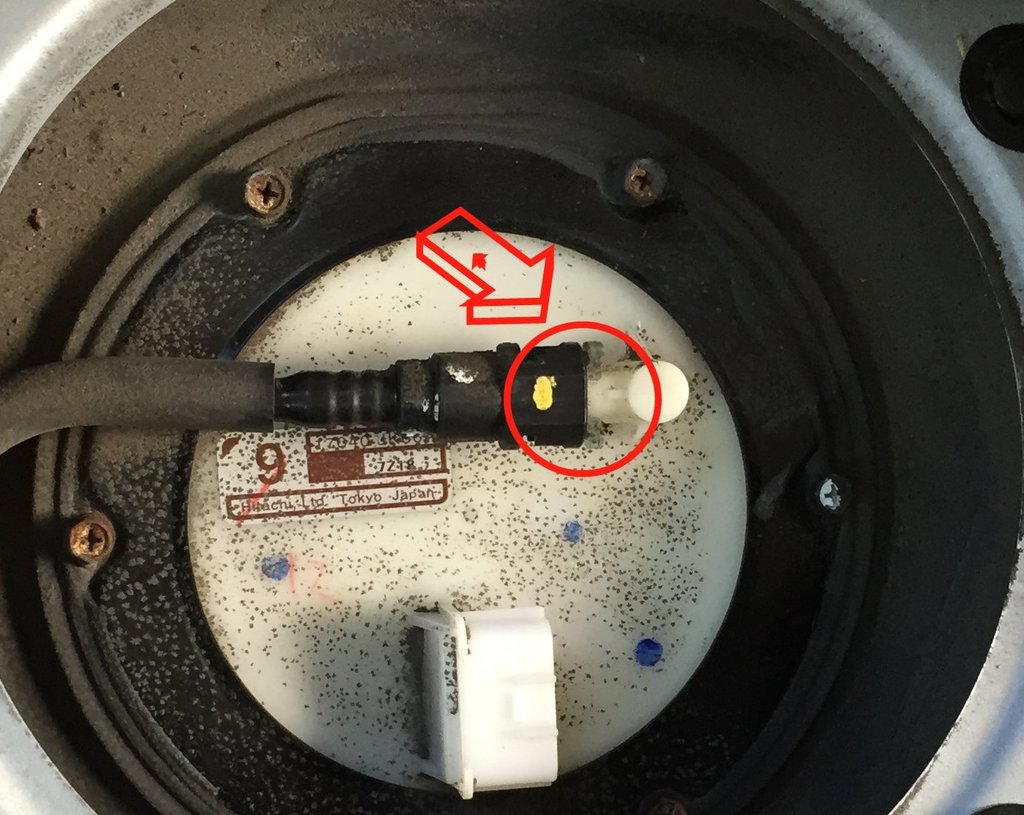
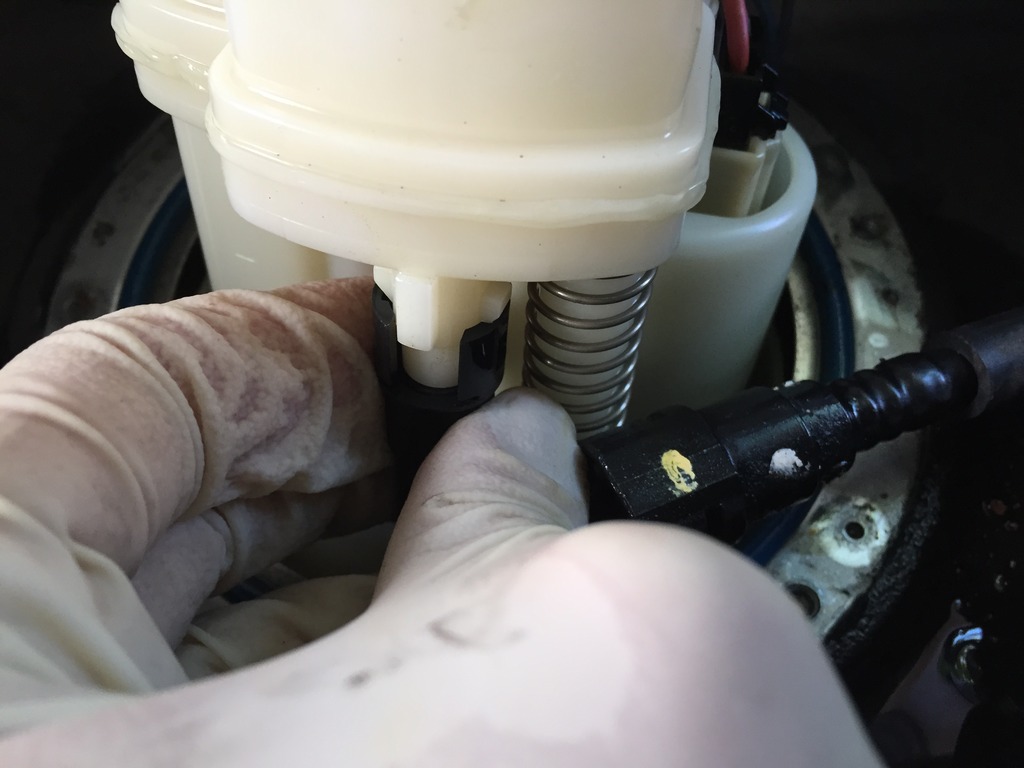
Step 3: Unclip the outgoing gas line. You'll probably get a quarter cup of gas leaking out when you do, that's normal. Just bring paper towels. There are two translucent clips in the circle. Just push the connector in, squeeze them and pull the line back.
Attachment 182158
Step 4: Remove the screw-head bolts holding the pump down. If you can't remove them with a screwdriver use an 8mm socket.
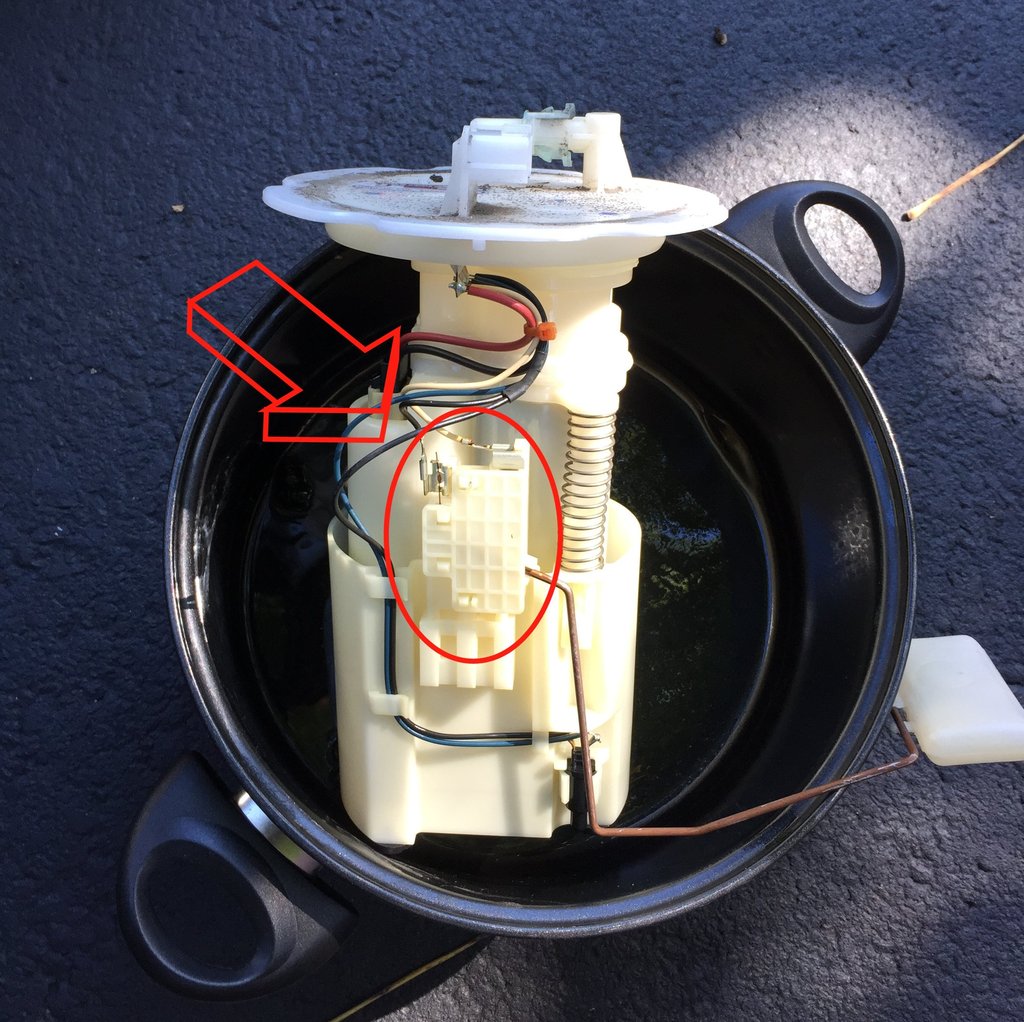
Step 5: Pull the pump up. Be gentle because you don't want to bend the float arm for the sending unit. Disconnect the second gas line. You'll have to do this by gently prying the connector off the tabs with a flathead screwdriver. DO NOT break the tabs ha ha. It's not hard to remove but i'd imagine it's easy to ruin.
Attachment 182159
Step 6: Carefully remove the pump. You'll have to maneuver it a little to get the float arm out. Just go slow and watch what you're doing. You're going to drip gas all over. It's inevitable.
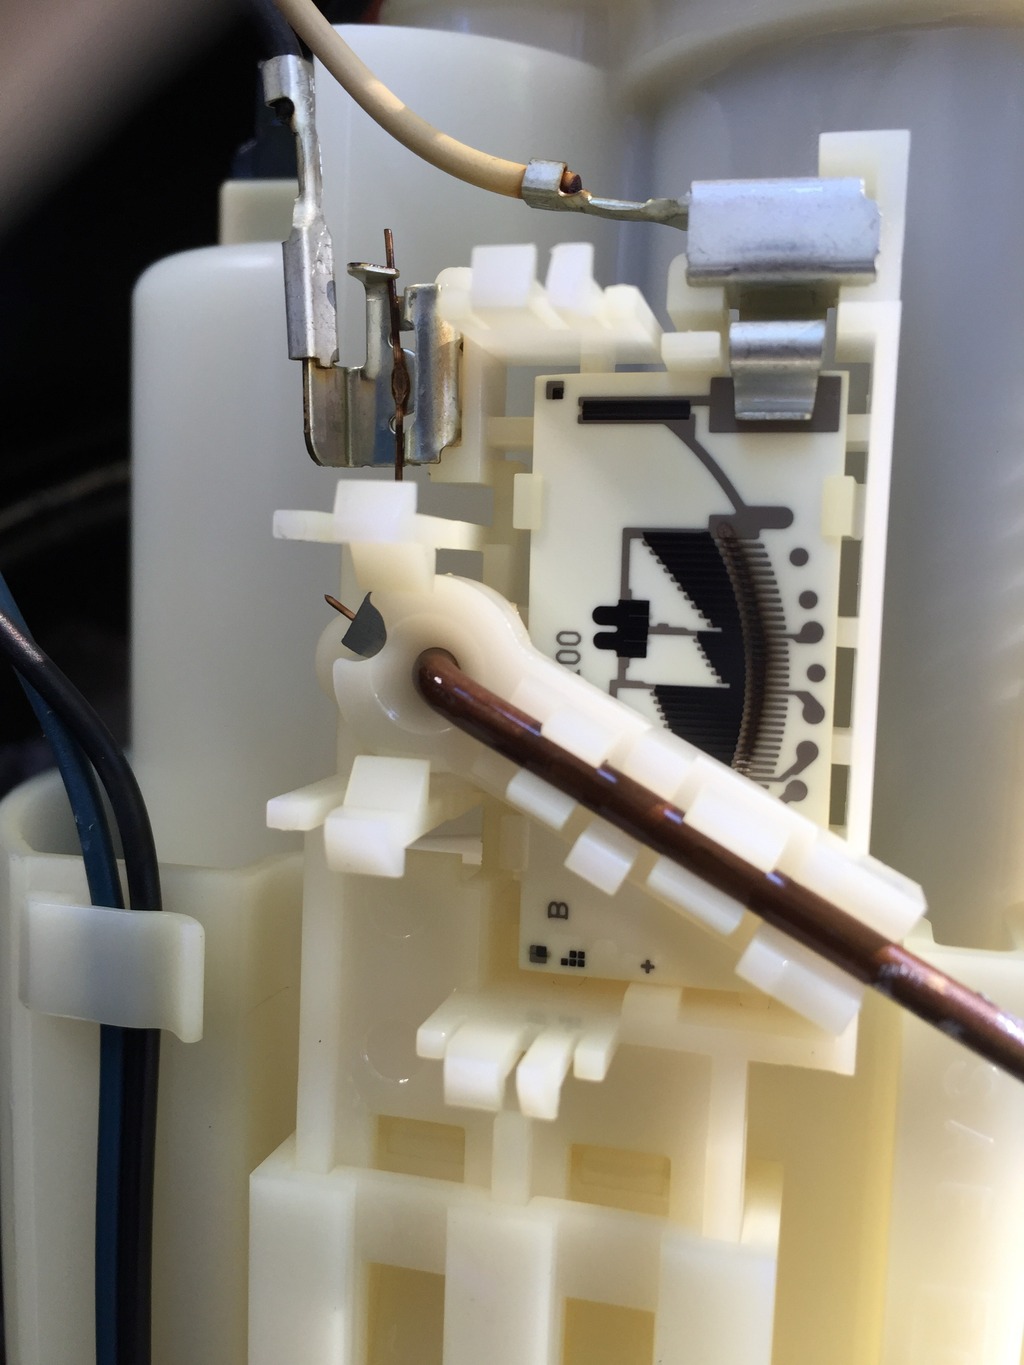
Step 7: Remove the cover to the sending unit on the pump. There are a few plastic tabs to squeeze. Just be gentle with them.
Attachment 182160
You'll see the sending unit contacts. They're probably filthy.
Attachment 182161
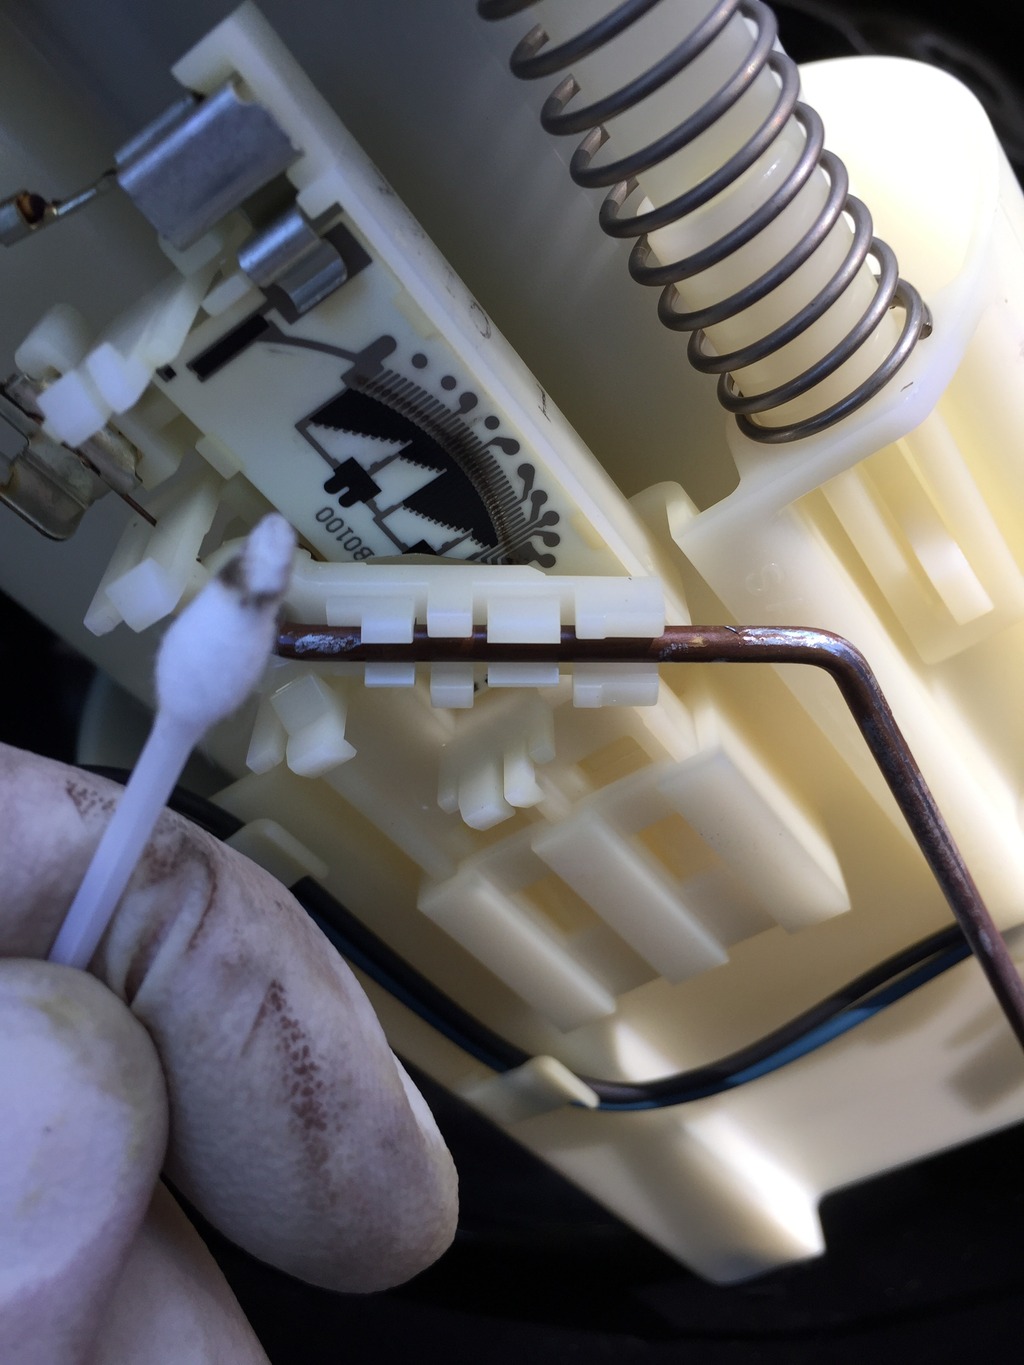
Step 8: Grab a Q-tip and clean those bad boys up.
Attachment 182162
See the difference?
Attachment 182163
Now just replace the sending unit cover (I forgot when I did it ha ha) and reassemble in the reverse order. If you choose to do the driver's side the process is the same, the only difference is there are no gas lines attached to that one. When you restart the car it may take an extra few seconds since all the gas leaked out of the line, this is normal so don't worry.
Enjoy!
- Bob
There are two sending units in the 08 G35. The sending unit/gas pump combo is under the rear passenger seat and the secondary sending unit (no pump, just a float arm) is under the rear driver side seat. Removing the seat is easy, just pull the release in the middle of the passenger and driver side cushion on each side where the cushion meets the car body (there are other posts out there for this). You could pull both, have them cleaned and replaced in about 45 minutes the first time you do it.
You'll need a wrench to disconnect the battery, a long phillips head screwdriver for the screws holding the pump down, a small flathead for removing the gas line and removing the cover from the sending unit and i'd recommend a 8mm socket with a 1/4" drive in case the screws holding the pump down have corrosion and you can't use the screwdriver (I had a few like this). Additionally you'll want some paper towels, a pot or pan that you don't care about getting gasoline in, and something to lay on the carpet in the car since you'll probably spill gas on it.
And as always, I take no responsibility for anything you choose to do to your vehicle. If you don't think you have the abilities to do this task then call a friend or bite the bullet and use a mechanic.
Here we go...
Step 1: Remove rear seat
Step 2: Remove the protective cover under the seat. There are four black little retention clips/tabs which you can turn using a phillips head screwdriver. Take note of the direction arrow on the clip. If you turn it the wrong way you'll ruin it (like I did...womp womp). This picture is of the driver's side but the passenger side looks just the same.
Attachment 182155
Step 2: Remove cover and disconnect electrical harness. It's a standard "squeeze and pull". I've already removed it in the photo. You'll see that there's a lot of dirt. I'd clean it to prevent it from getting into the gas tank.
Attachment 182156
Attachment 182157
Step 3: Unclip the outgoing gas line. You'll probably get a quarter cup of gas leaking out when you do, that's normal. Just bring paper towels. There are two translucent clips in the circle. Just push the connector in, squeeze them and pull the line back.
Attachment 182158
Step 4: Remove the screw-head bolts holding the pump down. If you can't remove them with a screwdriver use an 8mm socket.
Step 5: Pull the pump up. Be gentle because you don't want to bend the float arm for the sending unit. Disconnect the second gas line. You'll have to do this by gently prying the connector off the tabs with a flathead screwdriver. DO NOT break the tabs ha ha. It's not hard to remove but i'd imagine it's easy to ruin.
Attachment 182159
Step 6: Carefully remove the pump. You'll have to maneuver it a little to get the float arm out. Just go slow and watch what you're doing. You're going to drip gas all over. It's inevitable.
Step 7: Remove the cover to the sending unit on the pump. There are a few plastic tabs to squeeze. Just be gentle with them.
Attachment 182160
You'll see the sending unit contacts. They're probably filthy.
Attachment 182161
Step 8: Grab a Q-tip and clean those bad boys up.
Attachment 182162
See the difference?
Attachment 182163
Now just replace the sending unit cover (I forgot when I did it ha ha) and reassemble in the reverse order. If you choose to do the driver's side the process is the same, the only difference is there are no gas lines attached to that one. When you restart the car it may take an extra few seconds since all the gas leaked out of the line, this is normal so don't worry.
Enjoy!
- Bob
#7
08-07-2017, 08:40 PM


Join Date: May 2017
Location: Washington State
Posts: 14,792
Received 2,456 Likes
on
2,150 Posts
Coupe 6MT Premium RAS
Trending Topics
#8
01-18-2018, 09:17 PM

Registered User
The following users liked this post:
Jason Murrish (12-05-2023)
#9
01-19-2018, 10:08 PM
Join Date: May 2017
Location: Washington State
Posts: 14,792
Received 2,456 Likes
on
2,150 Posts
Coupe 6MT Premium RAS
#10
04-23-2018, 09:43 AM

Would the a check engine light be triggered doing this?
I recommend pulling the fuel pump fuse and starting the car BEFORE disconnecting the battery. Let the car run until it quits (empty gas line). That way you won't get a flood of gas when you disconnect the fuel line from the pump only a few drops that a rag will easily handle.
#11
04-23-2018, 11:13 AM
Join Date: May 2017
Location: Washington State
Posts: 14,792
Received 2,456 Likes
on
2,150 Posts
Coupe 6MT Premium RAS
The following users liked this post:
Jason Murrish (12-05-2023)

Thread
Thread Starter
Forum
Replies
Last Post
johnjohn077
Audio/Video/Electronics
4
08-05-2015 03:09 AM