When you click on links to various merchants on this site and make a purchase, this can result in this site earning a commission. Affiliate programs and affiliations include, but are not limited to, the eBay Partner Network.
Hello everyone!!! I just replaced my spark plugs today, I decided to take some pictures during my change so I can make a DIY. Hopefully it helps!
Tools needed:
-Ratchet
-Swivel head driver
-10mm socket
-14mm deep socket
-Long needle nose plier
-socket extensions
-screw drivers
-5mm male hex
-dielectric grease
-anti-seize
-6 sparks plugs (I used OEM Denso part number:22401-EW61C)
If you live in Canada, I suggest you buy the Denso plugs on eBay, I went to the dealership and they are charging 55 CAD for each plug. I got mine on eBay all 6 for 120 CAD :P
Lets begin!!! First remove your engine cover by using the 10mm socket with a ratchet, there's 5 in total on the engine cover. (also disconnect your battery at this time)
Next step is to remove the air boxes. First unplug the MAF sensors (I think that's what they are), no need to remove the sensors from the boxes. Then there's 1 screw holding each air box, remove the screw. Then with your flat head screw driver loosen the clamp attaching the air box to the intake. Push the intakes back until it is clears the box. And now if you pull the box straight up it should come out!
Now we need to remove the intake tubes. There's 1 screw holding a plastic box thingie on the passenger side, remove that. And there's 1 hose that is attached to the intake on the driver side. Use a plier to move down the clamp and you should be able to pull the tube out. Loosen the clamps attaching the intake tubes to the throttle body and pull out. You should have 2 intake tubes with the hose thingie in the middle all in 1 piece.
Now that the intake is removed. Move to the driver side cylinder closest to the car's front. This one is the easiest to remove, try out your tools and practice on this one first! To remove the spark plug, the same steps applies to all 6.
-Unplug the coil pack wire
-Use your 10mm socket to remove the screw holding the coil pack to the engine
-Pull the coil pack straight out
-Lower in your 14mm Deep socket with the extension until you feel it hooking up to the plug.
-Use either your ratchet or swivel head driver to unscrew the plug (Depends on space, use swivel for the inner 4 cylinders as room is tight)
-After completely unscrewed, fish out the plug with your long needle nose plier.
Some learnings I had after removing the first plug: If you have a 14mm deep socket that does not have a 1/2" drive, it is most likely not deep enough. This might seem obvious but when you do your test fit of the 14mm socket on your new spark plug, make sure the top of the plug doesn't go into the driver hole. I made a dumb mistake where it did and I didn't realize it, and when I tried to take out the one in my car because the driver was in, it wouldn't go deep enough to lock onto the plug. My 15mm deep socket was longer so it did partially lock, I thought maybe the originals might be 15mm instead and once I took it out my old plug was stuck in my 15mm socket. This was the dumb mistake I made, do not make it yourself. The plug for sure is a 14mm, if it doesn't fit it might be either your socket is too fat to fit into the well, or that your socket isn't deep enough.
Now to install your new plug, first use some anti-seize on the thread of the plug so it is easy to remove next time.
Now it is time to install it. DO NOT DROP IN YOUR NEW PLUG, THIS MIGHT CHANGE THE GAP ON THE SPARK PLUG. USE THE LONG NEEDLE NOSE PLIER TO CAREFULLY LOWER IN THE PLUG. There's no need to try to ling up your plug thread with the needle nose, once it is settled at the bottom, carefully lower the 14mm deep socket with the extension bar in and feel it lock onto the plug. Use your hands to start tightening the plug. I find that once you get the socket to lock onto the plug it lines up perfectly with the hole. Hand tighten until you can't anymore. Now depending on space use either the swivel head driver or ratchet to tighten another 1/2 turn. (This is what it says on my spark plug box, and my spark plug haven't been shot out of my engine yet... so I say it is enough torque :P). Apply some dielectric grease in the rubber hole of the coil pack with a Q-tip. And plug it back into the spark plug, plug the wire back into the coil pack and tighten the 10mm screw.
Now that you have finished this plug, move on to the passenger side cylinder closest to the front. This one required me to remove the fuel line as it was preventing me from getting my 14mm socket in. It's the silver thing with 2 red looking screws (idk what the thing is called). Remove them and pull the silver thing up. Once you remove the 2 red screws have someone holding up the fuel line so that not too much fuel comes out. Now repeat what you did for the first plug and then put back the fuel line. (I found it hard to press the silver thing back in so I just used the screw to press it back in).
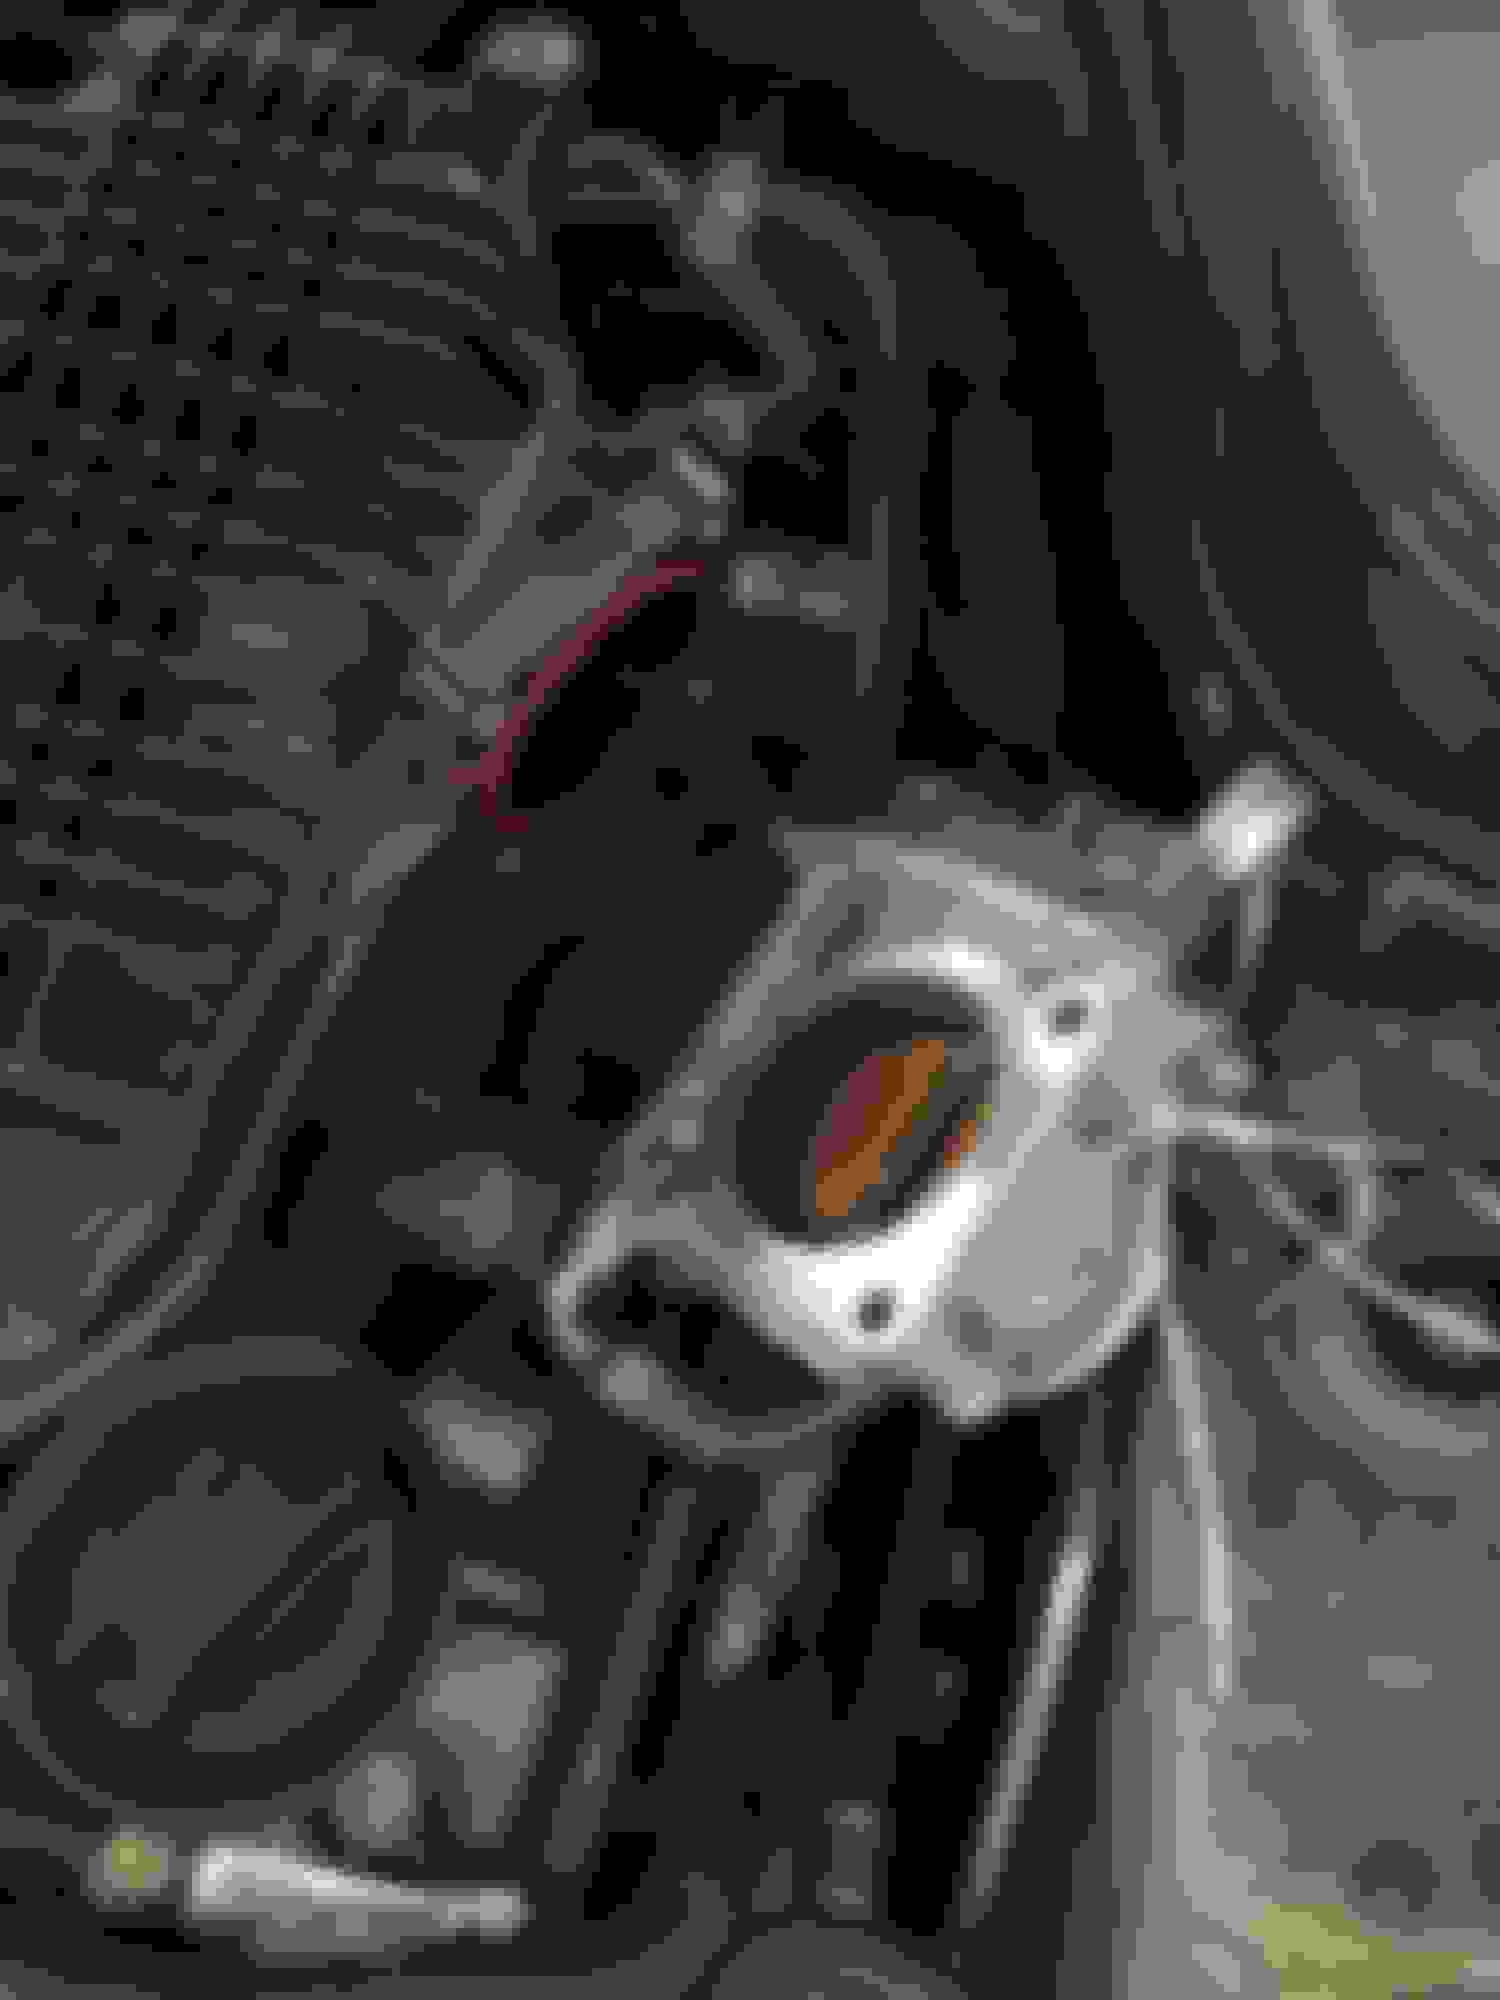
The inner 4 cylinders requires you to PARTIALLY remove the throttle bodies (TB). Use the 5mm male hex to remove the 4 bolts holding the throttle body to the plenum. After the 4 bolts is remove the TB you'll be able to move. STOP HERE, DO NOT REMOVE ANY OF THE HOSES ON THE TB, BAD THINGS WILL HAPPEN (REFER TO DIY TB CLEANING). And you shouldn't remove it fully anyways, this will give you plenty of room to change out the inner plugs. Tie it off to the side like I have.
Now remove the 2 inner spark plugs following the same steps and reinstall the TBs. This is a good time to clean your TBs if you want, again refer to DIY TB cleaning.
The other side is the same, remove the TB, tie it off, do your thing and put back the TB.
After all 6 plugs is replaced. Reverse your steps and reinstall your intakes and now congraz!!! you have replaced your plugs.
As for difficulty, this wasn't very hard, if you never worked on your car, I suggest you do not start with this. If you do your own fluid changes and etc, this is a straight forward 1 day project. It took me 6 hours only because I had to pick up a deeper 14mm socket. My inner 4 plugs took an hour to do.
If you have any questions, just ask! This is my first DIY post, I probably missed some details. Anyways, hope this helps!
Last edited by SofaKingAzn; 04-17-2016 at 12:56 PM.
1) The use of anti-seize compound is unnecessary and can actually lead to problems.
-- First off, it will alter your torque values on the plugs due to its lubrication factor, so your plugs will nearly always be over tightened when it is used, even if you use the rotation angle instead of torque wrench.
-- Virtually all major plug manufacturers specifically recommend against it (including Denso: http://www.globaldenso.com/en/produc...ion/index.html).
-- If you still choose to be pig-headed and decided to use it regardless, you definitely do not want to use a graphite-based compound like the one shown (it should be strictly zinc based, like this:
), nor do you want to use it in an amount anywhere approaching what you've shown on that plug (like maybe 5% of what's on that plug). Graphite is carbon, and carbon does very bad things inside a combustion chamber.
2) The major issue to watch out for with the throttle body isn't with the coolant hoses, it is from unplugging the electrical connection. The idle relearn failure syndrome is highly variable as to which cars experience it, but for those that do, it can be a nightmare, so it's definitely not worth the risk. Opening the coolant lines is no biggie, it would just require re-bleeding the cooling system (and make a mess).
3) The plug spec you gave is for the Nissan part, rather than the actual plug manufacturer's part number. The exact plug is available for much less (-50%) if you search for Denso part # 3442 , or FXE22HR-11 (
4) You really should not have to remove the fuel feed hose/damper to access the (cyl #1) plug, but if you do choose to open the fuel system there, be sure and change the O-ring, as they should never be reused. (see relevant thread: https://g35driver.com/forums/g35-sed...e-problem.html)
Haha fair enough,I had no idea I wasn't suppose to use anti-seize, couldn't find any DIY and information like that. That being said it was recommended to me, and it does say it is used for spark plug threads (and protects to 860 degrees C). Nevertheless I get what you are saying. Also the picture was before I wiped it down haha.
As for the fuel line, it is necessary to remove it, I personally did not replace the O-ring and I drove my car hard for about 300 km today and no problems :P I guess it's do it at your own risk like any other DIY out there.
Thanks for the clarification though. This will definitely help peeps when they do their own changes.
Thanks for posting this. I have used so many DIYs on this and other forums they are always appreciated. I have done this a few times and always review DIY's before I do anything like this if it s been a while and came across this.
Just a couple of things to add to this in addition to what VQsmile has mentioned in case anyone comes across this DIY.
1) As VQsmile mentioned you don't want to disconnect the wiring harness from the throttle body. AND you also don't want to move the butterfly valve if you have disconnected the battery (as you would have done before starting this DIY). You should finish with the plug change then reconnect the battery (maybe even reassemble everything except the engine cover without fully torquing it to spec and fire the car up for a minute or two to be safe then disassemble again without disconnecting the battery)
2) Instead of using needle nose pliers to lift the pugs out use a long reach magnet.
3) Instead of using pliers to put the plugs in use a length of tubing (About a foot with an inner diameter of 3/8 inches [same size used to bleed the brakes on this car]) and put it on the end of the spark plug and lower the plug down. Then twist the tube gently to get the plug onto the threads. IMO this is a much safer way to thread the plug as it gives you much more precision and "feel". The last thing you want is to cross thread the head by jamming pliers in there.
4) You shouldn't have to remove any fuel or coolant lines on a 07-08 g35HR to change the spark plugs. I never have.
5) there another DIY on this here: http://forums.nicoclub.com/how-to-ch...7-t466365.html I would refer to it along with this DIY (Sofaking's is better but it doesn't hurt to have a second perspective if something isn't clear to someone.)
6) For Canadians: NGK Laser Iridium plugs set of 6 shipped to your door in Canada including guaranteed prepaid duty/tax/customs/brokerage is $127.11 CAD (using 5% off coupon) [these are the ones I use and have been fantastic for over 100k]; OEM Denso's are $81.62 CAD for the same[ i.e. set of six shipped to your door in Canada]. I'm in the GTA and I think I got mine within 3 days (Regular shipping speed)
7) I don't remember the torque specs but maybe someone can add it to this thread so everything in one spot.
As for the torque specs on the spark plugs, it is NOT 19.6 foot-pounds. It is 19.6 newton-meters. This is equal to 14.46 foot-pounds (manual says 14 foot-pounds for convenience)
I thought the VQ35HR spark plugs switched over to the crush washer style and no longer used a measurable torque, thus why the torque values were not listed in the FSM. Snug plus 1/4 turn on a new crush washer.
I thought the VQ35HR spark plugs switched over to the crush washer style and no longer used a measurable torque, thus why the torque values were not listed in the FSM. Snug plus 1/4 turn on a new crush washer.
So you�re right that they have a crush washer and I�m not sure if they didn�t have washers back in 2007. However, there is a torque spec listed in the FSM for the 2007 Sedan using the OEM Denso plug (FXE22HR11)
Wierd? Those are definitely the HR plugs, what section and page number are you finding torque specs for it? I wonder if there was some kind of overlap since the '07 6MT coupe used the rev-up motor which would have printed torque specs but when they were writing the sedan FSM something got a little mixed up?
Wierd? Those are definitely the HR plugs, what section and page number are you finding torque specs for it? I wonder if there was some kind of overlap since the '07 6MT coupe used the rev-up motor which would have printed torque specs but when they were writing the sedan FSM something got a little mixed up?
Yea, that�s weird. So for the 2007 Sedan FSM you can find the torque specs in the �Engine Mechanical� section (abbreviated EM in the manual). It is specifically on page �EM-15�
That page has a schematic and shows the torque specs of the spark plugs on it. Hope this helps!
 04-16-2016, 10:27 PM