
Building Fiberglass Subwoofer box - A beginners DIY


Joined: Apr 2011
Posts: 482
Likes: 20
From: Allentown, Pa
Building Fiberglass Subwoofer box - A beginners DIY
I would like to preface this with PLEASE DONT FLAME. This is my first DIY project and i know its not amazing. but it is a DIY guide from a beginner that i feel would help some people. Also, any CONSTRUCTIVE criticism would be greatly appreciated. Thank you !
So i am playing around with my 2004 coupe's sound system. Bose Blose.
Il spare everyone the details of the system because all that matters for this thread is the fact that the subs are 10" and i am putting one on each side of the trunk.
Now i want to start with a misconception i had going in.
--- it doesnt seem that hard, there are plenty of DIY guides, and its just simple paper macheting with fiberglass.
WRONG- if you remember when you were a kid, yes paper macheting is very easy. BUT if you remember what it looked like when you were done? most likely ****. The actual process is easy to do, but its hard to make look nice.
Materials:
-Gallon of fiberglass resin (each) ( i used 3M brand which came with the hardener in the cap)
-Fiberglass mat
-Hardener ( i didnt realize it was hidden in the cap)
-bunch of brushes
-paint mask ( for the nasty smell)
-tin foil
-lots of scotch tape
-plastic cups
-chop sticks (stir the hardener and resin)
to this point, thats all i bought.
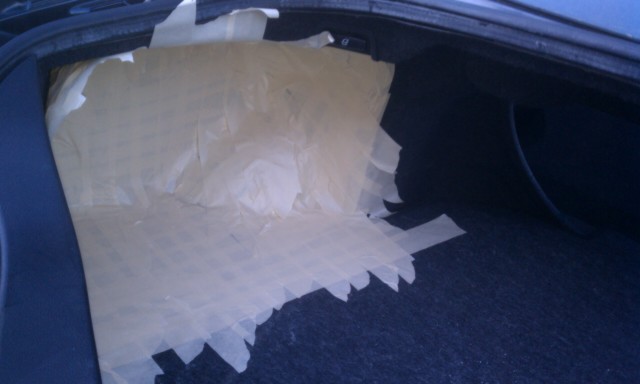
to start, i taped the corner of the trunk from top to bottom .
DO NOT DO THIS - First lay down a huge seat of plastic. the put down the aluminum and/or tape. This will allow you to simply pull out the box at the end - see farther down
I went vertical one way, then horizontal the next
Then i taped sections of aluminum foil down
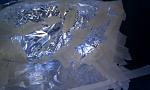
Not the prettiest, I know. But for this part i went with functionality over prettyness
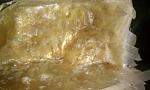
Next i started painting. Mix half a cup of resin with about 25 drops of hardener. 10 drops to an oz.
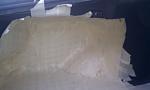
This is what it looked like after 1 layer. I will be going back and sanding out ugly section and air holes. but i wanted to wait till i pulled it out of the car and could get around all the corners easily.

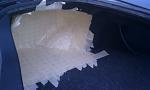
After about 3 layers i pulled it out of the car. This was not easy because the tape was sticking to the carpet...
So thats where i am now. Tomorrow after work, i am going to sand it down, and fix the inside to make it cleaner , add 3 more layers. while that is drying i will be working on the second sub box as well as installing the speakers (kappa components ) in the front of the car and wiring the amp.
Then il continue with the boxes with the rings and finishing them! Pictures to come.
Please remember, constructive criticism only, its only my first one !
So i am playing around with my 2004 coupe's sound system. Bose Blose.
Il spare everyone the details of the system because all that matters for this thread is the fact that the subs are 10" and i am putting one on each side of the trunk.
Now i want to start with a misconception i had going in.
--- it doesnt seem that hard, there are plenty of DIY guides, and its just simple paper macheting with fiberglass.
WRONG- if you remember when you were a kid, yes paper macheting is very easy. BUT if you remember what it looked like when you were done? most likely ****. The actual process is easy to do, but its hard to make look nice.
Materials:
-Gallon of fiberglass resin (each) ( i used 3M brand which came with the hardener in the cap)
-Fiberglass mat
-Hardener ( i didnt realize it was hidden in the cap)
-bunch of brushes
-paint mask ( for the nasty smell)
-tin foil
-lots of scotch tape
-plastic cups
-chop sticks (stir the hardener and resin)
to this point, thats all i bought.
to start, i taped the corner of the trunk from top to bottom .
DO NOT DO THIS - First lay down a huge seat of plastic. the put down the aluminum and/or tape. This will allow you to simply pull out the box at the end - see farther down

I went vertical one way, then horizontal the next
Then i taped sections of aluminum foil down

Not the prettiest, I know. But for this part i went with functionality over prettyness
Next i started painting. Mix half a cup of resin with about 25 drops of hardener. 10 drops to an oz.
This is what it looked like after 1 layer. I will be going back and sanding out ugly section and air holes. but i wanted to wait till i pulled it out of the car and could get around all the corners easily.


After about 3 layers i pulled it out of the car. This was not easy because the tape was sticking to the carpet...
So thats where i am now. Tomorrow after work, i am going to sand it down, and fix the inside to make it cleaner , add 3 more layers. while that is drying i will be working on the second sub box as well as installing the speakers (kappa components ) in the front of the car and wiring the amp.
Then il continue with the boxes with the rings and finishing them! Pictures to come.
Please remember, constructive criticism only, its only my first one !

Registered User
Joined: Jun 2009
Posts: 40
Likes: 0
From: St Louis area
FYI - It looks like you used the fibreglass that is woven in all different directions. If you were to use the fiberglass cloth that is woven like a checker board (3M Fiberglass Cloth, 05838) it will look much better when finished and is much easier to work with. Hope this makes sense.
Also, make sure you are building the boxes the correct size for the subs that you are using. It's much easier to build a box for a non-ported sub, that way you don't have to tune the port.
Good luck.
Also, make sure you are building the boxes the correct size for the subs that you are using. It's much easier to build a box for a non-ported sub, that way you don't have to tune the port.
Good luck.
Registered User
Joined: Jun 2009
Posts: 40
Likes: 0
From: St Louis area
Another tip, if you're interested. If you use a disposable container like "Gladware", once you are done with a coat....
leave the brush in the resin mixture and let it harden for about an hour or so (until the heat from the chemical reaction has cooled), you can squeeze the container to release the resin from the container and pop the resin out like a resin lollipop and you can reuse your container over and over. I rotate between two containers. You can even use old butter dishes or cool whip containers.
leave the brush in the resin mixture and let it harden for about an hour or so (until the heat from the chemical reaction has cooled), you can squeeze the container to release the resin from the container and pop the resin out like a resin lollipop and you can reuse your container over and over. I rotate between two containers. You can even use old butter dishes or cool whip containers.

Registered User
Joined: Oct 2010
Posts: 23
Likes: 0
From: Stagecoach, Texas
If you are adding more layers then do a wipe of your shells (inside) with acetone (wear your mask!). Let them sit for evaporation for 1 hour (good weather conditions) and then you are ready to go for your next layers without having to sand them for prep. This is only as an assumption of MOST general poly resins that are over the shelf as a few specialty resins do not have the film to contend with.
The other thing to take into consideration is that if you are doing fiberglass in multiple steps like this, each successive application to cure will cause additional warpage. In a part like the one you are doing it will cause the shell to cup... or in other words, resin shrinks when it cures and therefore pulls itself so you have to put some temporary braces in for one-offs to avoid excessive warpage. In production with the proper mold design and gelcoat this is not an issue, but as a one-off part done in multiple stages it is a serious issue to head off at the pass or you will be slinging mud to fill voids for fitment in the end.
It is great to see someone who has done a little research and taking a stab at it. Wear your mask, use gloves, and definitely use safety glasses as MEKP and acetone are horrible chemicals to work with. ALWAYS know where your emergency eye wash is, the small ones work ok for hobby use and they are only a few bucks at a pharmacy. They are a must have.
GL
Pics. of the driver's side first must mean you are right handled
Joined: Apr 2011
Posts: 482
Likes: 20
From: Allentown, Pa
Thanks everyone !
I am using the cross stitch, but it is hard to work with and has been falling apart. Now that it is out of the car it will be easier to keep tighter and nicer.
Lol ya I am right handed. Good call !
I am going to go back and probably use that acetone trick to smooth it . And sand it for good measure .
And I have been usong plastic cups with just a small amount. Usually enough for like 5 small squares. This keeps iy from drying at all in the cup !
More pics tonight !
Joined: Apr 2011
Posts: 482
Likes: 20
From: Allentown, Pa
Small update
I am working on installing components in the front. The kappa tweeters don't fit ... so i am going to custom mount them Monday after work. After they are done i will continue working on the sub enclosures !
I am working on installing components in the front. The kappa tweeters don't fit ... so i am going to custom mount them Monday after work. After they are done i will continue working on the sub enclosures !

I'm in the process of making my custom box as well I have 3 layers so far. There is bumps and war page everywhere how do I fix this also what grit sand paper do I use to sand for next layer. I will post pics of process later.
Trending Topics

Registered User
Joined: May 2012
Posts: 18
Likes: 1
now being made for the 03-06 sedans is both sides fiberglass boxes,
https://g35driver.com/forums/media-s...ml#post6459393
https://g35driver.com/forums/media-s...ml#post6459393
Joined: Apr 2011
Posts: 482
Likes: 20
From: Allentown, Pa
I never found a way to fully smooth it :/ also, I never sounded between layers. Still sounds good though! Not the cleanest subs and I know if they were made better I would get a cleaner sound, but they a year later they still hit hard and sound nice

Registered User
Joined: Sep 2008
Posts: 379
Likes: 21
From: Planet Earth
Nice job sharing your d.i.y.

 So true!
Joined: Apr 2011
Posts: 482
Likes: 20
From: Allentown, Pa
ya ima have to find all of the other pictures tho. probably on my old laptop.
i just ended up wrapping it in cloth to finish it. i mean tto bondo/paint them but never got around to it.
i just ended up wrapping it in cloth to finish it. i mean tto bondo/paint them but never got around to it.
If anyone is interest to see how my custom corner sub woofer box came out please just out 1st page of my progression thread. I have posted my steps there. Thanks.
https://g35driver.com/forums/media-s...on-thread.html
https://g35driver.com/forums/media-s...on-thread.html

Thread
Thread Starter
Forum
Replies
Last Post
ZoominG35
Audio/Video/Electronics
2
Oct 12, 2015 04:53 PM
AuAltima3.5
Audio/Video/Electronics
4
Sep 13, 2015 11:48 AM