DIY: Fahrenheit to Celsius Conversion
#1
 05-26-2007, 07:09 PM


DIY: Fahrenheit to Celsius Conversion
Hello Folks
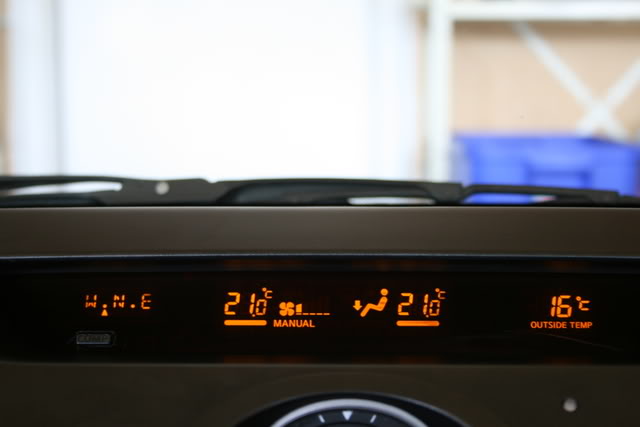
I have created a DIY to alter the information panel to display either Fahrenheit or Celsius. I have a 2003 G35 Coupe that was imported from the states thus the read out was in Fahrenheit and of course we use the metric Celsius read out in Canada.
This modification can take anywhere between 20 to 30 minutes. The modification requires running a wire between both harnesses connecting to the panel.
Credit for this DIY goes out to superduperjeff from g35frenzy.com for providing the steps to perform this modification.
Perform this modification at your own risk, neither me nor the aforementioned member are responsible for any negative outcome performing this modification.
Note this was performed on a 2003 Coupe, harnesses may differ in other years/models.
Materials:
Soldering Iron w/ Solder
Screw Driver w/ Cloth
Electrical Tape
Wire Stripper
1) Remove the bezel around the clock and information display. There are 4 clips retaining the bezel on the dash (1 at each corner). See pic.
To remove the bezel you'll want to remove the top 2 first and the bottom ones will easily unsnap. To do this you'll want to take a screw driver and wrap it in something so not to scratch your interior. I used a chisel wrapped in a micro fiber cloth.

Insert the chisel in one of the top corners, pulling back the bezel enough to temporarily put a piece of cardboard in.

Then do use the screwdriver on the other side pull enough so you can grasp the top end. With both hands on each side pull forward to un clip the bezel. The cardboard should have given you enough room on the other side to slide in.
2) Disconnect the harness running to the security blinker light

3) With the bezel out of the way you'll now find two philip head screws at either side of the information display. Remove these two. Pull the display up and towards yourself.

4) Remove both harnesses connected to the display.

5) You will find 1 black wire per harness. Separate these two, these are the two wires you will connect together with another wire.

6) Using a wire striper remove a bit of insulation on both. With the insulation removed, use your spare wire, connect the two black wires together. Solder your connections to ensure proper connection and wrap with electrical tape.

NOTE: If you'd like to switch between Fahrenheit and Celsius you can use a switch instead and switch back and forth at your desire.
7) Put everything back together, following the steps in reverse.
VOILA, your done, enjoy your new temperature read out.
I have created a DIY to alter the information panel to display either Fahrenheit or Celsius. I have a 2003 G35 Coupe that was imported from the states thus the read out was in Fahrenheit and of course we use the metric Celsius read out in Canada.
This modification can take anywhere between 20 to 30 minutes. The modification requires running a wire between both harnesses connecting to the panel.
Credit for this DIY goes out to superduperjeff from g35frenzy.com for providing the steps to perform this modification.
Perform this modification at your own risk, neither me nor the aforementioned member are responsible for any negative outcome performing this modification.
Note this was performed on a 2003 Coupe, harnesses may differ in other years/models.
Materials:
Soldering Iron w/ Solder
Screw Driver w/ Cloth
Electrical Tape
Wire Stripper
1) Remove the bezel around the clock and information display. There are 4 clips retaining the bezel on the dash (1 at each corner). See pic.
To remove the bezel you'll want to remove the top 2 first and the bottom ones will easily unsnap. To do this you'll want to take a screw driver and wrap it in something so not to scratch your interior. I used a chisel wrapped in a micro fiber cloth.
Insert the chisel in one of the top corners, pulling back the bezel enough to temporarily put a piece of cardboard in.
Then do use the screwdriver on the other side pull enough so you can grasp the top end. With both hands on each side pull forward to un clip the bezel. The cardboard should have given you enough room on the other side to slide in.
2) Disconnect the harness running to the security blinker light
3) With the bezel out of the way you'll now find two philip head screws at either side of the information display. Remove these two. Pull the display up and towards yourself.
4) Remove both harnesses connected to the display.
5) You will find 1 black wire per harness. Separate these two, these are the two wires you will connect together with another wire.
6) Using a wire striper remove a bit of insulation on both. With the insulation removed, use your spare wire, connect the two black wires together. Solder your connections to ensure proper connection and wrap with electrical tape.
NOTE: If you'd like to switch between Fahrenheit and Celsius you can use a switch instead and switch back and forth at your desire.
7) Put everything back together, following the steps in reverse.
VOILA, your done, enjoy your new temperature read out.
Last edited by RiCeBrNr; 05-26-2007 at 07:13 PM.
The following users liked this post:
TheIronYuppy (01-16-2013)


#5
10-16-2007, 04:05 PM

Registered User
Join Date: Jul 2007
Location: Brampton
Posts: 104
Likes: 0
Received 0 Likes
on
0 Posts


#7
01-02-2008, 05:36 PM

Originally Posted by Jeeves
gosh that looks complicated and something i can easily screw up...anyone try it on a 03? :S
Originally Posted by RiCeBrNr
I have created a DIY to alter the information panel to display either Fahrenheit or Celsius. I have a 2003 G35 Coupe that was imported from the states thus the read out was in Fahrenheit and of course we use the metric Celsius read out in Canada.
...
Note this was performed on a 2003 Coupe, harnesses may differ in other years/models.

Last edited by delaseouL; 01-02-2008 at 05:38 PM.
Trending Topics

#9
03-17-2008, 07:47 AM

Join Date: Mar 2008
Posts: 95
Likes: 0
Received 0 Likes
on
0 Posts
#10
04-29-2008, 04:05 PM


#13
05-04-2008, 04:26 PM


#14
05-29-2008, 06:30 PM

Seeing as how Nin didn't respond back, I took it opon myself to mod my 06 coupe with this DIY.
1. Take off the two dash panels that hold the climate control in place. The top panel needs to be lifted slightly from the front. You will notice that the bottom panel meets with the top panel on both sides.
As you lift the top panel, push the left side of the bottom panel outwards (toward the driver door). Do the same for the right side and you'll now notice that the bottom panel and top panel are now separated.
The top panel comes out by pulling it towards the seats.(There are two main clips holding it in place) The bottom panel comes out by pulling upwards towards the windshield. (There are 4-5 small clips holding it in place) The clips are white and sometimes they might come off the panel and stay in the dash. Just pull them back out and put them onto the lower panel again before reinstalling it.
Just wanted to let everyone know exactly how its done so that you don't pull the panels out the wrong way and break them.
2. Remove the two large star/phillips screws holding the climate control to the dash. They are located in the middle under the clock. Now pull out the climate control (it may be kind of hard at first but pulling the top part towards you will pop it out. Unplug the connector.
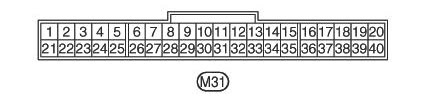
3. Connect the two black wires at locations #5 and #36 together:
Reconnect the connector and start the car to test it. If everything is fine then reinstall everything.
When I tried to put the bottom panel and top panel back in separately, it wouldn't sit flush with the dash properly. So I had to connect the two panels together and install them together. Try to get the top panel half way in and then slide the bottom panel into place. That's it, your done.
It seems complicated after writing it all out like this but I just did the whole thing in 20mins without even knowing which way to pull the panels or anything. Hope this helps the fellow imported G35's into Canada.
1. Take off the two dash panels that hold the climate control in place. The top panel needs to be lifted slightly from the front. You will notice that the bottom panel meets with the top panel on both sides.
As you lift the top panel, push the left side of the bottom panel outwards (toward the driver door). Do the same for the right side and you'll now notice that the bottom panel and top panel are now separated.
The top panel comes out by pulling it towards the seats.(There are two main clips holding it in place) The bottom panel comes out by pulling upwards towards the windshield. (There are 4-5 small clips holding it in place) The clips are white and sometimes they might come off the panel and stay in the dash. Just pull them back out and put them onto the lower panel again before reinstalling it.
Just wanted to let everyone know exactly how its done so that you don't pull the panels out the wrong way and break them.
2. Remove the two large star/phillips screws holding the climate control to the dash. They are located in the middle under the clock. Now pull out the climate control (it may be kind of hard at first but pulling the top part towards you will pop it out. Unplug the connector.
3. Connect the two black wires at locations #5 and #36 together:
Reconnect the connector and start the car to test it. If everything is fine then reinstall everything.
When I tried to put the bottom panel and top panel back in separately, it wouldn't sit flush with the dash properly. So I had to connect the two panels together and install them together. Try to get the top panel half way in and then slide the bottom panel into place. That's it, your done.
It seems complicated after writing it all out like this but I just did the whole thing in 20mins without even knowing which way to pull the panels or anything. Hope this helps the fellow imported G35's into Canada.
The following users liked this post:
TheIronYuppy (01-16-2013)