DIY Drive Belt Replacement (Serpentine Belts)

#16
 08-20-2014, 10:17 PM

#17
06-15-2015, 05:25 PM

Possible? I guess anything is possible, but I don't see a real way to get to the tensioners from the top. If you had tiny hands/arms, it might be feasible. Even if you could get it from the top, it'd be a huge *** pain. You really need to remove the undershroud, and jacking the car up is the only real way to do that. You would be fine lifting only one side with the factory jack though, so maybe that would be an option for you.
Yes, it is most likely you didn't tighten your belts enough. If there's nothing leaking on the belts themselves, then they are squeeking because they are too loose.
You need to figure out which belt is squeaking. Try this:
At a stop while the car is idling, turn on A/C. Belt squeeks, probably A/C belt.
At a stop while the car is idling, turn on headlights, heat, and as many electrical accessories possible while turning the steering wheel back and forth (DON'T TURN ON THE A/C). Belt squeeks, probably the drive belt.
Question- I replaced both drive and ac belts everything went good no squicks or whines but my ac dosnt blow cold air no more just hot? What did I do wrong? Thanks in advanced

#19
06-02-2016, 09:19 AM

On the Armada, it only has one large belt and that was fairly simple to get around the fan.
#20
11-24-2017, 06:51 PM

#21
11-24-2017, 08:15 PM

Join Date: May 2017
Location: Washington State
Posts: 14,790
Received 2,456 Likes
on
2,150 Posts
Coupe 6MT Premium RAS
I recommend keeping the old belts and a couple tools (14/12/10mm sockets, extension, ratchet) in your trunk somewhere in case you do ever blow a belt on the highway so you can just replace it on the spot and not need to call a tow truck. Those items in a ziplock baggie in the spare tire well can be a real life saver.
#22
11-24-2017, 08:46 PM
Well I already threw it in the dumpster :/ I didn’t think about that. I only changed the a/c belt because it was cracked, but the main reason why I changed it was because I had a slight whistle/squeak. I turned the main drive tensioner 1/4 turn loose and it was then finger loose. Lol. Okay? So that’s probably why it was squeaking, but could have been the a/c belt. My tools are snap-on so idk if I really want to leave them in the car. Since I don’t have a garage and have to park outside. Plus I like to keep all my sockets in there holder. Good idea though. I don’t get on the highway much. Maybe I should grab a rail of Craftsman sockets and a ratchet. Used to be $10 for a rail of short sockets. I was really surprised how easy it was with a 1/4” set.
#23
11-24-2017, 09:04 PM
Join Date: May 2017
Location: Washington State
Posts: 14,790
Received 2,456 Likes
on
2,150 Posts
Coupe 6MT Premium RAS

#25
01-20-2019, 11:34 AM

++Electrical load=Squealing?
DIY Drive Belt Replacement (Serpentine Belts)
Intro:
Here's the complete guide to removing/replacing 03-05 G35 Coupe drive belts. Other years may be similar. During this tutorial, you will be shown how to replace both drive belts. The larger (wider) drive belt powers the alternator and power steering pump. The smaller (thinner) belt powers your air conditioner compressor. Inspect belts for cracks, fraying, wear and oil. If necessary, replace.
Tool List:
3/8" drive ratchet
3/8" drive 6" extension
14mm socket (shallow and deep)
12mm socket
10mm socket
Electric Impact Driver (not required, but makes things go much faster. Use 1/4" ratchet as a substitute)

Parts:
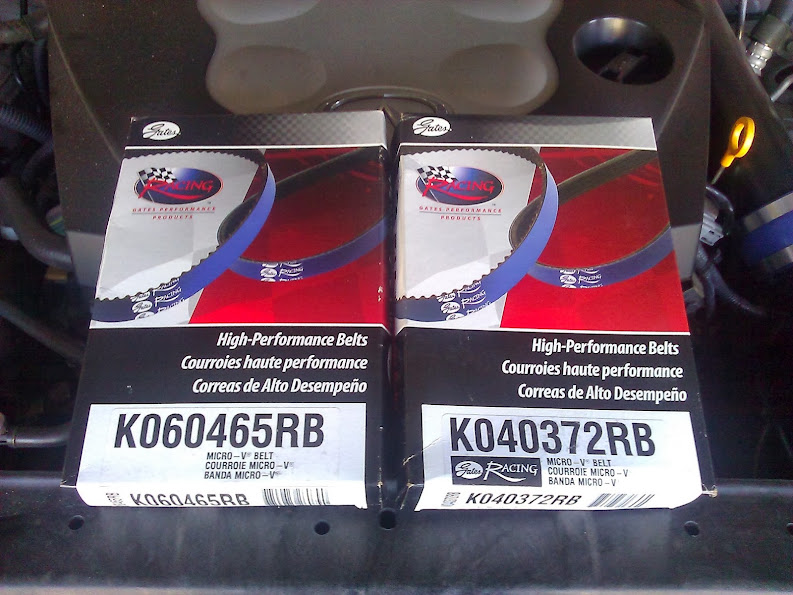
Make sure you get the right belts. Depending on the year of your car, the larger (wider) drive belt that powers the alternator and power steering pump comes in different lengths. From what I've read, some of the earlier G models actually had a mechanical fan, which requires a slightly different length belt. If you have any question about what belt to buy, contact your local dealer and they should be able to confirm the length of the belt for your car's year and model. With that information, you will be able to purchase the correct belt. I ordered a set of pretty blue Gates belts for my 03' Coupe. Why blue Gates High-Performance Belts? Because race car. The Gates part numbers are:
PS/Alternator belt- K060465RB
AC Belt- K040372RB
1.) Remove the lower plastic undershroud. There are a **** ton of 10mm bolts. Use the impact driver to zip them all out until the undershroud is loose. Now would be a good time to scrub it clean before you reinstall it later. Now you should have a clear view of the underside of the engine.

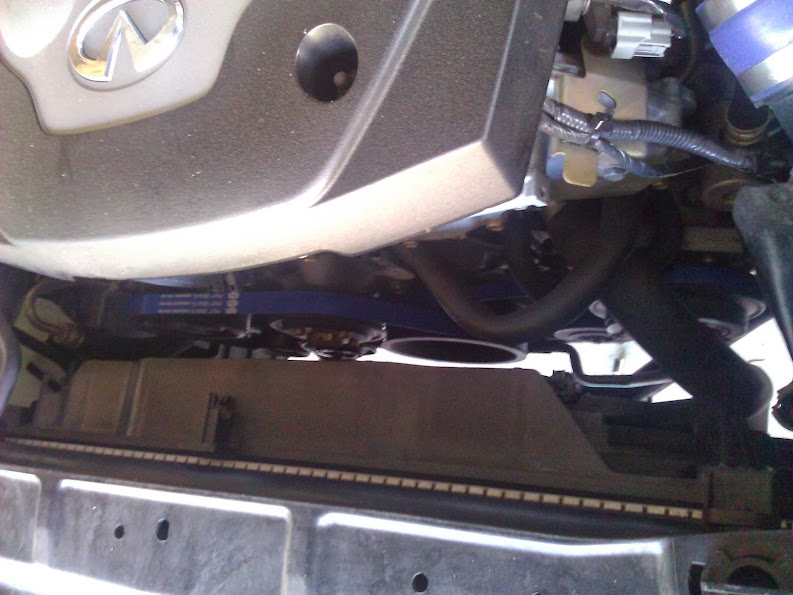
2.) Before taking the old belts loose, go up top and tug on both belts. Get a feel for the tension, so that when you install the new belts, you have an idea how the new belts should feel when installed.
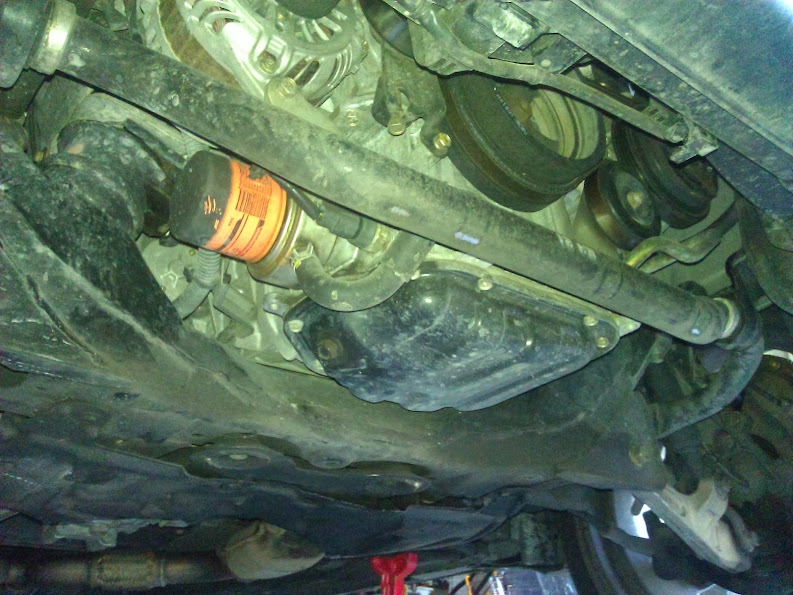
3.) When looking under the car, you can see each of tensioner/idler pullies. The tensioner on the left side of the picture (the 2 red circles) is for the larger drive belt that powers the alternator and power steering pump. The upper bolt (upper red circle) must be loosened first to release the pulley, and then the tension bolt (lower red circle) bolt can then be loosened to release the tension on the belt.
The same applies for the smaller (thinner) belt that powers your air conditioner compressor. The tensioner is located on the right side of the picture (the 2 blue circles). The upper bolt (upper blue circle) must be loosened first to release the pulley, and then the tension bolt (lower blue circle) bolt can then be loosened to release the tension on the belt. These steps are done in reverse order when putting on the new belts.

4.) Use a short 14mm socket to loosen the larger PS/ALT belt's idler pulley.

Then loosen the tensioner bolt using the 12mm socket with extension. Now remove the belt. One way to try and get the belt tension close on the new belt, is to count the number of full turns that you loosen the tensioner bolt when you take the old belt off. When you put the new belt on, tighten it the same number of turns it took you to remove the old belt. That should at least get you close to the proper belt tension.

4.) Use a deep 14mm socket to loosen the smaller A/C belt's idler pulley.

Then loosen the tensioner bolt using the 12mm socket with extension. Now remove the belt.
At this point, all the old belts are removed, and you are ready to install the new belts. This is a good time to check all the pulleys. Rotate each pulley by hand and make sure it spins freely and doesn't squeak. Replace any defective pulleys as needed.

As you can see, I really needed new belts.
5.) route your new belts around the pulleys. Make sure you install the A/C belt first.

6.) Tighten the tensioner bolt on larger PS/ALT belt using the 12mm socket with extension. You can use the feel method coupled with counting turns as I have suggested, or use a tension gauge and the FSM specs. Either way works. The first is easier, the second is more precise, so you can pick.

After you get the belt properly tensioned, tighten the pulley bolt using the short 14mm socket. Double check the torque on the nut with a torque wrench: 30.4 - 39.2 N�m (3.1 - 4.0 kg-m, 23 - 28 ft-lb)

8.) Tighten the tensioner bolt on smaller A/C belt using the 12mm socket with extension. Tension the belt properly using one of the methods described above.
After you get the belt properly tensioned, tighten the pulley bolt using the deep 14mm socket. Double check the torque on the nut with a torque wrench: 30.4 - 39.2 N�m (3.1 - 4.0 kg-m, 23 - 28 ft-lb)

9.) Start the car and make sure everything is operating normally. If you hear squeaking, it's likely you did not tension the belts tight enough. The car should sound smooth with no squeaking or grinding noises. If everything is working as it should, reinstall the undershroud and you should be good to go.
Intro:
Here's the complete guide to removing/replacing 03-05 G35 Coupe drive belts. Other years may be similar. During this tutorial, you will be shown how to replace both drive belts. The larger (wider) drive belt powers the alternator and power steering pump. The smaller (thinner) belt powers your air conditioner compressor. Inspect belts for cracks, fraying, wear and oil. If necessary, replace.
Tool List:
3/8" drive ratchet
3/8" drive 6" extension
14mm socket (shallow and deep)
12mm socket
10mm socket
Electric Impact Driver (not required, but makes things go much faster. Use 1/4" ratchet as a substitute)
Parts:
Make sure you get the right belts. Depending on the year of your car, the larger (wider) drive belt that powers the alternator and power steering pump comes in different lengths. From what I've read, some of the earlier G models actually had a mechanical fan, which requires a slightly different length belt. If you have any question about what belt to buy, contact your local dealer and they should be able to confirm the length of the belt for your car's year and model. With that information, you will be able to purchase the correct belt. I ordered a set of pretty blue Gates belts for my 03' Coupe. Why blue Gates High-Performance Belts? Because race car. The Gates part numbers are:
PS/Alternator belt- K060465RB
AC Belt- K040372RB
1.) Remove the lower plastic undershroud. There are a **** ton of 10mm bolts. Use the impact driver to zip them all out until the undershroud is loose. Now would be a good time to scrub it clean before you reinstall it later. Now you should have a clear view of the underside of the engine.
2.) Before taking the old belts loose, go up top and tug on both belts. Get a feel for the tension, so that when you install the new belts, you have an idea how the new belts should feel when installed.
3.) When looking under the car, you can see each of tensioner/idler pullies. The tensioner on the left side of the picture (the 2 red circles) is for the larger drive belt that powers the alternator and power steering pump. The upper bolt (upper red circle) must be loosened first to release the pulley, and then the tension bolt (lower red circle) bolt can then be loosened to release the tension on the belt.
The same applies for the smaller (thinner) belt that powers your air conditioner compressor. The tensioner is located on the right side of the picture (the 2 blue circles). The upper bolt (upper blue circle) must be loosened first to release the pulley, and then the tension bolt (lower blue circle) bolt can then be loosened to release the tension on the belt. These steps are done in reverse order when putting on the new belts.
4.) Use a short 14mm socket to loosen the larger PS/ALT belt's idler pulley.
Then loosen the tensioner bolt using the 12mm socket with extension. Now remove the belt. One way to try and get the belt tension close on the new belt, is to count the number of full turns that you loosen the tensioner bolt when you take the old belt off. When you put the new belt on, tighten it the same number of turns it took you to remove the old belt. That should at least get you close to the proper belt tension.
4.) Use a deep 14mm socket to loosen the smaller A/C belt's idler pulley.
Then loosen the tensioner bolt using the 12mm socket with extension. Now remove the belt.
At this point, all the old belts are removed, and you are ready to install the new belts. This is a good time to check all the pulleys. Rotate each pulley by hand and make sure it spins freely and doesn't squeak. Replace any defective pulleys as needed.
As you can see, I really needed new belts.
5.) route your new belts around the pulleys. Make sure you install the A/C belt first.
6.) Tighten the tensioner bolt on larger PS/ALT belt using the 12mm socket with extension. You can use the feel method coupled with counting turns as I have suggested, or use a tension gauge and the FSM specs. Either way works. The first is easier, the second is more precise, so you can pick.
After you get the belt properly tensioned, tighten the pulley bolt using the short 14mm socket. Double check the torque on the nut with a torque wrench: 30.4 - 39.2 N�m (3.1 - 4.0 kg-m, 23 - 28 ft-lb)
8.) Tighten the tensioner bolt on smaller A/C belt using the 12mm socket with extension. Tension the belt properly using one of the methods described above.
After you get the belt properly tensioned, tighten the pulley bolt using the deep 14mm socket. Double check the torque on the nut with a torque wrench: 30.4 - 39.2 N�m (3.1 - 4.0 kg-m, 23 - 28 ft-lb)
9.) Start the car and make sure everything is operating normally. If you hear squeaking, it's likely you did not tension the belts tight enough. The car should sound smooth with no squeaking or grinding noises. If everything is working as it should, reinstall the undershroud and you should be good to go.
Any chance you know anything about belt squealing when electrical load from turning on the heater system?
The belt system squeals upon start-up.
upon turning the blower on for the heater or ac (no problem with squealing when it�s just the fan)
the power steeringis stiff when squealing happens,
upon startup power steering is non existent (until belts stop squealing) power steering fluid is normal and not low.
voltage drops when squealing occurs. Falling from 14.2 to 11.7 volts. Obviously the charging system is working hard to catch up. The volts from the alternator is not happening when the squealing happens.
anyone have any idea if this is just a lose belt issue or pulley issue? I didn't have this issue until the monsoon happened so I suspect the 2-3 foot deep puddles that cover the road here had something to do with it.
Any informed advice and experience would be appreciated. Thank you in advance.
#26
01-20-2019, 12:04 PM

Registered User
Any chance you know anything about belt squealing when electrical load from turning on the heater system?
The belt system squeals upon start-up.
upon turning the blower on for the heater or ac (no problem with squealing when it’s just the fan)
the power steeringis stiff when squealing happens,
upon startup power steering is non existent (until belts stop squealing) power steering fluid is normal and not low.
voltage drops when squealing occurs. Falling from 14.2 to 11.7 volts. Obviously the charging system is working hard to catch up. The volts from the alternator is not happening when the squealing happens.
anyone have any idea if this is just a lose belt issue or pulley issue? I didn't have this issue until the monsoon happened so I suspect the 2-3 foot deep puddles that cover the road here had something to do with it.
Any informed advice and experience would be appreciated. Thank you in advance.
#27
01-20-2019, 12:27 PM
Join Date: May 2017
Location: Washington State
Posts: 14,790
Received 2,456 Likes
on
2,150 Posts
Coupe 6MT Premium RAS
With water that deep you might be looking at a corroded tensioner bearing with an intermittent problem and almost definitely a contaminated belt. Take Fresh's advice and disassemble/clean everything, spin the pulleys by hand and see what they feel like. Should be a little resistance and NO NOISE WHATSOEVER, if they spin wildly and have any noise they're worn and need replacing.
I've had good success in the past using brake cleaner to clean belts that were contaminated from a power steering rupture / transmission cooler rupture / etc. Who knows what kind of oily mess was mixed in with that flood water.
I've had good success in the past using brake cleaner to clean belts that were contaminated from a power steering rupture / transmission cooler rupture / etc. Who knows what kind of oily mess was mixed in with that flood water.
#28
09-16-2019, 09:08 AM

I swapped my belts yesterday, and of course now they squeal 
I tensioned them to what I thought felt similar to the belts that were on there. I did notice that the tensioner was set much lower than what it was beforehand. I guess the other belts were stretched out more to allow for this difference?
Is there a semi-easy way to check proper tension on the belts? I have access to a torque wrench, but nothing to measure deflection like the FSM says. I think they're under tensioned, because I'll get some squealing on start-up and initial driving while the engine is cold. Once warmed up it goes away.
Is it a trial and error thing, or is there a good way to guestimate over/under tension?
#30
09-16-2019, 09:41 AM
I swapped my belts yesterday, and of course now they squeal
I tensioned them to what I thought felt similar to the belts that were on there. I did notice that the tensioner was set much lower than what it was beforehand. I guess the other belts were stretched out more to allow for this difference?
Is there a semi-easy way to check proper tension on the belts? I have access to a torque wrench, but nothing to measure deflection like the FSM says. I think they're under tensioned, because I'll get some squealing on start-up and initial driving while the engine is cold. Once warmed up it goes away.
Is it a trial and error thing, or is there a good way to guestimate over/under tension?


you need a pull gauge.