
DIY: g35 coupe trunk removal and rear seat removal for trunk swap


Joined: Feb 2008
Posts: 1,922
Likes: 12
From: Belcamp, MD
DIY: g35 coupe trunk removal and rear seat removal for trunk swap
Proceed with the following at your own risk!!!!
This will be the first part of this DIY, if its your first time attempting something like this and you want to take your time doing it, I'd say the total time in just removing the trunk lid with or without spoiler would be 30-45 minutes.
To properly do a trunk swap for the sake of one person going wingless and the other going winged, you should also switch out your rear deck panel. This gives the newly wingless a third brake light and it also allows the newly winged to have only one 3rd brake light as opposed to two of them. Now if you were wingless before and had your window tinted, you probably will want to get it done again as now you'll have a clear hole in the tint from where the tinter more than likely tinted around your interior 3rd brake light. Something to consider if you haven't tinted your car yet and want to eventually swap out trunks.
Now for the fun stuff, I borrowed some of these photos from a previous DIY on spoiler installment.
Tools needed for the trunk:
1x small flat-blade screw driver
1x 3/8'" ratchet and 12mm socket
1x 12mm hand wrench (closed end prefered)
1x extra set of hands for removing or holding up lid when it comes time to.
1x set of standard pliers
1.Remove trunk release handle from its dock, slide cable through the handle so that the skinny portion of it is easily pulled from its grip:
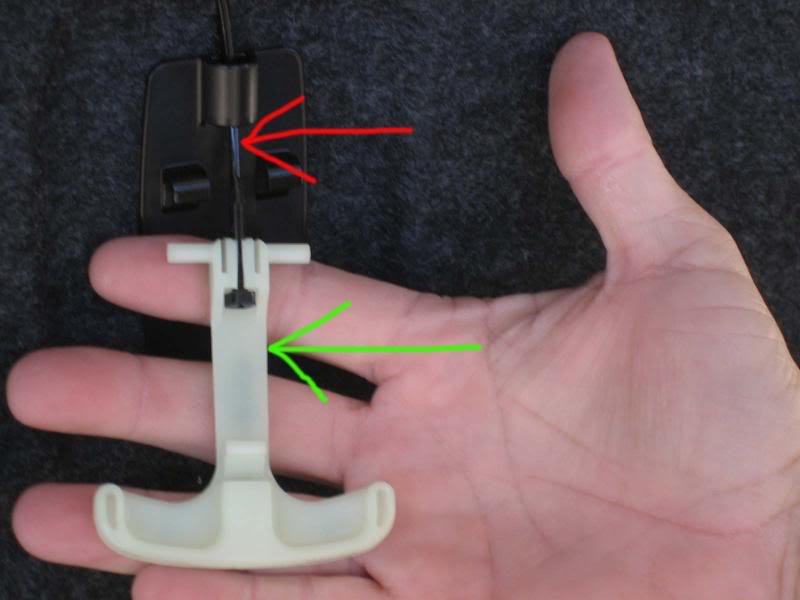
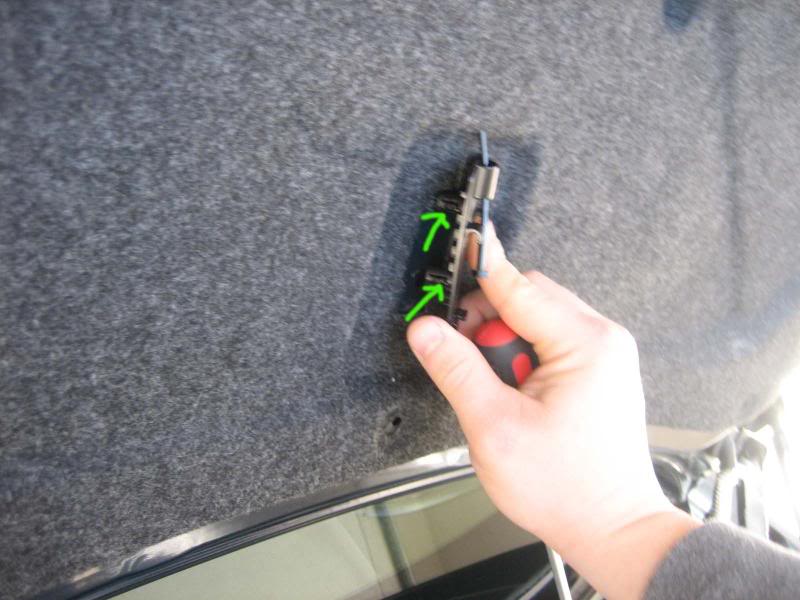
2. Take flat-blade screw driver and carefully pry the dock away from the trunk panel:
3. Locate the push/pop caps on the trunk panel (shown in red)
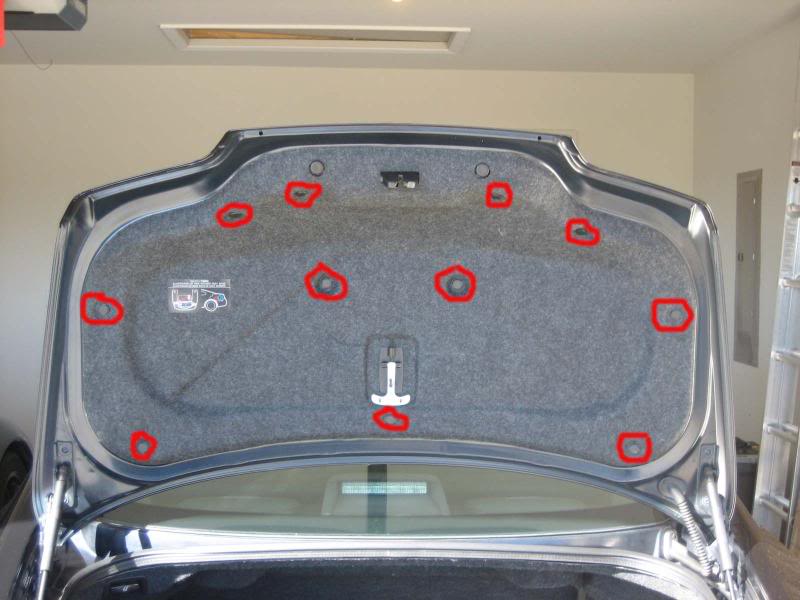
4.Take flat-blade screw driver and pop them out one by one:

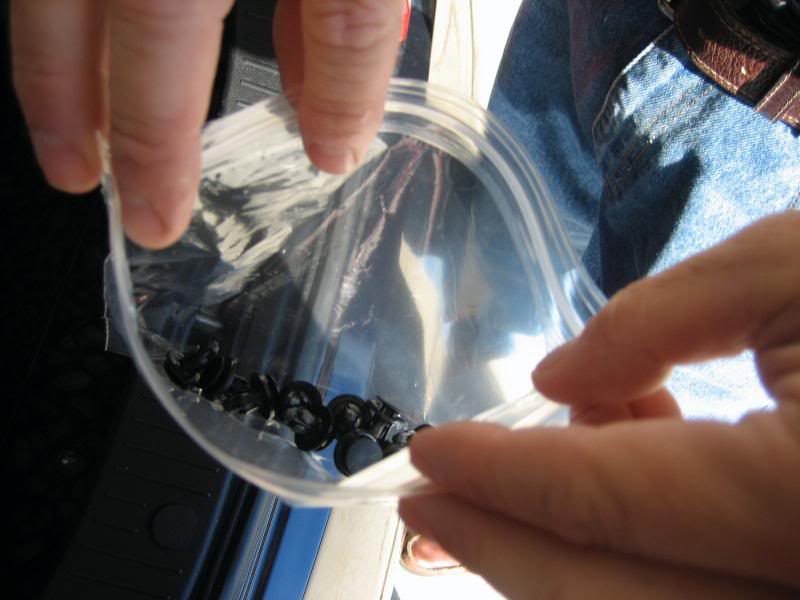
5. Put the caps securely in a ziplock bag or somewhere you will not lose them:
6. Your trunk should now look like this:, remove brown plug (from spoiler) and remove the black and white plugs from the lock assembly:

7: Using the pliers, remove clips holding the harness into the trunk and then feed the harness through the OEM holes which also requires you to remove the rubber boot plug thats in the trunk:

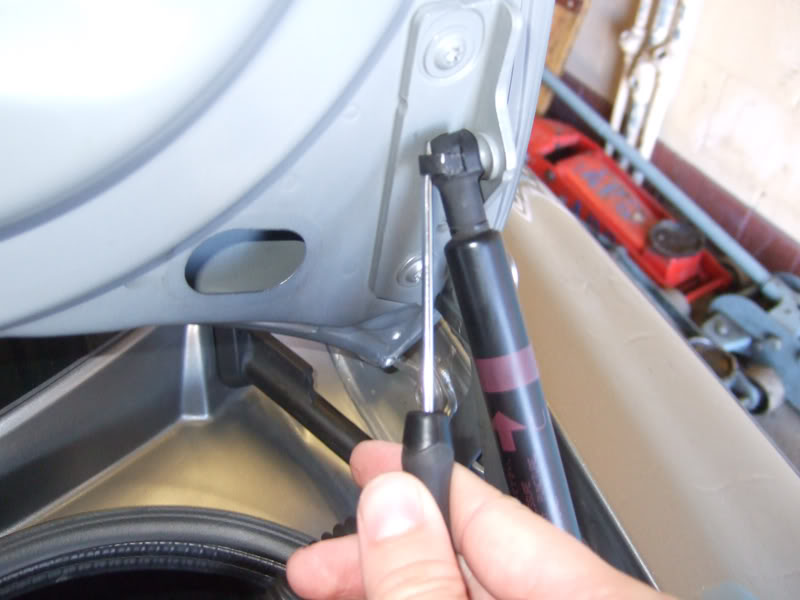
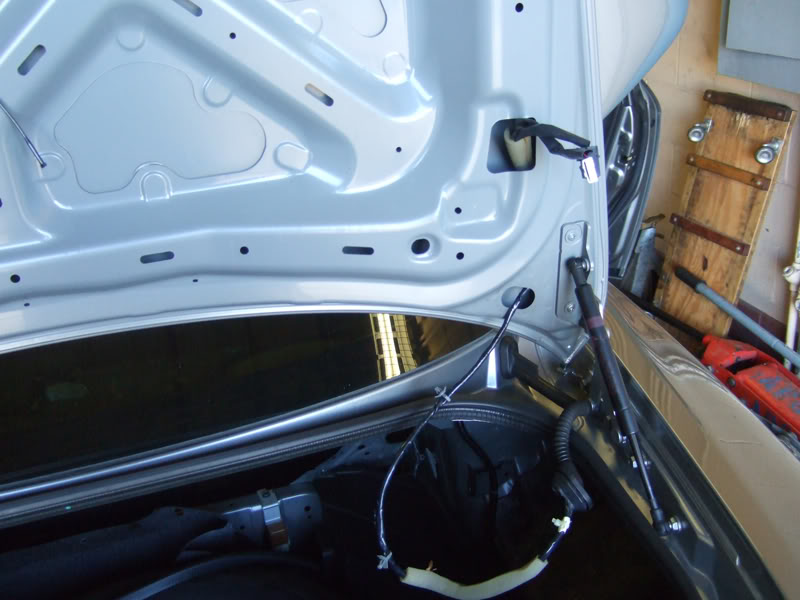
8. Take flat-blade screw driver and pry open the retaining clip on the trunk shocks, I chose to do the top ones which will be obvious later on. I also did not switch the trunk shocks as they seemed to not be different. Once the clip is off or moved out of the way, pop the shock mount off and away from the trunk, have a friend hold it in place for you as now there is nothing to hold up the trunk anymore:
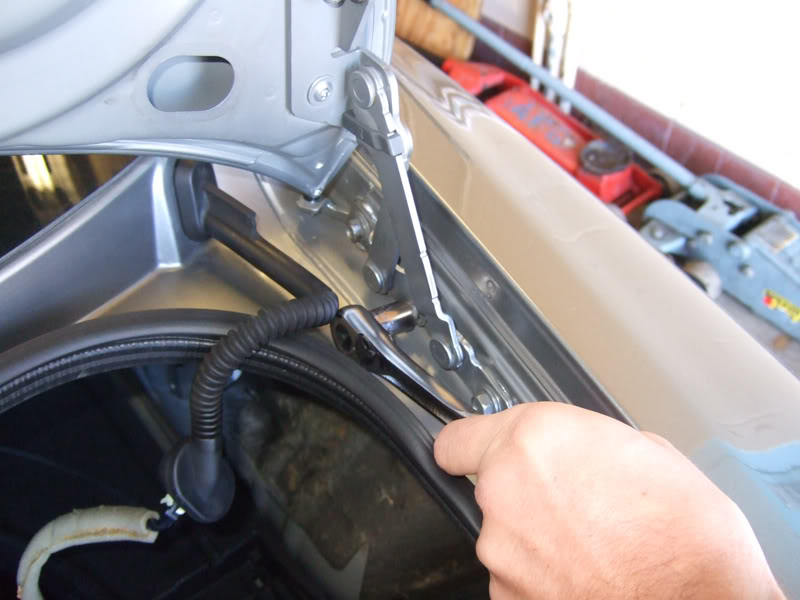
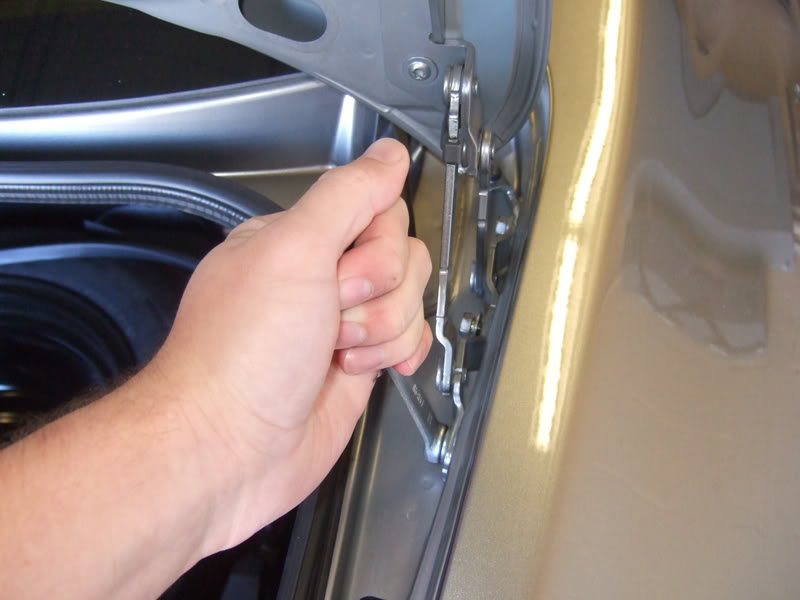
9. Take ratchet and 12mm socket and begin to loosen (not remove) the bolts holding the hinges, the ratchet may only reach the forward and middle bolts:
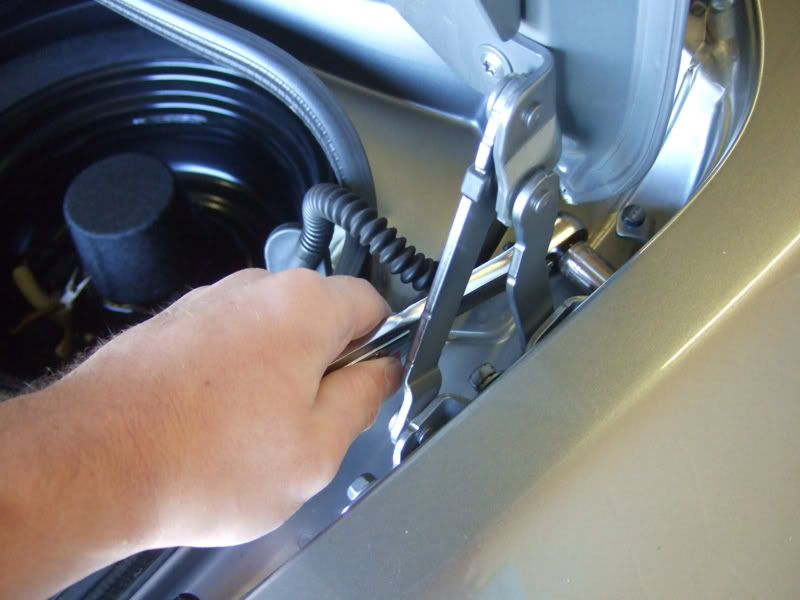
10. Take the 12mm hand wrench and losen the rear most bolt of the trunk hinge (by rear most I mean the ones closest to the tail lamps):
11. At this point you and your buddy can go ahead and remove the bolts from the hinges while holding the trunk up in place.
12. Once the bolts are out, carefully break the seal holding the hinges to the body, a little bit of forcefull prying and swaying of the hinges will do this for you.
13. Now one side at a time, remove the hinge from the body and the inserts holding it in place.
Viola, your trunk is off, install is the opposite of removal!
....more pictures and details to come later, sorry.
This will be the first part of this DIY, if its your first time attempting something like this and you want to take your time doing it, I'd say the total time in just removing the trunk lid with or without spoiler would be 30-45 minutes.
To properly do a trunk swap for the sake of one person going wingless and the other going winged, you should also switch out your rear deck panel. This gives the newly wingless a third brake light and it also allows the newly winged to have only one 3rd brake light as opposed to two of them. Now if you were wingless before and had your window tinted, you probably will want to get it done again as now you'll have a clear hole in the tint from where the tinter more than likely tinted around your interior 3rd brake light. Something to consider if you haven't tinted your car yet and want to eventually swap out trunks.
Now for the fun stuff, I borrowed some of these photos from a previous DIY on spoiler installment.
Tools needed for the trunk:
1x small flat-blade screw driver
1x 3/8'" ratchet and 12mm socket
1x 12mm hand wrench (closed end prefered)
1x extra set of hands for removing or holding up lid when it comes time to.
1x set of standard pliers
1.Remove trunk release handle from its dock, slide cable through the handle so that the skinny portion of it is easily pulled from its grip:
2. Take flat-blade screw driver and carefully pry the dock away from the trunk panel:
3. Locate the push/pop caps on the trunk panel (shown in red)
4.Take flat-blade screw driver and pop them out one by one:
5. Put the caps securely in a ziplock bag or somewhere you will not lose them:
6. Your trunk should now look like this:, remove brown plug (from spoiler) and remove the black and white plugs from the lock assembly:
7: Using the pliers, remove clips holding the harness into the trunk and then feed the harness through the OEM holes which also requires you to remove the rubber boot plug thats in the trunk:
8. Take flat-blade screw driver and pry open the retaining clip on the trunk shocks, I chose to do the top ones which will be obvious later on. I also did not switch the trunk shocks as they seemed to not be different. Once the clip is off or moved out of the way, pop the shock mount off and away from the trunk, have a friend hold it in place for you as now there is nothing to hold up the trunk anymore:
9. Take ratchet and 12mm socket and begin to loosen (not remove) the bolts holding the hinges, the ratchet may only reach the forward and middle bolts:
10. Take the 12mm hand wrench and losen the rear most bolt of the trunk hinge (by rear most I mean the ones closest to the tail lamps):
11. At this point you and your buddy can go ahead and remove the bolts from the hinges while holding the trunk up in place.
12. Once the bolts are out, carefully break the seal holding the hinges to the body, a little bit of forcefull prying and swaying of the hinges will do this for you.
13. Now one side at a time, remove the hinge from the body and the inserts holding it in place.
Viola, your trunk is off, install is the opposite of removal!
....more pictures and details to come later, sorry.
Last edited by idrive_MD; Mar 24, 2010 at 11:25 AM.
Joined: Feb 2008
Posts: 1,922
Likes: 12
From: Belcamp, MD
its been awhile since I've tried to update this, but I have had a few questions regarding additional details and I also had to rehost my pictures through another source.
Here are some additional details:
This picture shows the connections you need to undo and or fish out to disconnect the third brake light and/or remove the trunk from the car.
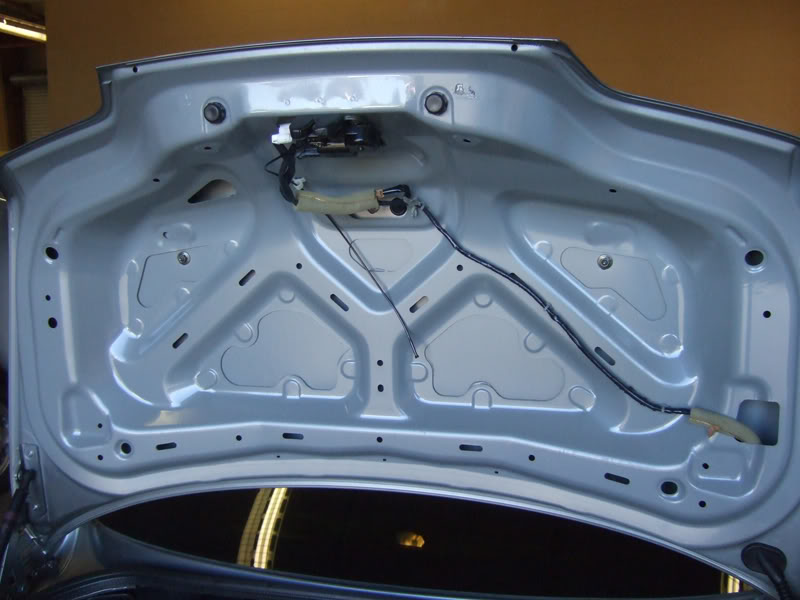
The brown plug is the power to the spoiler light, the white plug is the power to the trunk lock sensors.
You have to unplug them both and unclip the harness and fish them out of the lower passenger side hole to completely remove the trunk.
Once you swap the trunks and reattach them to the appropriate cars, reinsert the harness in the reverse of removal. If you now have the winged trunk with the spoiler brake light, connect the brown plugs. If you do not have the winged trunk anymore, leave the brown plug unplug at that location. For both setups, remember to plug in the white plug before reinstalling the trunk lid panel.
Skipping a few big steps here to be added later, after you have switched out trunks you should have also switched out rear parcel shelfs, that way the now wingless person can have a 3rd brake light. In the location of parcel shelf, there is the light for the trunk as well, there is also another brown plug connection stemming from that light. That brown plug connects to the brown plug on the rear parcel shelf 3rd brake light...make that connection and you should have a working interior 3rd brake light (just make sure the other connections in the trunk are completed as well or it wont work).
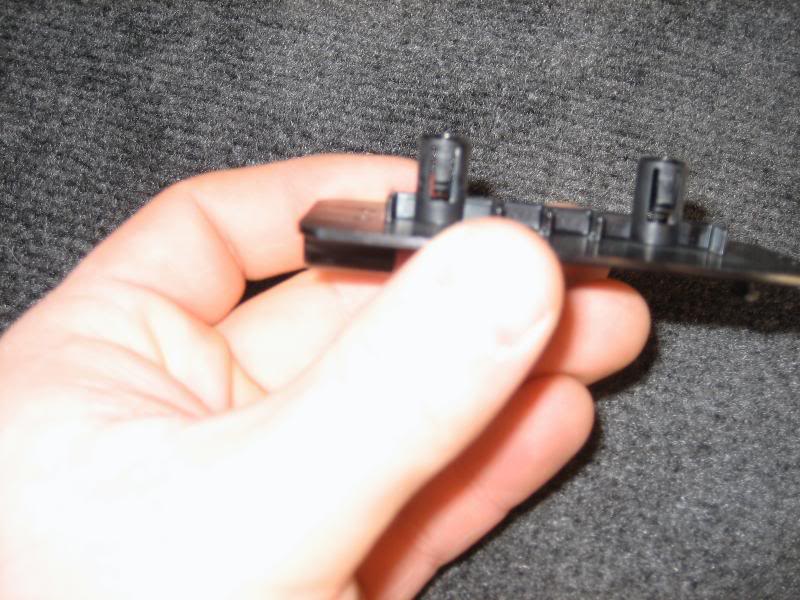
This is that plug, its wrapped in a foam insulator:
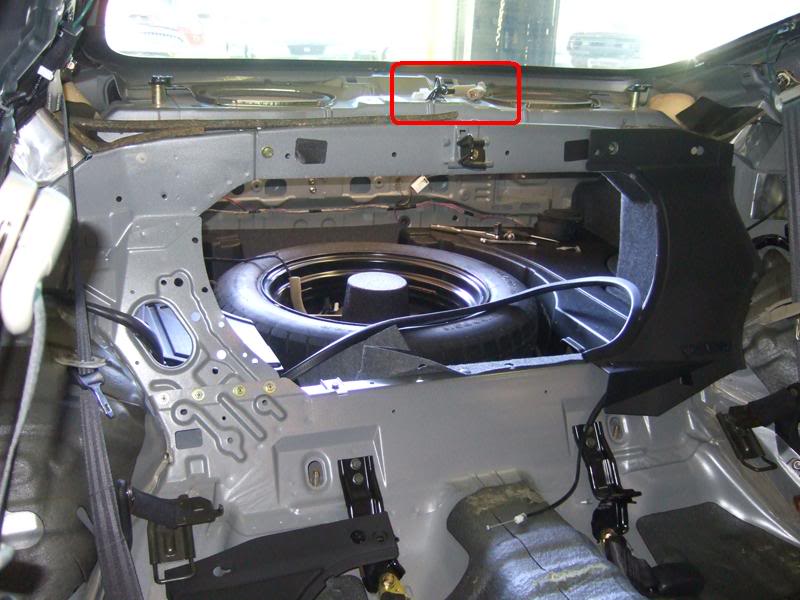
That picture also shows all of the panelling you need to remove just to get that parcel shelf out. I have not taken pictures of that process yet, its covered in the FSM through multiple sections and it is easy to do, but just time consuming because you need to be cautious with removal and re-installation. Actually that picture shows more than it requires, I got carried away and removed more panels than I should have. In the trunk there is not one single panel you need to remove to access anything, other than the panel on the trunk lid obviously. As for the view from the front seats, the only panels you do not have to remove are the trim panels around the trunk pass through (only one is pictured because I realized they did not need to be removed). The seat bottom and back, left and right side panels and a couple of other items do have to be removed (i.e. seat belt mounts, secret bolt behind SRS badge in B-pillar).
Here are some additional details:
This picture shows the connections you need to undo and or fish out to disconnect the third brake light and/or remove the trunk from the car.
The brown plug is the power to the spoiler light, the white plug is the power to the trunk lock sensors.
You have to unplug them both and unclip the harness and fish them out of the lower passenger side hole to completely remove the trunk.
Once you swap the trunks and reattach them to the appropriate cars, reinsert the harness in the reverse of removal. If you now have the winged trunk with the spoiler brake light, connect the brown plugs. If you do not have the winged trunk anymore, leave the brown plug unplug at that location. For both setups, remember to plug in the white plug before reinstalling the trunk lid panel.
Skipping a few big steps here to be added later, after you have switched out trunks you should have also switched out rear parcel shelfs, that way the now wingless person can have a 3rd brake light. In the location of parcel shelf, there is the light for the trunk as well, there is also another brown plug connection stemming from that light. That brown plug connects to the brown plug on the rear parcel shelf 3rd brake light...make that connection and you should have a working interior 3rd brake light (just make sure the other connections in the trunk are completed as well or it wont work).
This is that plug, its wrapped in a foam insulator:
That picture also shows all of the panelling you need to remove just to get that parcel shelf out. I have not taken pictures of that process yet, its covered in the FSM through multiple sections and it is easy to do, but just time consuming because you need to be cautious with removal and re-installation. Actually that picture shows more than it requires, I got carried away and removed more panels than I should have. In the trunk there is not one single panel you need to remove to access anything, other than the panel on the trunk lid obviously. As for the view from the front seats, the only panels you do not have to remove are the trim panels around the trunk pass through (only one is pictured because I realized they did not need to be removed). The seat bottom and back, left and right side panels and a couple of other items do have to be removed (i.e. seat belt mounts, secret bolt behind SRS badge in B-pillar).
Last edited by idrive_MD; Mar 24, 2010 at 11:28 AM.
Joined: Feb 2008
Posts: 1,922
Likes: 12
From: Belcamp, MD
Sorry I havent expanded more on the third brake light swap, but if someones in my area want me to help with a swap, I can and while I am at it I'll take some pictures to update this thread.

Joined: Feb 2008
Posts: 1,922
Likes: 12
From: Belcamp, MD
Im aware of the pictures not uploading. I will fix this but the pictures are not on my home PC and I wont be back in the office for another two weeks sorry. Its an issue with my picture upload site, the problem might fix itself so check back again later. Sorry for the inconvienence.

Trending Topics
Joined: Feb 2008
Posts: 1,922
Likes: 12
From: Belcamp, MD
sorry Im a lazy a$$, it is fixed now. Pictures are photobucket, so I am sorry if you have work-filters.
Also if anyone in the MD-NOVA-DE-PA area want my help with this I will more than gladly offer my assistance, it would be a nice oppurtunity to go through it again and get additional pictures. I'll work for favors, unwanted parts or mountain dew.
Also if anyone in the MD-NOVA-DE-PA area want my help with this I will more than gladly offer my assistance, it would be a nice oppurtunity to go through it again and get additional pictures. I'll work for favors, unwanted parts or mountain dew.
Last edited by idrive_MD; Mar 24, 2010 at 11:31 AM.
Thank You very much. I am greatly appreciated.
sorry Im a lazy a$$, it is fixed now. Pictures are photobucket, so I am sorry if you have work-filters.
Also if anyone in the MD-NOVA-DE-PA area want my help with this I will more than gladly offer my assistance, it would be a nice oppurtunity to go through it again and get additional pictures. I'll work for favors, unwanted parts or mountain dew.
Also if anyone in the MD-NOVA-DE-PA area want my help with this I will more than gladly offer my assistance, it would be a nice oppurtunity to go through it again and get additional pictures. I'll work for favors, unwanted parts or mountain dew.


Idk if you left your rear seats out or not but if you did did you feel a good difference in acceleration with the seats out? and also do you have an estimate of much those seats weigh?


