
DIY: $135 OEM Spoiler Install


Thread Starter
|
Registered User
Joined: Dec 2007
Posts: 22
Likes: 0
From: Lexington, KY
DIY: $135 OEM Spoiler Install
Hey guys... I just installed my OEM knock off spoiler from Spoilersource.com. I got it for a total of $138.00 including the kit, painted spoiler, and shipping. Here's my first how to. I hope it helps.
Please note that this how to may not apply to all aftermarket spoilers. I got mine from spoilersource.com and dont know how the other guys work.
Have fun!!!
Please note that this how to may not apply to all aftermarket spoilers. I got mine from spoilersource.com and dont know how the other guys work.
Have fun!!!
Last edited by Abneya; Jan 1, 2008 at 10:20 AM.
Thread Starter
|
Registered User
Joined: Dec 2007
Posts: 22
Likes: 0
From: Lexington, KY
Materials needed:
1. One G35 coupe or sedan (check)
2. A drill bit set and if it does not include one a �� bit
3. A hammer (don�t worry�. Nothing crazy)
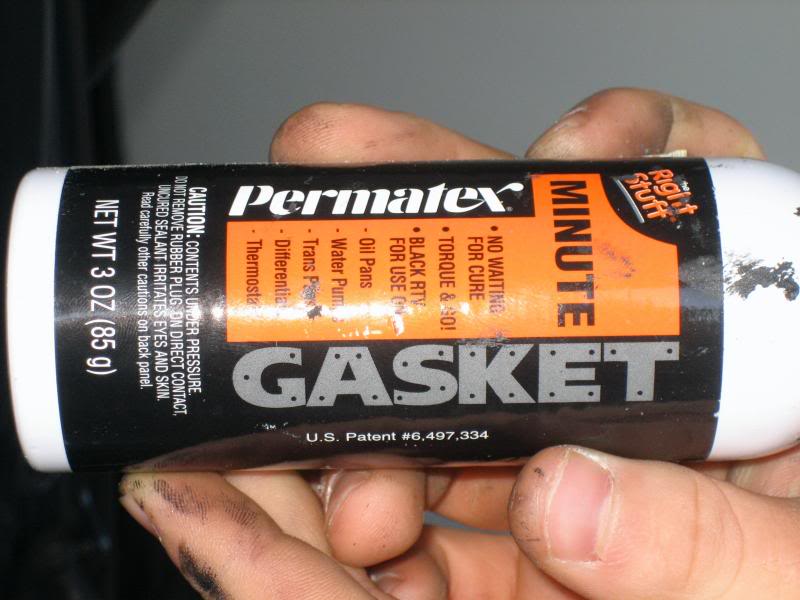
4. Some gasket maker (see pic later)
5. 1 wire coat hanger
6. Masking tape (get the good stuff)
7. A drill
8. A can of thick spray auto primer (rattle can)
9. �Q� tips
10. Wire Snips (or needle nose pliers with snips on them)
11. Some thread locker compound
12. And of course one spoiler kit from spoilersource.com
1. One G35 coupe or sedan (check)
2. A drill bit set and if it does not include one a �� bit
3. A hammer (don�t worry�. Nothing crazy)
4. Some gasket maker (see pic later)
5. 1 wire coat hanger
6. Masking tape (get the good stuff)
7. A drill
8. A can of thick spray auto primer (rattle can)
9. �Q� tips
10. Wire Snips (or needle nose pliers with snips on them)
11. Some thread locker compound
12. And of course one spoiler kit from spoilersource.com
Last edited by Abneya; Jan 1, 2008 at 10:19 AM.
Thread Starter
|
Registered User
Joined: Dec 2007
Posts: 22
Likes: 0
From: Lexington, KY
Step One: (prep work)
First we must remove the lining of the trunk lid so that we can start drilling and installing without causing any damage.
1. Remove all of the 11 caps that hold the liner to the trunk lid (caps in red).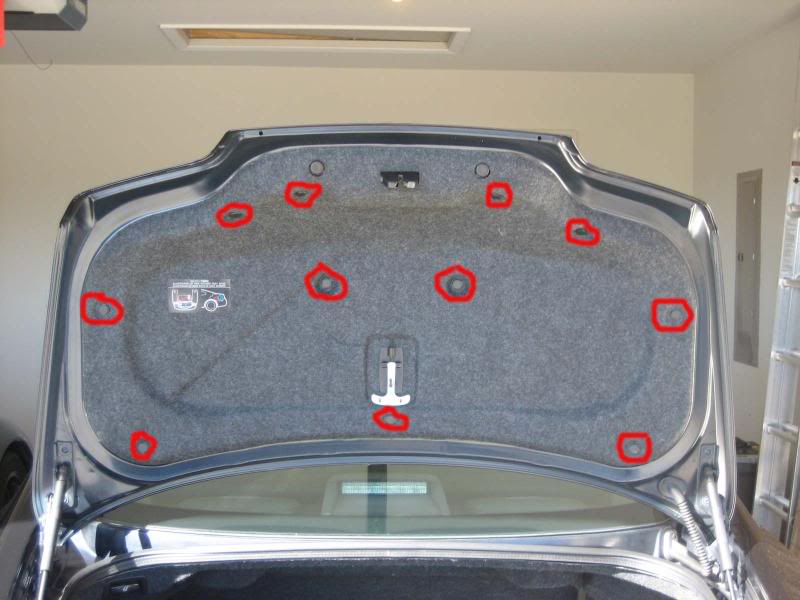
Do this by inserting a flat head screwdriver in the slot on each cap and partially (not intirely) separating the top part of the cap from the bottom (see second picture). This will allow the caps(s) to be removed from the liner and free the trunk liner to be removed.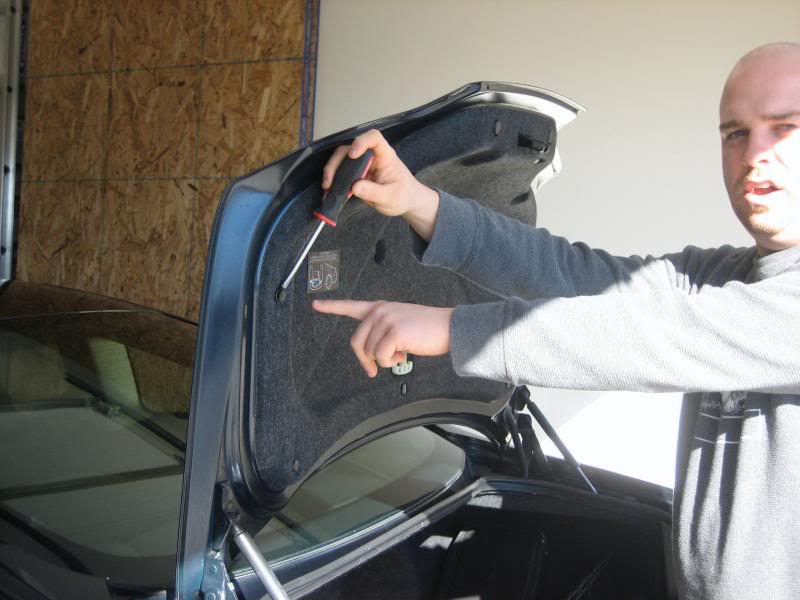
Do not attempt to remove the liner at this time as there are still a few more parts that have to come off first. I recommend putting these caps in a plastic baggie.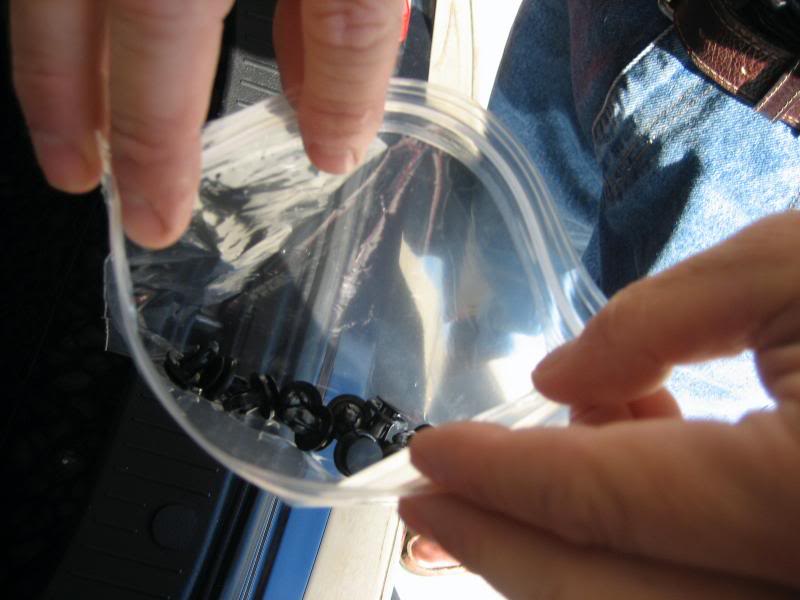
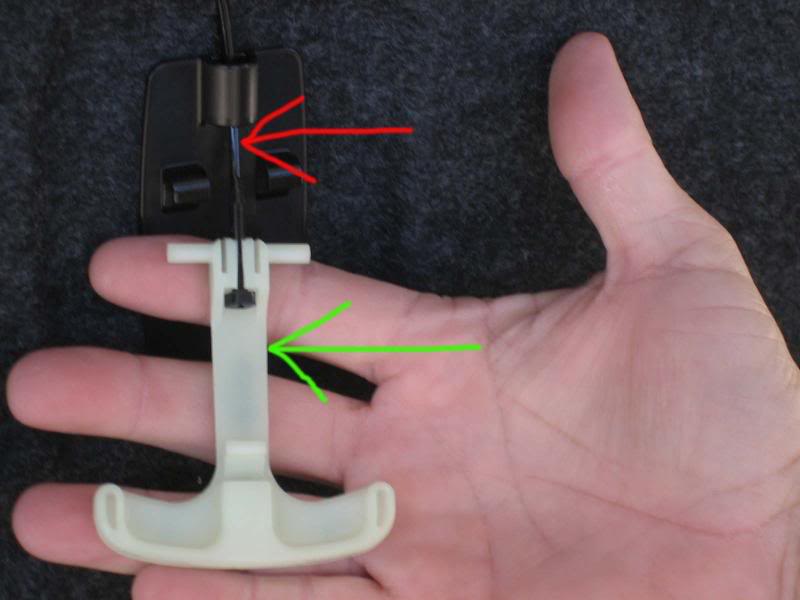
2. Separate the emergency trunk release pull tab from the trunk release cable (in red). Do so by turning the tab over and pulling the cable down (by pushing the tab up along the cable) so that the skinny portion of the cable is where the slot in the tab is (see green arrow). Pull the tab back away from the cable to separate.
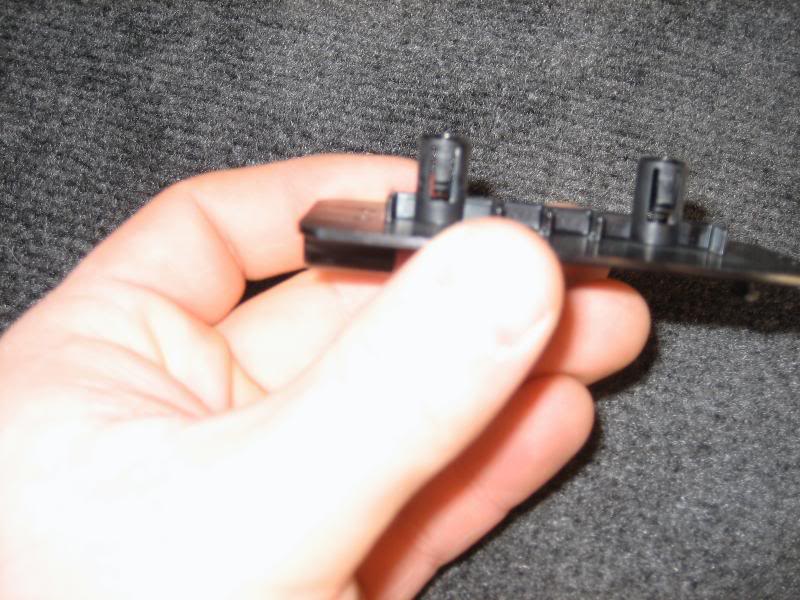
3. Remove the emergency trunk release housing from the trunk liner. Pull the black box from right to left to remove it. It helps to use a screwdriver to push in the tabs on the two posts that hold the housing to the trunk lid (in green).
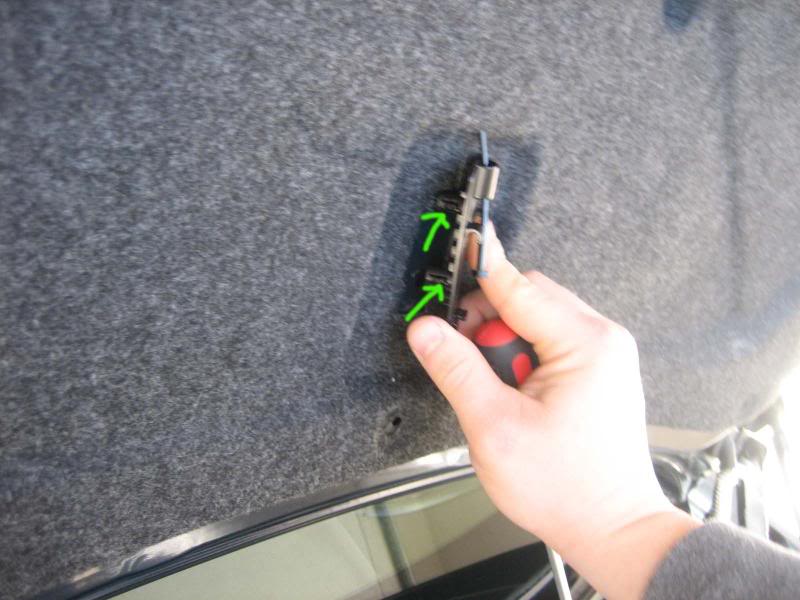
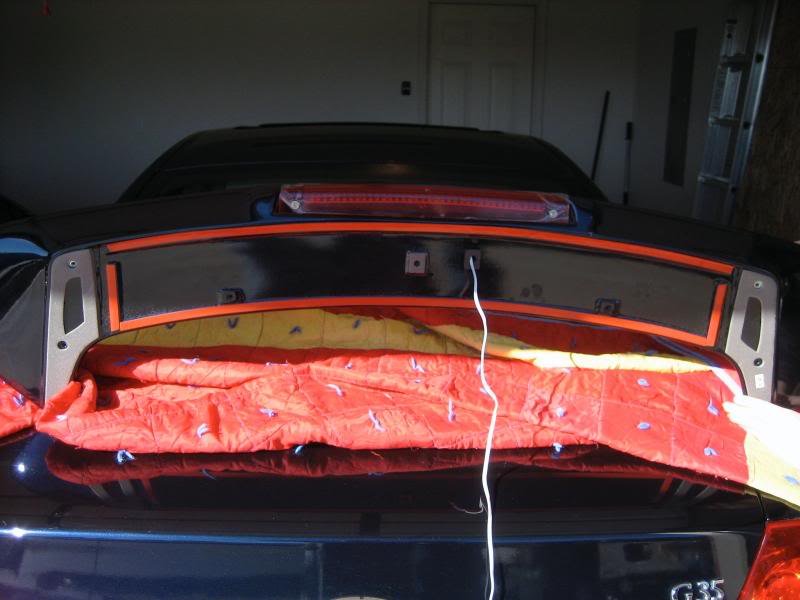
When depressed (not sad but depressed) these tabs will release the housing. You will still have to use some force. This is what it looks like removed. Pull the trunk release cable through the trunk lid liner and remove the liner. Now we�re ready to have some fun!!!
First we must remove the lining of the trunk lid so that we can start drilling and installing without causing any damage.
1. Remove all of the 11 caps that hold the liner to the trunk lid (caps in red).
Do this by inserting a flat head screwdriver in the slot on each cap and partially (not intirely) separating the top part of the cap from the bottom (see second picture). This will allow the caps(s) to be removed from the liner and free the trunk liner to be removed.
Do not attempt to remove the liner at this time as there are still a few more parts that have to come off first. I recommend putting these caps in a plastic baggie.
2. Separate the emergency trunk release pull tab from the trunk release cable (in red). Do so by turning the tab over and pulling the cable down (by pushing the tab up along the cable) so that the skinny portion of the cable is where the slot in the tab is (see green arrow). Pull the tab back away from the cable to separate.
3. Remove the emergency trunk release housing from the trunk liner. Pull the black box from right to left to remove it. It helps to use a screwdriver to push in the tabs on the two posts that hold the housing to the trunk lid (in green).
When depressed (not sad but depressed) these tabs will release the housing. You will still have to use some force. This is what it looks like removed. Pull the trunk release cable through the trunk lid liner and remove the liner. Now we�re ready to have some fun!!!
Thread Starter
|
Registered User
Joined: Dec 2007
Posts: 22
Likes: 0
From: Lexington, KY
Step Two: (measuring for the spoiler)
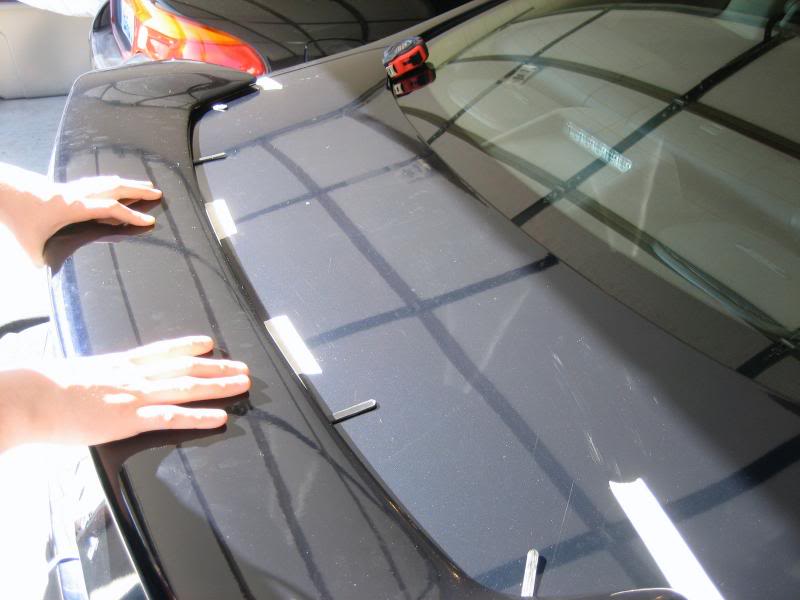
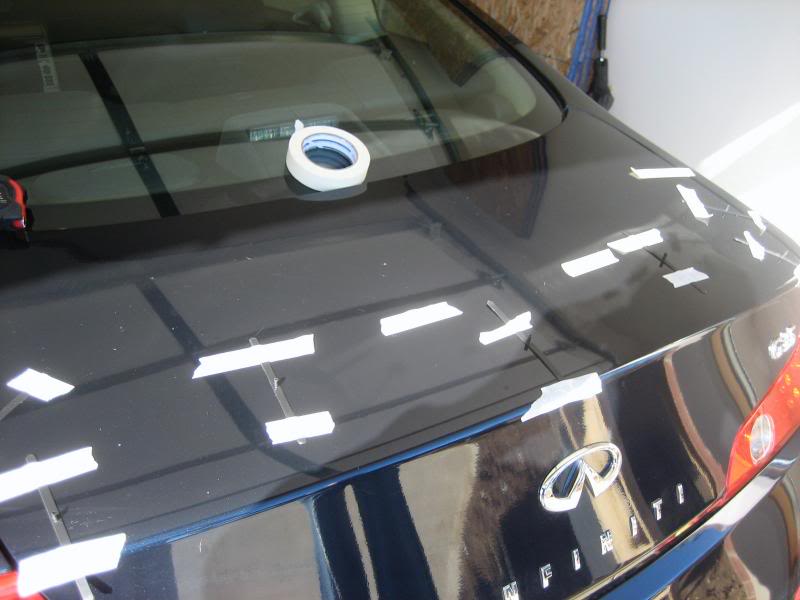
1. Eyeball it � Close the trunk lid and place the spoiler on the deck where it appears centered and pleasing to the eye. Don�t worry� we�re going to measure and make sure it looks perfect.
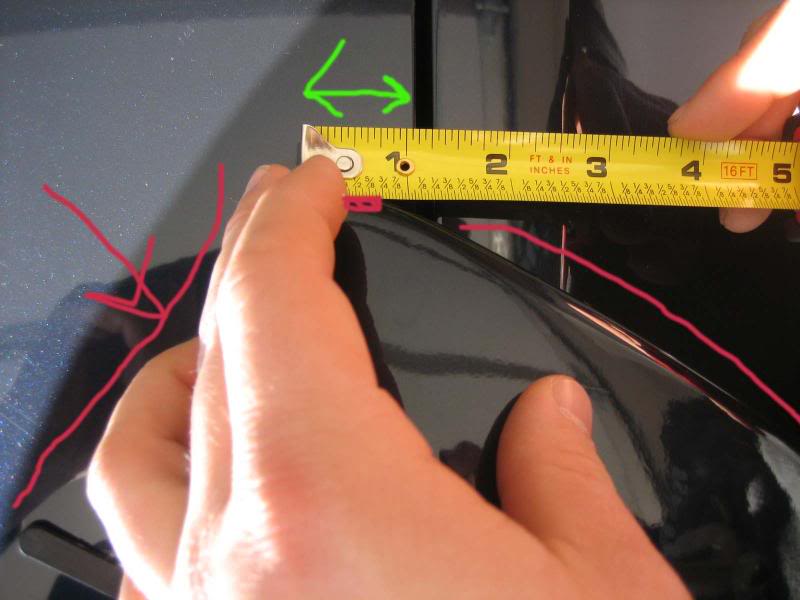
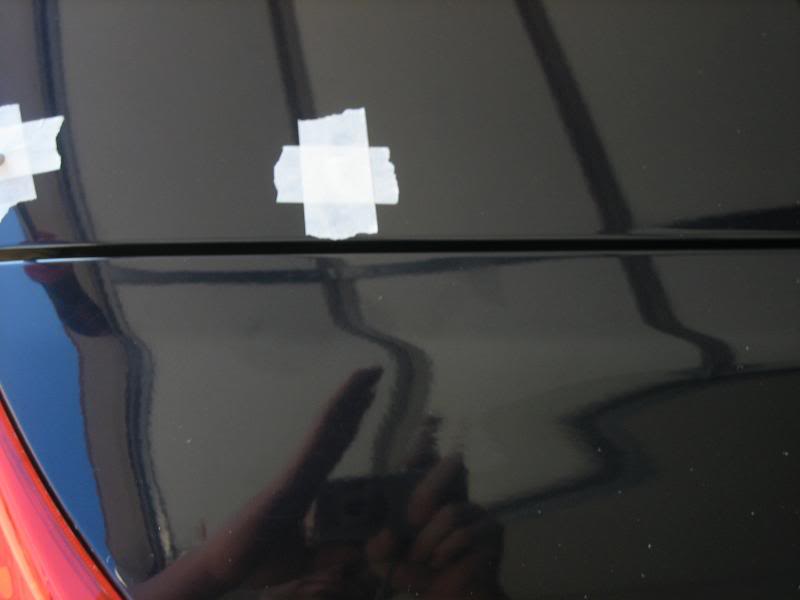
2. Centered from left to right - Now measure from the highest point on the two rear tips of the spoiler to the crack that separates the trunk lid from the rear fenders (see pic). Move the spoiler left to right and until the left measurement and the right measurement are exactly equal. I would recommend the same person do all the measuring so that they know where exactly they measured at on the other side.
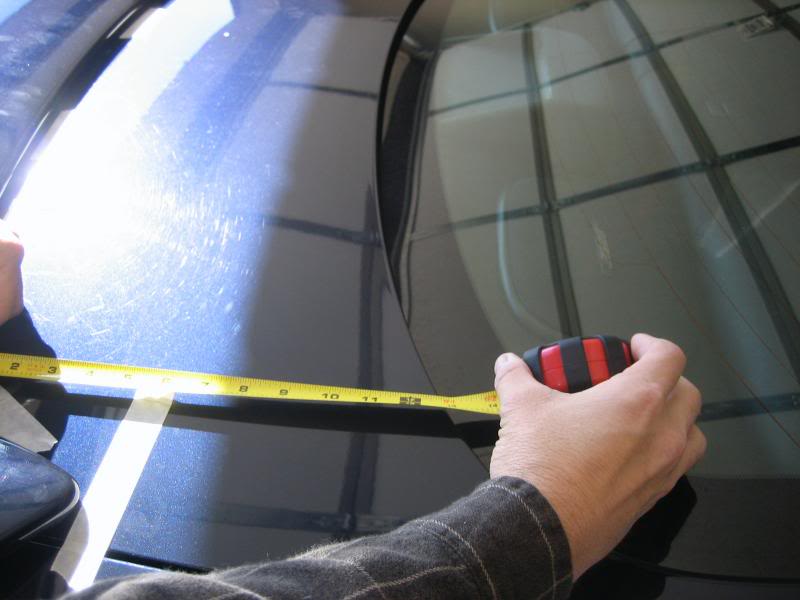
3. Centered from top to bottom � Now measure from those two tips to the top of the trunk lid (near the rear glass that looks into the back seat) (see pic). Make sure that the distance from the left tip to the end of the trunk is the same as the right tip to the end of the trunk. Adjust accordingly. If you want also measure along the center to double check yourself.
4. Mark It � Now we need to mark an outline of where the spoiler is so we can come back to it later. We�re going to have to take the spoiler back off for a while so it is IMPORTANT to do this right. Use masking tape to mark a few places along the back edge of the spoiler. Also mark the highest points (where the tips are). When you�ve marked enough spots that you feel you could set the spoiler back where it needs to go remove the spoiler.
1. Eyeball it � Close the trunk lid and place the spoiler on the deck where it appears centered and pleasing to the eye. Don�t worry� we�re going to measure and make sure it looks perfect.
2. Centered from left to right - Now measure from the highest point on the two rear tips of the spoiler to the crack that separates the trunk lid from the rear fenders (see pic). Move the spoiler left to right and until the left measurement and the right measurement are exactly equal. I would recommend the same person do all the measuring so that they know where exactly they measured at on the other side.
3. Centered from top to bottom � Now measure from those two tips to the top of the trunk lid (near the rear glass that looks into the back seat) (see pic). Make sure that the distance from the left tip to the end of the trunk is the same as the right tip to the end of the trunk. Adjust accordingly. If you want also measure along the center to double check yourself.
4. Mark It � Now we need to mark an outline of where the spoiler is so we can come back to it later. We�re going to have to take the spoiler back off for a while so it is IMPORTANT to do this right. Use masking tape to mark a few places along the back edge of the spoiler. Also mark the highest points (where the tips are). When you�ve marked enough spots that you feel you could set the spoiler back where it needs to go remove the spoiler.
Thread Starter
|
Registered User
Joined: Dec 2007
Posts: 22
Likes: 0
From: Lexington, KY
Step Three: (creating a template for drilling)
1. This is what the underside of your spoiler looks like.
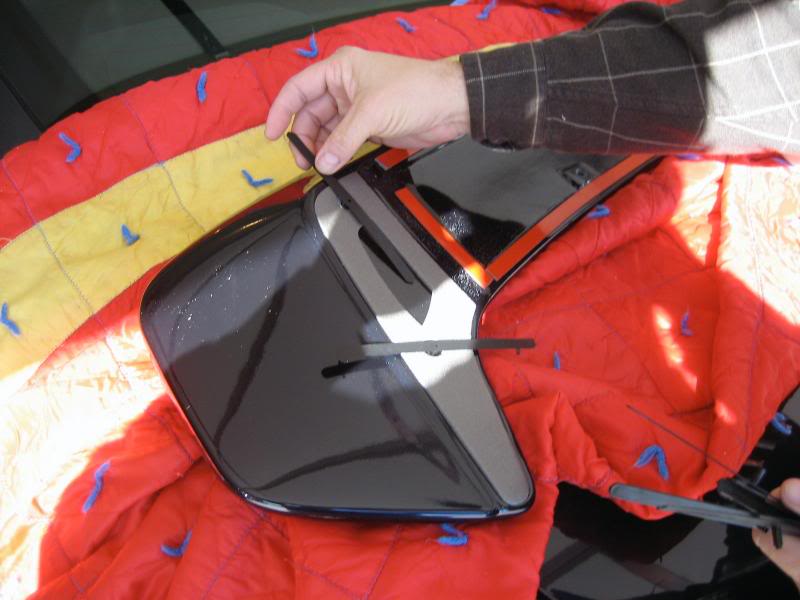
In the holes where screws should go and where the wire will go through place the black tabs. Make sure to position them in such a way so that when you lay the spoiler on the trunk that the ends of the tabs will stick out beyond the spoiler. This is important as you will use the ends of the tabs later.
2. Very lightly (with one very thin, torn piece of masking tape) tape the tabs to the underside of the spoiler (see picture).
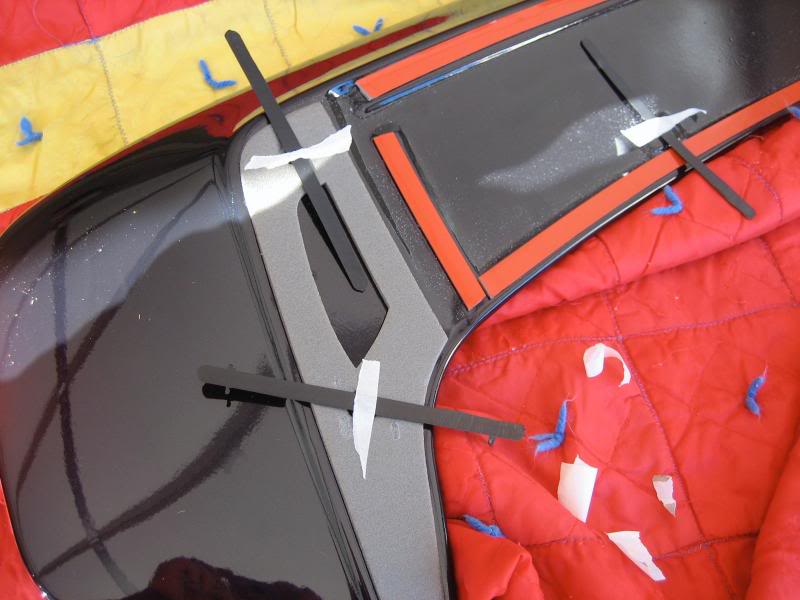
3. Now place the spoiler back on the trunk according to where you marked it in the part 4 of the last step (�Mark It�)
4. Once the spoiler is in place, have someone hold it in position with their hand so it doesn�t move. Step back and look at it from a distance. Is it centered? Is it where you want it to be? If so move on to part 5 of this step. If not start over at Step Two and repeat until you�re happy with it.
5. Tape down the ends of the tabs so that they will not move (aka they�ll stay on the trunk not the spoiler) when you pull up on the spoiler. You�ll need to tape these down well so that they�ll stick harder to the trunk (and not move) and pull away from the spoiler.
6. Pull the spoiler away from the trunk leaving behind the tabs.
7. Put the spoiler back on the tabs to make sure they stayed in place. If they didn�t move the spoiler should easily fit back over the tabs. If they did move begin Step Three again. (practice makes perfect)
8. If all is well remove the spoiler and set it aside. The fun stuff is about to begin. This is what your trunk should look like now.
1. This is what the underside of your spoiler looks like.
In the holes where screws should go and where the wire will go through place the black tabs. Make sure to position them in such a way so that when you lay the spoiler on the trunk that the ends of the tabs will stick out beyond the spoiler. This is important as you will use the ends of the tabs later.
2. Very lightly (with one very thin, torn piece of masking tape) tape the tabs to the underside of the spoiler (see picture).
3. Now place the spoiler back on the trunk according to where you marked it in the part 4 of the last step (�Mark It�)
4. Once the spoiler is in place, have someone hold it in position with their hand so it doesn�t move. Step back and look at it from a distance. Is it centered? Is it where you want it to be? If so move on to part 5 of this step. If not start over at Step Two and repeat until you�re happy with it.
5. Tape down the ends of the tabs so that they will not move (aka they�ll stay on the trunk not the spoiler) when you pull up on the spoiler. You�ll need to tape these down well so that they�ll stick harder to the trunk (and not move) and pull away from the spoiler.
6. Pull the spoiler away from the trunk leaving behind the tabs.
7. Put the spoiler back on the tabs to make sure they stayed in place. If they didn�t move the spoiler should easily fit back over the tabs. If they did move begin Step Three again. (practice makes perfect)
8. If all is well remove the spoiler and set it aside. The fun stuff is about to begin. This is what your trunk should look like now.
Thread Starter
|
Registered User
Joined: Dec 2007
Posts: 22
Likes: 0
From: Lexington, KY
Step Four: (drilling)
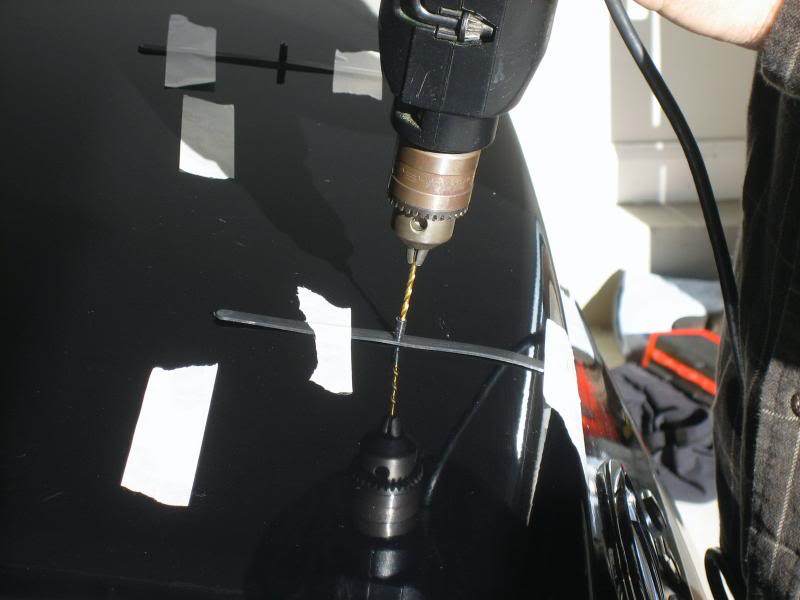
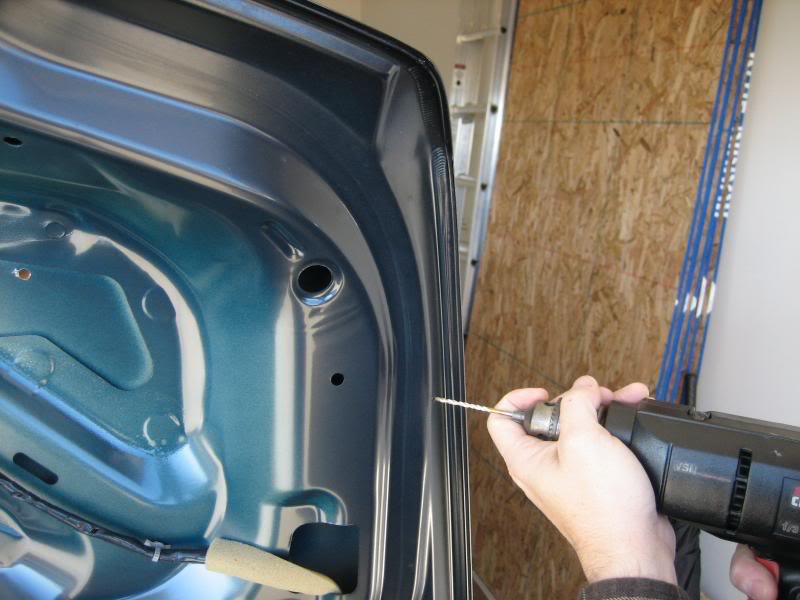
1. Get Ready - Each of the tabs that you just taped down have a post in the center of them. This is where you�ll be drilling pilot holes. I don�t remember what size pilot drill bit you use but refer to the instructions that come with your kit. This pilot hole bit will fit perfectly inside the post. Get your bit, put it in your drill, and don�t freak out (see picture) like my dad.

2. Pilot Holes - Insert the bit into the post on the tabs and drill (make sure your drill is set on �F� not �R�). Let the drill do the work (see pic). You don�t have to push really hard. If you push too hard on the drill you can damage the trunk when the hole is made as you will force the rest of the drill to strike the trunk causing dings and dents no G35 owner should ever have.
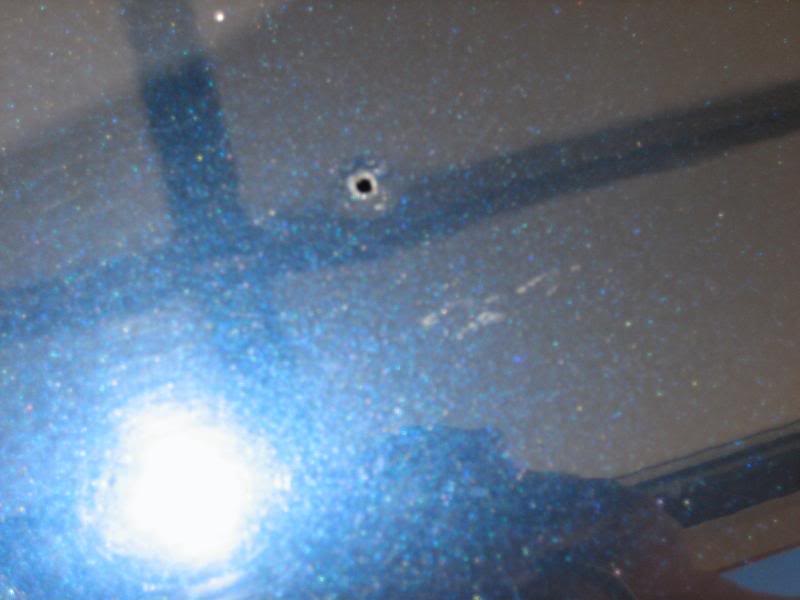
3. Remove the tape/tabs - Once all the holes are drilled remove the tape and the tabs. Your trunk should have a lot of little holes like these.
4. Safety first - Take your masking tape, and using two strips, tape a protective plus sign over each hold. You�re going to have to drill these holes out to a larger diameter. This will give you some protection from the drill hitting the trunk. Its not much but it will help.

5. Drill the real holes - Refer to the included directions for what size bit to use now. Using the larger bit drill out the holes to the larger diameter.
6. Whats Left - The four center holes (three for screws and the one for the brake light wire) are ready for action now and require no more drilling (big deep breath). Unfortunately you�re going to have to drill out some large holes to allow access from the inside of the trunk lid to the four end holes (two on each end of the outside of the trunk lid) you just drilled.
7. Mark it once - So as to know where to drill on the inside of the trunk lid, take a Philips head screwdriver and insert it into the four holes on the ends of the top of the trunk lid (two on each side). Using mild force strike the top of the screwdriver with your hand so that it scores or marks the underside of the trunk lid. This will tell you where you need to drill your holes (see picture).
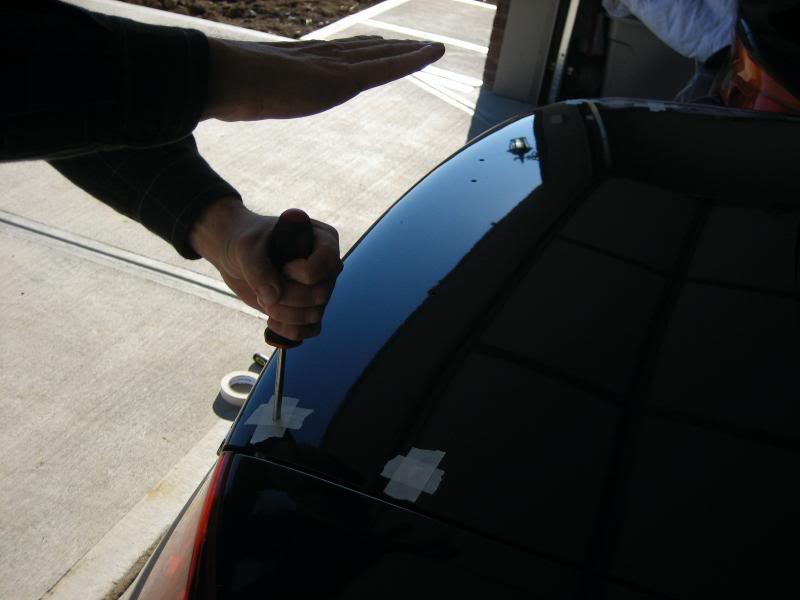
8. Mark it twice - Use this same screwdriver in the same way on the underside of the trunk lid where you just made marks. Push those indentions back in, in the opposite way so that you have an indentation to drill on instead of a bump that would only cause you heartache. You can also use a screw and a hammer (that�s what we did) to do this. (See pic)
9. Drill, Drill, Drill - Once you have your indentations use a small pilot drill bit and drill through each of the four indentations. Now use larger drill bits to widen the hole until you reach 1/2 � diameter. Do this in several steps skipping 2-3 bits every time you move up in drill bit size. Make sure to position your hole at an angle which allows you access to the smaller top holes. The goal is to be able to fit a bolt and a washer through the larger hole and up through the smaller hole above.
10. Hone it � Even the �� bit isn�t completely large enough to fit a bolt and a washer through at times. With the �� bit in the bottom holes wiggle it around evenly to widen the holes a little. Use one of the included washers and bolts (in the spoiler kit) to check to see if its big enough. If you can get it through the bottom (larger) hole and into the top (smaller hole) than its big enough. Take a deep breath� here comes the easy part.
1. Get Ready - Each of the tabs that you just taped down have a post in the center of them. This is where you�ll be drilling pilot holes. I don�t remember what size pilot drill bit you use but refer to the instructions that come with your kit. This pilot hole bit will fit perfectly inside the post. Get your bit, put it in your drill, and don�t freak out (see picture) like my dad.
2. Pilot Holes - Insert the bit into the post on the tabs and drill (make sure your drill is set on �F� not �R�). Let the drill do the work (see pic). You don�t have to push really hard. If you push too hard on the drill you can damage the trunk when the hole is made as you will force the rest of the drill to strike the trunk causing dings and dents no G35 owner should ever have.
3. Remove the tape/tabs - Once all the holes are drilled remove the tape and the tabs. Your trunk should have a lot of little holes like these.
4. Safety first - Take your masking tape, and using two strips, tape a protective plus sign over each hold. You�re going to have to drill these holes out to a larger diameter. This will give you some protection from the drill hitting the trunk. Its not much but it will help.
5. Drill the real holes - Refer to the included directions for what size bit to use now. Using the larger bit drill out the holes to the larger diameter.
6. Whats Left - The four center holes (three for screws and the one for the brake light wire) are ready for action now and require no more drilling (big deep breath). Unfortunately you�re going to have to drill out some large holes to allow access from the inside of the trunk lid to the four end holes (two on each end of the outside of the trunk lid) you just drilled.
7. Mark it once - So as to know where to drill on the inside of the trunk lid, take a Philips head screwdriver and insert it into the four holes on the ends of the top of the trunk lid (two on each side). Using mild force strike the top of the screwdriver with your hand so that it scores or marks the underside of the trunk lid. This will tell you where you need to drill your holes (see picture).
8. Mark it twice - Use this same screwdriver in the same way on the underside of the trunk lid where you just made marks. Push those indentions back in, in the opposite way so that you have an indentation to drill on instead of a bump that would only cause you heartache. You can also use a screw and a hammer (that�s what we did) to do this. (See pic)
9. Drill, Drill, Drill - Once you have your indentations use a small pilot drill bit and drill through each of the four indentations. Now use larger drill bits to widen the hole until you reach 1/2 � diameter. Do this in several steps skipping 2-3 bits every time you move up in drill bit size. Make sure to position your hole at an angle which allows you access to the smaller top holes. The goal is to be able to fit a bolt and a washer through the larger hole and up through the smaller hole above.
10. Hone it � Even the �� bit isn�t completely large enough to fit a bolt and a washer through at times. With the �� bit in the bottom holes wiggle it around evenly to widen the holes a little. Use one of the included washers and bolts (in the spoiler kit) to check to see if its big enough. If you can get it through the bottom (larger) hole and into the top (smaller hole) than its big enough. Take a deep breath� here comes the easy part.
Thread Starter
|
Registered User
Joined: Dec 2007
Posts: 22
Likes: 0
From: Lexington, KY
Step Five: (priming/rust protecting)
1. I recommend rust protecting these holes big time. You how have bare, unpainted metal exposed that can easily lead to rust no matter where you live. To limit the risk of rust do the following:
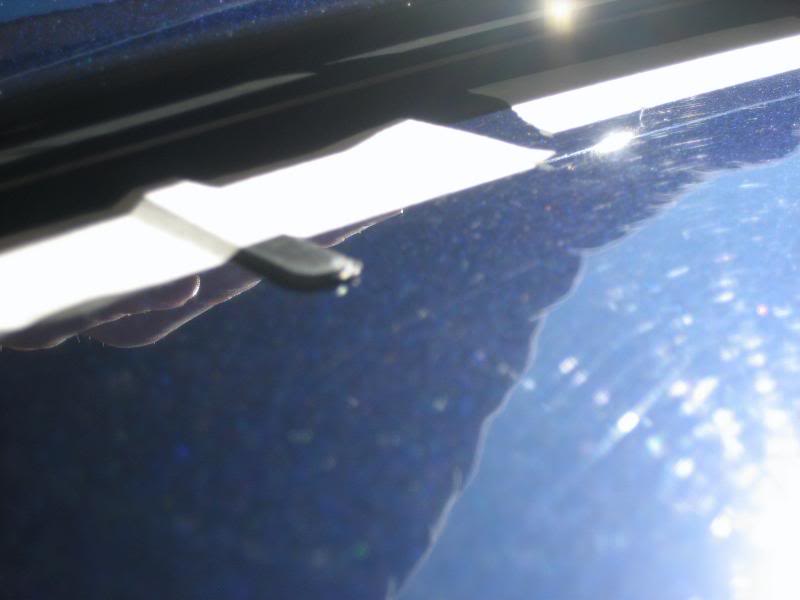
2. Find the holes on the top of the trunk lid. Use masking tape and cover the tops of all of them well.
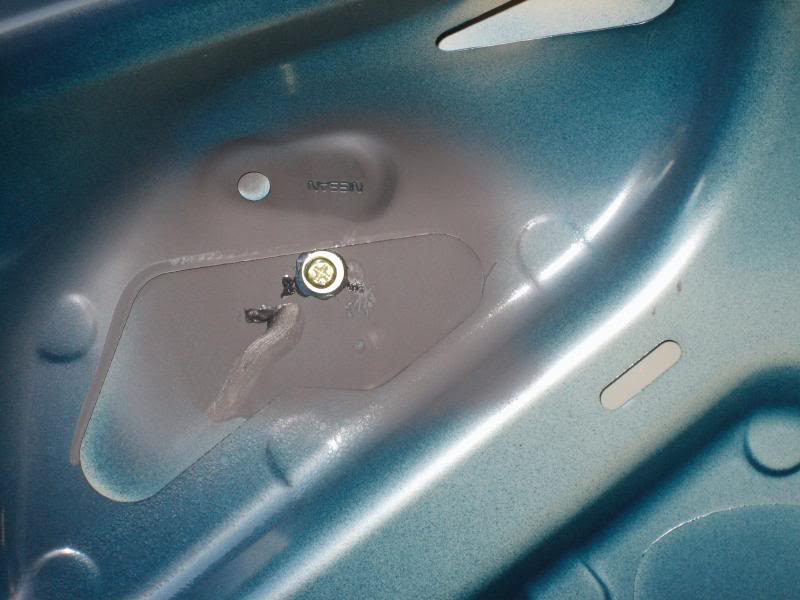
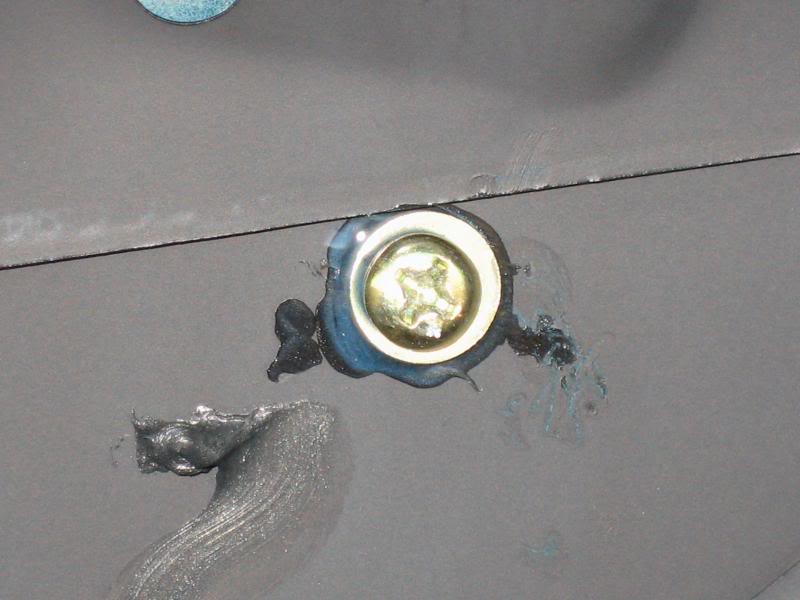
3. Using a high quality (the cheap stuff is water thin and doesn�t work) metal primer (in a rattle can) spray the under side of each of the holes including the four large ones on the underside. Do a few layers (2-3). Use a rag to catch any runs. The masking tape will keep the primer from getting on the top of the trunk lid and onto your nice pretty paint. This is what it will look like when done minus the screw/bolt. (see picture)
4. After the primer has dried (like 2 minutes at most) remove the tape from the trunk and use a black silicone gasket maker and a �Q� tip (see pictures)
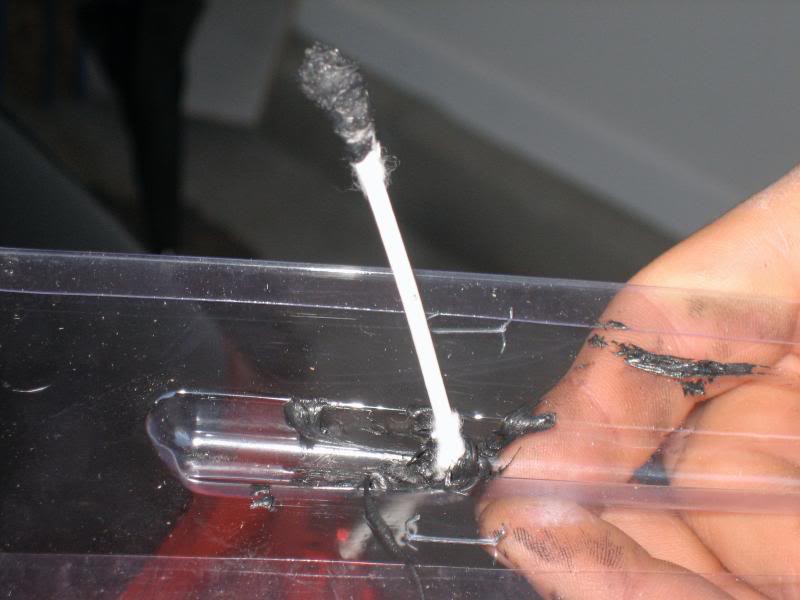
and cover each of the insides of the holes with a thin layer of gasket maker. Don�t worry if it shows up around the top� its ok! You�re going to cover all of that up with a spoiler in about five minutes.
5. Give the gasket stuff about 3 minutes to dry and move on.
1. I recommend rust protecting these holes big time. You how have bare, unpainted metal exposed that can easily lead to rust no matter where you live. To limit the risk of rust do the following:
2. Find the holes on the top of the trunk lid. Use masking tape and cover the tops of all of them well.
3. Using a high quality (the cheap stuff is water thin and doesn�t work) metal primer (in a rattle can) spray the under side of each of the holes including the four large ones on the underside. Do a few layers (2-3). Use a rag to catch any runs. The masking tape will keep the primer from getting on the top of the trunk lid and onto your nice pretty paint. This is what it will look like when done minus the screw/bolt. (see picture)
4. After the primer has dried (like 2 minutes at most) remove the tape from the trunk and use a black silicone gasket maker and a �Q� tip (see pictures)
and cover each of the insides of the holes with a thin layer of gasket maker. Don�t worry if it shows up around the top� its ok! You�re going to cover all of that up with a spoiler in about five minutes.
5. Give the gasket stuff about 3 minutes to dry and move on.
Trending Topics
Thread Starter
|
Registered User
Joined: Dec 2007
Posts: 22
Likes: 0
From: Lexington, KY
Step Six: (put it on)
This step will require you to have more than one person around. I recommend three for ease of installation but you could get by with two people (including yourself).
1. Feed the spoiler�s brake light wire through the hole that you drilled for it
2. Remove the adhesive strips (4) from the underside of the spoiler. These strips are in red in the picture.
3. Watch from the underside of the trunk to see if the holes in your trunk are lining up with the holes in the spoiler. Position the spoiler holes over the trunk holes and place the spoiler on the trunk lid. If it doesn�t place correctly its ok. The adhesive isn�t killer strong� you can move it if you need to. Have someone hold the spoiler in place.
4. Put the washers (in the kit) on all of the bolts (in the kit) and place the three center bolts in the spoiler. Don�t forget to put thread locker on the threads before you screw them into the spoiler (see pic).
The bolts will feed up from the under side of the trunk lid and into the underside of the spoiler. Your spoiler will stay in place now without anyone holding it. It may be helpful not to fully tighten the screws so that you can move the spoiler some to line up the holes between the trunk lid and the spoiler.
5. Now screw in the remaining four bolts into the spoiler. DON�T FORGET THE THREAD LOCKER!!!
6. Your spoiler is on. Have a cold one, a cup of coffee, a glass of water or whatever relaxes you and finish this little project.
Last edited by Abneya; Jan 1, 2008 at 10:13 AM.
Thread Starter
|
Registered User
Joined: Dec 2007
Posts: 22
Likes: 0
From: Lexington, KY
Step Seven: (wire the light)
I didn�t do the last little bit of this step (I did the first part though) because I had to work on my own car (this car is my dads), but I know what they did. My descriptions will be a bit vague at the end but should be enough to get you through it.
1. Wrap the wire around � Along the inside of the trunk lid there is a few wires that run along into a rubber boot. Wrap the brake light wire from the spoiler around these (it doesn�t have to be pretty�. Its going to get covered up by the trunk liner again) wires until you get to the boot (see pic). Sorry the pics suck here!
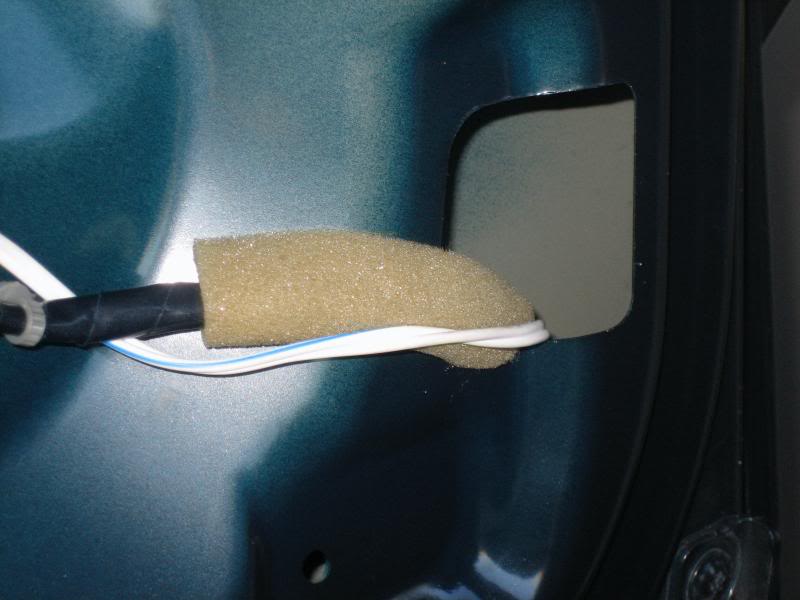
2. Take a wire hanger and snip the ends off. Stretch it out so that its straight.
3. Bend a very small piece of the end of the hanger around the brake light with needle nose pliers so that the wire is held tightly to the hanger.
4. Pull the boot off at each end (see pic)
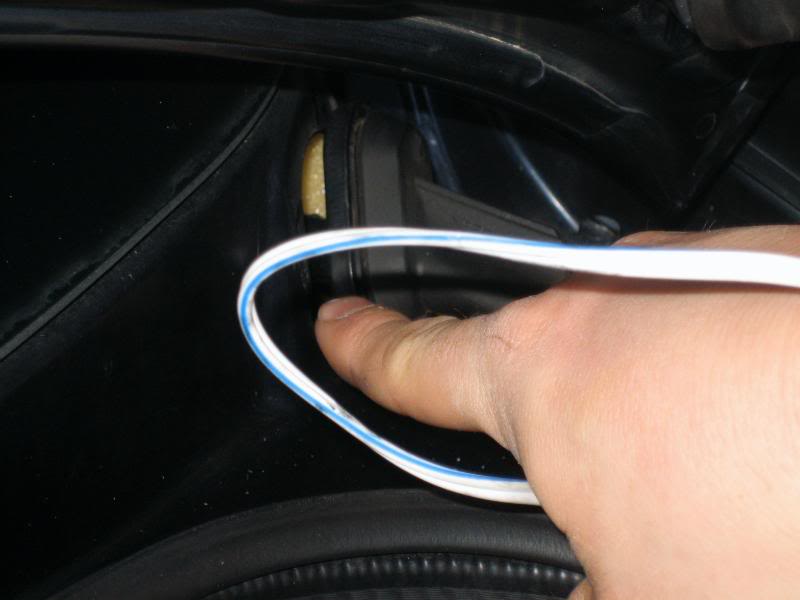
5. Straighten the boot out and push the opposite end of the hanger that the wire is attached at through the boot. Be careful and patient. This is a pain in the butt.
6. Once you have the hanger fished through the boot but it all the way through. This will pull the wire through the boot.
7. Pull down the back of the trunk liner (not the trunk lid liner) and find the wiring for the cars rear brake light (the one that is in the rear window). You can do one of two things here: Either way use wire strippers to expose the wires and twist them together. Then cover them with electrical tape.
a. detach the wires from the rear window brake light� splice into them and power your spoiler this way. (this turns off the rear brake light permanently) I recommend this method as G35�s that come with a spoiler have this rear window light turned off as well. It makes it so that no one has to know your spoiler is aftermarket.
b. just splice into the wires and keep the rear window brake light in use.
I didn�t do the last little bit of this step (I did the first part though) because I had to work on my own car (this car is my dads), but I know what they did. My descriptions will be a bit vague at the end but should be enough to get you through it.
1. Wrap the wire around � Along the inside of the trunk lid there is a few wires that run along into a rubber boot. Wrap the brake light wire from the spoiler around these (it doesn�t have to be pretty�. Its going to get covered up by the trunk liner again) wires until you get to the boot (see pic). Sorry the pics suck here!
2. Take a wire hanger and snip the ends off. Stretch it out so that its straight.
3. Bend a very small piece of the end of the hanger around the brake light with needle nose pliers so that the wire is held tightly to the hanger.
4. Pull the boot off at each end (see pic)
5. Straighten the boot out and push the opposite end of the hanger that the wire is attached at through the boot. Be careful and patient. This is a pain in the butt.
6. Once you have the hanger fished through the boot but it all the way through. This will pull the wire through the boot.
7. Pull down the back of the trunk liner (not the trunk lid liner) and find the wiring for the cars rear brake light (the one that is in the rear window). You can do one of two things here: Either way use wire strippers to expose the wires and twist them together. Then cover them with electrical tape.
a. detach the wires from the rear window brake light� splice into them and power your spoiler this way. (this turns off the rear brake light permanently) I recommend this method as G35�s that come with a spoiler have this rear window light turned off as well. It makes it so that no one has to know your spoiler is aftermarket.
b. just splice into the wires and keep the rear window brake light in use.

 I like the picture of drill step.