
DIY: Rear Camera install


Thread Starter
|
Registered User
Joined: Jun 2006
Posts: 279
Likes: 4
From: MD
DIY: Rear Camera install
PART 1
REMINDER: DO AT YOUR OWN RISK!!! I am willing to help but I can only do so much over this forums (I HAVE AN O4 G35 COUPLE) Dont know if all the other colors of the wires are the same as they are on my car. If you give me make model and year i can look it up and tell you.
REMINDER!!!!!!! BYPASSING THE DVD (PLAYING WHILE DRIVING IS AGAINST THE LAW...DO AT OWN RISK)
I was looking all over the forum and I really didn't see anything about rear camera's...or install if that. I was in some what of a rush and I have a sh*t cam so be easy on me if this isn't grade A write up. I got my rear camera from work for like 80$ made my Audiovox. I think the pic quality is ok not that bad. Im guessing that the pioneer somethig something cam is better but i would have to special order it and wait and go thur some BS to get a discount on it. I got my Navi Interface from www.avelectronic.com for like around 250$...I was talking to someone...sounded asian..I was thinking about a group buy...up to like 5 or more..cuz my friends were thinking about it...he was talking about maybe $225 each...so if you guy want to start a group buy then thats something to think about. There is another well known place to go to www.tvandnav2go.com/rgb.html (there interface looks like it has some bottons on it for "reset" "brightness" so I dont know if this place might be better, yet I dont know if it is plug in play) The interface that I got from AV electronic is pretty much plug and play. I do have to CUT a pink wire which I got from behind the radio, as well as find the REVERSE wire.
I have an 04 Infiniti G35 coupe im not sure if it works for the newer ones but you can call and find out. It comes with some install instructions....pretty much step by step...but no pics. I think it was pretty easy. It only took me about 3 hours just because it was my first time! haha and I bypassed the parking break so I can watch my dvd's (when i get my PS2 so i can watch dvds and play games when i like while driving...haha shhh and its soo small it will fit in my glove box...theres no point in getting just a dvd play for the price) I made a switch so i can watch the dvds while driving...you can GROUND that wire out but I made a switch. As well as I didnt connect my REVERSE wire to the REVERSE wire to the car...I also ran that to a switch....therefore I can have the rear cam displace whenever I flick the switch. I think thats pretty cool bec I can be driving and flick the switch and use that as a rear view mirror...seeing if ne 5 0's are on my tail. All in all im pretty happy I use it all the time bec I do reverse park alot! Gotta love that front end out, so sexxy.! Tell me what you guys think...
1. TAKING OFF THE **** **** (IF MANUAL) THIS PART IS SOMEWHAT HARD! BE VERY CAREFUL. I FORGOT TO TAKE PIC'S BUT IF YOU STICK YOUR HAND ON THE LEATHER BOOT AND PULL ON THE TRIM PANEL UPWARDS THAT IS AROUND THE SHIFTER IT WILL UNSNAP...GET SOME CHANNEL LOCKS THAT WILL HOLD ON THE SHIFTER NOT THE SHIFTKNOB THE SHIFTER, THEN USE A MONKEY WRENCH TO TWIST OFF THE SHIFTKNOB (MAKE SURE YOU USE A CLOTH AROUND THE SHIFTERKNOB SO YOU WONT MESS UP THE LEATHER ON THE SHIFTKNOB. WHILE KEEPING THE CHANNEL LOCKS IN PLACE TWIST OFF THE SHIFTKNOB USING A MONKEY WRENCH COUNTER CLOCKWISE. ITS VERY HARD TO GET THE SHIFTKNOB OFF FOR THE FIRST TIME. THE FACTORY PUTS IT ON SO TIGHT. IF YOU DONT USE THE CHANNEL LOCKS THE (SHIFTER ITSELF WILL COME OFF) THIS HAS HAPPENED TO ME!


I DID PUT IT BACK ON USING SOME SILICONE AND IT IS FINE NOW. BUT JUST MAKE SURE WHEN UR TWISTING THE SHIFT **** OFF YOU DO NOT LET THE SHIFTER PART MOVE. BUT NOT A BIG DEAL . YOU CAN PUT IT BACK ON WITH SILICONE. AFTER THAT THE SHIFTKNOB WILL COME OFF AND JUST UNPLUG THE LIGHT THAT GOES TO THE ASHTRAY AND THE HARNESS THAT GOES TO YOUR HAPPYLIGHTS (HAZARDS)
IT SHOULD LOOKS LIKE THIS WHEN DONE

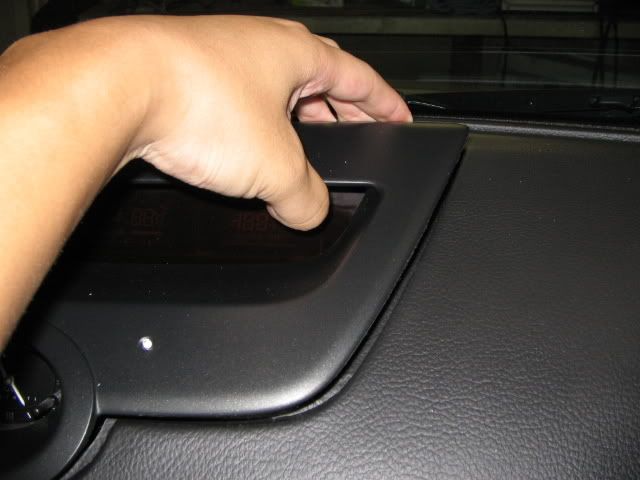
Pull down the panel under the glove box..just pressure clips no screws

Now to take the glove box off....pop off that long kick panel trim


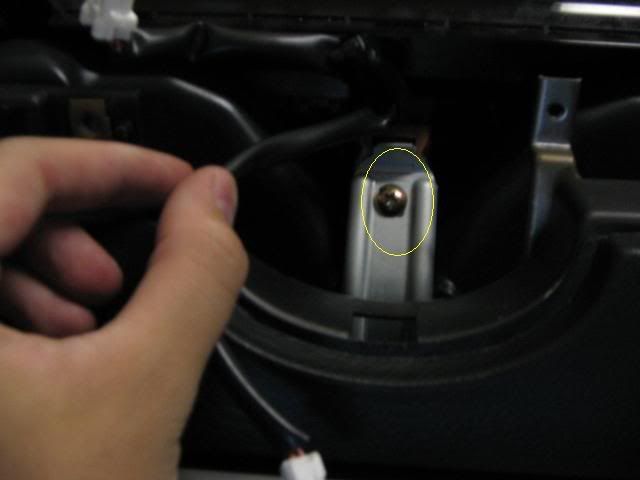
remove the plastic nut

pull passenger kick panel to ur left

remove a screw on the left

and then the right

open glove box and remove 4 screws

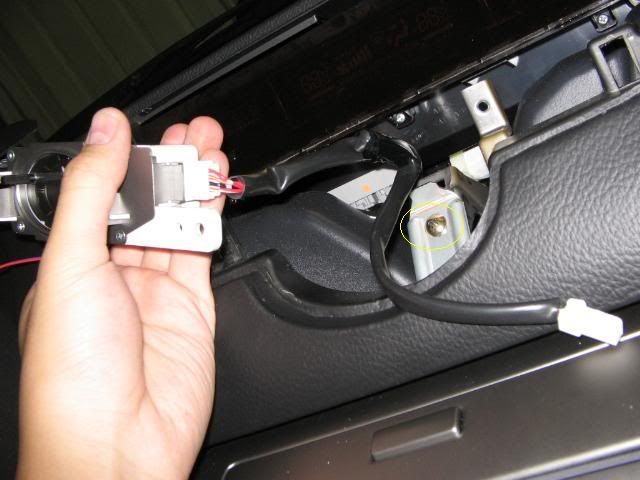
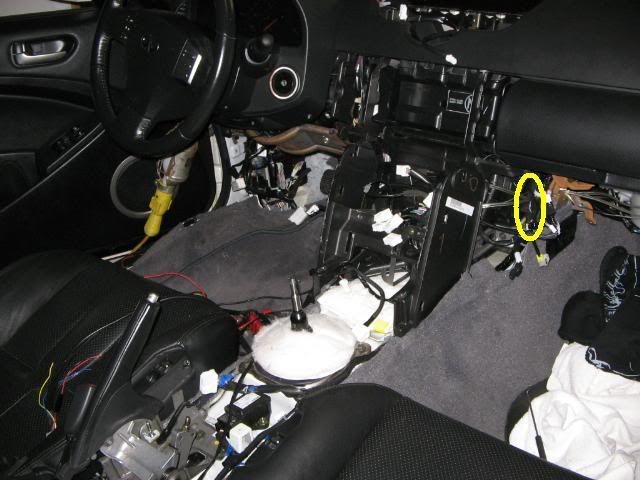
CAREFULLY PULL DOWN THE WHOLE GLOVE BOX BUT SLOW! THERE IS AN AIR BAG HANRESS THAT IS CONNECTED TO THE GLOVE BOX! DO NOT DISCONNET THIS YELLOW HARNESS IF YOU DO IT WILL TRIP THE AIRBAG SENSOR AND YOU WILL HAVE TO TAKE IT BACK TO THE DEALER FOR THEM TO RESET IT AND IT IS NOT CHEAP! HAHA YOU CAN DETACH THE WHOLE HARNESS FROM THE GLOVEBOX BY JUST PUSHING THIS LITTLE CLIPS THAT ARE BEING HELD IN WITH. WHEN THAT IS DONE YOU CAN TAKE OFF ALL THE OTHER PLUGS WITH NO PROBLEMS

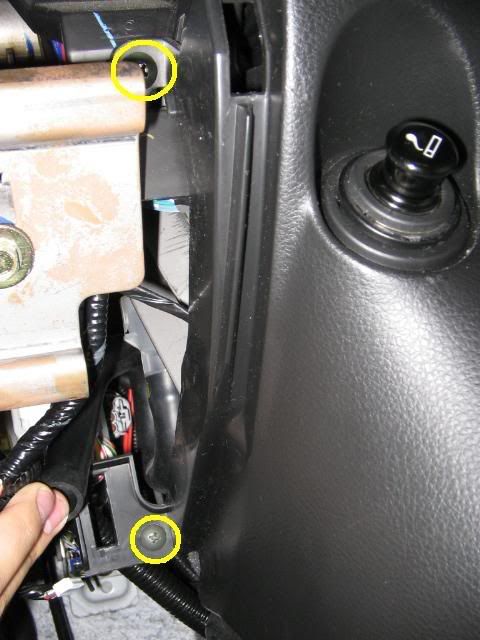
TO YOUR LEFT OF THE GLOVEBOX WILL BE THE CIG LIGHTER THAT PANEL IS HELD IN WITH TWO SCREW AFTER THAT REMOVE.
remove the plug
back to the radio at the bottom remove to gold screws
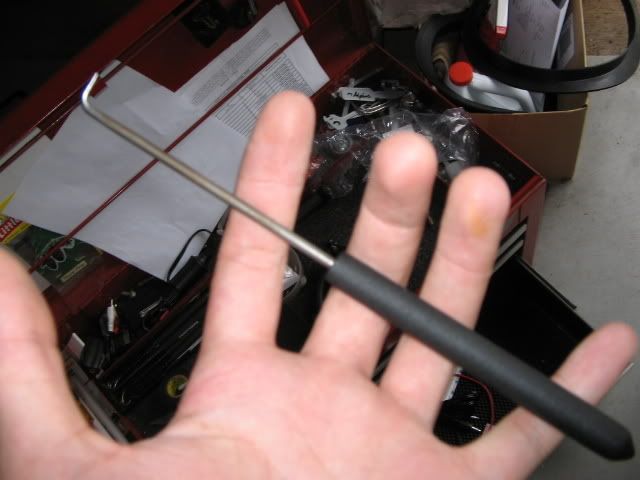
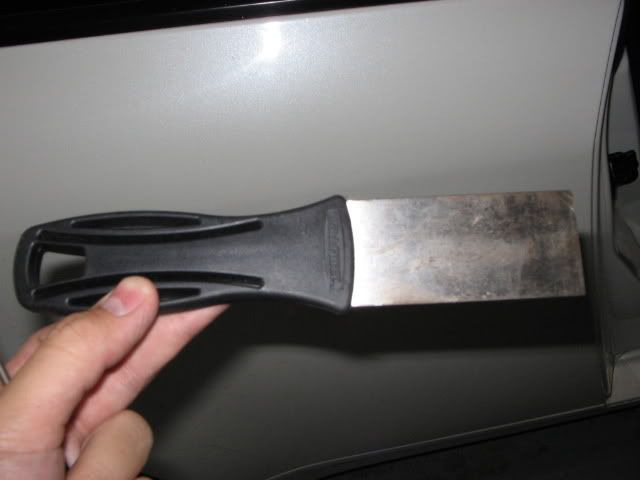
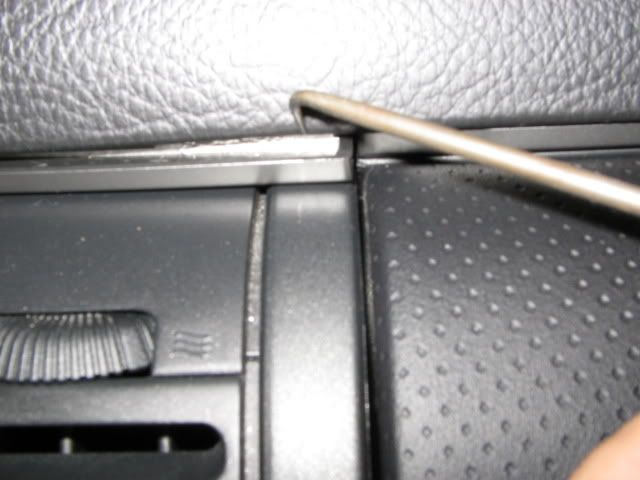
at the top of the radio the clock trim will have to come out. You will need some tools that look like this a pik and a STIFF but yet thin putty knife. I got the pick from sears its a set of 4 with different angels and the putty knife from home depo.
there is a THIN silver strip that is in between the top of the radio and the leather dash you will have to use ur pik and pull it out. started on the right
next is the trim for the clock, it is somewhat tricky...there is 4 pressure clip holding it in one each corner
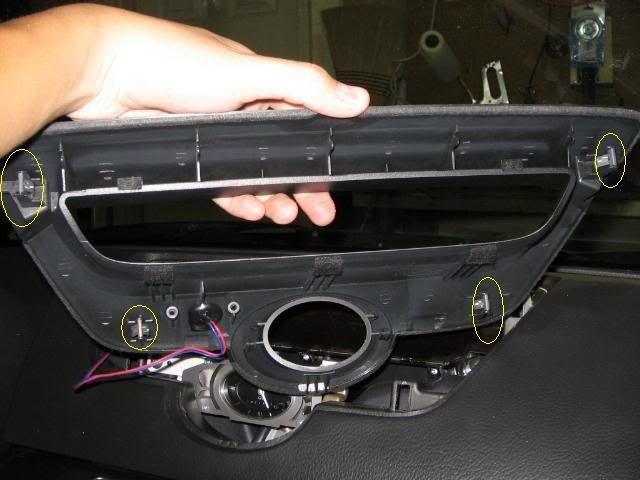
you can use the putty knife but it depents on how stiff ur putty knife is, if not that stiff that putty knife will just bend and do nothing. I have the stiffest one and it still didnt work. I just pulled it with my hands. but here are some good pressure points
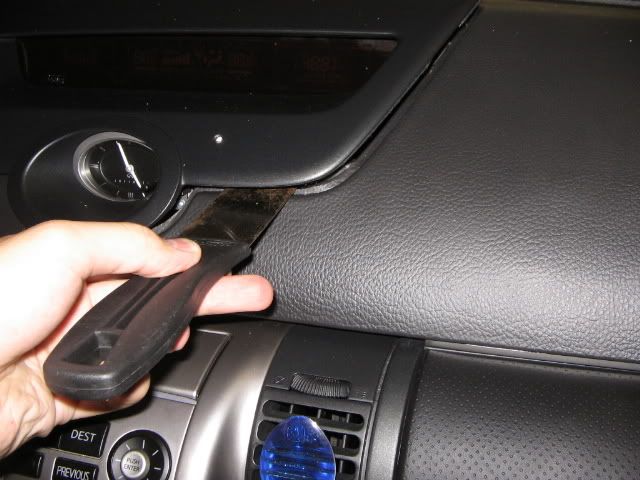

You can use the putty knife to lift up the trim so u can get ur fingers in..i used both hands on the top right and got my fingers around the trim and just pulled hard as sh*t TOWARD ME..(toward the trunk of the car..(BACK) )
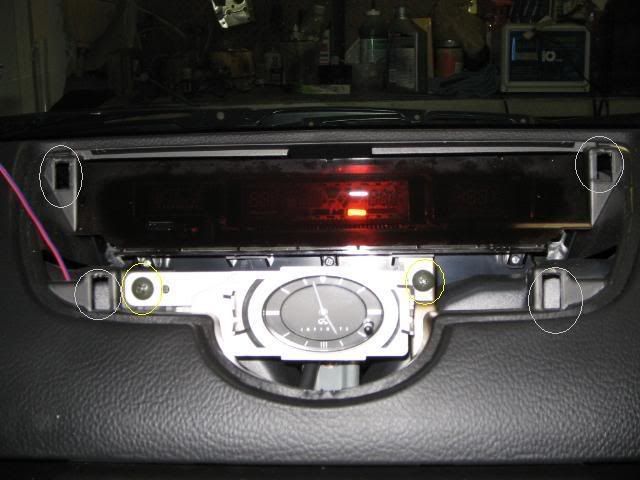
next remove the two screw that are holding in the clock and then disconnect that harness
move another gold screw
better pic angle
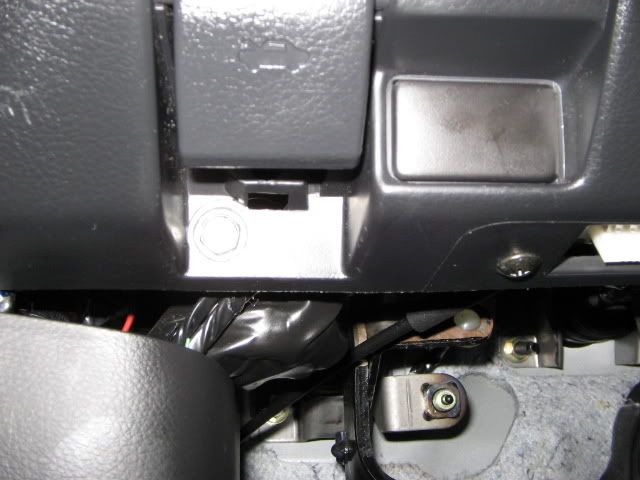
now go on the driverside. remove a 10mm bolt that is located under ther hood release
move the steering wheel up
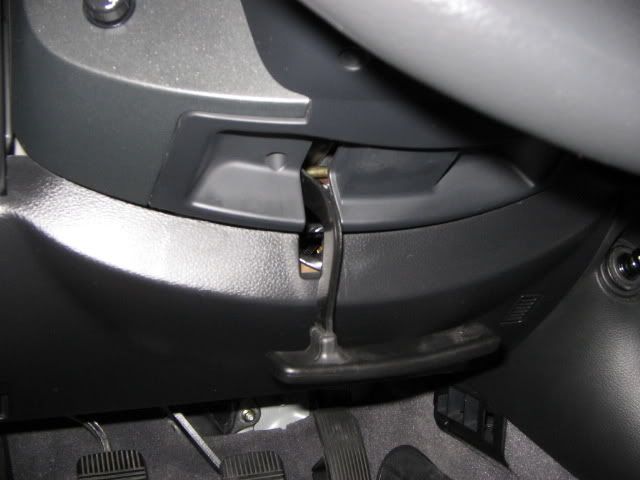
pull down and out the underdash panel, and disconnect all the plugs and harnesses
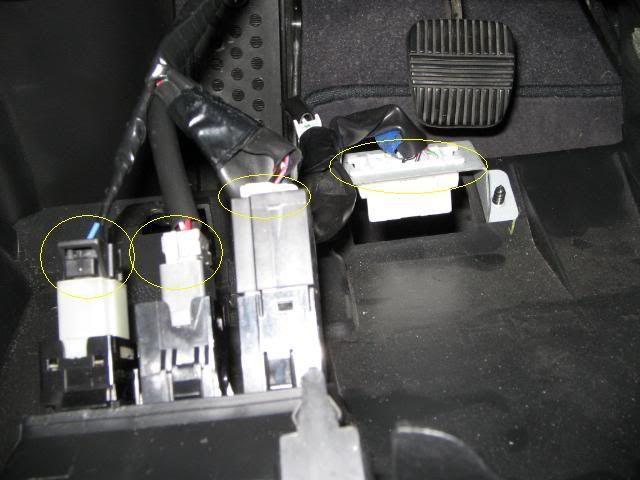
like the samething on the passenger sides cig lighter there anr 2 screws holding that panel in...remove them
and harnesses
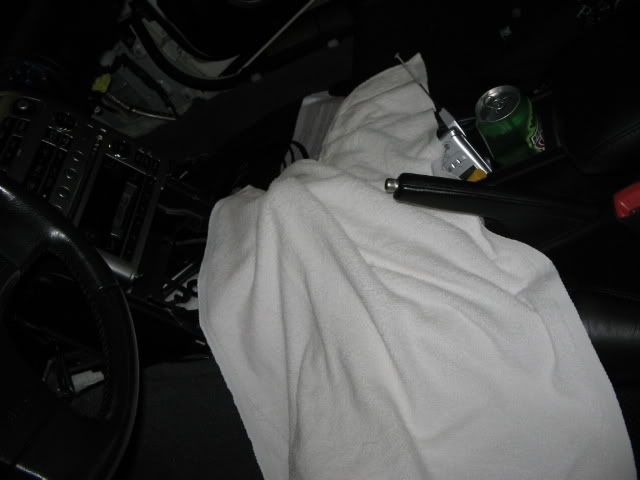
lay a long and somewhat think cloth over ur shifter bec now your taking out the radio.
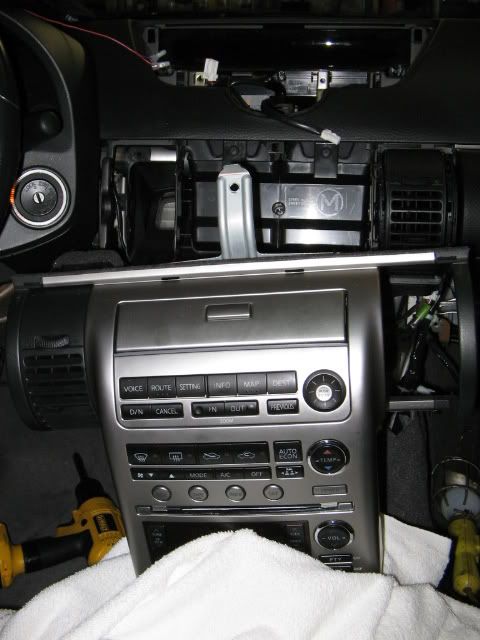
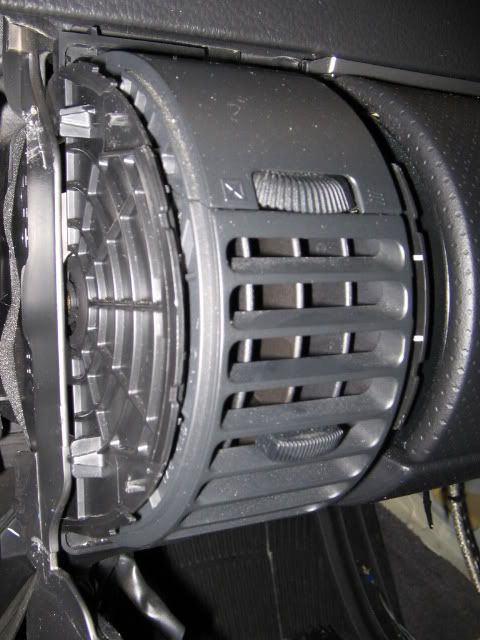
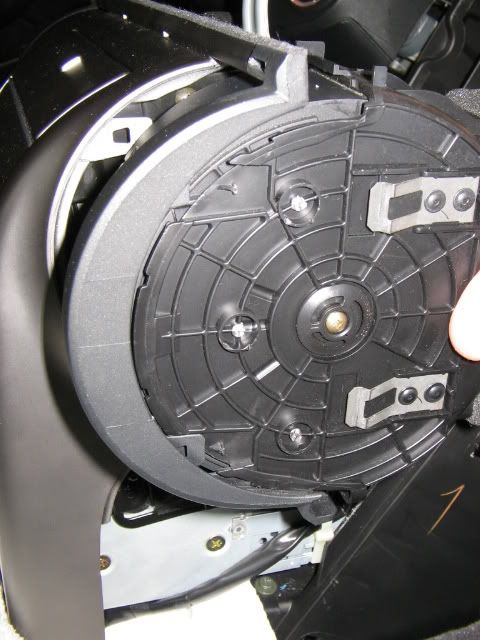
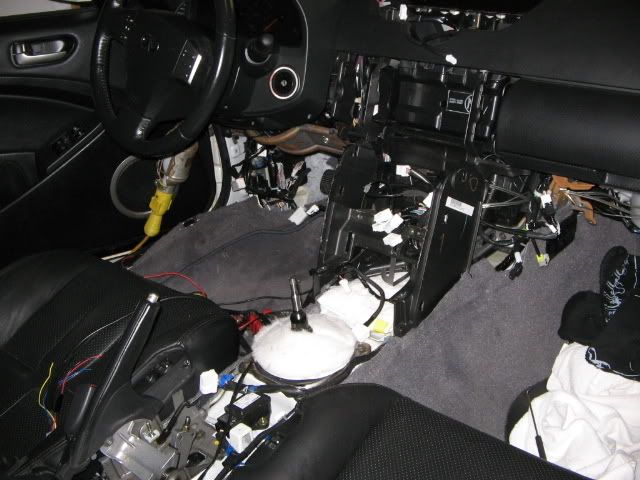
starting from the bottom pull outwards...and then downwards ....wiggle it a little bec the air vents are connected to the dash trim and to the dash itself. You might have some trouble because of the metal piece gets in the way...after you get it out it should look like this.
REMINDER: DO AT YOUR OWN RISK!!! I am willing to help but I can only do so much over this forums (I HAVE AN O4 G35 COUPLE) Dont know if all the other colors of the wires are the same as they are on my car. If you give me make model and year i can look it up and tell you.
REMINDER!!!!!!! BYPASSING THE DVD (PLAYING WHILE DRIVING IS AGAINST THE LAW...DO AT OWN RISK)
I was looking all over the forum and I really didn't see anything about rear camera's...or install if that. I was in some what of a rush and I have a sh*t cam so be easy on me if this isn't grade A write up. I got my rear camera from work for like 80$ made my Audiovox. I think the pic quality is ok not that bad. Im guessing that the pioneer somethig something cam is better but i would have to special order it and wait and go thur some BS to get a discount on it. I got my Navi Interface from www.avelectronic.com for like around 250$...I was talking to someone...sounded asian..I was thinking about a group buy...up to like 5 or more..cuz my friends were thinking about it...he was talking about maybe $225 each...so if you guy want to start a group buy then thats something to think about. There is another well known place to go to www.tvandnav2go.com/rgb.html (there interface looks like it has some bottons on it for "reset" "brightness" so I dont know if this place might be better, yet I dont know if it is plug in play) The interface that I got from AV electronic is pretty much plug and play. I do have to CUT a pink wire which I got from behind the radio, as well as find the REVERSE wire.
I have an 04 Infiniti G35 coupe im not sure if it works for the newer ones but you can call and find out. It comes with some install instructions....pretty much step by step...but no pics. I think it was pretty easy. It only took me about 3 hours just because it was my first time! haha and I bypassed the parking break so I can watch my dvd's (when i get my PS2 so i can watch dvds and play games when i like while driving...haha shhh and its soo small it will fit in my glove box...theres no point in getting just a dvd play for the price) I made a switch so i can watch the dvds while driving...you can GROUND that wire out but I made a switch. As well as I didnt connect my REVERSE wire to the REVERSE wire to the car...I also ran that to a switch....therefore I can have the rear cam displace whenever I flick the switch. I think thats pretty cool bec I can be driving and flick the switch and use that as a rear view mirror...seeing if ne 5 0's are on my tail. All in all im pretty happy I use it all the time bec I do reverse park alot! Gotta love that front end out, so sexxy.! Tell me what you guys think...
1. TAKING OFF THE **** **** (IF MANUAL) THIS PART IS SOMEWHAT HARD! BE VERY CAREFUL. I FORGOT TO TAKE PIC'S BUT IF YOU STICK YOUR HAND ON THE LEATHER BOOT AND PULL ON THE TRIM PANEL UPWARDS THAT IS AROUND THE SHIFTER IT WILL UNSNAP...GET SOME CHANNEL LOCKS THAT WILL HOLD ON THE SHIFTER NOT THE SHIFTKNOB THE SHIFTER, THEN USE A MONKEY WRENCH TO TWIST OFF THE SHIFTKNOB (MAKE SURE YOU USE A CLOTH AROUND THE SHIFTERKNOB SO YOU WONT MESS UP THE LEATHER ON THE SHIFTKNOB. WHILE KEEPING THE CHANNEL LOCKS IN PLACE TWIST OFF THE SHIFTKNOB USING A MONKEY WRENCH COUNTER CLOCKWISE. ITS VERY HARD TO GET THE SHIFTKNOB OFF FOR THE FIRST TIME. THE FACTORY PUTS IT ON SO TIGHT. IF YOU DONT USE THE CHANNEL LOCKS THE (SHIFTER ITSELF WILL COME OFF) THIS HAS HAPPENED TO ME!
I DID PUT IT BACK ON USING SOME SILICONE AND IT IS FINE NOW. BUT JUST MAKE SURE WHEN UR TWISTING THE SHIFT **** OFF YOU DO NOT LET THE SHIFTER PART MOVE. BUT NOT A BIG DEAL . YOU CAN PUT IT BACK ON WITH SILICONE. AFTER THAT THE SHIFTKNOB WILL COME OFF AND JUST UNPLUG THE LIGHT THAT GOES TO THE ASHTRAY AND THE HARNESS THAT GOES TO YOUR HAPPYLIGHTS (HAZARDS)
IT SHOULD LOOKS LIKE THIS WHEN DONE
Pull down the panel under the glove box..just pressure clips no screws
Now to take the glove box off....pop off that long kick panel trim
remove the plastic nut
pull passenger kick panel to ur left
remove a screw on the left
and then the right
open glove box and remove 4 screws
CAREFULLY PULL DOWN THE WHOLE GLOVE BOX BUT SLOW! THERE IS AN AIR BAG HANRESS THAT IS CONNECTED TO THE GLOVE BOX! DO NOT DISCONNET THIS YELLOW HARNESS IF YOU DO IT WILL TRIP THE AIRBAG SENSOR AND YOU WILL HAVE TO TAKE IT BACK TO THE DEALER FOR THEM TO RESET IT AND IT IS NOT CHEAP! HAHA YOU CAN DETACH THE WHOLE HARNESS FROM THE GLOVEBOX BY JUST PUSHING THIS LITTLE CLIPS THAT ARE BEING HELD IN WITH. WHEN THAT IS DONE YOU CAN TAKE OFF ALL THE OTHER PLUGS WITH NO PROBLEMS
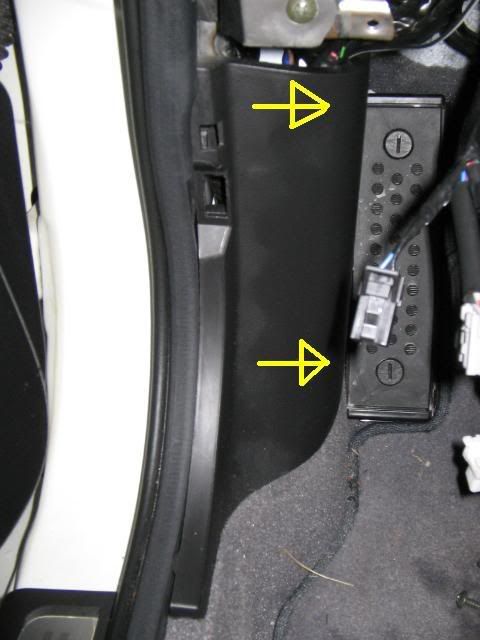
TO YOUR LEFT OF THE GLOVEBOX WILL BE THE CIG LIGHTER THAT PANEL IS HELD IN WITH TWO SCREW AFTER THAT REMOVE.
remove the plug
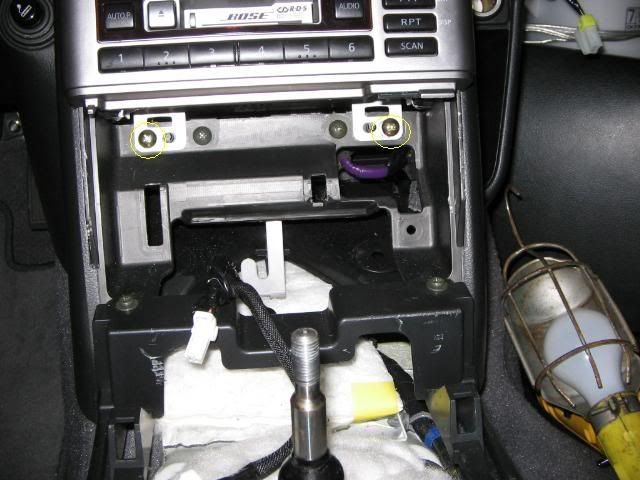
back to the radio at the bottom remove to gold screws
at the top of the radio the clock trim will have to come out. You will need some tools that look like this a pik and a STIFF but yet thin putty knife. I got the pick from sears its a set of 4 with different angels and the putty knife from home depo.
there is a THIN silver strip that is in between the top of the radio and the leather dash you will have to use ur pik and pull it out. started on the right
next is the trim for the clock, it is somewhat tricky...there is 4 pressure clip holding it in one each corner
you can use the putty knife but it depents on how stiff ur putty knife is, if not that stiff that putty knife will just bend and do nothing. I have the stiffest one and it still didnt work. I just pulled it with my hands. but here are some good pressure points
You can use the putty knife to lift up the trim so u can get ur fingers in..i used both hands on the top right and got my fingers around the trim and just pulled hard as sh*t TOWARD ME..(toward the trunk of the car..(BACK) )
next remove the two screw that are holding in the clock and then disconnect that harness
move another gold screw
better pic angle
now go on the driverside. remove a 10mm bolt that is located under ther hood release
move the steering wheel up
pull down and out the underdash panel, and disconnect all the plugs and harnesses
like the samething on the passenger sides cig lighter there anr 2 screws holding that panel in...remove them
and harnesses
lay a long and somewhat think cloth over ur shifter bec now your taking out the radio.
starting from the bottom pull outwards...and then downwards ....wiggle it a little bec the air vents are connected to the dash trim and to the dash itself. You might have some trouble because of the metal piece gets in the way...after you get it out it should look like this.
Thread Starter
|
Registered User
Joined: Jun 2006
Posts: 279
Likes: 4
From: MD
DIY: Rear camera install PART 2
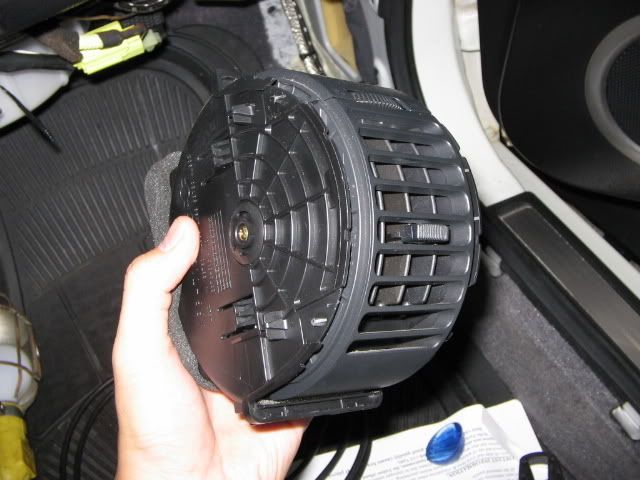
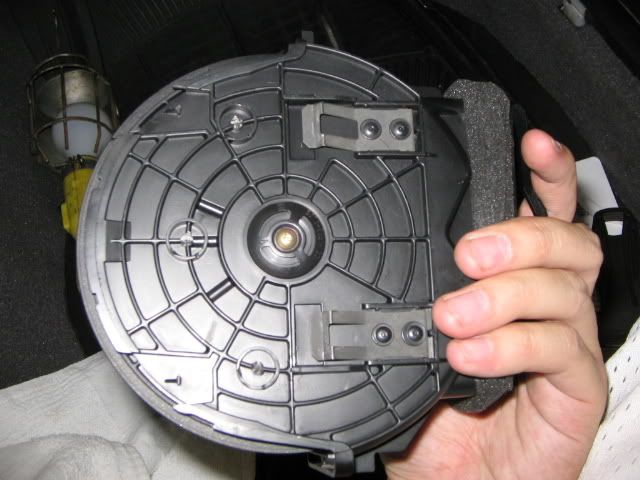
a vent might come off the radio dash and still be on the car. Thats ok
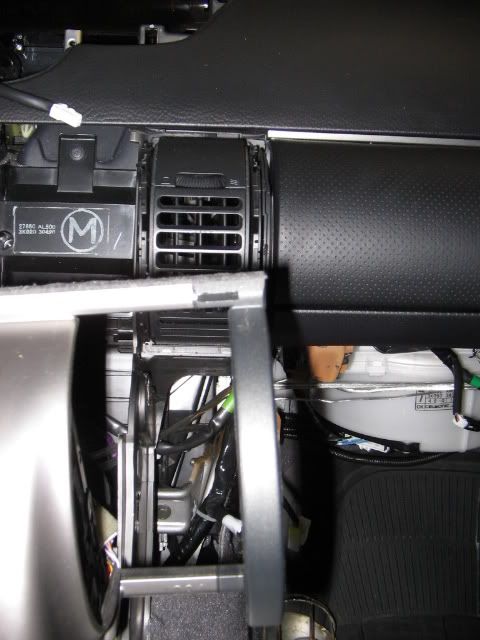
Its can come off and be snapped back on the radio trim in this part...you can leave it as it is thats ok to. when you go 2 put the radio back in it will click back on
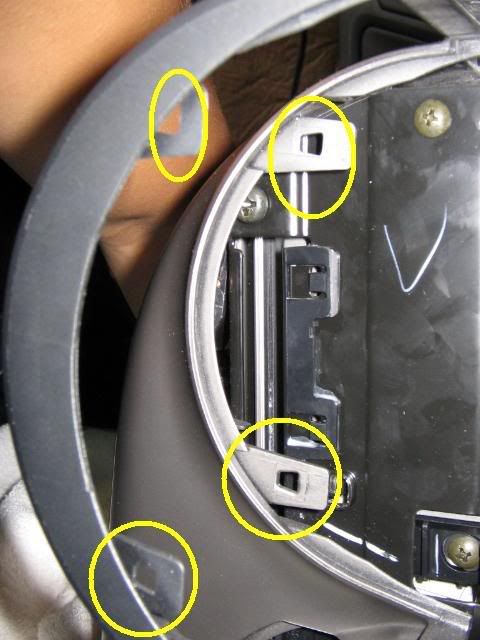
I took mine out and clicked it back to the radio trim
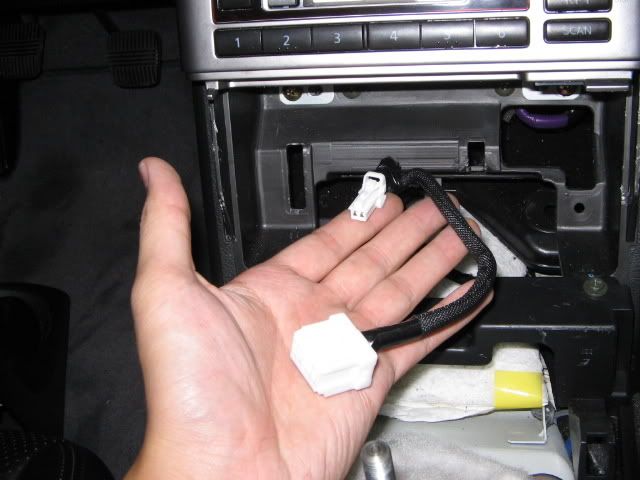
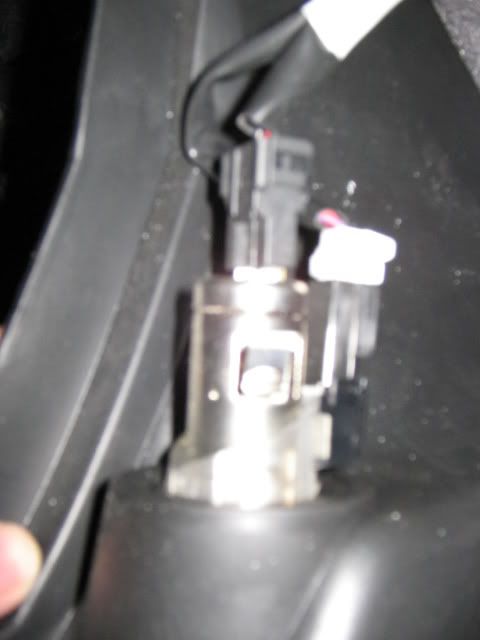
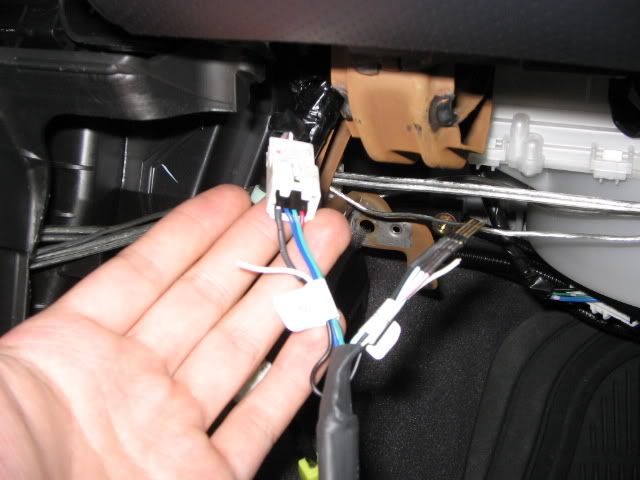
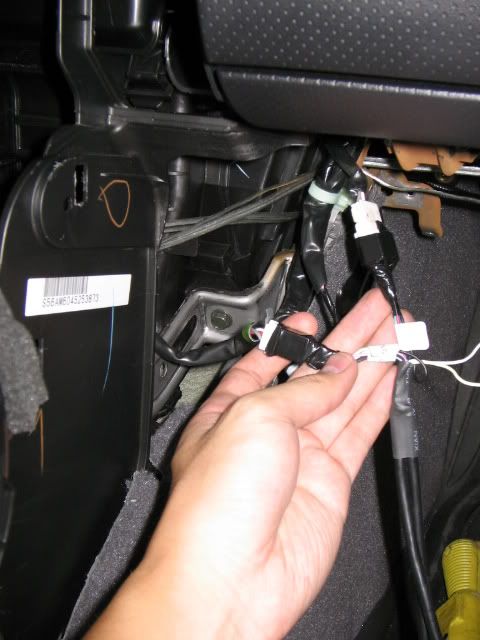
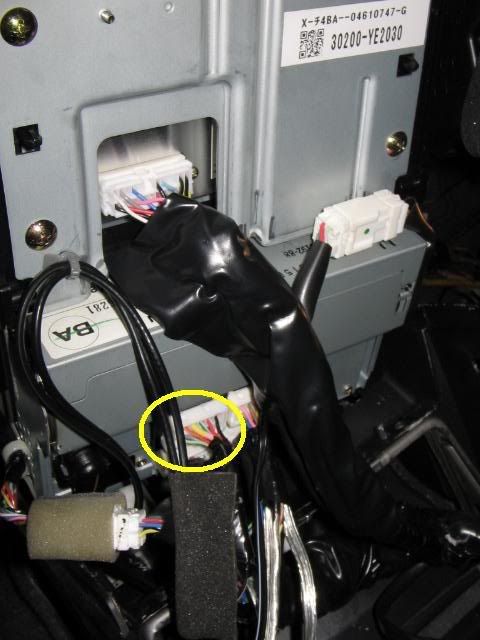
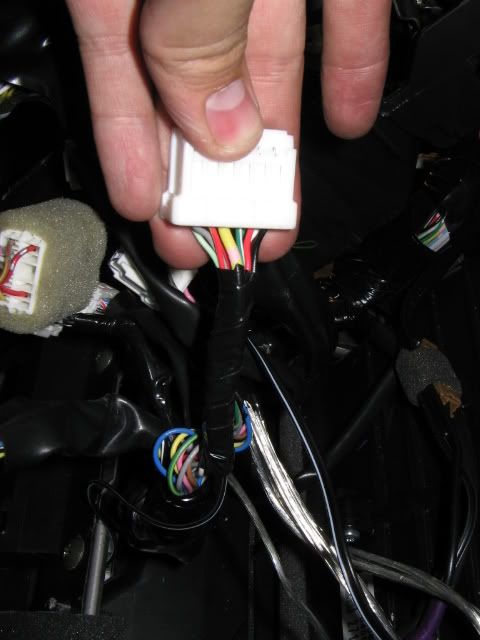
Moving on..you will have to locate the WHITE 4 PIN HARNESS that you will have to DISCONNECT and plug in the interface to. The harness location is on the right side of the radio a lil on the side where ur knee is
It will look like this.
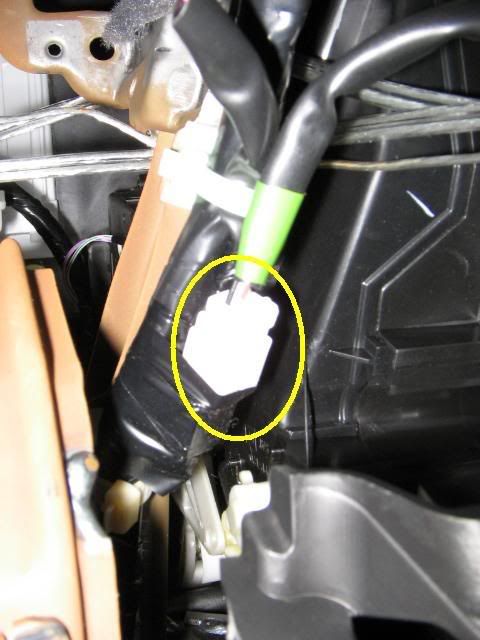
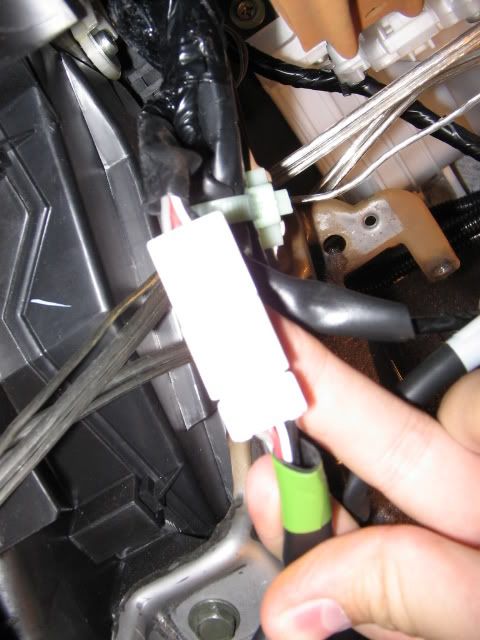
Disconnet it and it should look like this. IN THE PIC I LABELED WRONG..the top is the MALE and the bottom is FEMALE
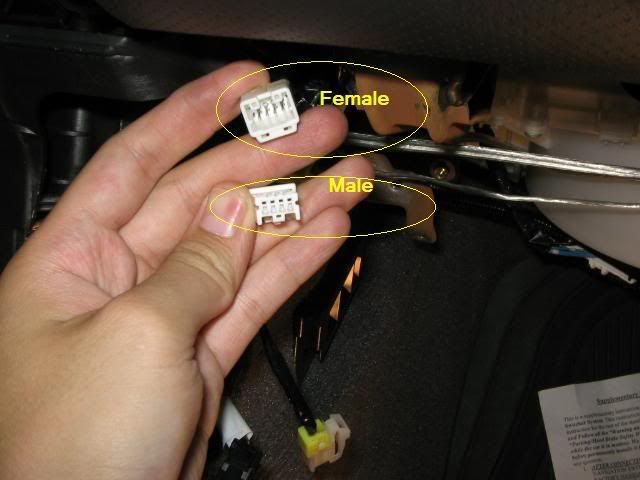
Now for the interface. MALE on the right and FEMALE on the left.
The FEMALES from the interface goes to the MALE harness of the car
The MALE from the interface goes to the FEMALE harness of the car
When connected make sure it is all the way in and use 3M tape, so it doesnt fall out.
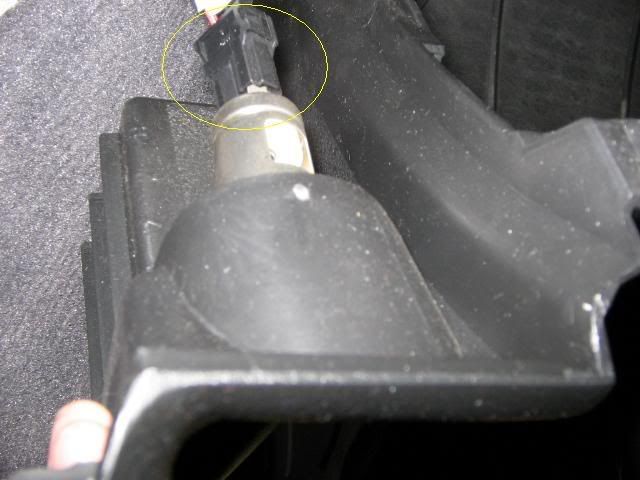
Now BEHIND the radio (behind the screen should be like a 24 pin plug)
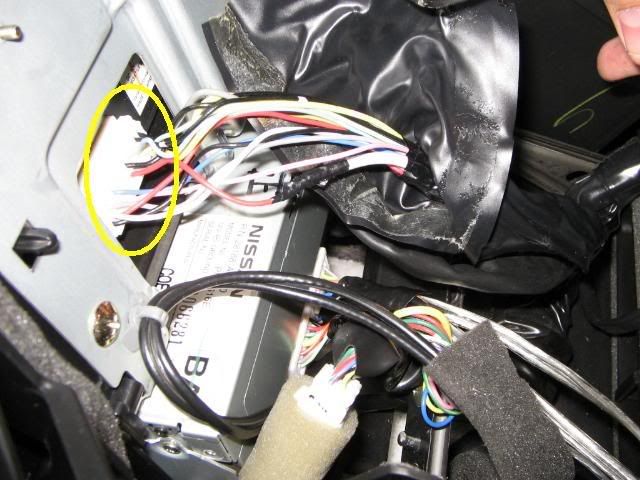
Location a pink wire...this wire u will be CUTTING IN HALF
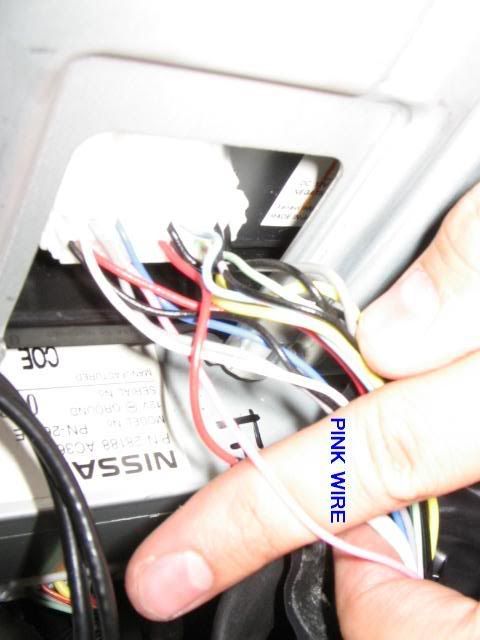
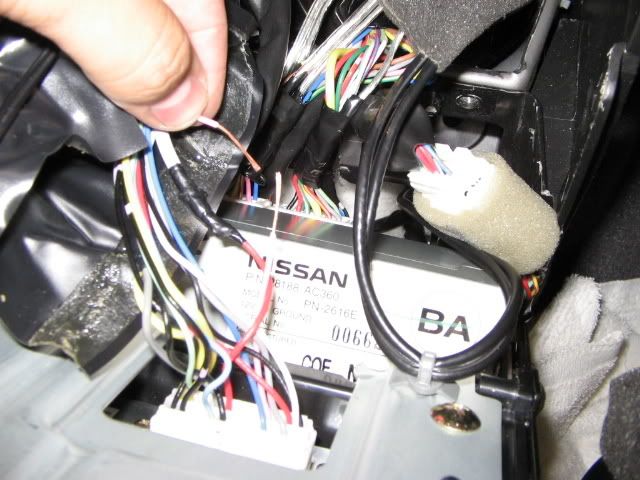
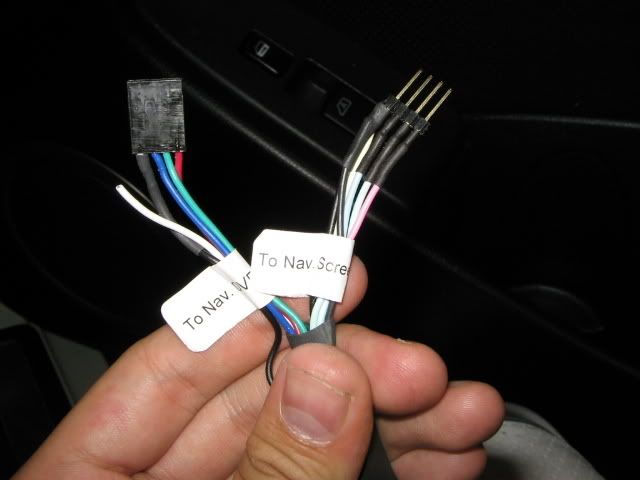
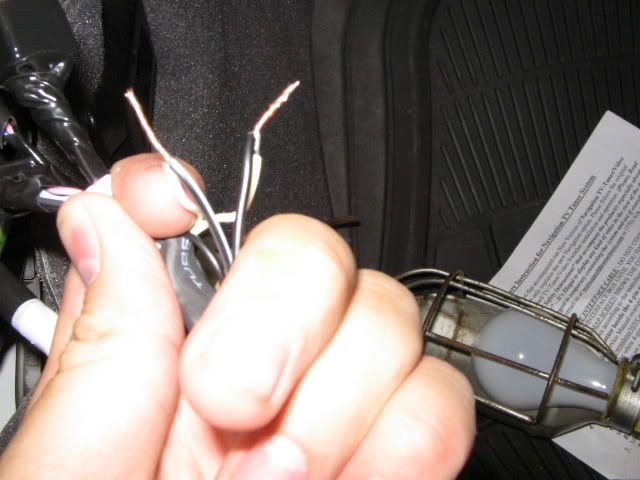
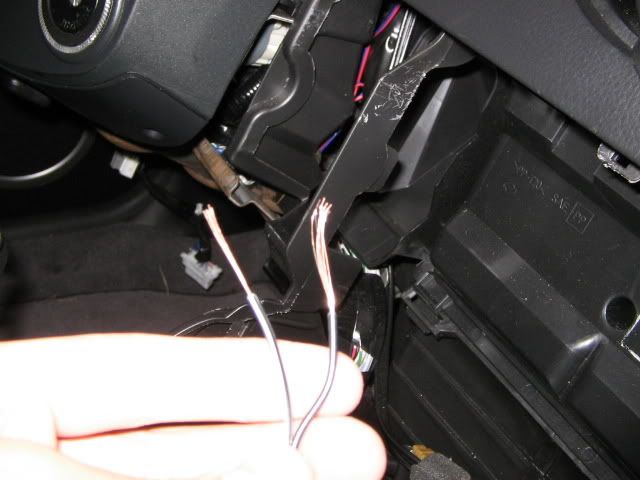
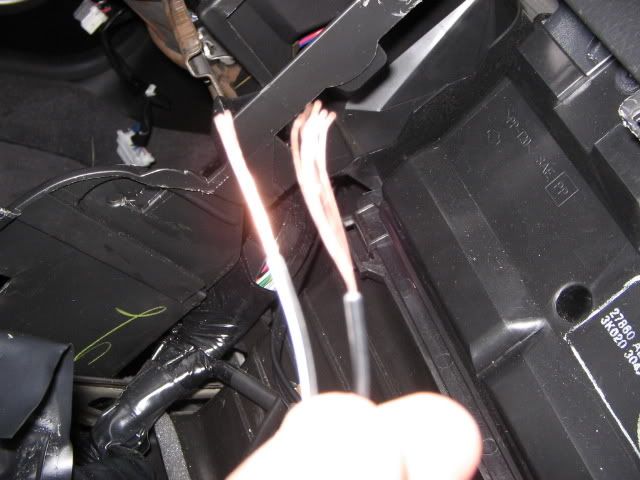
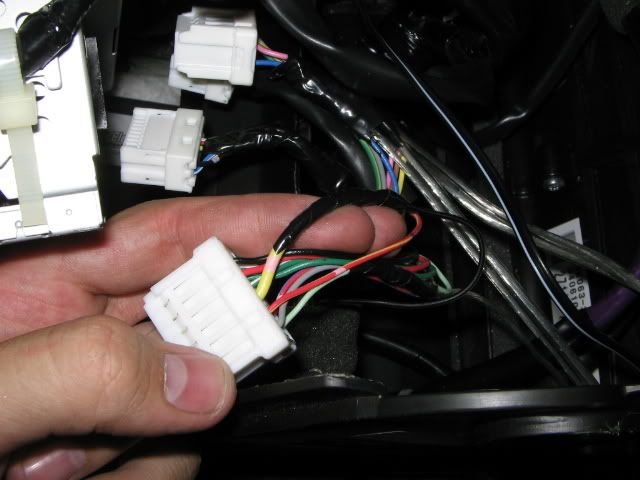
Back at the 4 pin plug where you connected the interface to the car. There are 2 white wires that are hanging free...One is WHITE and the other is OFF WHITE. They should be labeled to what wire goes where. The WHITE wire goes to the pink wire that is leading to the DVD unit and the OFF WHITE wire is going to the pink wire that is going 2 the screen. Most likely you will have to extend those white wires to get to the back of the screen. You can use newire...might wanna choose different colors. I have a black/white and a black. In the pic i have black/white going to the pink wire that leads to the DVD unit and the black wire connect to the other pink wire that is leading to the screen.
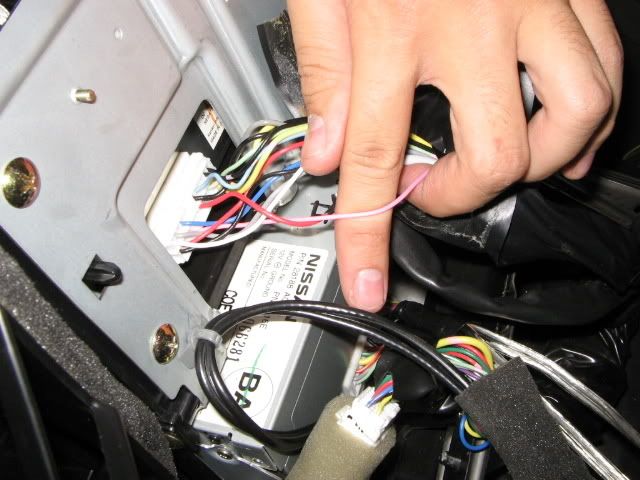
Pic of pink wire CUT
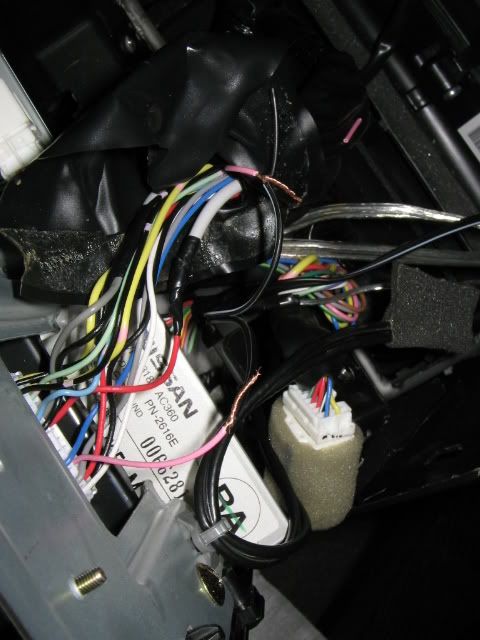
when done make sure u tape up the connections
Moving along to the driviner side. Pop off that long kick trim
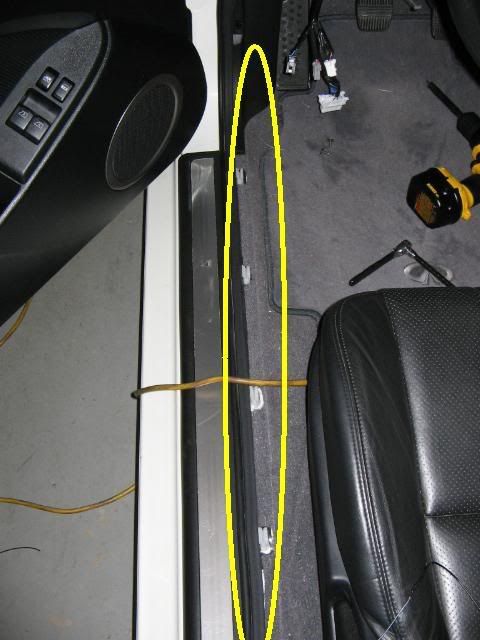
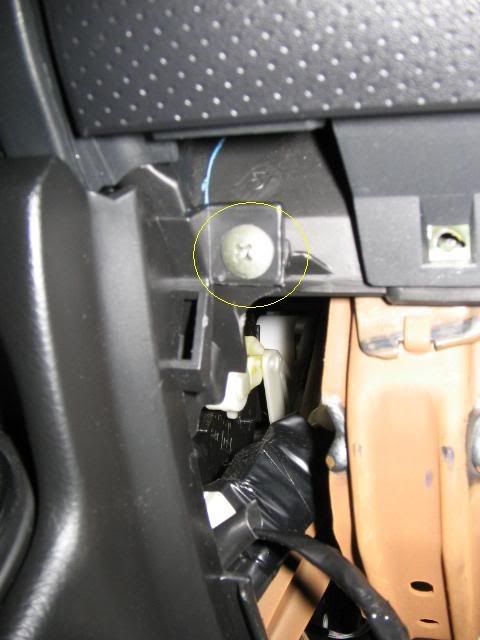
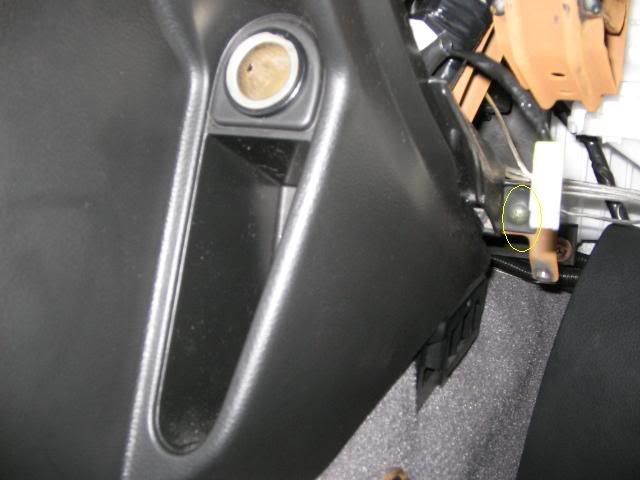
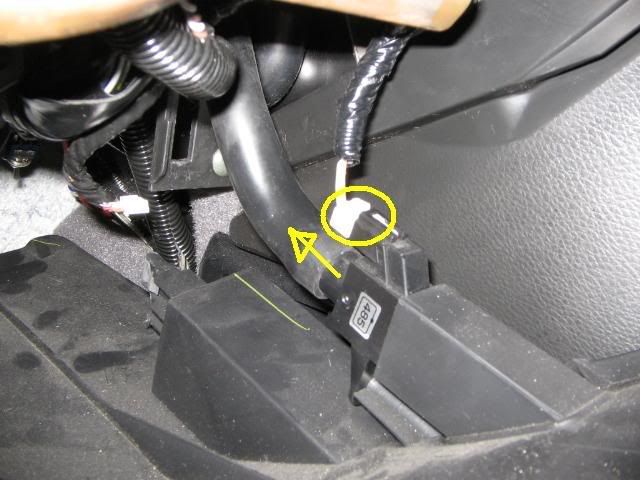
Same as the passenger side pull off that kick panel. BUT WAIT...there is a hidden plastic bult behind the foot rest...just pull the foot rest out and take off the plastic bult before removing the kick panel.
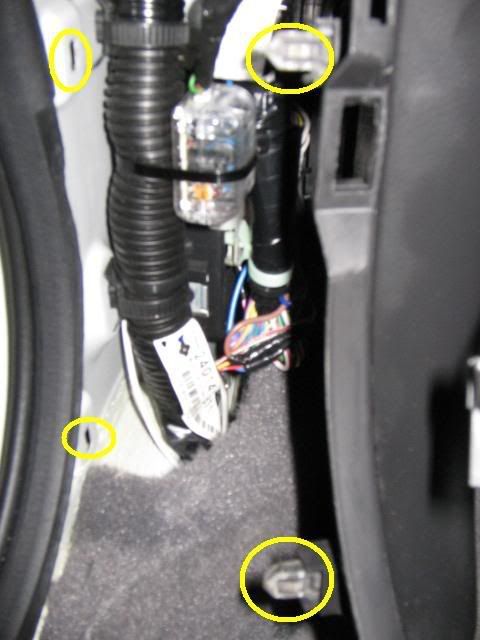
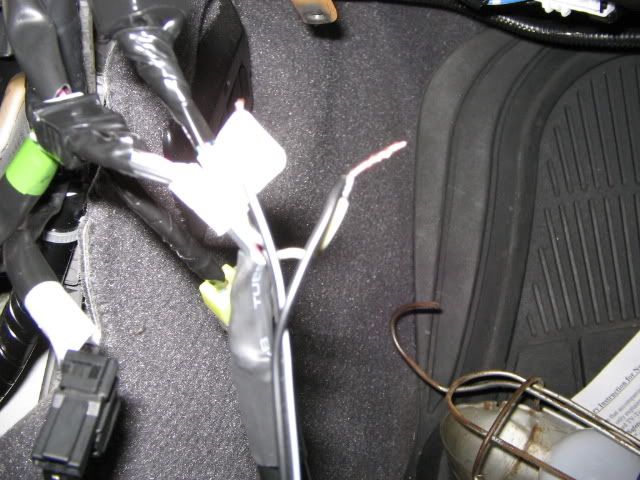
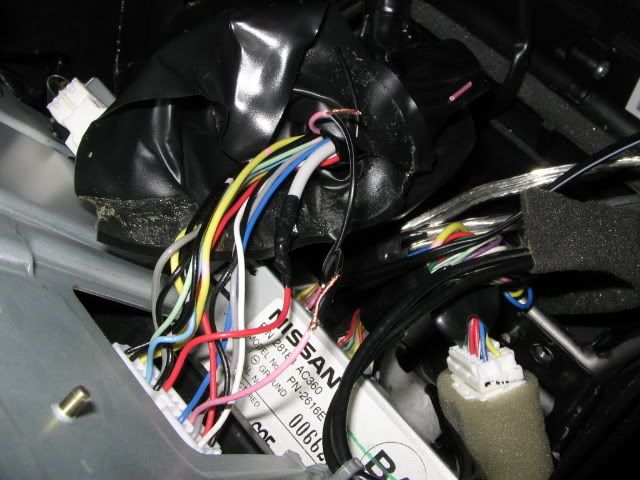
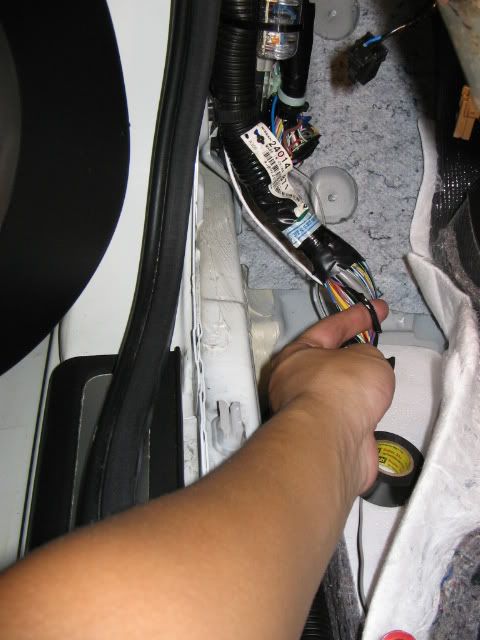
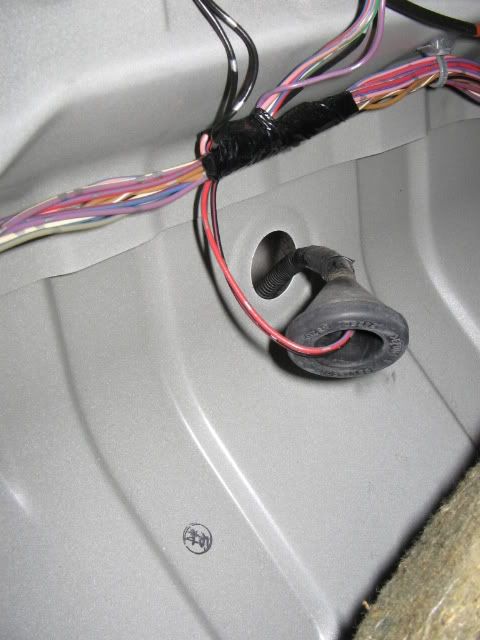
Next Deep along the driverkick should be a fat roll of wires. Your reverse wire is in here. It is PURPLE

At the other end of the interface should look like this. The BLACK goes to GROUND. Yellow does to parking brake, Red to constant 12V ( you can also get that behind the radio, make sure u sure a volt meter...I will show u later where I connected mine) and the PURPLE wire goes to the reverse wire
NOW AGAIN. I BYPASSED MY PARKING BREAK WIRE (YELLOW WIRE) so i can watch DVD while driving AND I didnt hook up my PURPLE WIRE from the interface to my REVERSE to the car. I hooked it to a switch. So i can turn it on and off whenever i want. I will show you how I did it later. But if u want you can hook up the purlple wire from the interface to the purple wire to the car...so when u put the car in reverse the screen will switch to ur rear cam and when u take it out of reverse it will switch back to ur navi.
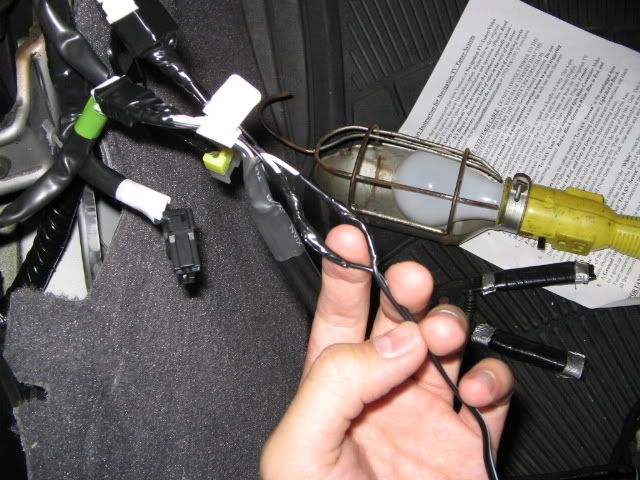
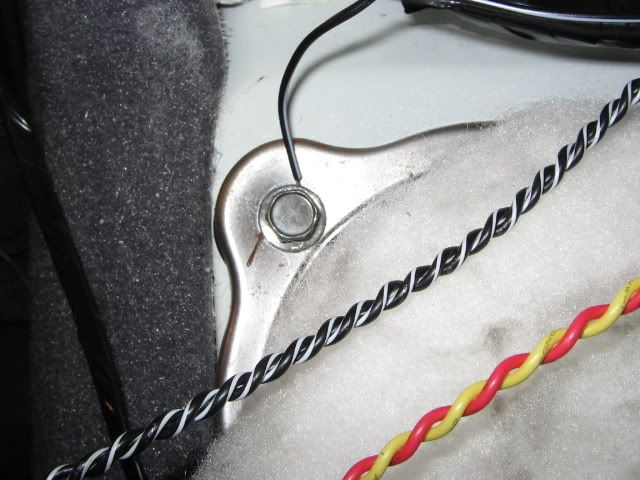
For the GROUND from the interface. All you have to do is put a ring terminal on it and drill it to bare metal. I have mine here...yea i know its ghetto that i dont have a ring terminal but i was in a rush and I dont have ne on hand...
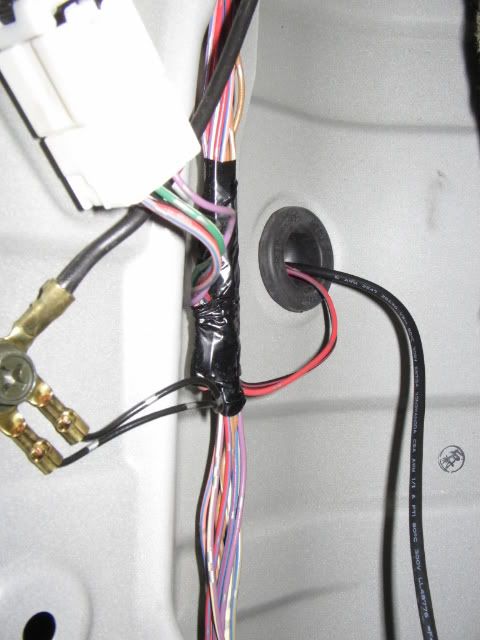
As for the 12V I got mine behind the radio. On my car is the yellow should be the same for you BUT MAKE SURE. TEST IT OUT WITH A VOLT METER!
I dont know about your radio but MINES doesnt have anti-theft so it was ok to unplug my WHOLE radio with out nething happening (AGAIN I HAVE AN 04 G35 COUPE!) Its just easyer to T-tap the yellow wire to get my 12V.
So you run you RED wire from the interface to your cars 12V..(yellow)...in the pic my wire isnt RED. Thats bec the red wire wasnt long enough so i extended it which is ok.
When done dont for get to tape!
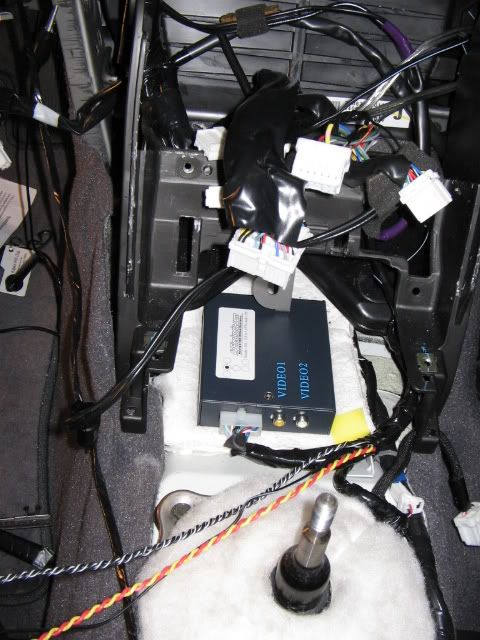
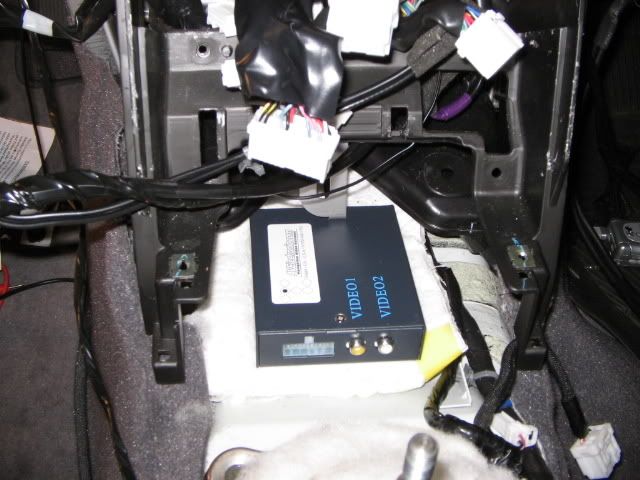
OH YEA! This is where i put my interface.
As for the bypassing of the DVD (watch while driving) and the switch on the rear cam ( so you can turn it off and on netime you want) I used 2 switches.
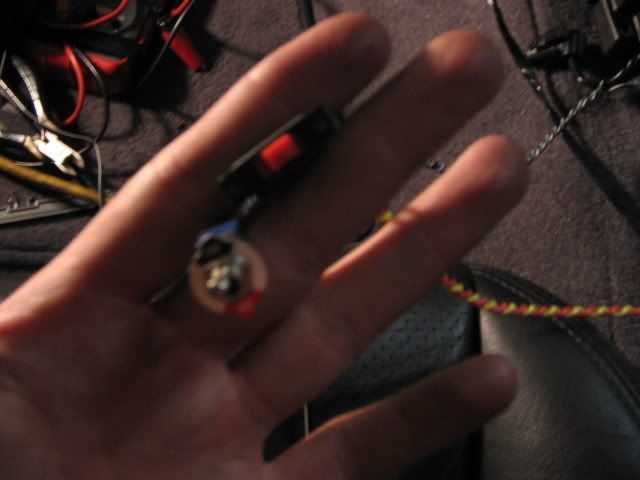
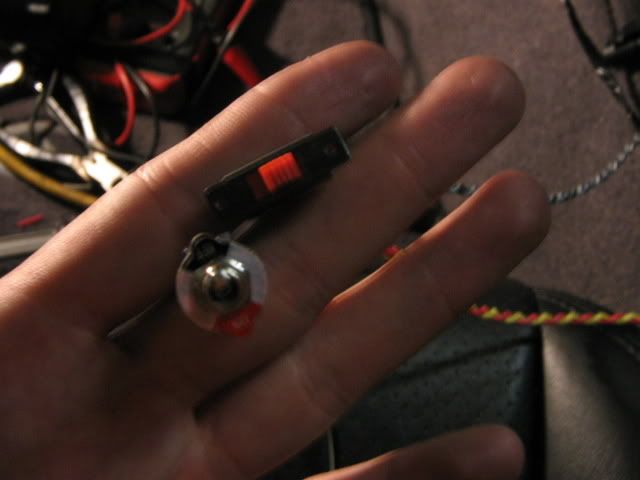
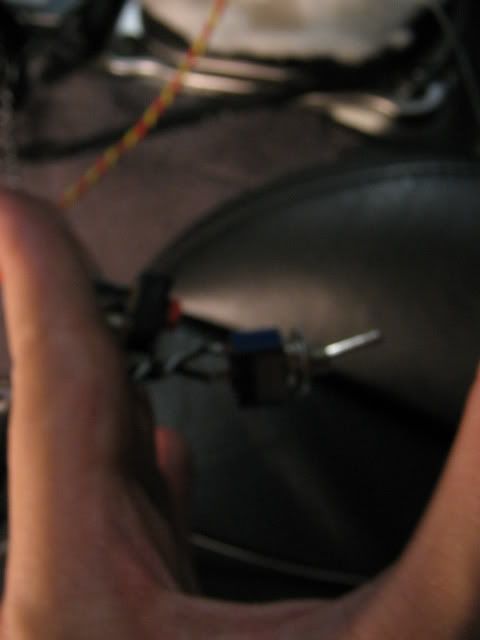
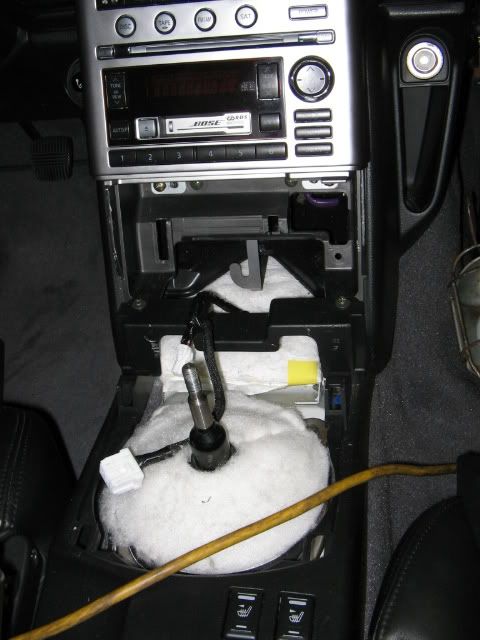
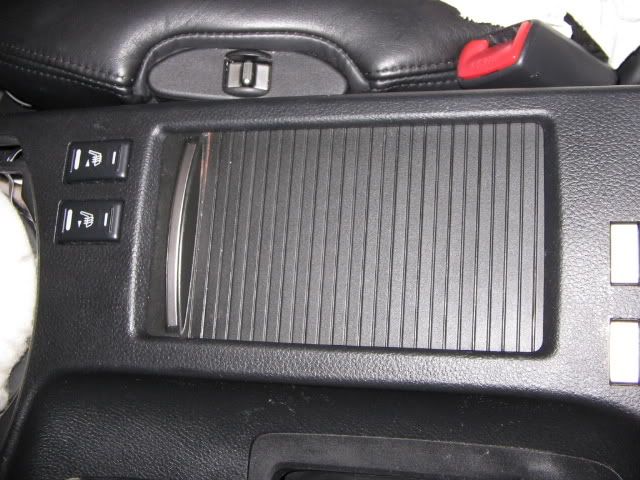
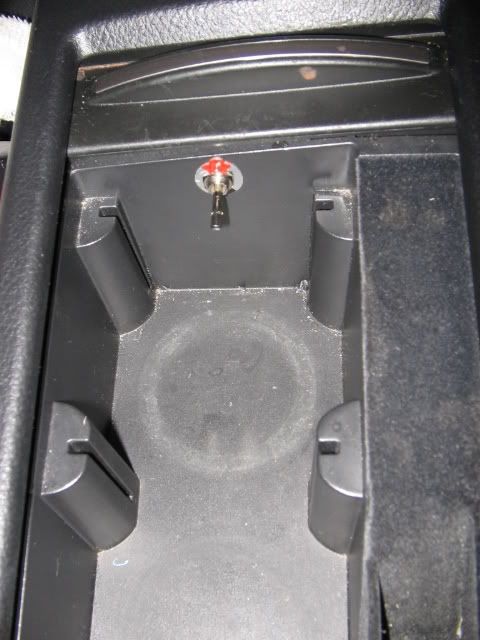
Its on you where you want to mount the switches I put my rear cam in my cup holder and the dvd switch i just tucked it under the carpet. DUMMY me i use a long switch...so it sticks out...so i cant put a drink in the cup holder.....but im going 2 cut it shorter so its ok. I put it there bec my hand is rear there soo when i need to flick the switch real quick i can.
I dont have ne pics on how i bypassed the DVD but you can ask and i can try and show u somehow...ill draw a pic or something. But...i can try and say it now. The YELLOW wire off the interface goes to GROUND, THEN CUT THAT YELLOW WIRE IN HALF AND INTERRUPT it was a switch. As for the REVERSE WIRE, RUN THE PURPLE WIRE OFF THE INTERFACE TO A CONSTANT 12V...INTERRUPT THAT PURPLE WIRE OFF THE INTERFACE WITH THE OTHER SWITCH. THANKS IT!
Its can come off and be snapped back on the radio trim in this part...you can leave it as it is thats ok to. when you go 2 put the radio back in it will click back on
I took mine out and clicked it back to the radio trim
Moving on..you will have to locate the WHITE 4 PIN HARNESS that you will have to DISCONNECT and plug in the interface to. The harness location is on the right side of the radio a lil on the side where ur knee is
It will look like this.
Disconnet it and it should look like this. IN THE PIC I LABELED WRONG..the top is the MALE and the bottom is FEMALE
Now for the interface. MALE on the right and FEMALE on the left.
The FEMALES from the interface goes to the MALE harness of the car
The MALE from the interface goes to the FEMALE harness of the car
When connected make sure it is all the way in and use 3M tape, so it doesnt fall out.
Now BEHIND the radio (behind the screen should be like a 24 pin plug)
Location a pink wire...this wire u will be CUTTING IN HALF
Back at the 4 pin plug where you connected the interface to the car. There are 2 white wires that are hanging free...One is WHITE and the other is OFF WHITE. They should be labeled to what wire goes where. The WHITE wire goes to the pink wire that is leading to the DVD unit and the OFF WHITE wire is going to the pink wire that is going 2 the screen. Most likely you will have to extend those white wires to get to the back of the screen. You can use newire...might wanna choose different colors. I have a black/white and a black. In the pic i have black/white going to the pink wire that leads to the DVD unit and the black wire connect to the other pink wire that is leading to the screen.
Pic of pink wire CUT
when done make sure u tape up the connections
Moving along to the driviner side. Pop off that long kick trim
Same as the passenger side pull off that kick panel. BUT WAIT...there is a hidden plastic bult behind the foot rest...just pull the foot rest out and take off the plastic bult before removing the kick panel.
Next Deep along the driverkick should be a fat roll of wires. Your reverse wire is in here. It is PURPLE
At the other end of the interface should look like this. The BLACK goes to GROUND. Yellow does to parking brake, Red to constant 12V ( you can also get that behind the radio, make sure u sure a volt meter...I will show u later where I connected mine) and the PURPLE wire goes to the reverse wire
NOW AGAIN. I BYPASSED MY PARKING BREAK WIRE (YELLOW WIRE) so i can watch DVD while driving AND I didnt hook up my PURPLE WIRE from the interface to my REVERSE to the car. I hooked it to a switch. So i can turn it on and off whenever i want. I will show you how I did it later. But if u want you can hook up the purlple wire from the interface to the purple wire to the car...so when u put the car in reverse the screen will switch to ur rear cam and when u take it out of reverse it will switch back to ur navi.
For the GROUND from the interface. All you have to do is put a ring terminal on it and drill it to bare metal. I have mine here...yea i know its ghetto that i dont have a ring terminal but i was in a rush and I dont have ne on hand...
As for the 12V I got mine behind the radio. On my car is the yellow should be the same for you BUT MAKE SURE. TEST IT OUT WITH A VOLT METER!
I dont know about your radio but MINES doesnt have anti-theft so it was ok to unplug my WHOLE radio with out nething happening (AGAIN I HAVE AN 04 G35 COUPE!) Its just easyer to T-tap the yellow wire to get my 12V.
So you run you RED wire from the interface to your cars 12V..(yellow)...in the pic my wire isnt RED. Thats bec the red wire wasnt long enough so i extended it which is ok.
When done dont for get to tape!
OH YEA! This is where i put my interface.
As for the bypassing of the DVD (watch while driving) and the switch on the rear cam ( so you can turn it off and on netime you want) I used 2 switches.
Its on you where you want to mount the switches I put my rear cam in my cup holder and the dvd switch i just tucked it under the carpet. DUMMY me i use a long switch...so it sticks out...so i cant put a drink in the cup holder.....but im going 2 cut it shorter so its ok. I put it there bec my hand is rear there soo when i need to flick the switch real quick i can.
I dont have ne pics on how i bypassed the DVD but you can ask and i can try and show u somehow...ill draw a pic or something. But...i can try and say it now. The YELLOW wire off the interface goes to GROUND, THEN CUT THAT YELLOW WIRE IN HALF AND INTERRUPT it was a switch. As for the REVERSE WIRE, RUN THE PURPLE WIRE OFF THE INTERFACE TO A CONSTANT 12V...INTERRUPT THAT PURPLE WIRE OFF THE INTERFACE WITH THE OTHER SWITCH. THANKS IT!
Thread Starter
|
Registered User
Joined: Jun 2006
Posts: 279
Likes: 4
From: MD
DIY: Rear camera install PART 3
Now the running the wires for the rear cam
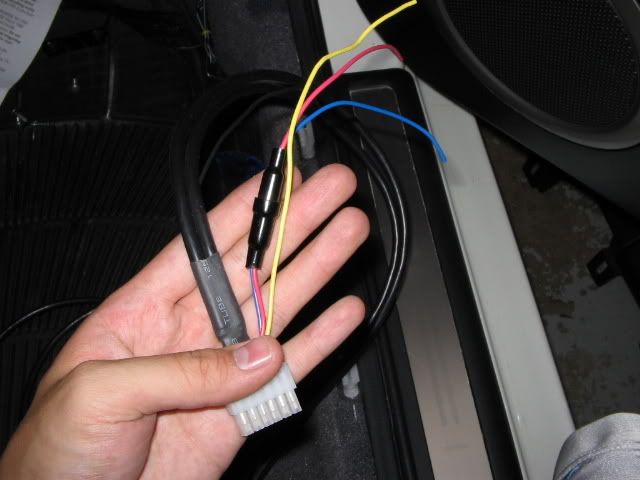
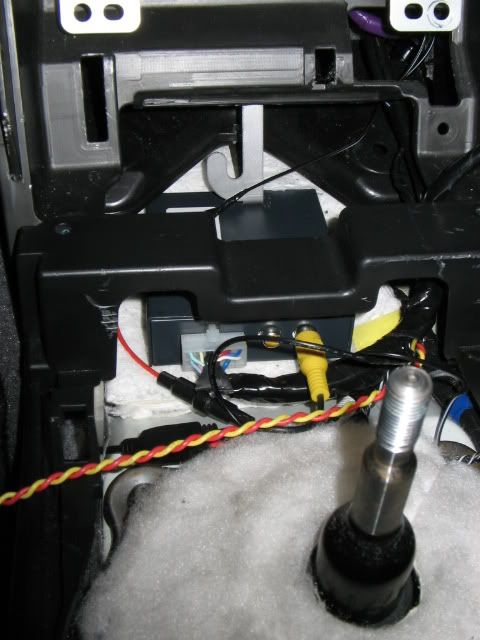
This is just a pic of the extention and that red thing is a "jumper" which flips the pic around so i can see backwards or forwards
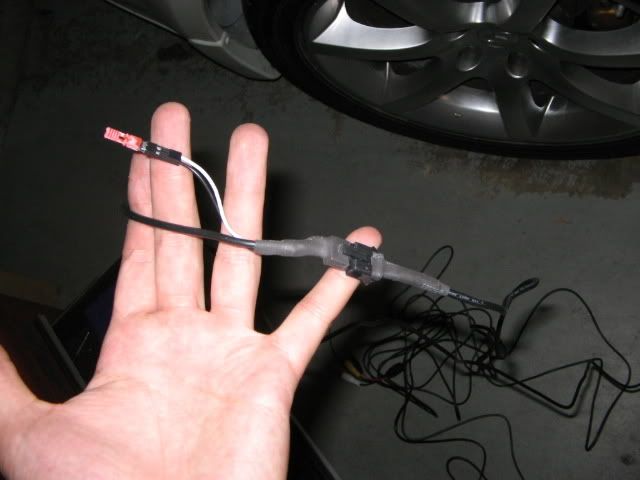
At the end I have RED goes to (12V) and BLACK goes to (ground) Yellow RCA for video ( goes into interface) and WHITE RCA which is auto? haha didnt use that.
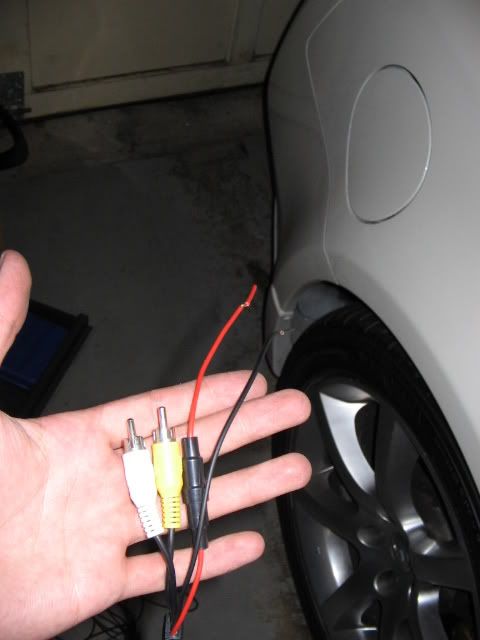
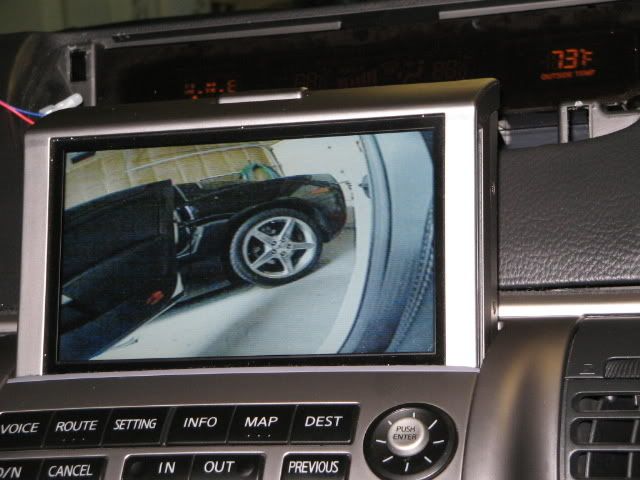
I hooked it up to do a test and works great! So happy at this point!
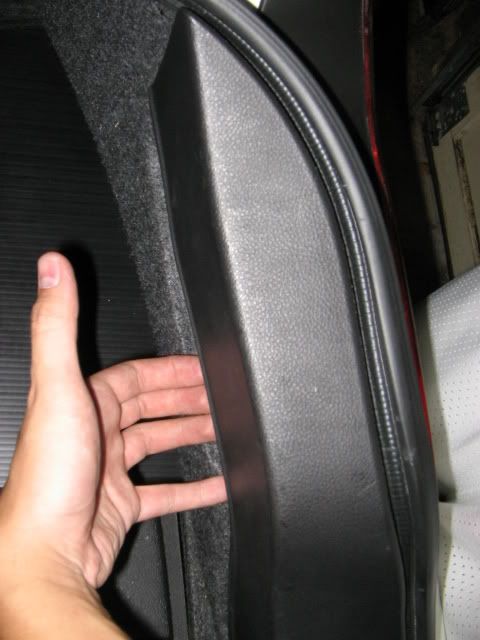
As for the install...go to the rear...(THIS IS FOR 04 COUPLE) and pull back panel str8 up.
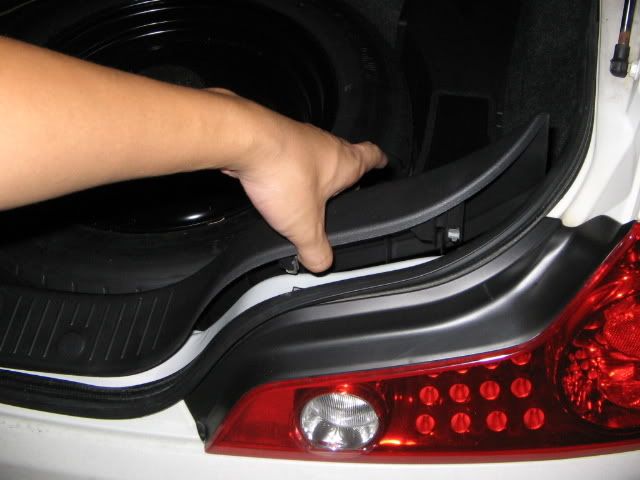
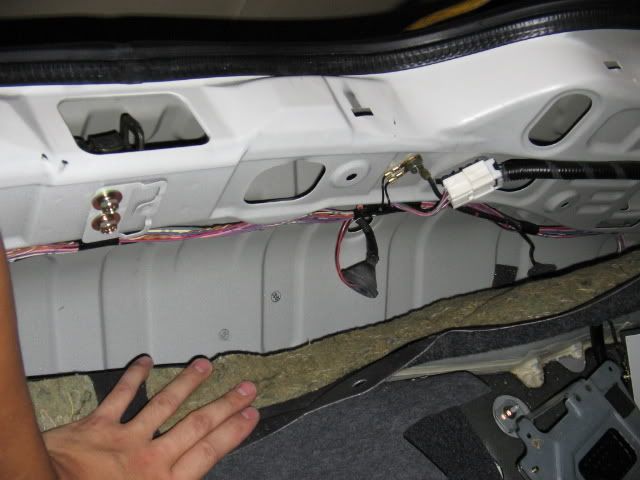
Remove all mats and carpent in the trunk. On the left should be a big plastic panel/cover held in with two 10mm nuts. Take them off
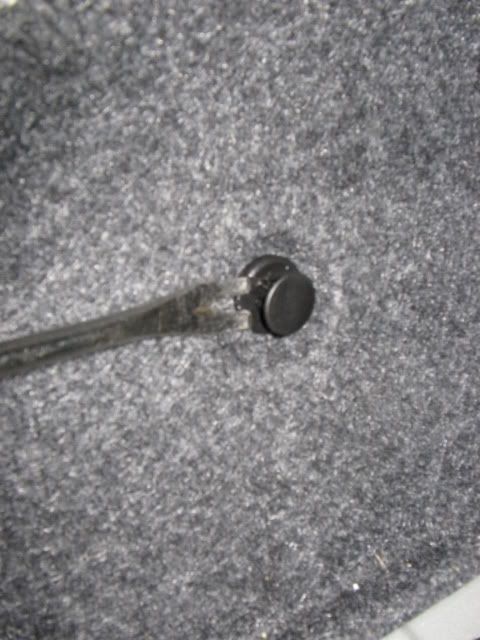
Alone the back...take off some pop tab thing.

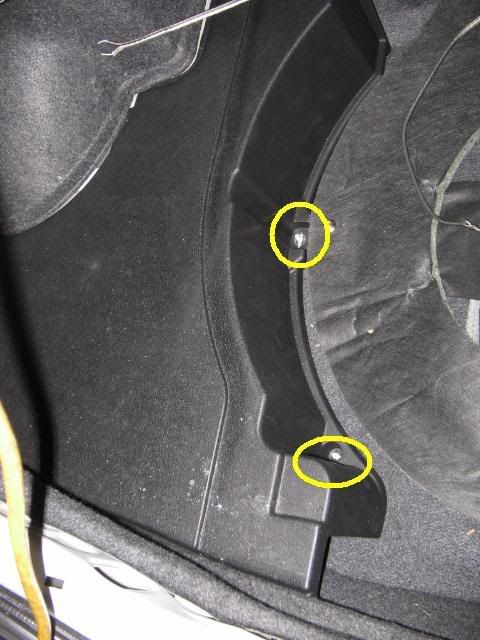
Should then look like this.
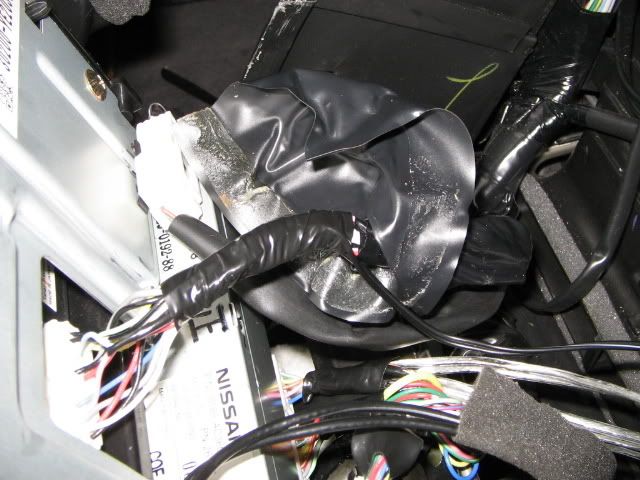
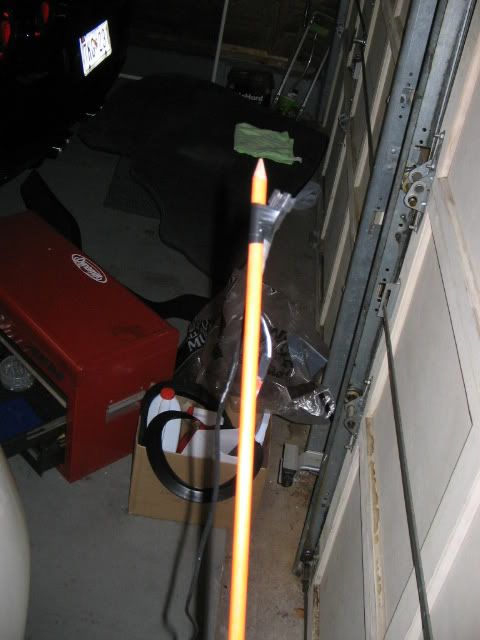
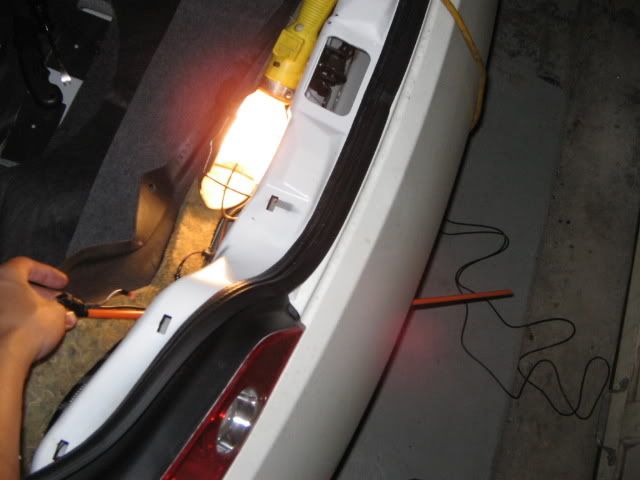
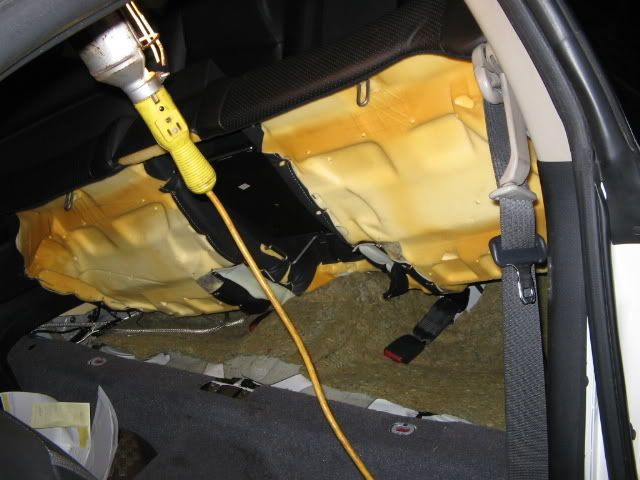
I disconnected my extention cable so i can put it on a stick so i can feed it thru the hole
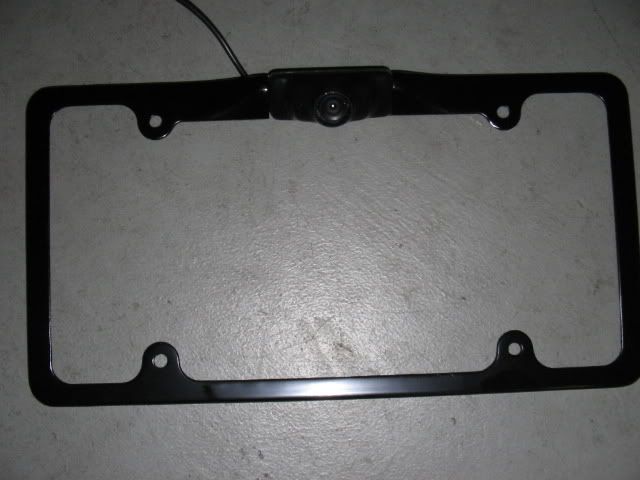
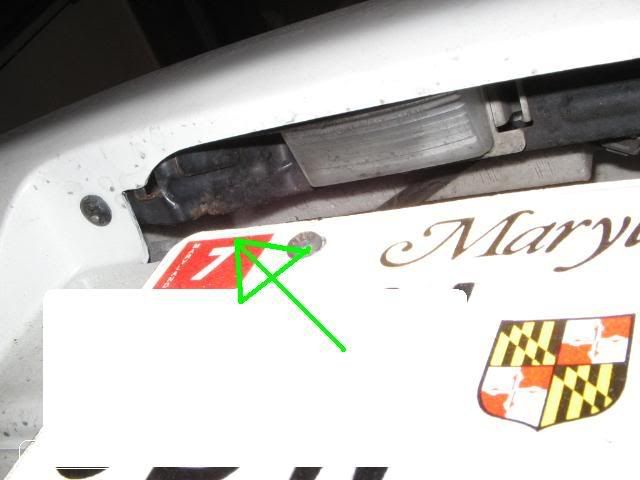
Look up near the licence plate and shind some light so u can see where to poke
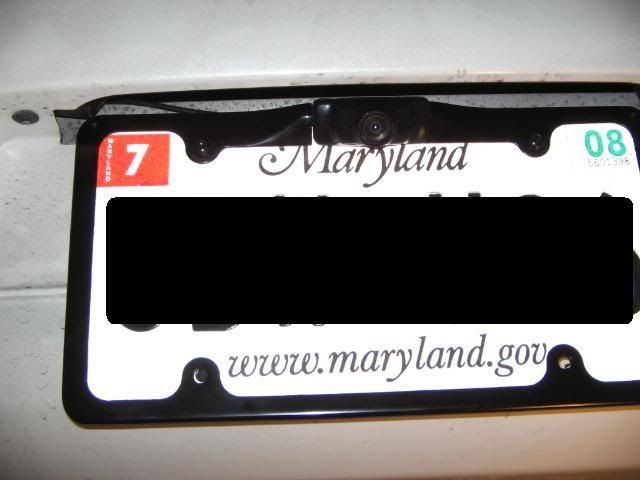
Mount plate
pull extra slack
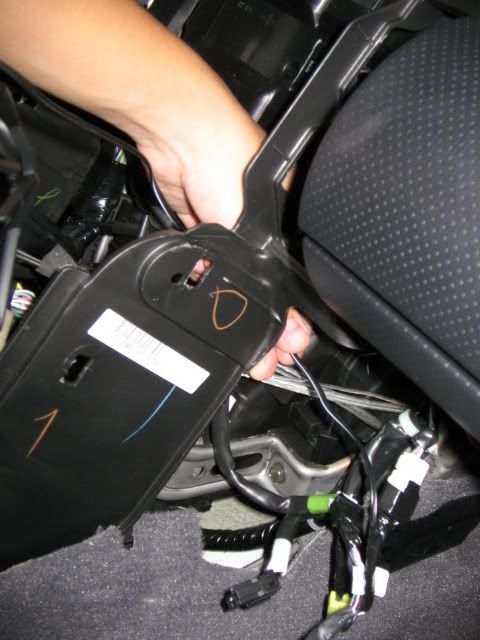
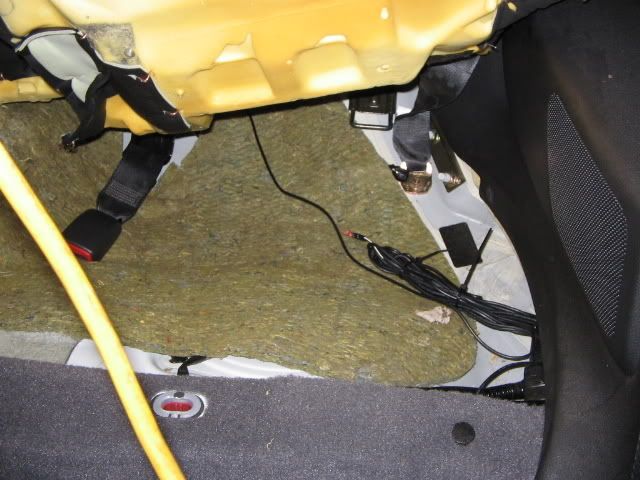
I just lifted my rear seats..they come right up...and ran all the extra wire there.
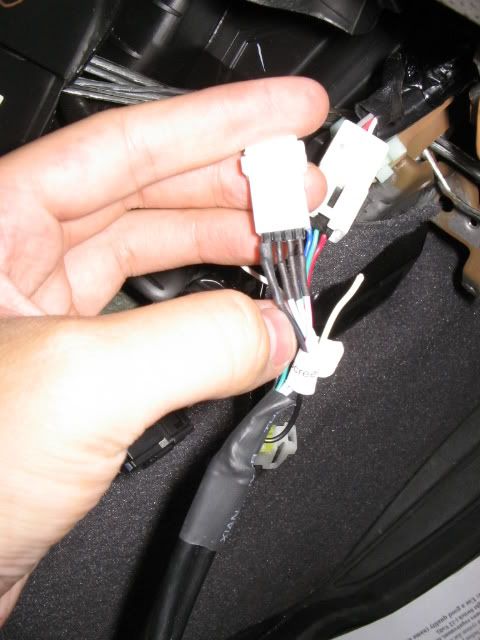
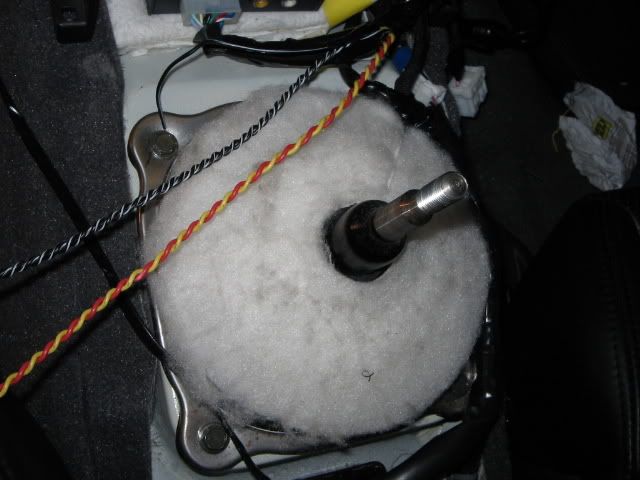
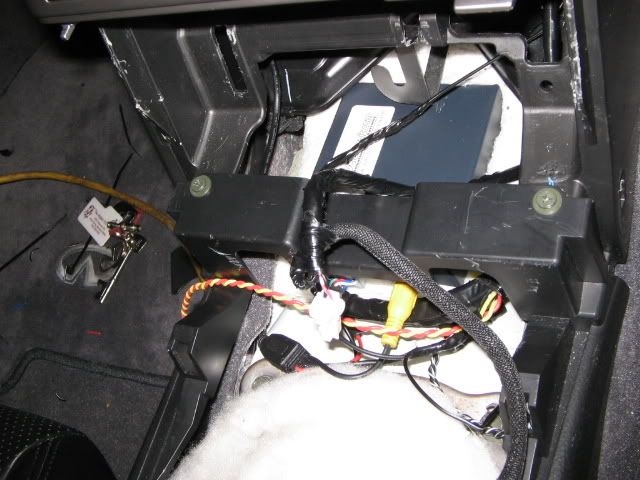
Hook up everything and make everything clean...heres another pic of the final look on the interface
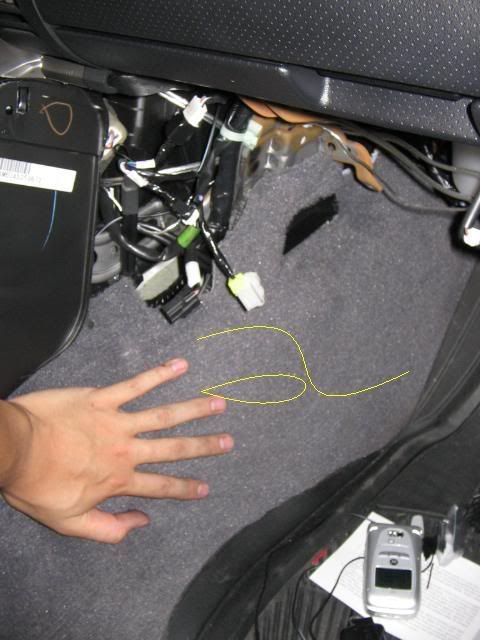
I hid the extra interface wire here..where my hand is and where i drew
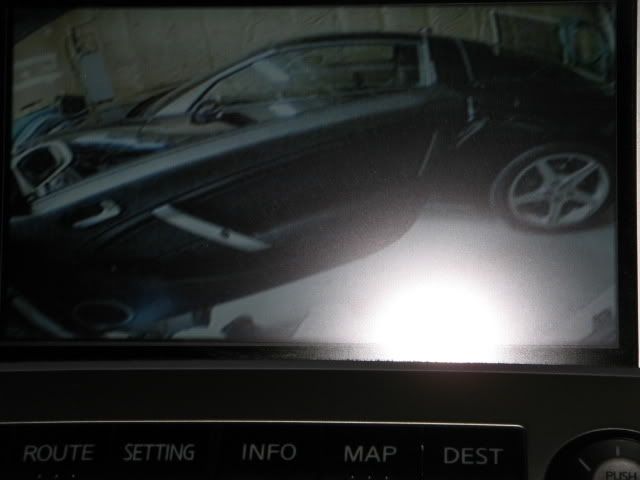
pretty crazy pic when u look at it...
After that your done...do a final test and enjoy! Tell me how it goes and im here if you need help.
This is just a pic of the extention and that red thing is a "jumper" which flips the pic around so i can see backwards or forwards
At the end I have RED goes to (12V) and BLACK goes to (ground) Yellow RCA for video ( goes into interface) and WHITE RCA which is auto? haha didnt use that.
I hooked it up to do a test and works great! So happy at this point!
As for the install...go to the rear...(THIS IS FOR 04 COUPLE) and pull back panel str8 up.
Remove all mats and carpent in the trunk. On the left should be a big plastic panel/cover held in with two 10mm nuts. Take them off
Alone the back...take off some pop tab thing.
Should then look like this.
I disconnected my extention cable so i can put it on a stick so i can feed it thru the hole
Look up near the licence plate and shind some light so u can see where to poke
Mount plate
pull extra slack
I just lifted my rear seats..they come right up...and ran all the extra wire there.
Hook up everything and make everything clean...heres another pic of the final look on the interface
I hid the extra interface wire here..where my hand is and where i drew
pretty crazy pic when u look at it...
After that your done...do a final test and enjoy! Tell me how it goes and im here if you need help.


Thread
Thread Starter
Forum
Replies
Last Post
FS[Texas]: KSport Air Suspension G35/350Z/M35
privatecorye
Steering & Suspension
1
May 31, 2016 01:56 AM