
DIY - 3rd brake light replacement/rear seat removal 2006 G35x


Thread Starter
|
Registered User
Joined: Jun 2012
Posts: 11
Likes: 5
DIY - 3rd brake light replacement/rear seat removal 2006 G35x
Hi all,
I couldn't find a good write-up of removing the rear seat, and since I had to replace my third brake light, I took some pictures and decided to write it up. It takes a while, but it's pretty straightforward.
There is an alternative method of replacing this light that requires drilling through the sheet metal in the trunk, but I wanted to do it all official-like.
Tools: Deep 14mm socket, 10mm socket, flat screwdriver, 3 pound sledgehammer
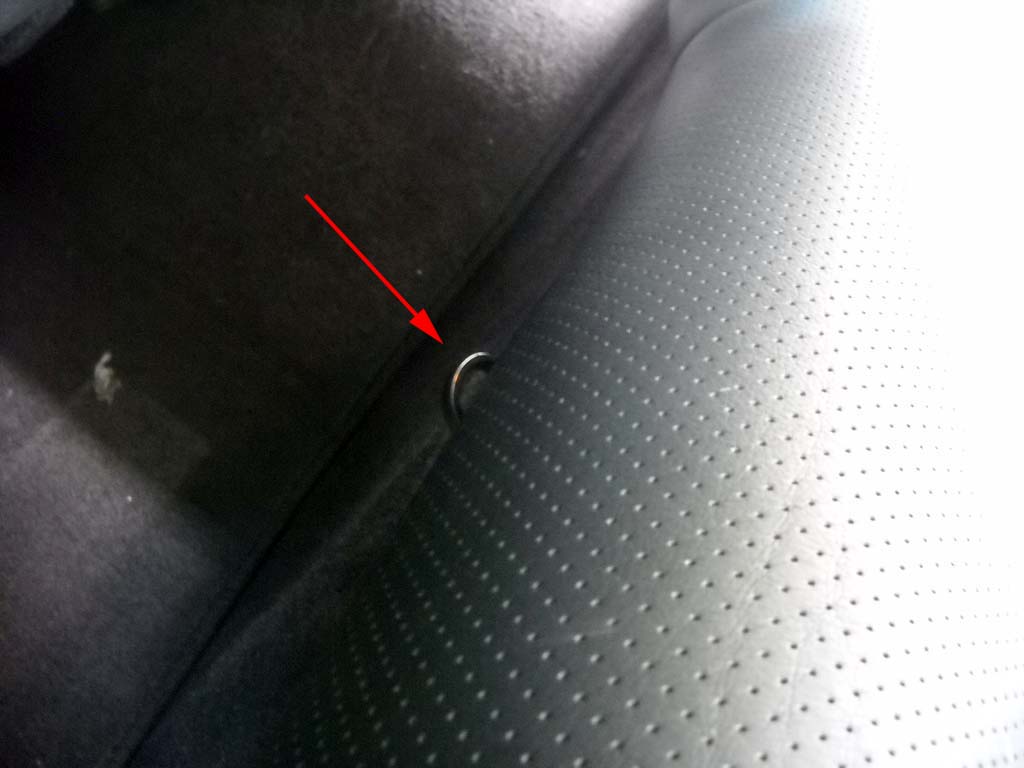
1) Locate the pull tabs under the bottom of the rear seat. There is one tab on each side. When you pull the tab, lift up on the seat to release it from the catch. Once you've pulled both out, pull the seat belt clasps through the holes and the bottom seat pulls right out.
2) Now you have to remove the center arm rest. Pull the leather cover back (it's velcro attached) to get to the bolts that hold the arm rest on. Note the plastic clip in the center - you'll have to pull that, too.
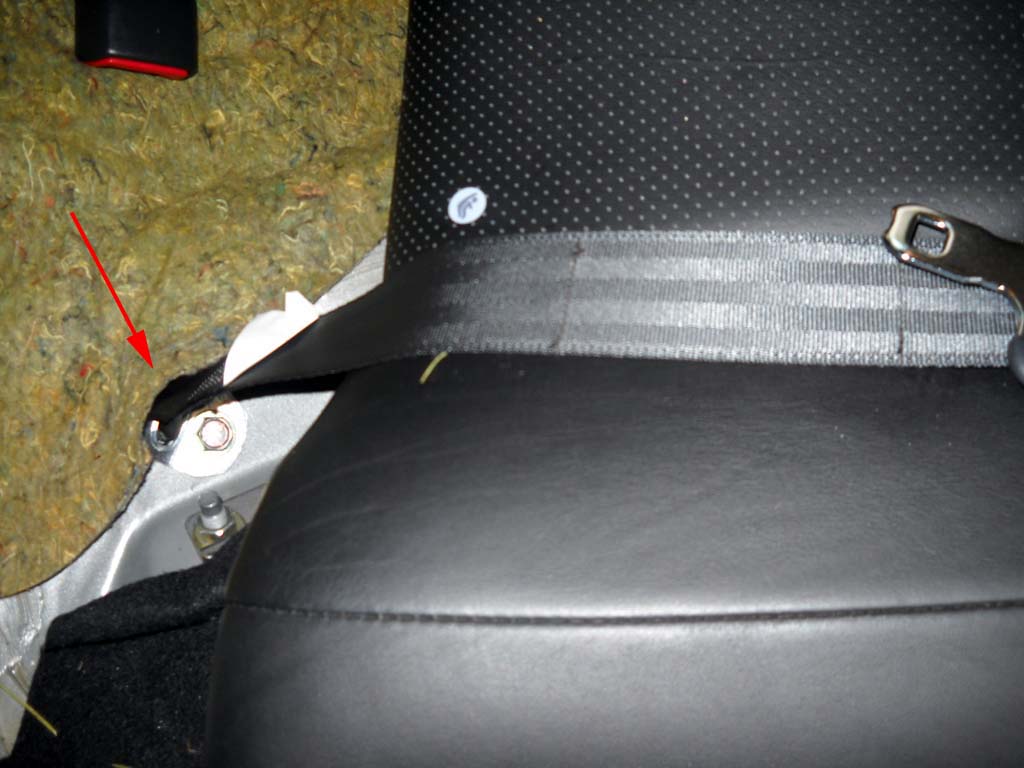
3) You don't need to pull the seat belts completely, but to get the seats out you do have to remove the harness bolts at the bottom of each belt. Remove the bolts and take note of the orientation - you'll want to set them correctly when you put everything back together.
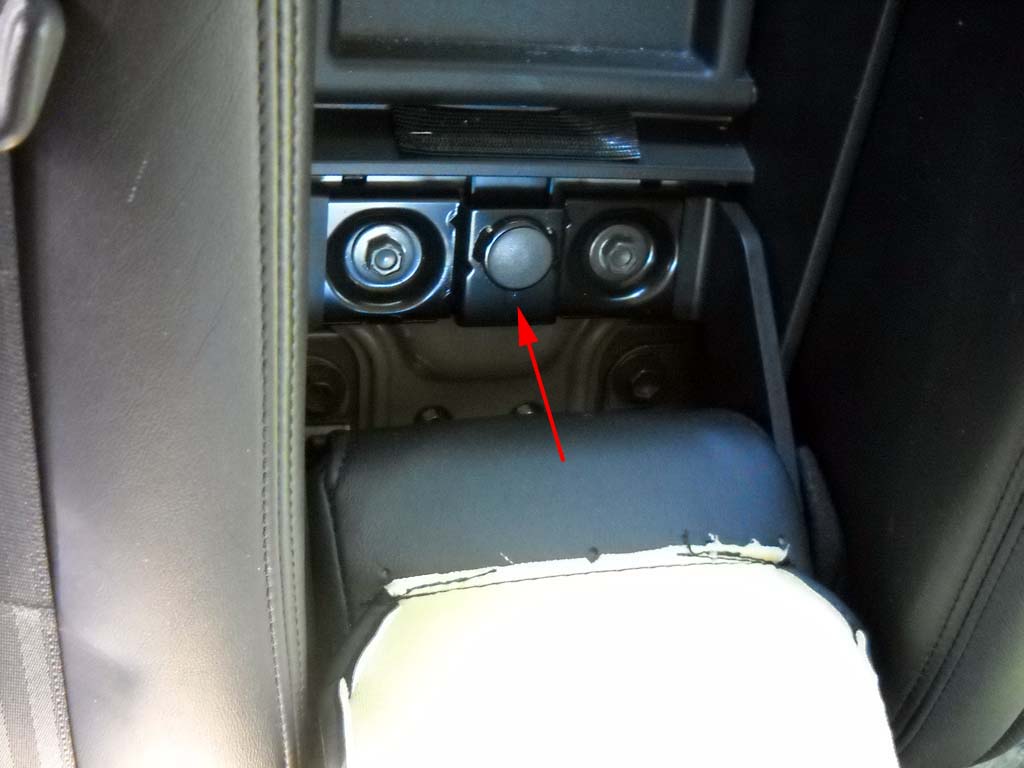
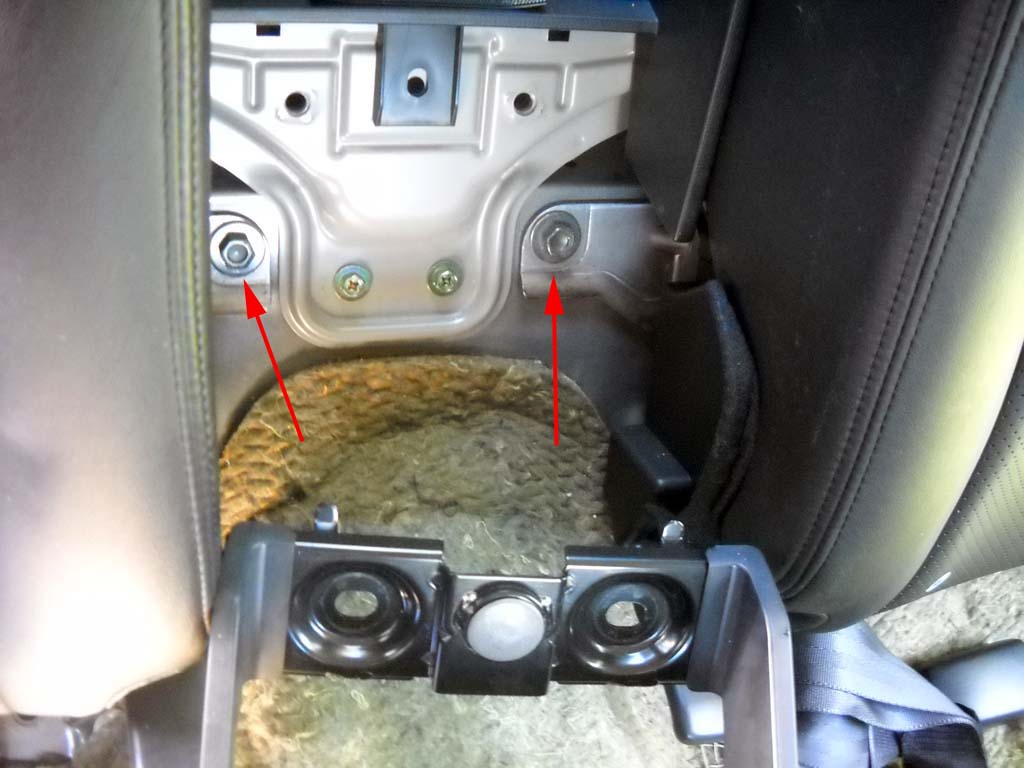
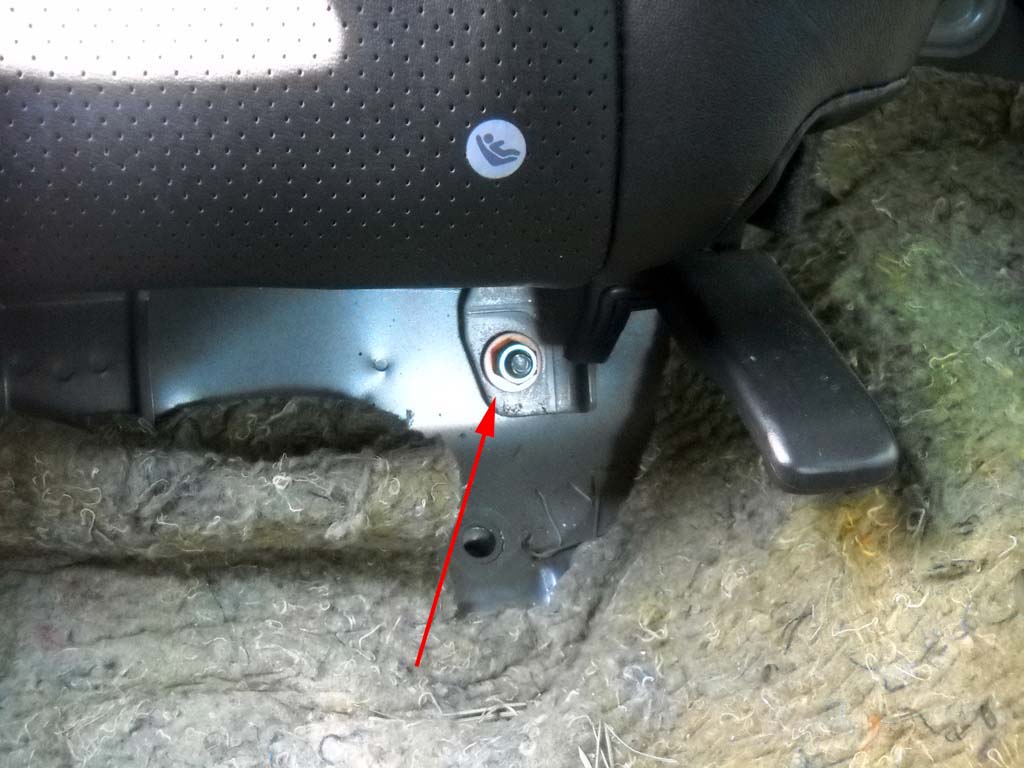
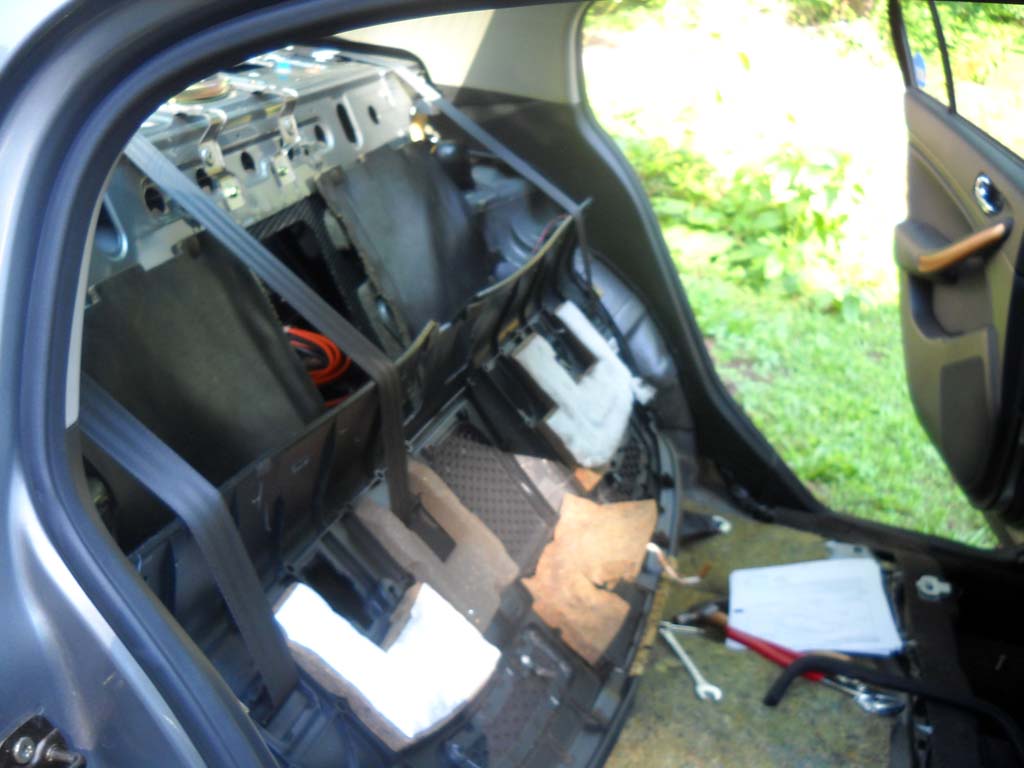
4) The seat bolts are a royal PITA. I had to use a deep 14 mm socket and a 3 pound sledge to get them loose. There are four per seat, two on the inside and two near the door. The pictures are as follows: 1st pic - inner center bolts, 2nd pic - inner floor bolt, 3rd pic - outer floor bolts. Remove the bolts and the seat backs lift right out.

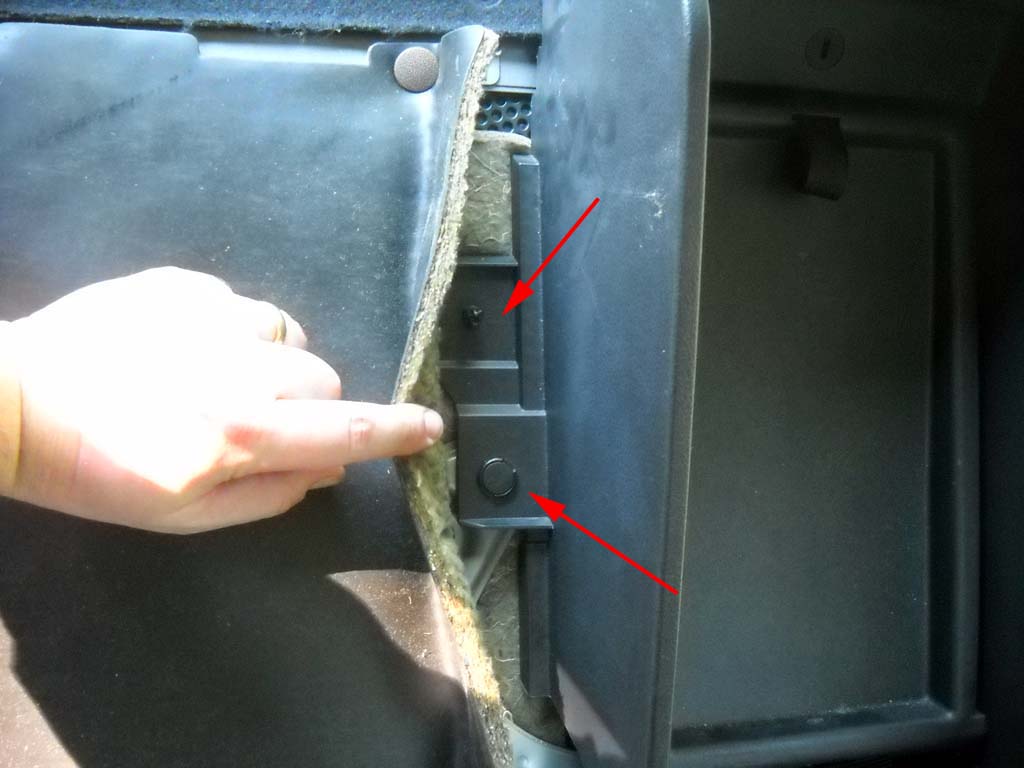
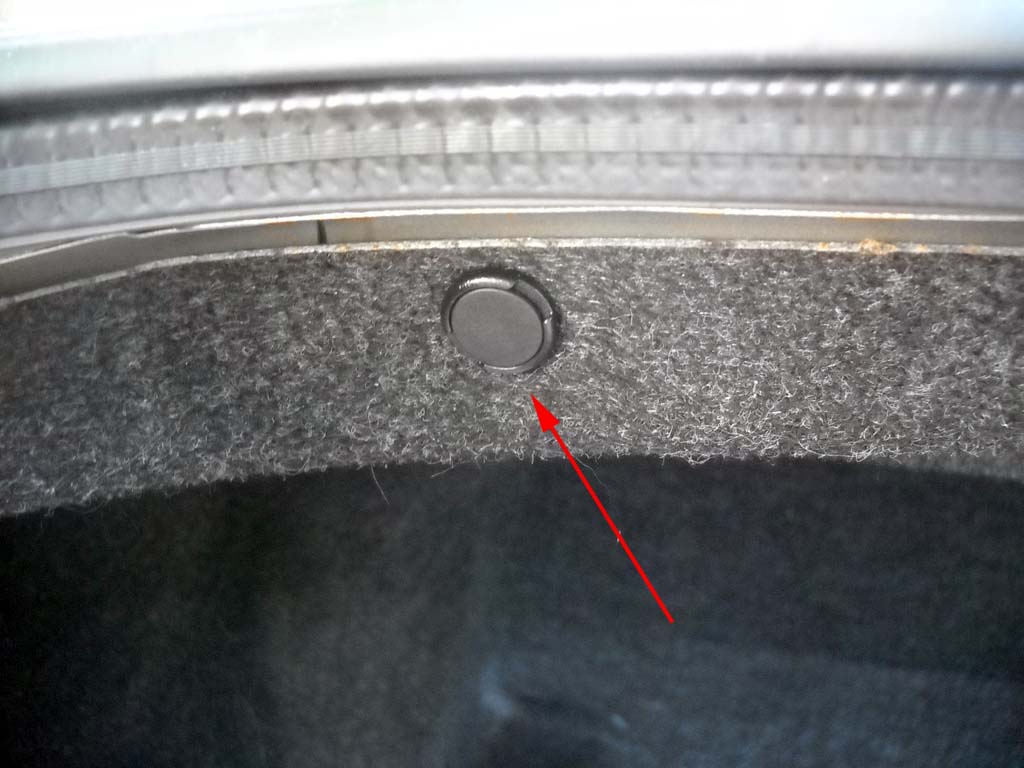
5) The center console is next. There are four clips holding it on, two you can remove from inside the car. The other two you have to pull from the trunk, as you can see in the second image.

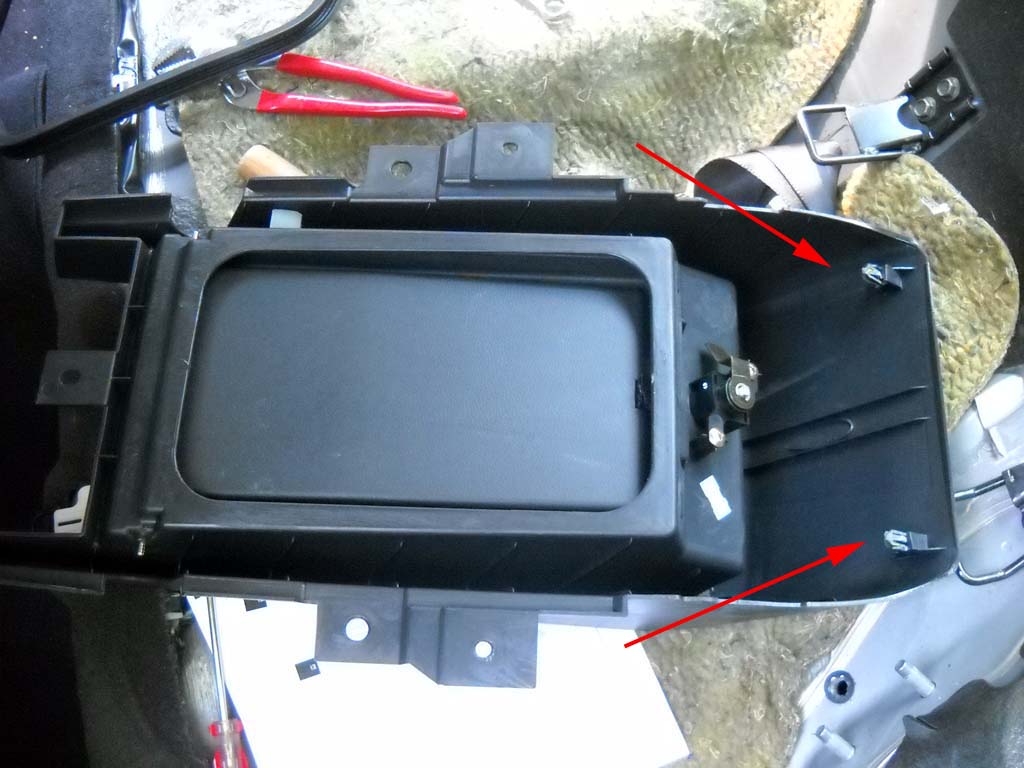
6) Once you have pulled the clips, there are two hidden clips up top that hold the console on. You have to pull the console straight up to get it to release. This is a picture of the back of the console so you can see the clips. DO NOT PULL THE CONSOLE OUT TOWARDS YOU, YOU'LL BREAK THE CLIPS! Pull up.
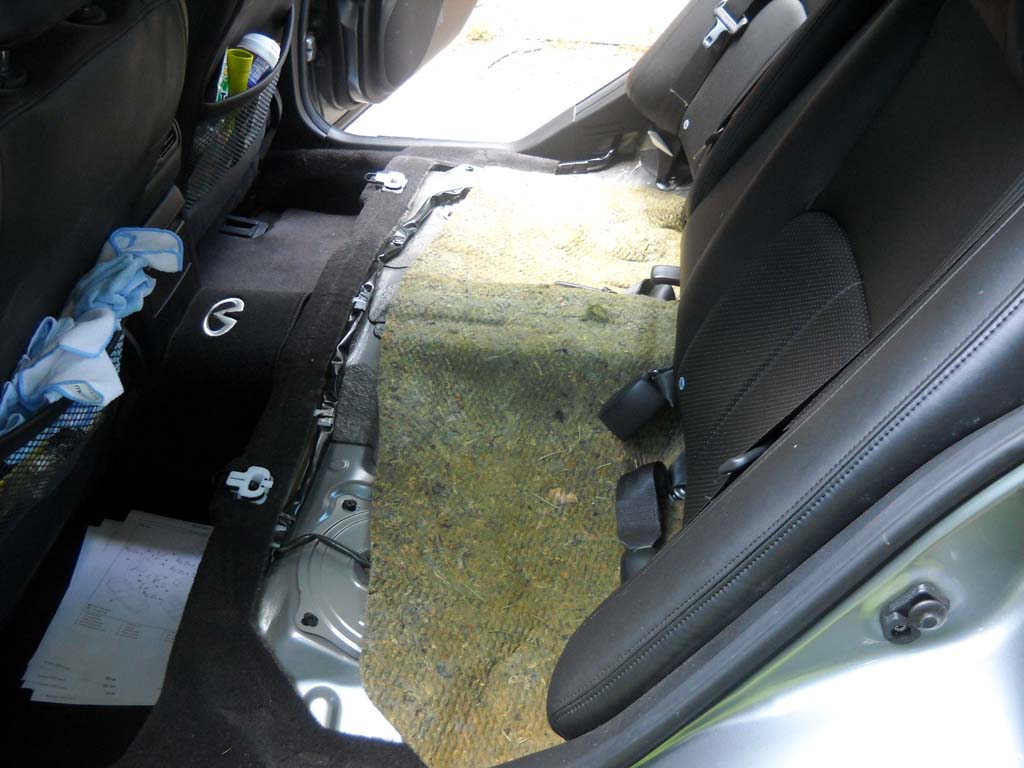
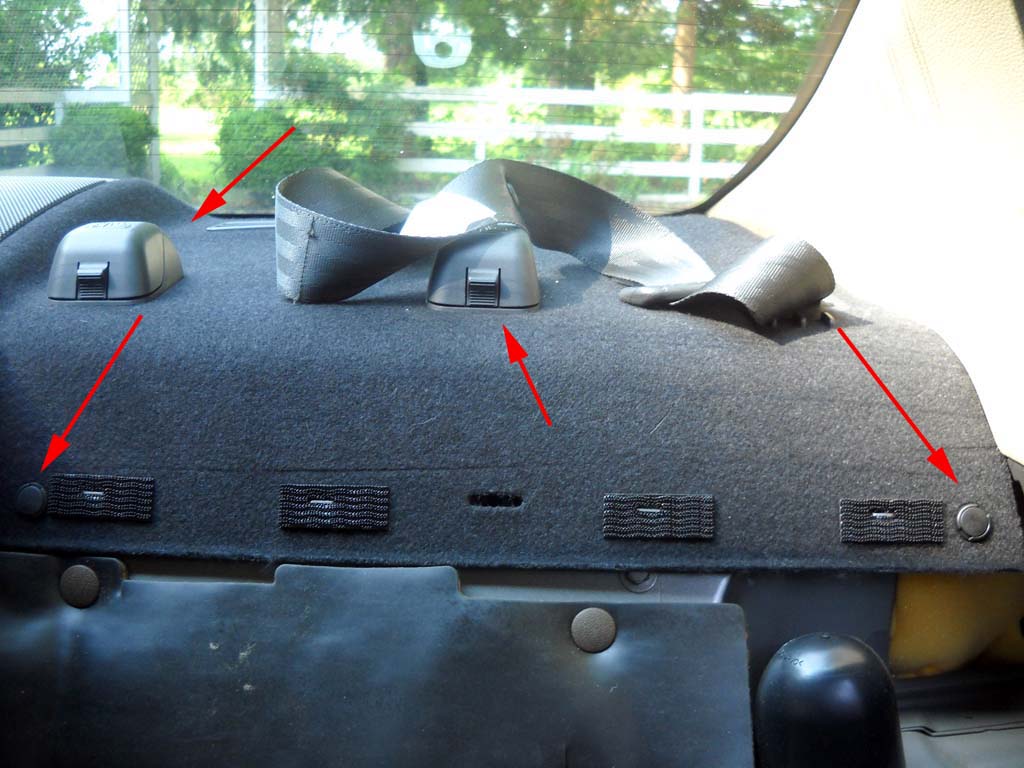
7) Now that everything is out of the way, start pulling the clips and the child seat restraints:

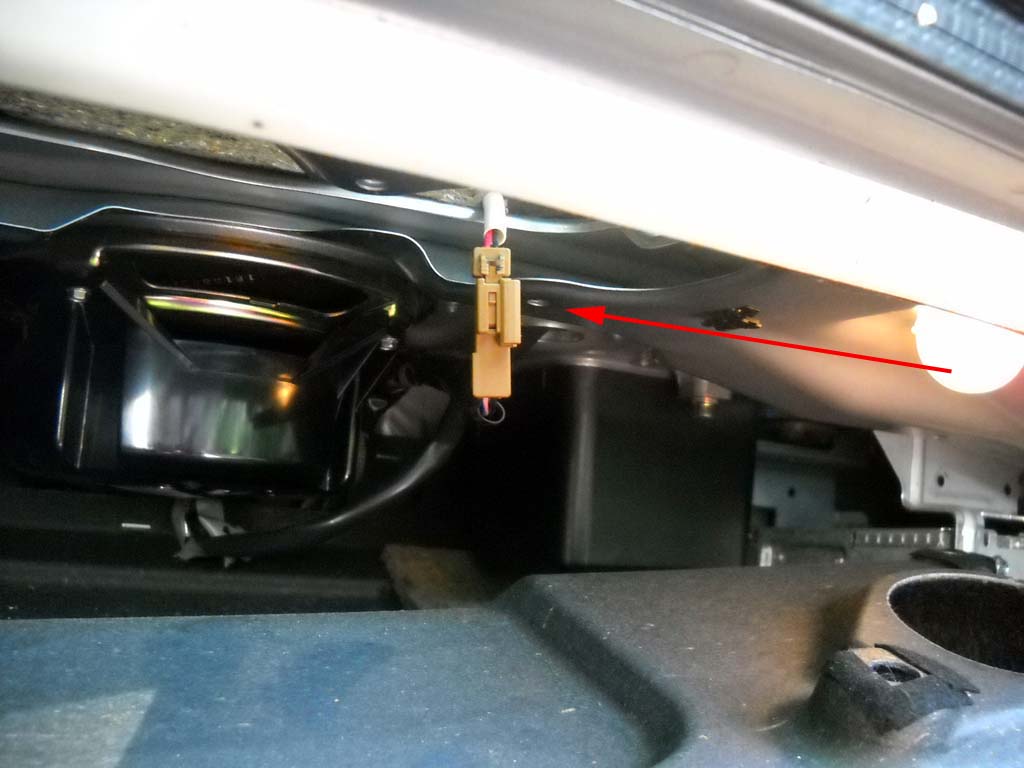
8) Before you pull the shelf, you have to go around to the trunk and un-clip the 3rd brake light cable. There are six clips that hold the top front trunk cover on, the first photo is a close up of one of the clips. The second photo is the brake light cable. Un-clip it so you can pull the shelf back in the next step.
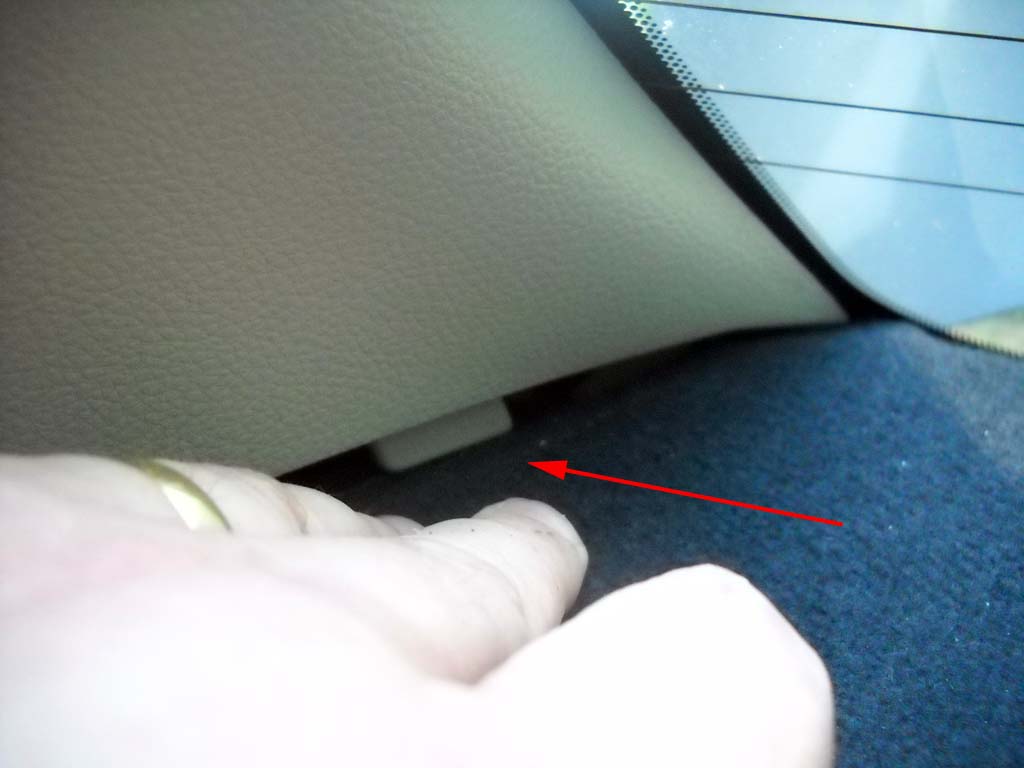
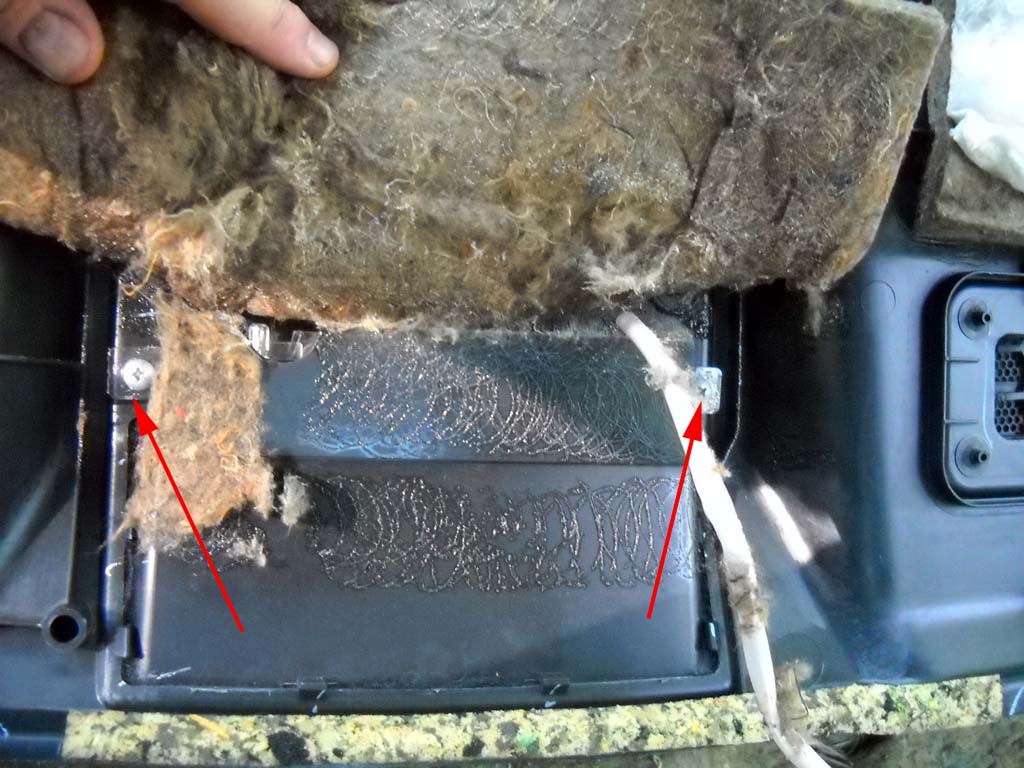
9) Flipping the shelf is a little tricky. The shelf itself pulls forward but you have to release the back corners from the trim catch, as shown in the first picture. Do that for each side. Once those are released, you can gently pull the whole shelf forward and flip it over.
10) To get the light out, there are two mounting screws. Remove them and the light slides right out.
NOTE: When replacing the light, make sure it is oriented correctly. If there is a gap between the plastic housing and the screw brackets then you have it upside down. It should sit flush on the brackets.
That's it! Reverse the procedure to put everything back together.
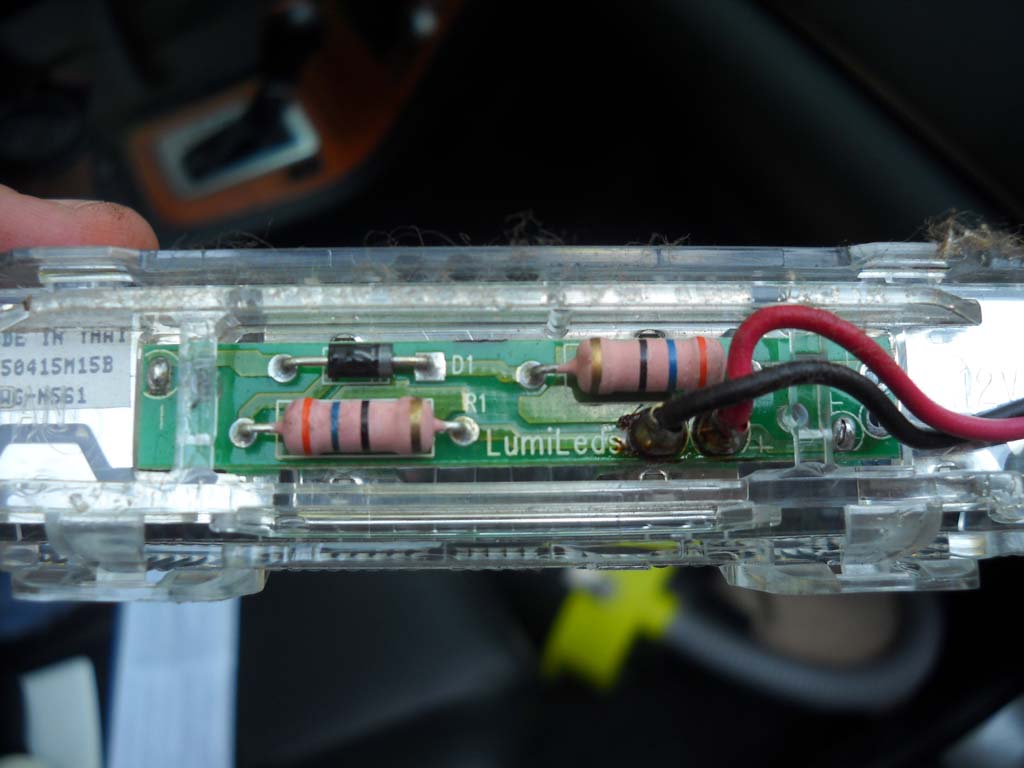
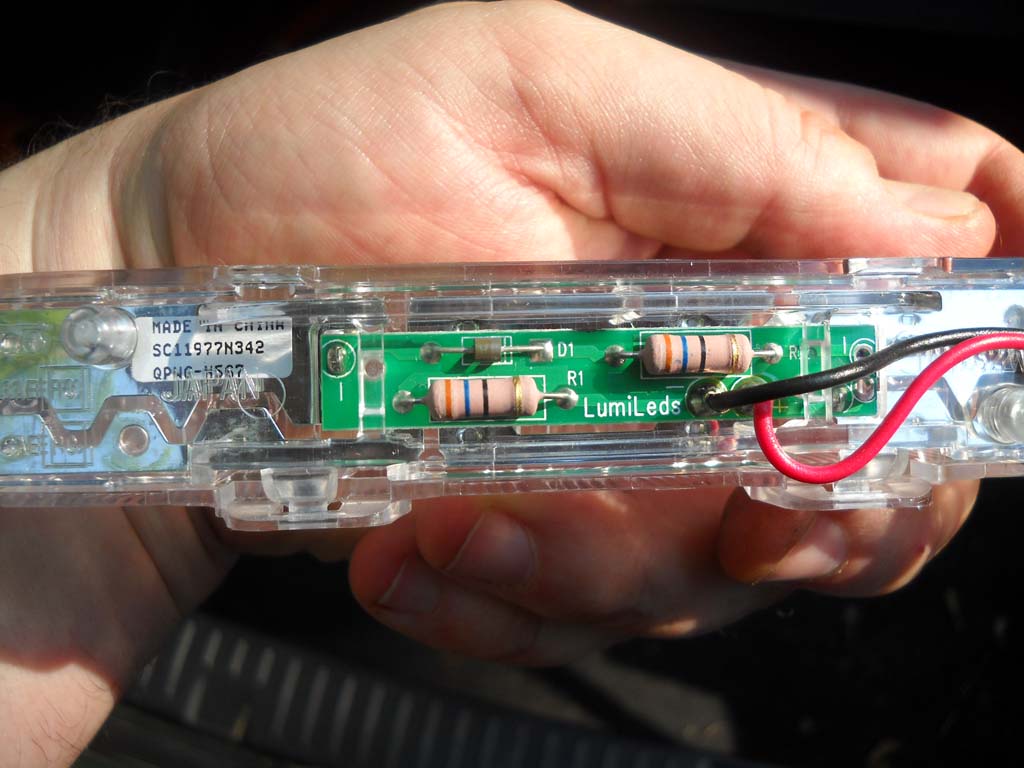
For any DIY electricians out there, here are photos of the old light, then the new light. The diode labeled "D1" is what goes bad and kills the light. If you don't want to pony up for a new one, try replacing that diode.
I couldn't find a good write-up of removing the rear seat, and since I had to replace my third brake light, I took some pictures and decided to write it up. It takes a while, but it's pretty straightforward.
There is an alternative method of replacing this light that requires drilling through the sheet metal in the trunk, but I wanted to do it all official-like.
Tools: Deep 14mm socket, 10mm socket, flat screwdriver, 3 pound sledgehammer
1) Locate the pull tabs under the bottom of the rear seat. There is one tab on each side. When you pull the tab, lift up on the seat to release it from the catch. Once you've pulled both out, pull the seat belt clasps through the holes and the bottom seat pulls right out.
2) Now you have to remove the center arm rest. Pull the leather cover back (it's velcro attached) to get to the bolts that hold the arm rest on. Note the plastic clip in the center - you'll have to pull that, too.
3) You don't need to pull the seat belts completely, but to get the seats out you do have to remove the harness bolts at the bottom of each belt. Remove the bolts and take note of the orientation - you'll want to set them correctly when you put everything back together.
4) The seat bolts are a royal PITA. I had to use a deep 14 mm socket and a 3 pound sledge to get them loose. There are four per seat, two on the inside and two near the door. The pictures are as follows: 1st pic - inner center bolts, 2nd pic - inner floor bolt, 3rd pic - outer floor bolts. Remove the bolts and the seat backs lift right out.
5) The center console is next. There are four clips holding it on, two you can remove from inside the car. The other two you have to pull from the trunk, as you can see in the second image.
6) Once you have pulled the clips, there are two hidden clips up top that hold the console on. You have to pull the console straight up to get it to release. This is a picture of the back of the console so you can see the clips. DO NOT PULL THE CONSOLE OUT TOWARDS YOU, YOU'LL BREAK THE CLIPS! Pull up.
7) Now that everything is out of the way, start pulling the clips and the child seat restraints:
8) Before you pull the shelf, you have to go around to the trunk and un-clip the 3rd brake light cable. There are six clips that hold the top front trunk cover on, the first photo is a close up of one of the clips. The second photo is the brake light cable. Un-clip it so you can pull the shelf back in the next step.
9) Flipping the shelf is a little tricky. The shelf itself pulls forward but you have to release the back corners from the trim catch, as shown in the first picture. Do that for each side. Once those are released, you can gently pull the whole shelf forward and flip it over.
10) To get the light out, there are two mounting screws. Remove them and the light slides right out.
NOTE: When replacing the light, make sure it is oriented correctly. If there is a gap between the plastic housing and the screw brackets then you have it upside down. It should sit flush on the brackets.
That's it! Reverse the procedure to put everything back together.
For any DIY electricians out there, here are photos of the old light, then the new light. The diode labeled "D1" is what goes bad and kills the light. If you don't want to pony up for a new one, try replacing that diode.


did u replace the D1 Diode?
would this be what would need to be re-soldiered in? or something similar?
http://www.ebay.com/itm/25-pcs-Schot...item45eeefb84e
would this be what would need to be re-soldiered in? or something similar?
http://www.ebay.com/itm/25-pcs-Schot...item45eeefb84e

Registered User
Joined: May 2004
Posts: 370
Likes: 4
From: NJ
Thanks for posting. My 2004G is such a pain to work on: the brake lights in this thread, a simple spark plug replacement becomes a major job, replace the starter ( yea I did it and it took me 3 hours, why? just like the spark plugs, no room to work on! ). The Japanese engineers designed this car did not care about maintenance!!!
Trending Topics

Joined: Mar 2009
Posts: 18,299
Likes: 1,488
From: By the sea, Tx
G35 sedan w/ too much money in mods

Awesome DIY. Quick note though, you don't need to unbolt the seatbelt harness bolts to get the seat backs out. Just work the belt around the outside of each seat and they'll come right out.
Thread Starter
|
Registered User
Joined: Jun 2012
Posts: 11
Likes: 5
I don't have a better picture
If you want to add more padding, you can easily reach the subwoofer by taking out the top of the trunk lining (six clips) and removing the four nuts that hold it up. You can probably just stuff dynomat around the top of the subwoofer from the bottom. No need to remove the seats - just drop the top liner of the trunk.
Thread Starter
|
Registered User
Joined: Jun 2012
Posts: 11
Likes: 5
Replace if you have time
did u replace the D1 Diode?
would this be what would need to be re-soldiered in? or something similar?
http://www.ebay.com/itm/25-pcs-Schot...item45eeefb84e
would this be what would need to be re-soldiered in? or something similar?
http://www.ebay.com/itm/25-pcs-Schot...item45eeefb84e
If you have the time and the skill, and you don't mind "testing" - then go ahead and order a few diodes to replace. Diodes are 1 cent parts - figure for every two you order one is bad.
Thread Starter
|
Registered User
Joined: Jun 2012
Posts: 11
Likes: 5
Belts question
So:
YOU CAN SKIP THE SEAT BELT HARNESS BOLTS IF YOU WORK THE SEATS OUT.


Thread Starter
|
Registered User
Joined: Jun 2012
Posts: 11
Likes: 5
Probably close to the same
Nissan used the same rear seats for the 2003-2006 FX series and the 2005-2006 GX series. If your rear seats have a reclining mechanism, then it's going to be the same. If they don't, then it will be slightly different, but not by much. The same procedure should work since the mount points aren't different.

subd.
after replacing my OEM Trunk with Spoiler lights i connected my 3rd brake like and its been acting funny.. only works half the time. im think something is loose.. bc every time fiddle around with the wires through my trunk it magically starts working.. im thinking it has something to do with my sub woofers vibrating something loose. but idk?
will use this write to figure out the problem. AWESOME write up!