
My Big Fat Akebono BBK Upgrade Thread


Joined: Jan 2013
Posts: 347
Likes: 29
From: Victoria BC
My Big Fat Akebono BBK Upgrade Thread
Hey all.
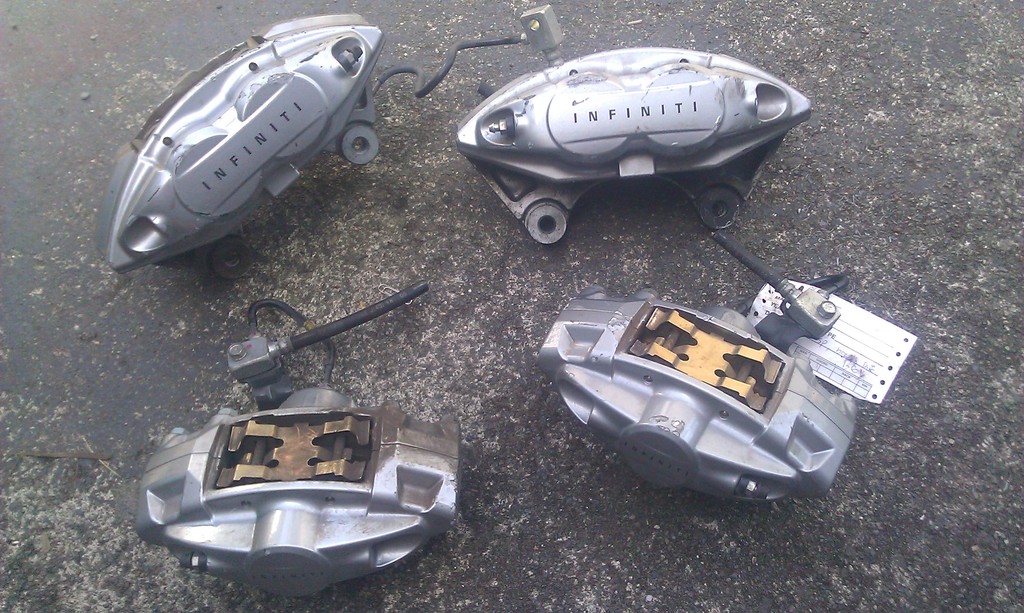
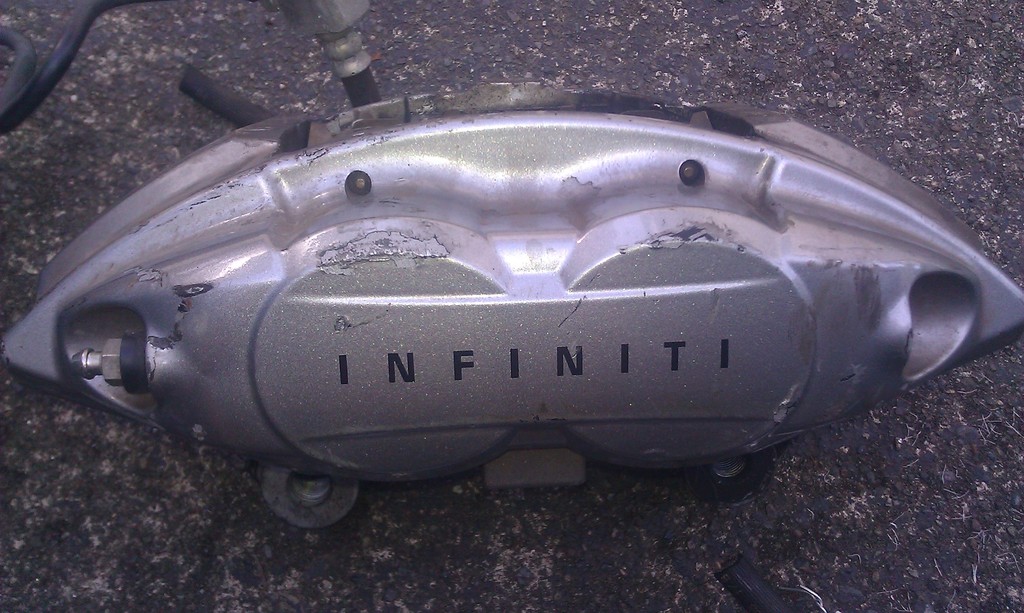
So my indecision on what BBK to get for my '04 Sedan has paid off, as I happened to find a set of G37S calipers in a forgotten corner of a German auto recycler here in Vancouver. Covered in a couple of years of grime atop a pile of Audi and Bimmer brakes, the crown jewels of Nissan's OEM braking technology...
The front rotors were missing, but the rear calipers and rotors were still attached to the axle. A quick negotiation of $500 all-in later and I would have been on my way. The one caveat? The place was in the process of moving locations and their tools were at the new place. So nobody was able to separate the axle for me. I had to come back a couple of days later.
When I came back they had found one of the front rotors, but somehow lost both the rear ones. I ended up taking just the calipers for $450. Good deal! The punchline here is that once I have done everything I need to do, this won't be much less than buying a new Akebono upgrade kit from one of the many Nissan speed shops that offer them. But I like doing stuff myself. My objective is to get it all done for $1400, which depending on where you go is $600-$800 less than a complete kit with two-piece rotors. Will I go over budget? Watch this space!
They were pretty beaten-up and I knew that part of my build would involve a complete strip-down, media-blast and powdercoating. And just for laughs I bought a set of unlicensed Akebono decals on eBay and a can of caliper high-temp clear-coat and decided to bling my new brakes.
To complete the build I also needed new rotors, pads, and caliper rebuild kits. I shopped around and sourced the new slotted two-piece front rotors from Z1 Motorsports along with the brackets required to adapt the larger brakes to my older G35. The caliper kits and rear rotors came from the local Nissan/Infiniti dealer, and to my surprise their price on those items was far less than the local auto parts places.
By the way, the service from Z1 was pretty good. The guy on the phone was kind of surly, but the gear was on my door-step in five business days which is pretty impressive for a cross-border sale. And more importantly, it was the right stuff!
Step 1: re/re those calipers...
The calipers were pretty rough. The pads and hardware were in good condition but I decided to start from scratch. Extracting caliper pistons is pretty easy - just get a compressed air source and force them out. Be sure to use a wooden shim to keep them from popping all the way out - if one comes out, all the air pressure to force the others out will disappear. Use a 3/4" shim centred between the sides of the caliper and the pistons will come out to the point you can wiggle them out by hand the rest of the way. DO NOT use pliers on them. Just be patient and wiggle them until they fall out.
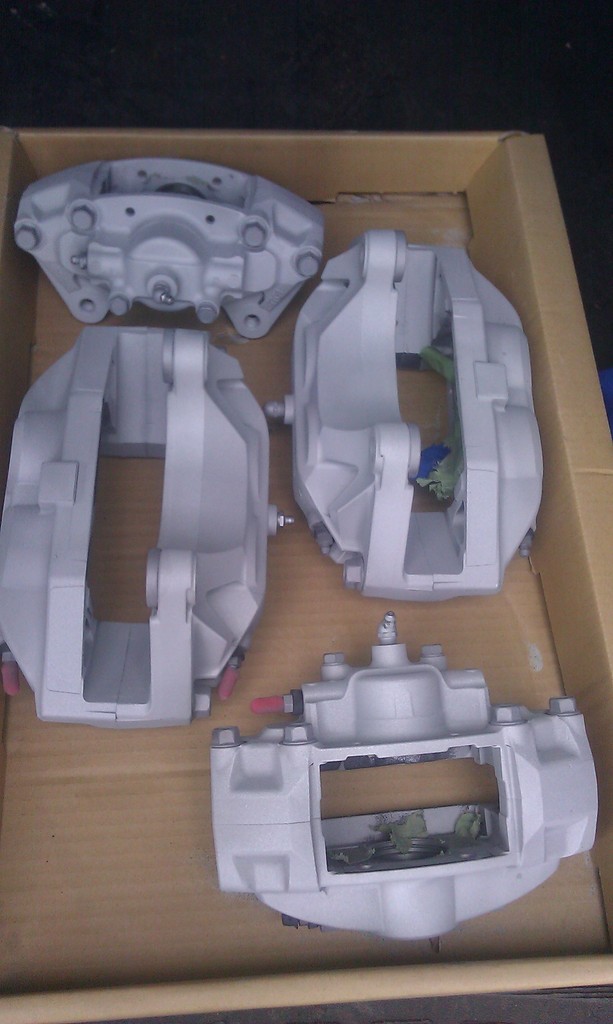
After pulling all the pistons and seals from them, they were ready for a strip-down. One thing to remember when refinishing these bad-boys is that they aren't iron - they're alloy. So taking a wire brush to them to remove the paint will damage them. A better option is to media-blast them. Again, because they are alloy, don't use sand. Use a glass-bead media to strip the paint. I opted to send mine to a shop and got a deal because I wasn't in a hurry to get them back. The guy who blasted them did them at the same time as another job. Here's what they looked like $60 later...
Then I took them to a powdercoater. I'm glad I shopped around because prices ranged from $30 each caliper to $100 each! In the end I paid just about the midle of that range, but the shop was clean and had examples of other customers' projects awaiting pick-up. And they were done in one day. They're sexy as hell, too...
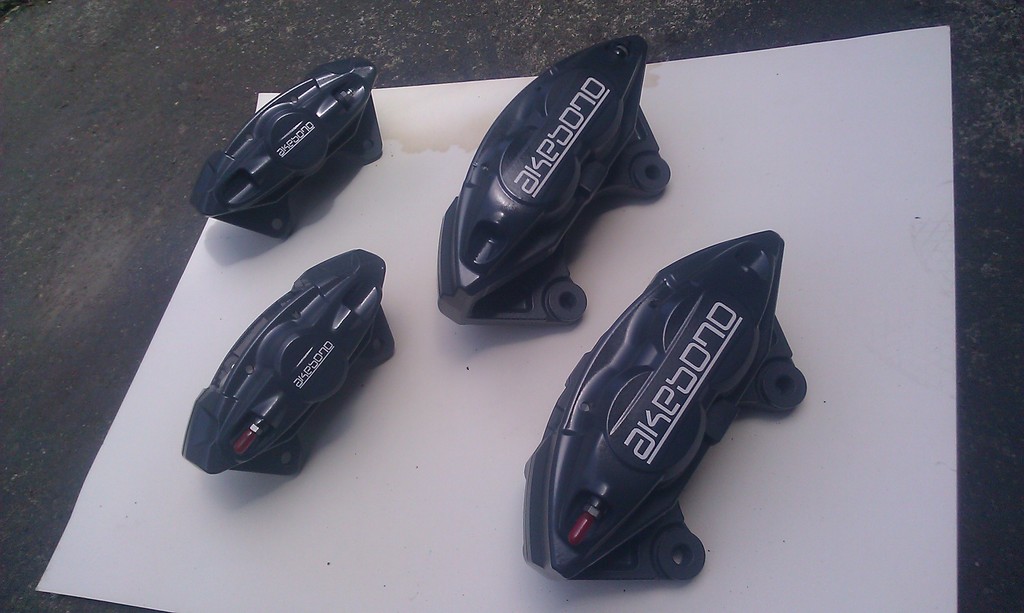
I didn't want to go too "rice" with the finish, but I didn't want black, either. I opted for a gloss dark grey with no metal flake in the finish it has a very slight blue tint in direct sunlight but once installed they will look slate grey. These are going to look great on my silver sedan. Subtle, but those of us who know will know! Once I got them back from the shop I added the ebay decals and hit the calipers with two coats of VHT caliper clear coat.
Of course it is very important to keep the caliper cylinders clean at all times. The powdercoater cleaned them thoroughly, then taped/capped all the openings for the process, then cleaned all the ports again. When I got therm home I taped them over before applying the clear coat. I won't uncover them until it's time to rebuild.
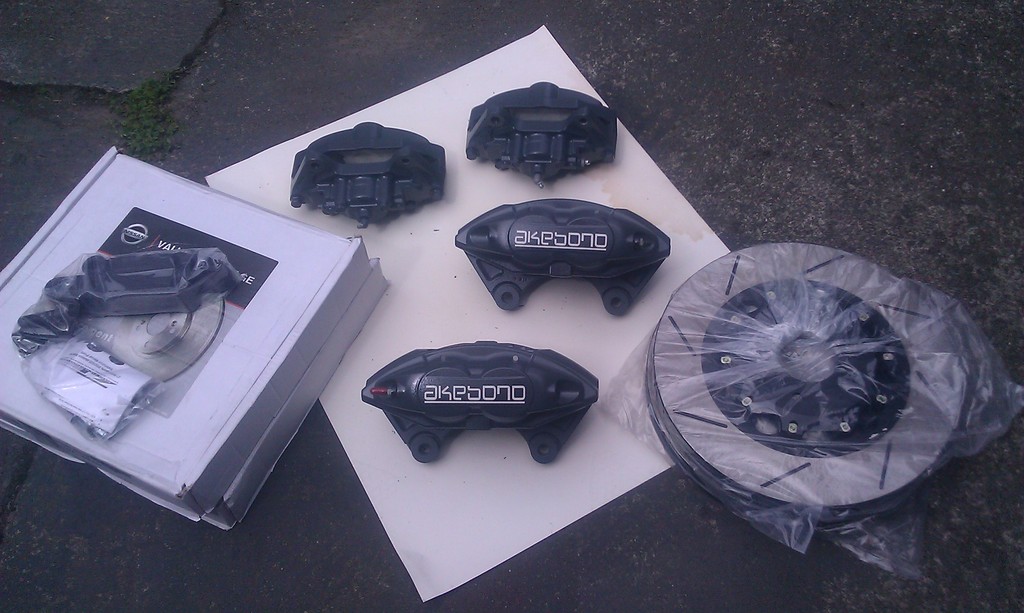
So now I'm waiting on the rebuild kits. In the meantime here's a pic of all my sexy new brake components.... Check back for part 2!
So my indecision on what BBK to get for my '04 Sedan has paid off, as I happened to find a set of G37S calipers in a forgotten corner of a German auto recycler here in Vancouver. Covered in a couple of years of grime atop a pile of Audi and Bimmer brakes, the crown jewels of Nissan's OEM braking technology...
The front rotors were missing, but the rear calipers and rotors were still attached to the axle. A quick negotiation of $500 all-in later and I would have been on my way. The one caveat? The place was in the process of moving locations and their tools were at the new place. So nobody was able to separate the axle for me. I had to come back a couple of days later.
When I came back they had found one of the front rotors, but somehow lost both the rear ones. I ended up taking just the calipers for $450. Good deal! The punchline here is that once I have done everything I need to do, this won't be much less than buying a new Akebono upgrade kit from one of the many Nissan speed shops that offer them. But I like doing stuff myself. My objective is to get it all done for $1400, which depending on where you go is $600-$800 less than a complete kit with two-piece rotors. Will I go over budget? Watch this space!
They were pretty beaten-up and I knew that part of my build would involve a complete strip-down, media-blast and powdercoating. And just for laughs I bought a set of unlicensed Akebono decals on eBay and a can of caliper high-temp clear-coat and decided to bling my new brakes.


To complete the build I also needed new rotors, pads, and caliper rebuild kits. I shopped around and sourced the new slotted two-piece front rotors from Z1 Motorsports along with the brackets required to adapt the larger brakes to my older G35. The caliper kits and rear rotors came from the local Nissan/Infiniti dealer, and to my surprise their price on those items was far less than the local auto parts places.
By the way, the service from Z1 was pretty good. The guy on the phone was kind of surly, but the gear was on my door-step in five business days which is pretty impressive for a cross-border sale. And more importantly, it was the right stuff!
Step 1: re/re those calipers...
The calipers were pretty rough. The pads and hardware were in good condition but I decided to start from scratch. Extracting caliper pistons is pretty easy - just get a compressed air source and force them out. Be sure to use a wooden shim to keep them from popping all the way out - if one comes out, all the air pressure to force the others out will disappear. Use a 3/4" shim centred between the sides of the caliper and the pistons will come out to the point you can wiggle them out by hand the rest of the way. DO NOT use pliers on them. Just be patient and wiggle them until they fall out.
After pulling all the pistons and seals from them, they were ready for a strip-down. One thing to remember when refinishing these bad-boys is that they aren't iron - they're alloy. So taking a wire brush to them to remove the paint will damage them. A better option is to media-blast them. Again, because they are alloy, don't use sand. Use a glass-bead media to strip the paint. I opted to send mine to a shop and got a deal because I wasn't in a hurry to get them back. The guy who blasted them did them at the same time as another job. Here's what they looked like $60 later...

Then I took them to a powdercoater. I'm glad I shopped around because prices ranged from $30 each caliper to $100 each! In the end I paid just about the midle of that range, but the shop was clean and had examples of other customers' projects awaiting pick-up. And they were done in one day. They're sexy as hell, too...

I didn't want to go too "rice" with the finish, but I didn't want black, either. I opted for a gloss dark grey with no metal flake in the finish it has a very slight blue tint in direct sunlight but once installed they will look slate grey. These are going to look great on my silver sedan. Subtle, but those of us who know will know! Once I got them back from the shop I added the ebay decals and hit the calipers with two coats of VHT caliper clear coat.
Of course it is very important to keep the caliper cylinders clean at all times. The powdercoater cleaned them thoroughly, then taped/capped all the openings for the process, then cleaned all the ports again. When I got therm home I taped them over before applying the clear coat. I won't uncover them until it's time to rebuild.
So now I'm waiting on the rebuild kits. In the meantime here's a pic of all my sexy new brake components.... Check back for part 2!


Joined: Mar 2009
Posts: 18,299
Likes: 1,488
From: By the sea, Tx
G35 sedan w/ too much money in mods

IIRC you need adapter brackets for at least the front calipers.
https://conceptzperformance.com/czp-...100_p_3411.php
https://conceptzperformance.com/czp-...100_p_3411.php
Trending Topics
Joined: Jan 2013
Posts: 347
Likes: 29
From: Victoria BC
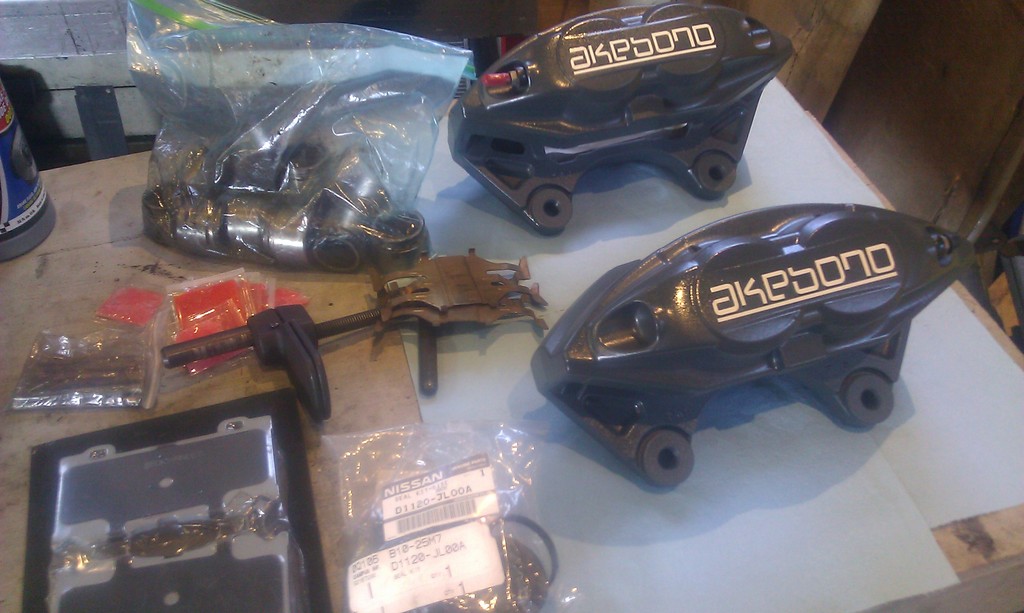
Correct. the plastic bag sitting atop my boxed rotors in the last photo is the bag with the front adapters in it.
The rears are a direct bolt-on, no adapter needed.
The rears are a direct bolt-on, no adapter needed.
IIRC you need adapter brackets for at least the front calipers.
https://conceptzperformance.com/czp-...100_p_3411.php
https://conceptzperformance.com/czp-...100_p_3411.php
Joined: Jan 2013
Posts: 347
Likes: 29
From: Victoria BC
A'ight, so here we are at the half-way mark.
I went by the dealer yesterday and picked up the caliper rebuild kit I ordered. Unfortunately the rear kit is still backordered so all I got was the kit for the front calipers.
I decided to rebuild the fronts and wait until the rears were ready before installing, but as it happens rebuilding the front calipers took far less time than I anticipated so I decided to spend the rest of the afternoon installing the front half of the BBK.
The naval base where I work has an auto hobby club with access to hoists and tools galore. Makes everything much easier. But everything I did today can be done in your driveway (although having a hoist and air tools saves a ton of time!)
Caliper rebuild:
First off, most Nissan/Infiniti dealers do not stock the caliper rebuild kits; they have to be special ordered. So bear that in mind when setting your project time-frame. With my local dealer, the front kits took a week to arrive, but the rears will be up to four weeks. No auto parts places in my area stock aftermarket kits so that was not an option. Your mileage may vary. For reference, the caliper rebuild kit for a 2009 G37 Akebono front kit is Nissan part # D1120-JL00A. Each kit is for a pair of calipers and includes grease for assembly.
NOTE: *do not* split the caliper halves! the gasket between the two halves is not part of the caliper rebuild kit, and once the calipers are assembled at the factory they are not meant to be split again.
The first step when rebuilding your calipers, after prepping them by cleaning/sandblasting/painting, is to get all the components together.
You will need:
calipers
pads
rebuild kit
dental pick or similar
box wrench (for bleeder valves)
optional: caliper piston compression tool or medium C-clamp
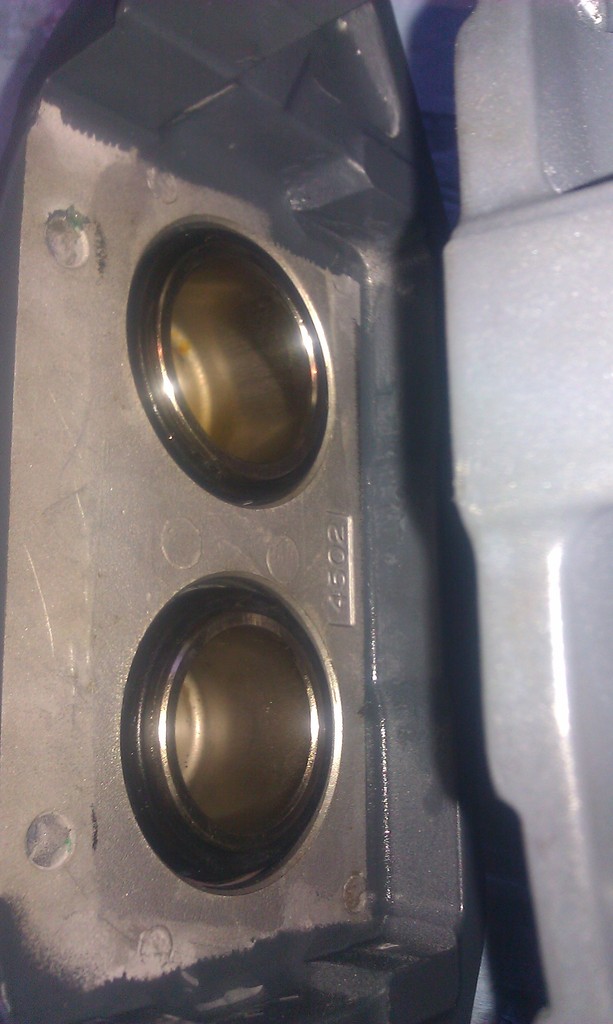
In this photo you can see the calipers and reusable parts, the kit, the pads, the packets of grease that come with the kit, and the freezer-bag full of pistons.
Note that the front caliper pistons come in two sizes: 41mm and 45mm. the piston seals are size-specific, but the rubber dust boots and metal retaining clips are not.
Step one: after ensuring the piston chambers are clean and free of debris, grease the piston seals (with the pink/red grease) and the channels in which they sit. Also grease the other channel, because you will eventually be inserting the dust boots into those, too. Seat the seals in the channels, then once each one is seated "scoop" behind the seal with a dental pic to ensure no air is trapped between the seal and the channel. Remember, the seals are matched to the two different sizes of pistons, so make sure the smaller seals are seated in the 41mm holes and the larger ones are seated in the 45mm holes.
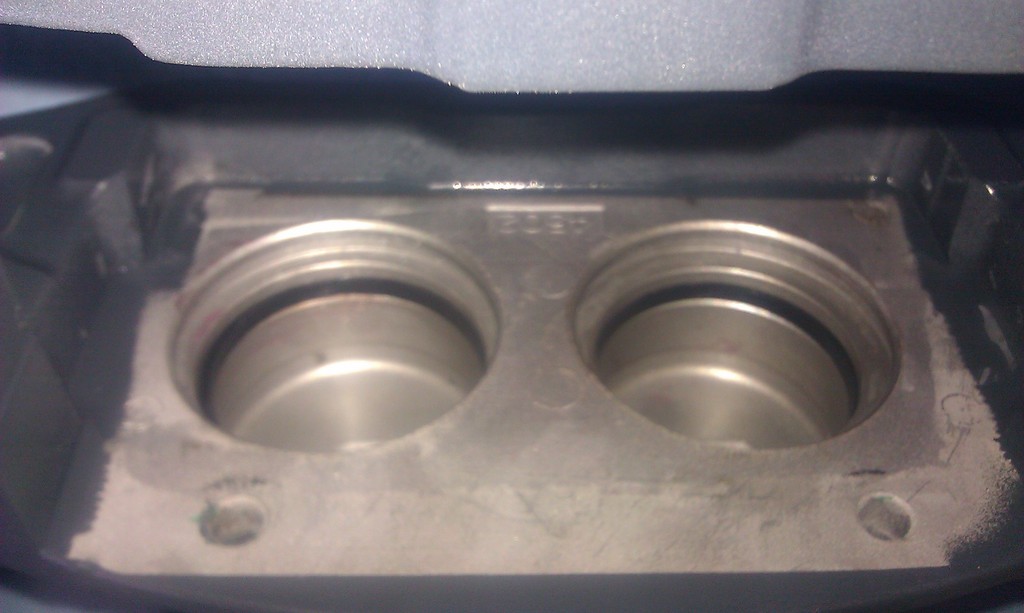
In this photo you can see the piston seals installed.
Note: make sure at least one bleeder valve is removed from the caliper during piston installation. This will ensure air can escape the caliper as you put the pistons in.
Step two: wipe down and then grease the pistons, one at a time. the closed end goes in first. What you want to do is rest the piston on the seal you have just seated, spin it back and forth a bit to evenly distribute the grease, and then gently rock the piston back and forth with your thumbs. The pistons are very slightly crowned, so once you gently work one side past the lip of the seal, the other side will follow. IMPORTANT: do not force the piston too hard. It should slide right in with gentle but even force. If it puts up a struggle, remove and retry. Patience, because if you damage a seal while doing this step, you won't know until your newly installed calipers start leaking brake fluid!
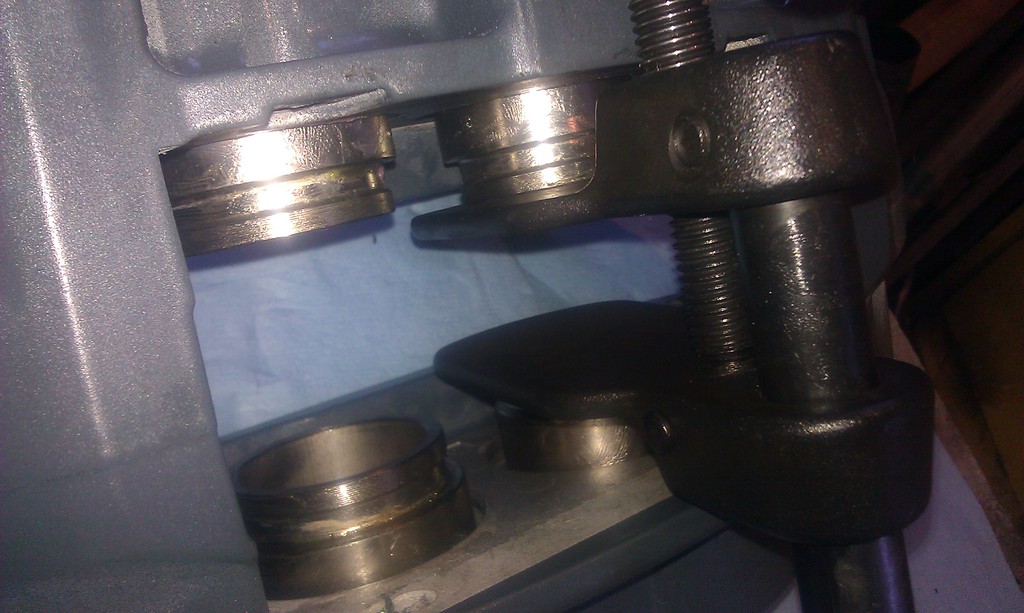
In this photo you can see the compression tool being used to push the pistons into place. It was kind of useless and I ended up using my bare hands instead. Note the groove at the end of each piston - this is where your dust boot goes (in step three).
NOTE: do not push the pistons all the way in. It is easier to install the dust boot (step three) if the piston is slightly protruding. Push each piston about 3/4 of the way in.
I watched a few tutorials on-line before starting this step. Everybody said to use a C-clamp or a compression tool to install the pistons. You can do that if you want, but I found it much easier using the two thumb method. Some guys will argue that "rocking" the piston into place puts too much stress on the seal, but let's face it we're not building a space shuttle here. The tolerances in a mass-produced brake caliper aren't that tight.
Step three: grease the dust boot (again, with the red/pink grease) and the "neck" of the piston. Place the dust boot on the piston so that it expands downward. I'm hesitant to say you want it to go on kind of like a condom, but that's what you want!
Once your dust boot is seated on the neck of the piston, carefully work the outsude of the dust boot into the channel. Seven our of the eight I installed today were trouble free, but the last one kind of didn't sit right in the channel and I had to retry it. Be careful and take your time while doing this step. Once all the boots are in place you can press the pistons all the way in for step four...
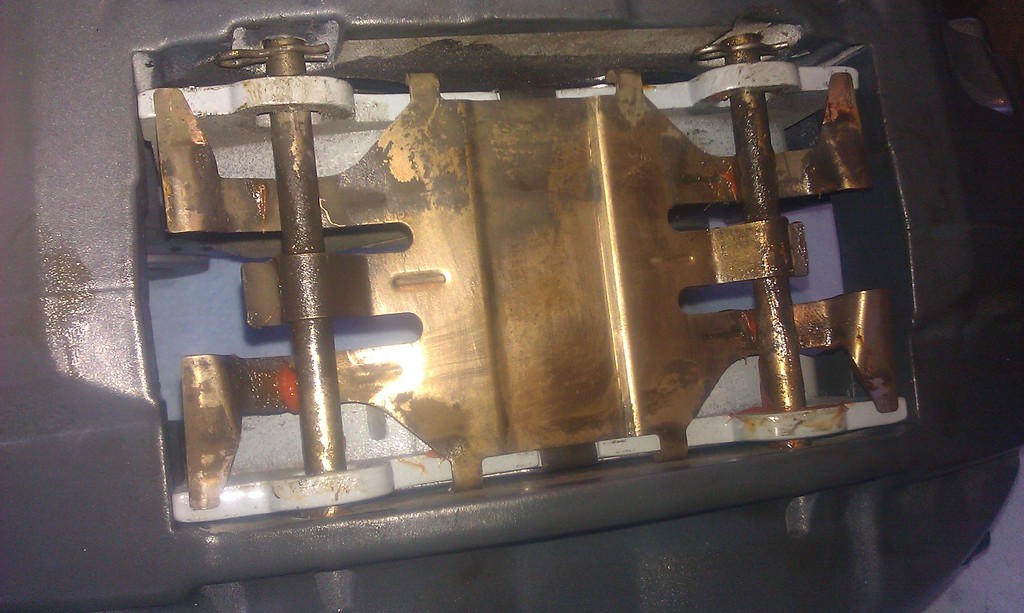
Step four: once the dust boots are seated, take the pain-in-the-*** metal retaining clips and carefully insert them under the edge of the dust boot. Be very careful not to puncture the dust boot with the unnecessarily sharp ends of the clips. Just very carefully, a section at a time, push the clip in until it disappears behind the edge of the opening in the caliper. This is another step in which the dental pick can be useful. Just be careful not to puncture the dust boot with the pick or screwdriver or whatever you use.
In this photo you can see the dust boots installed and the pistons fully-retracted into the caliper. Not seen but totally installed: the pain-in-the-*** metal retaining clips.
Step five: install pads as per any other brake caliper. The orange lube in the caliper rebuild kit is for the pad pins.
In this photo you can see the pads installed and held in place by the pins. Note the cotter pins (top of photo) which keep the pins from falling out.
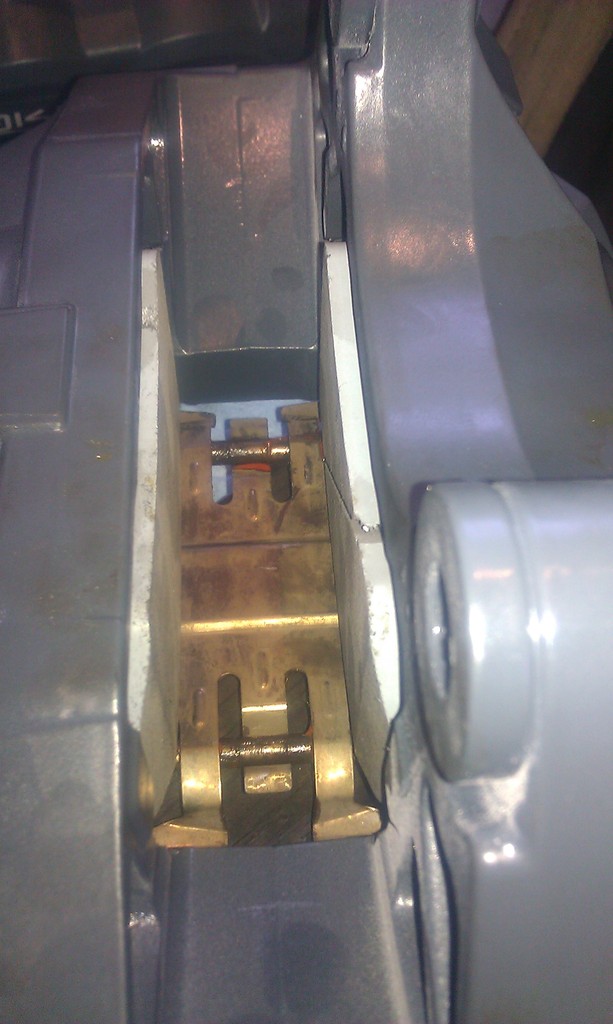
Another view of the caliper with pads installed.
Next post: Installing the BBK!
I went by the dealer yesterday and picked up the caliper rebuild kit I ordered. Unfortunately the rear kit is still backordered so all I got was the kit for the front calipers.
I decided to rebuild the fronts and wait until the rears were ready before installing, but as it happens rebuilding the front calipers took far less time than I anticipated so I decided to spend the rest of the afternoon installing the front half of the BBK.
The naval base where I work has an auto hobby club with access to hoists and tools galore. Makes everything much easier. But everything I did today can be done in your driveway (although having a hoist and air tools saves a ton of time!)
Caliper rebuild:
First off, most Nissan/Infiniti dealers do not stock the caliper rebuild kits; they have to be special ordered. So bear that in mind when setting your project time-frame. With my local dealer, the front kits took a week to arrive, but the rears will be up to four weeks. No auto parts places in my area stock aftermarket kits so that was not an option. Your mileage may vary. For reference, the caliper rebuild kit for a 2009 G37 Akebono front kit is Nissan part # D1120-JL00A. Each kit is for a pair of calipers and includes grease for assembly.
NOTE: *do not* split the caliper halves! the gasket between the two halves is not part of the caliper rebuild kit, and once the calipers are assembled at the factory they are not meant to be split again.
The first step when rebuilding your calipers, after prepping them by cleaning/sandblasting/painting, is to get all the components together.
You will need:
calipers
pads
rebuild kit
dental pick or similar
box wrench (for bleeder valves)
optional: caliper piston compression tool or medium C-clamp

In this photo you can see the calipers and reusable parts, the kit, the pads, the packets of grease that come with the kit, and the freezer-bag full of pistons.
Note that the front caliper pistons come in two sizes: 41mm and 45mm. the piston seals are size-specific, but the rubber dust boots and metal retaining clips are not.
Step one: after ensuring the piston chambers are clean and free of debris, grease the piston seals (with the pink/red grease) and the channels in which they sit. Also grease the other channel, because you will eventually be inserting the dust boots into those, too. Seat the seals in the channels, then once each one is seated "scoop" behind the seal with a dental pic to ensure no air is trapped between the seal and the channel. Remember, the seals are matched to the two different sizes of pistons, so make sure the smaller seals are seated in the 41mm holes and the larger ones are seated in the 45mm holes.

In this photo you can see the piston seals installed.
Note: make sure at least one bleeder valve is removed from the caliper during piston installation. This will ensure air can escape the caliper as you put the pistons in.
Step two: wipe down and then grease the pistons, one at a time. the closed end goes in first. What you want to do is rest the piston on the seal you have just seated, spin it back and forth a bit to evenly distribute the grease, and then gently rock the piston back and forth with your thumbs. The pistons are very slightly crowned, so once you gently work one side past the lip of the seal, the other side will follow. IMPORTANT: do not force the piston too hard. It should slide right in with gentle but even force. If it puts up a struggle, remove and retry. Patience, because if you damage a seal while doing this step, you won't know until your newly installed calipers start leaking brake fluid!

In this photo you can see the compression tool being used to push the pistons into place. It was kind of useless and I ended up using my bare hands instead. Note the groove at the end of each piston - this is where your dust boot goes (in step three).
NOTE: do not push the pistons all the way in. It is easier to install the dust boot (step three) if the piston is slightly protruding. Push each piston about 3/4 of the way in.
I watched a few tutorials on-line before starting this step. Everybody said to use a C-clamp or a compression tool to install the pistons. You can do that if you want, but I found it much easier using the two thumb method. Some guys will argue that "rocking" the piston into place puts too much stress on the seal, but let's face it we're not building a space shuttle here. The tolerances in a mass-produced brake caliper aren't that tight.
Step three: grease the dust boot (again, with the red/pink grease) and the "neck" of the piston. Place the dust boot on the piston so that it expands downward. I'm hesitant to say you want it to go on kind of like a condom, but that's what you want!
Once your dust boot is seated on the neck of the piston, carefully work the outsude of the dust boot into the channel. Seven our of the eight I installed today were trouble free, but the last one kind of didn't sit right in the channel and I had to retry it. Be careful and take your time while doing this step. Once all the boots are in place you can press the pistons all the way in for step four...
Step four: once the dust boots are seated, take the pain-in-the-*** metal retaining clips and carefully insert them under the edge of the dust boot. Be very careful not to puncture the dust boot with the unnecessarily sharp ends of the clips. Just very carefully, a section at a time, push the clip in until it disappears behind the edge of the opening in the caliper. This is another step in which the dental pick can be useful. Just be careful not to puncture the dust boot with the pick or screwdriver or whatever you use.

In this photo you can see the dust boots installed and the pistons fully-retracted into the caliper. Not seen but totally installed: the pain-in-the-*** metal retaining clips.
Step five: install pads as per any other brake caliper. The orange lube in the caliper rebuild kit is for the pad pins.

In this photo you can see the pads installed and held in place by the pins. Note the cotter pins (top of photo) which keep the pins from falling out.

Another view of the caliper with pads installed.
Next post: Installing the BBK!
Last edited by TheIronYuppy; Aug 1, 2016 at 05:13 PM.
Joined: Jan 2013
Posts: 347
Likes: 29
From: Victoria BC
Are you sick of reading about dust boots? Me too! Let's get on to the good stuff.... replacing the shameful, bony-girl-arms stock brakes with some hyper-masculine components worthy of awe and a respect borne of fear and envy...
In this photo you can see the stock brakes, more suited for something Andy Dick or Nathan Lane would drive to Whole Foods, or to a store that was the opposite of a place where one could buy workout supplements, guns, and military-grade methamphetamines from topless Czech pornstars.
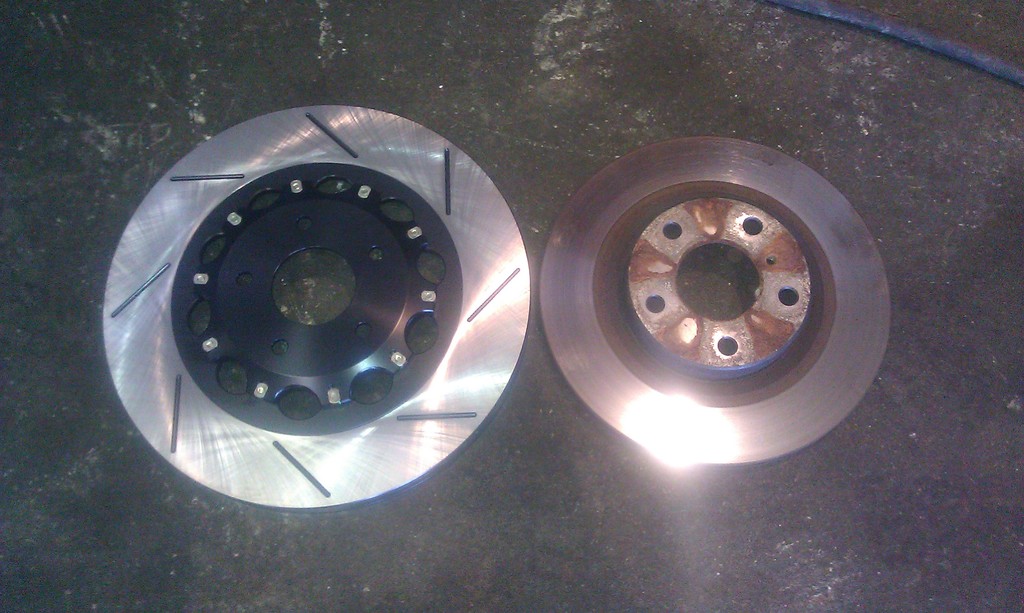
Okay, just look at this ****! The stock rotor on the right just crapped its pants! All hail and bow-down before the mighty Z1 14" slotted two-piece rotor, puny humans!
On to the install...
What you will need:
Lug wrench
22mm impact socket
larger allen bit for bracket bolts (Sorry, I forgot what size)
torque wrench (98 ft/lbs)
steel hammer
optional: cutting wheel for dust shield
short lengths of wire or twine (to suspend old caliper during removal)
rubber mallet or dead-blow hammer
10mm, 11mm, 12mm open-end box wrenches
brake cleaner
brake fluid
Loktite
rags
tube or bleed kit for bleeding brakes
catch bottle or bucket for brake fluid
a patient friend to help with the bleeding part
Note: brake fluid is highly corrosive to paint. Keep a few clean rags on-hand to quickly wipe brake fluid from any painted surface as often as necessary. If your calipers are painted be sure to wipe them down with a mixture of water and mild detergent (dishwashing liquid) once you have finished installing, filling, and bleeding them. That should be the last thing you do before putting your wheels back on.
Step one: Remove your wheel and detach the stock caliper from the hub by removing the two bolts which hold it in-place. Leave the caliper attached to the brake line for now, and use a piece of wire or twine to hang the caliper out of the way without stressing the brake line.
Step two: remove the stock rotor from the hub. If it doesn't pull off freely, use a dead-blow hammer or a rubber mallet to loosen it. If you live in the rust-belt, you might consider either using some kind of powerful explosive, or moving to the West Coast like a normal person. Once the rotor and caliper are out of the way, either cut or bend the metal dust shield out of the way. Optional: disassemble the hub and remove the dust shield entirely
Step three: Retrieve the three page instruction manual that came with the adapter brackets and crumple it into a tight ball of paper. Throw it away, because it's useless. Orient the brackets as shown in the following photo. Before locking everything down, test-fit the bracket, rotor, new caliper, and your wheel to ensure everything is going to live in harmony.
Step four: Using the supplied allen-head bolts fit the bracket as shown in this photo. Tighten the bolts to 98 ft-lbs.
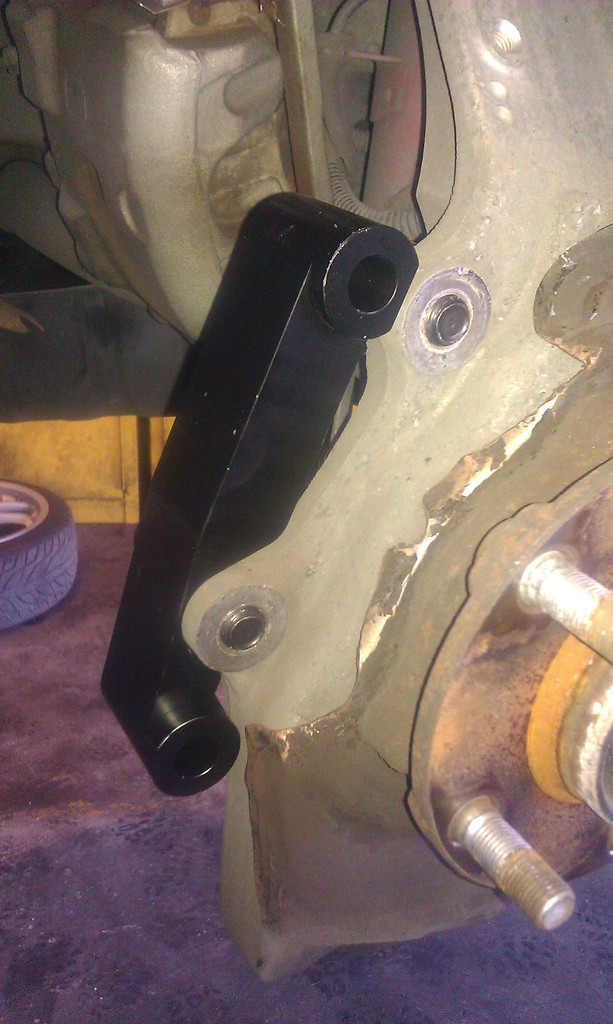
In this photo we can see the Z1 Motorsports bracket - which looks nothing like the one in the instruction manual - test-fitted on the hub. There's really only one way to mount the bracket so don't be too concerned about doing it wrong. Note also in the photo how the stock dust-shield is mostly cut-away, with the remaining sections pounded flat with a hammer to get them out of the way. That was the best part - I love hitting things with hammers.
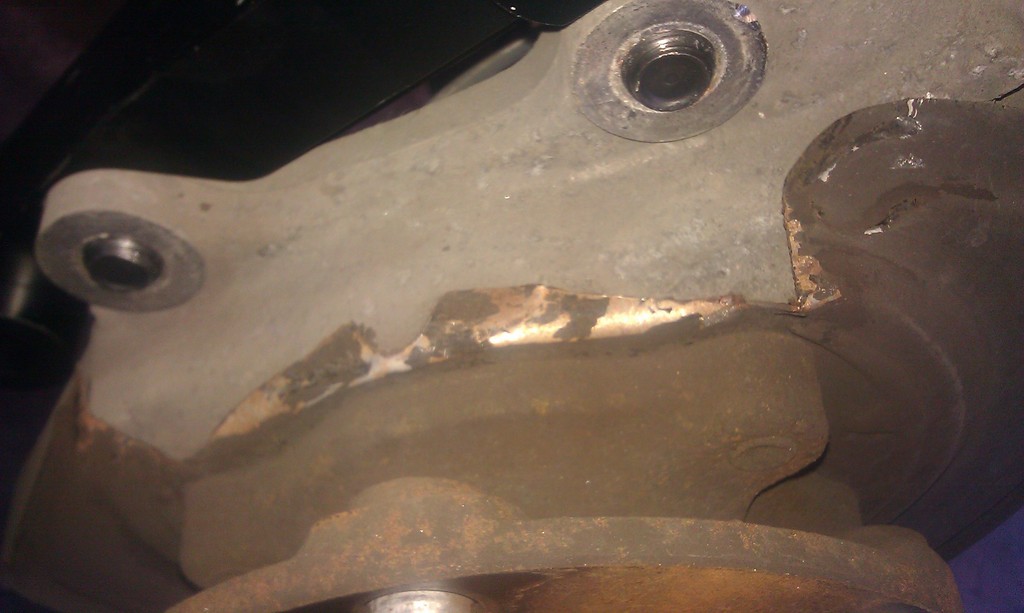
In this photo you can see the remaining sheet metal of the dust shield hammered flat against the hub. Also, this photo makes it look a bit like a frog, which is kind of cool.
Note: the instructions didn't mention Loktite, but I decided to use it when installing the brackets. Why the heck not?! These brackets are the only things attaching the rotors to your car, and once installed they never need to be removed unless you want to go back to stock brakes like a tiny girl would.
Step five: Seat the new rotor on the hub, and hold in place with one finger-tight lug nut (for safety). **Before placing the rotor on the hub, spray it liberally with brake cleaner to remove any of the packing grease and other impurities. Once it's on the hub spray again with brake cleaner to remove any residue from your hands or gloves.
Step six: using the supplied long bolts, install the new caliper by attaching it to the free end of the bracket.
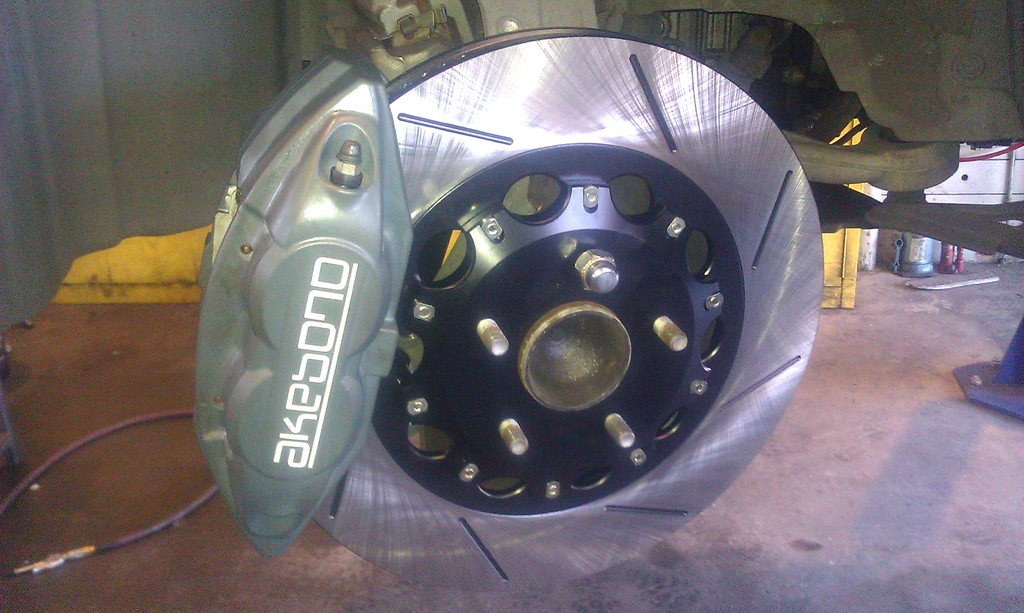
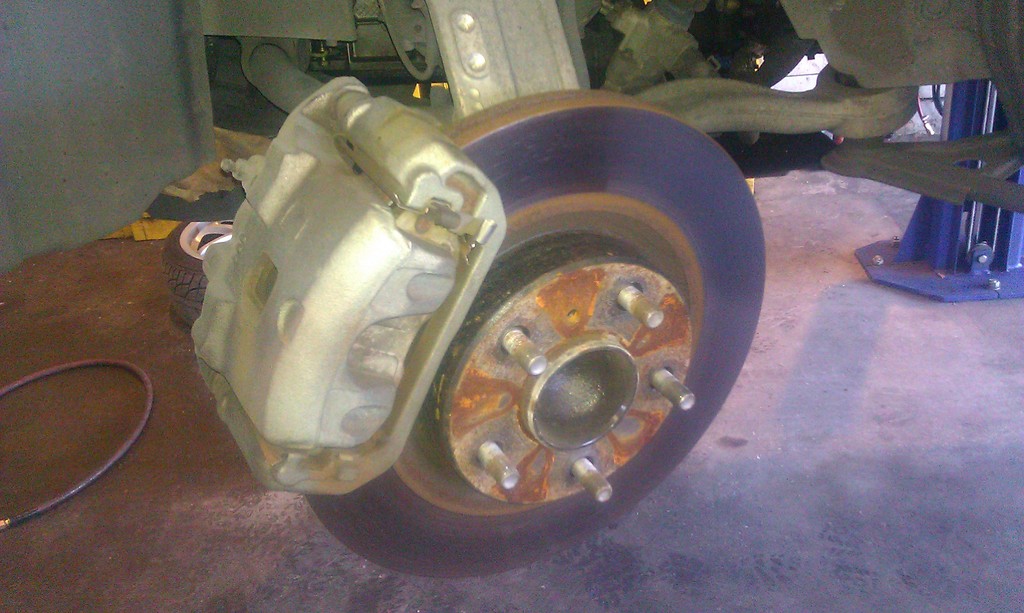
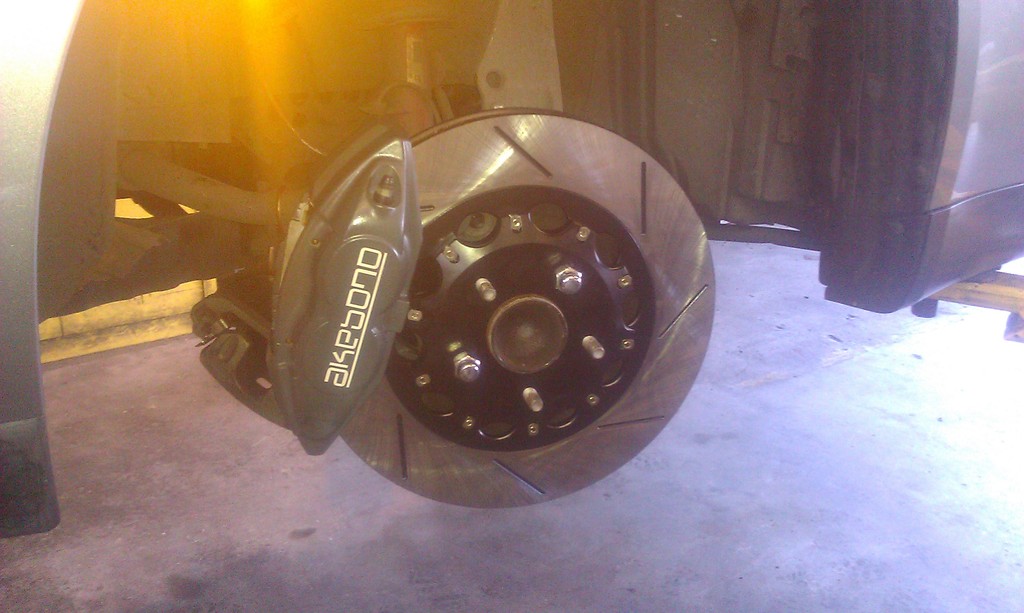
In this photo you can see rotor and caliper fitted to the left front wheel and awaiting tightening of hardware. Note also the direction of the rotor slots (forward) and the orientation of the caliper bleeder valves (at the top).
Here for reference is a page explaining the correct way to install directional rotors:
http://www.cquence.net/blog/how_to_p..._brake_rotors/
Step seven: remove the brake lines from the old calipers and simply attach to the new ones. Tighten everything. Double and triple check all the components, ensure there is enough "slack" in your brake lines to match your car's full turning range, and then fill/bleed your brake lines as per usual brake system service. Put your wheels back on, torque to spec, and go for a drive with your pimpin' new shoes.
Note: if you opt to keep as much fluid in the brake system as you can during the swap, instead of letting it drain, you only need to fill/bleed the wheels on the axle you're doing. As long as your master cylinder doesn't completely drain, the fluid in the rear lines and calipers will stay intact. You only need to fill and bleed the fronts!
In this photo you can see the completed brake system.
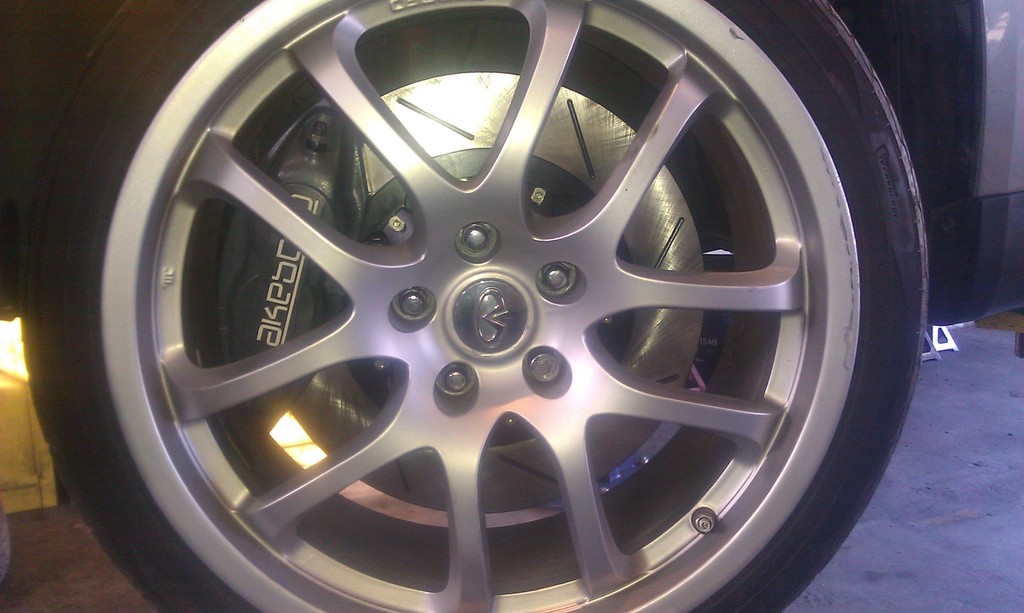
And in this photo, ready to roll behind 19" coupe wheels. Admit it, you're a little turned-on right now.
Next up (eventually), the far-easier rear brake install.....

In this photo you can see the stock brakes, more suited for something Andy Dick or Nathan Lane would drive to Whole Foods, or to a store that was the opposite of a place where one could buy workout supplements, guns, and military-grade methamphetamines from topless Czech pornstars.
Okay, just look at this ****! The stock rotor on the right just crapped its pants! All hail and bow-down before the mighty Z1 14" slotted two-piece rotor, puny humans!

On to the install...
What you will need:
Lug wrench
22mm impact socket
larger allen bit for bracket bolts (Sorry, I forgot what size)
torque wrench (98 ft/lbs)
steel hammer
optional: cutting wheel for dust shield
short lengths of wire or twine (to suspend old caliper during removal)
rubber mallet or dead-blow hammer
10mm, 11mm, 12mm open-end box wrenches
brake cleaner
brake fluid
Loktite
rags
tube or bleed kit for bleeding brakes
catch bottle or bucket for brake fluid
a patient friend to help with the bleeding part
Note: brake fluid is highly corrosive to paint. Keep a few clean rags on-hand to quickly wipe brake fluid from any painted surface as often as necessary. If your calipers are painted be sure to wipe them down with a mixture of water and mild detergent (dishwashing liquid) once you have finished installing, filling, and bleeding them. That should be the last thing you do before putting your wheels back on.
Step one: Remove your wheel and detach the stock caliper from the hub by removing the two bolts which hold it in-place. Leave the caliper attached to the brake line for now, and use a piece of wire or twine to hang the caliper out of the way without stressing the brake line.
Step two: remove the stock rotor from the hub. If it doesn't pull off freely, use a dead-blow hammer or a rubber mallet to loosen it. If you live in the rust-belt, you might consider either using some kind of powerful explosive, or moving to the West Coast like a normal person. Once the rotor and caliper are out of the way, either cut or bend the metal dust shield out of the way. Optional: disassemble the hub and remove the dust shield entirely
Step three: Retrieve the three page instruction manual that came with the adapter brackets and crumple it into a tight ball of paper. Throw it away, because it's useless. Orient the brackets as shown in the following photo. Before locking everything down, test-fit the bracket, rotor, new caliper, and your wheel to ensure everything is going to live in harmony.
Step four: Using the supplied allen-head bolts fit the bracket as shown in this photo. Tighten the bolts to 98 ft-lbs.

In this photo we can see the Z1 Motorsports bracket - which looks nothing like the one in the instruction manual - test-fitted on the hub. There's really only one way to mount the bracket so don't be too concerned about doing it wrong. Note also in the photo how the stock dust-shield is mostly cut-away, with the remaining sections pounded flat with a hammer to get them out of the way. That was the best part - I love hitting things with hammers.

In this photo you can see the remaining sheet metal of the dust shield hammered flat against the hub. Also, this photo makes it look a bit like a frog, which is kind of cool.
Note: the instructions didn't mention Loktite, but I decided to use it when installing the brackets. Why the heck not?! These brackets are the only things attaching the rotors to your car, and once installed they never need to be removed unless you want to go back to stock brakes like a tiny girl would.
Step five: Seat the new rotor on the hub, and hold in place with one finger-tight lug nut (for safety). **Before placing the rotor on the hub, spray it liberally with brake cleaner to remove any of the packing grease and other impurities. Once it's on the hub spray again with brake cleaner to remove any residue from your hands or gloves.
Step six: using the supplied long bolts, install the new caliper by attaching it to the free end of the bracket.

In this photo you can see rotor and caliper fitted to the left front wheel and awaiting tightening of hardware. Note also the direction of the rotor slots (forward) and the orientation of the caliper bleeder valves (at the top).
Here for reference is a page explaining the correct way to install directional rotors:
http://www.cquence.net/blog/how_to_p..._brake_rotors/
Step seven: remove the brake lines from the old calipers and simply attach to the new ones. Tighten everything. Double and triple check all the components, ensure there is enough "slack" in your brake lines to match your car's full turning range, and then fill/bleed your brake lines as per usual brake system service. Put your wheels back on, torque to spec, and go for a drive with your pimpin' new shoes.
Note: if you opt to keep as much fluid in the brake system as you can during the swap, instead of letting it drain, you only need to fill/bleed the wheels on the axle you're doing. As long as your master cylinder doesn't completely drain, the fluid in the rear lines and calipers will stay intact. You only need to fill and bleed the fronts!

In this photo you can see the completed brake system.

And in this photo, ready to roll behind 19" coupe wheels. Admit it, you're a little turned-on right now.
Next up (eventually), the far-easier rear brake install.....
Last edited by TheIronYuppy; Aug 1, 2016 at 05:52 PM.

Joined: Jan 2013
Posts: 347
Likes: 29
From: Victoria BC
How to "bed-in" new brakes...
Once you've got your car on the road you want to "bed-in" the new rotors and pads. Basically what you are doing is mating the pads and rotors, subjecting them to gradual friction and heat. This will remove any glazing which can occur with new pads, and ultimately it will improve braking efficiency and prolong the life of your wearable brake components. It also gives you an opportunity to find any critical faults in your new components under a very controlled situation, rather than, say, when you're doing 90 on the freeway and a stupid deer jumps in front of you.
Find a big parking lot or a quiet stretch of road.
Bring your car up to around 30 MPH (50Km/h) and use gradual braking pressure to bring your speed down to 1/4 of that. Do this 8-10 times within five-ten minutes.
Once you've done that sequence, go back up to 30 MPH (50Km/h) and do it 2-3 times more with more urgent braking. Not locking the brakes up, but hard pressure.
That's it, you're done "bedding-in".
Joined: Mar 2009
Posts: 18,299
Likes: 1,488
From: By the sea, Tx
G35 sedan w/ too much money in mods
Are you sick of reading about dust boots? Me too! Let's get on to the good stuff.... replacing the shameful, bony-girl-arms stock brakes with some hyper-masculine components worthy of awe and a respect borne of fear and envy...

In this photo you can see the stock brakes, more suited for something Andy Dick or Nathan Lane would drive to Whole Foods, or to a store that was the opposite of a place where one could buy workout supplements, guns, and military-grade methamphetamines from topless Czech pornstars.
Okay, just look at this ****! The stock rotor on the right just crapped its pants! All hail and bow-down before the mighty Z1 14" slotted two-piece rotor, puny humans!

On to the install...
What you will need:
Lug wrench
22mm impact socket
larger allen bit for bracket bolts (Sorry, I forgot what size)
torque wrench (98 ft/lbs)
steel hammer
optional: cutting wheel for dust shield
short lengths of wire or twine (to suspend old caliper during removal)
rubber mallet or dead-blow hammer
10mm, 11mm, 12mm open-end box wrenches
brake cleaner
brake fluid
Loktite
rags
tube or bleed kit for bleeding brakes
catch bottle or bucket for brake fluid
a patient friend to help with the bleeding part
Note: brake fluid is highly corrosive to paint. Keep a few clean rags on-hand to quickly wipe brake fluid from any painted surface as often as necessary. If your calipers are painted be sure to wipe them down with a mixture of water and mild detergent (dishwashing liquid) once you have finished installing, filling, and bleeding them. That should be the last thing you do before putting your wheels back on.
Step one: Remove your wheel and detach the stock caliper from the hub by removing the two bolts which hold it in-place. Leave the caliper attached to the brake line for now, and use a piece of wire or twine to hang the caliper out of the way without stressing the brake line.
Step two: remove the stock rotor from the hub. If it doesn't pull off freely, use a dead-blow hammer or a rubber mallet to loosen it. If you live in the rust-belt, you might consider either using some kind of powerful explosive, or moving to the West Coast like a normal person. Once the rotor and caliper are out of the way, either cut or bend the metal dust shield out of the way. Optional: disassemble the hub and remove the dust shield entirely
Step three: Retrieve the three page instruction manual that came with the adapter brackets and crumple it into a tight ball of paper. Throw it away, because it's useless. Orient the brackets as shown in the following photo. Before locking everything down, test-fit the bracket, rotor, new caliper, and your wheel to ensure everything is going to live in harmony.
Step four: Using the supplied allen-head bolts fit the bracket as shown in this photo. Tighten the bolts to 98 ft-lbs.

In this photo we can see the Z1 Motorsports bracket - which looks nothing like the one in the instruction manual - test-fitted on the hub. There's really only one way to mount the bracket so don't be too concerned about doing it wrong. Note also in the photo how the stock dust-shield is mostly cut-away, with the remaining sections pounded flat with a hammer to get them out of the way. That was the best part - I love hitting things with hammers.

In this photo you can see the remaining sheet metal of the dust shield hammered flat against the hub. Also, this photo makes it look a bit like a frog, which is kind of cool.
Note: the instructions didn't mention Loktite, but I decided to use it when installing the brackets. Why the heck not?! These brackets are the only things attaching the rotors to your car, and once installed they never need to be removed unless you want to go back to stock brakes like a tiny girl would.
Step five: Seat the new rotor on the hub, and hold in place with one finger-tight lug nut (for safety). **Before placing the rotor on the hub, spray it liberally with brake cleaner to remove any of the packing grease and other impurities. Once it's on the hub spray again with brake cleaner to remove any residue from your hands or gloves.
Step six: using the supplied long bolts, install the new caliper by attaching it to the free end of the bracket.

In this photo you can see rotor and caliper fitted to the left front wheel and awaiting tightening of hardware. Note also the direction of the rotor slots (forward) and the orientation of the caliper bleeder valves (at the top).
Here for reference is a page explaining the correct way to install directional rotors:
http://www.cquence.net/blog/how_to_p..._brake_rotors/
Step seven: remove the brake lines from the old calipers and simply attach to the new ones. Tighten everything. Double and triple check all the components, ensure there is enough "slack" in your brake lines to match your car's full turning range, and then fill/bleed your brake lines as per usual brake system service. Put your wheels back on, torque to spec, and go for a drive with your pimpin' new shoes.
Note: if you opt to keep as much fluid in the brake system as you can during the swap, instead of letting it drain, you only need to fill/bleed the wheels on the axle you're doing. As long as your master cylinder doesn't completely drain, the fluid in the rear lines and calipers will stay intact. You only need to fill and bleed the fronts!

In this photo you can see the completed brake system.

And in this photo, ready to roll behind 19" coupe wheels. Admit it, you're a little turned-on right now.
Next up (eventually), the far-easier rear brake install.....
In this photo you can see the stock brakes, more suited for something Andy Dick or Nathan Lane would drive to Whole Foods, or to a store that was the opposite of a place where one could buy workout supplements, guns, and military-grade methamphetamines from topless Czech pornstars.
Okay, just look at this ****! The stock rotor on the right just crapped its pants! All hail and bow-down before the mighty Z1 14" slotted two-piece rotor, puny humans!
On to the install...
What you will need:
Lug wrench
22mm impact socket
larger allen bit for bracket bolts (Sorry, I forgot what size)
torque wrench (98 ft/lbs)
steel hammer
optional: cutting wheel for dust shield
short lengths of wire or twine (to suspend old caliper during removal)
rubber mallet or dead-blow hammer
10mm, 11mm, 12mm open-end box wrenches
brake cleaner
brake fluid
Loktite
rags
tube or bleed kit for bleeding brakes
catch bottle or bucket for brake fluid
a patient friend to help with the bleeding part
Note: brake fluid is highly corrosive to paint. Keep a few clean rags on-hand to quickly wipe brake fluid from any painted surface as often as necessary. If your calipers are painted be sure to wipe them down with a mixture of water and mild detergent (dishwashing liquid) once you have finished installing, filling, and bleeding them. That should be the last thing you do before putting your wheels back on.
Step one: Remove your wheel and detach the stock caliper from the hub by removing the two bolts which hold it in-place. Leave the caliper attached to the brake line for now, and use a piece of wire or twine to hang the caliper out of the way without stressing the brake line.
Step two: remove the stock rotor from the hub. If it doesn't pull off freely, use a dead-blow hammer or a rubber mallet to loosen it. If you live in the rust-belt, you might consider either using some kind of powerful explosive, or moving to the West Coast like a normal person. Once the rotor and caliper are out of the way, either cut or bend the metal dust shield out of the way. Optional: disassemble the hub and remove the dust shield entirely
Step three: Retrieve the three page instruction manual that came with the adapter brackets and crumple it into a tight ball of paper. Throw it away, because it's useless. Orient the brackets as shown in the following photo. Before locking everything down, test-fit the bracket, rotor, new caliper, and your wheel to ensure everything is going to live in harmony.
Step four: Using the supplied allen-head bolts fit the bracket as shown in this photo. Tighten the bolts to 98 ft-lbs.
In this photo we can see the Z1 Motorsports bracket - which looks nothing like the one in the instruction manual - test-fitted on the hub. There's really only one way to mount the bracket so don't be too concerned about doing it wrong. Note also in the photo how the stock dust-shield is mostly cut-away, with the remaining sections pounded flat with a hammer to get them out of the way. That was the best part - I love hitting things with hammers.
In this photo you can see the remaining sheet metal of the dust shield hammered flat against the hub. Also, this photo makes it look a bit like a frog, which is kind of cool.
Note: the instructions didn't mention Loktite, but I decided to use it when installing the brackets. Why the heck not?! These brackets are the only things attaching the rotors to your car, and once installed they never need to be removed unless you want to go back to stock brakes like a tiny girl would.
Step five: Seat the new rotor on the hub, and hold in place with one finger-tight lug nut (for safety). **Before placing the rotor on the hub, spray it liberally with brake cleaner to remove any of the packing grease and other impurities. Once it's on the hub spray again with brake cleaner to remove any residue from your hands or gloves.
Step six: using the supplied long bolts, install the new caliper by attaching it to the free end of the bracket.
In this photo you can see rotor and caliper fitted to the left front wheel and awaiting tightening of hardware. Note also the direction of the rotor slots (forward) and the orientation of the caliper bleeder valves (at the top).
Here for reference is a page explaining the correct way to install directional rotors:
http://www.cquence.net/blog/how_to_p..._brake_rotors/
Step seven: remove the brake lines from the old calipers and simply attach to the new ones. Tighten everything. Double and triple check all the components, ensure there is enough "slack" in your brake lines to match your car's full turning range, and then fill/bleed your brake lines as per usual brake system service. Put your wheels back on, torque to spec, and go for a drive with your pimpin' new shoes.
Note: if you opt to keep as much fluid in the brake system as you can during the swap, instead of letting it drain, you only need to fill/bleed the wheels on the axle you're doing. As long as your master cylinder doesn't completely drain, the fluid in the rear lines and calipers will stay intact. You only need to fill and bleed the fronts!
In this photo you can see the completed brake system.
And in this photo, ready to roll behind 19" coupe wheels. Admit it, you're a little turned-on right now.
Next up (eventually), the far-easier rear brake install.....
I normally cringe when people quote every damn pic and all the text of lengthy posts then post a one sentence comment or question. Makes me want to reach into my screen and choke the living **** out of them. BUT.............
This was one of the most entertaining posts (and damn informative) I have read on this forum in the last 7.5 years. Your humor is well placed, spot on and literally made my day. Thanks!!!