
CandlestickPark
ill Sedan
close


Jul 9, 2015
- Join DateJun 2007
- LocationLong Beach, SoCal
- Posts:23,261
-
iTrader Positive Feedback100
-
iTrader Feedback Score(87)
-
Likes:1,230
-
Liked:2,688 Times in 1,449 Posts
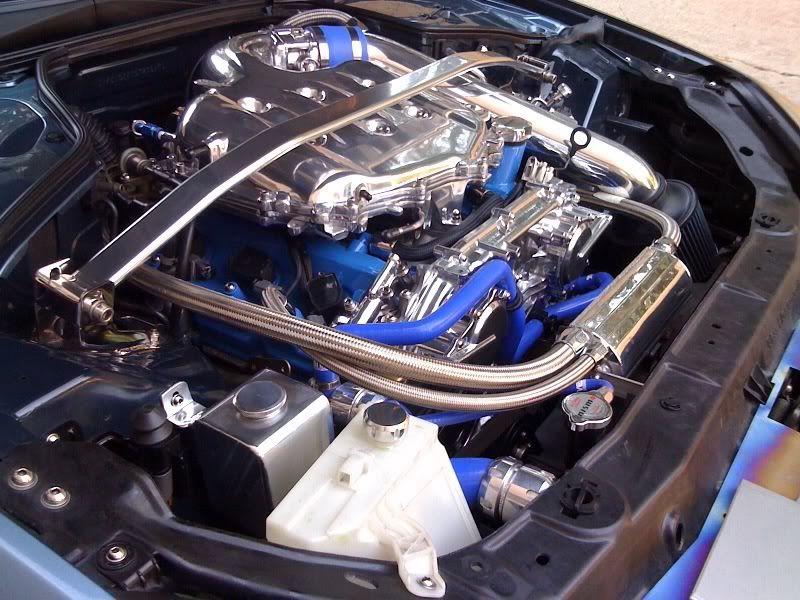
Installed my PS Tank today.
Thanks again to SxExCx-Sean for making this happen, bigc-Chris (for the last minute help on the phone!) and caskyline-Randy for their help with this mod.
Please excuse the dirty bay, haven't cleaned it in a couple weeks.
Quick iPhone photos:
Thanks again to SxExCx-Sean for making this happen, bigc-Chris (for the last minute help on the phone!) and caskyline-Randy for their help with this mod.
Please excuse the dirty bay, haven't cleaned it in a couple weeks.
Quick iPhone photos:
CandlestickPark
ill Sedan
close
Jul 9, 2015
- Join DateJun 2007
- LocationLong Beach, SoCal
- Posts:23,261
-
iTrader Positive Feedback100
-
iTrader Feedback Score(87)
-
Likes:1,230
-
Liked:2,688 Times in 1,449 Posts
Quote:
+1, I'm curious about this too Sean.Originally Posted by laksjd84
Sean, I know on the cap, there is a tiny needle size hole for ventilation. If I were to cover up this hole, would it matter? this is my planned setup...

Registered User
Quote:
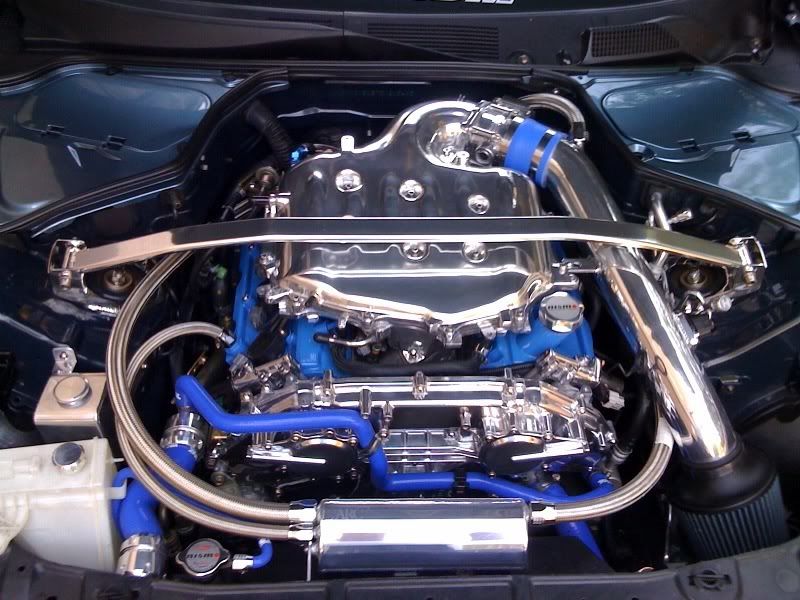
Thanks again to SxExCx-Sean for making this happen, bigc-Chris (for the last minute help on the phone!) and caskyline-Randy for their help with this mod.
Please excuse the dirty bay, haven't cleaned it in a couple weeks.
Quick iPhone photos:
the painted rocker covers look sweeeet!!! Nice color match - ties it all in nicely! Originally Posted by CandlestickPark
Installed my PS Tank today.Thanks again to SxExCx-Sean for making this happen, bigc-Chris (for the last minute help on the phone!) and caskyline-Randy for their help with this mod.
Please excuse the dirty bay, haven't cleaned it in a couple weeks.
Quick iPhone photos:

Quote:

ahh, ok...yes it is in the worksOriginally Posted by Max626
Lol actually i meant to say the coolant overflow tank
Quote:
I'm not totally sure but for comparison sake, the Weapon-r tank is not vented and the NRG does not appear to be either (although I am not sure). If you decide to try it, I would replace the cap filter with a solid bolt so the fluid wont peel up the adhesive on the sticker. Let me know if you try it.Originally Posted by laksjd84
Sean, I know on the cap, there is a tiny needle size hole for ventilation. If I were to cover up this hole, would it matter? this is my planned setup...


Quote:
Originally Posted by CandlestickPark
Registered User
gary c
Registered User
close
Mar 31, 2022
- Join DateFeb 2005
- LocationValencia, Ca
- Posts:19,433
-
iTrader Positive Feedback100
-
iTrader Feedback Score(10)
-
Likes:69
-
Liked:1,133 Times in 1,003 Posts
Installed my P/S tank on Saturday, from the pic I guess I'm the only one that split the OEM washers and used them under the contact points. Sean, looking forward to your next tank....rad overflow/catch can....
Gary
Gary
I hope everyone realized that new polished bolts and washers were included in the boxes.
CandlestickPark
ill Sedan
close
Jul 9, 2015
- Join DateJun 2007
- LocationLong Beach, SoCal
- Posts:23,261
-
iTrader Positive Feedback100
-
iTrader Feedback Score(87)
-
Likes:1,230
-
Liked:2,688 Times in 1,449 Posts
^Yup, saw them taped to the inside of the box. I ended up using 2 of the 3 the polished bolts that I already had installed on the OEM tank bracket so they would match with my other bolts.
Yeah, I realized you already had matching bolts but for the other guys...
Registered User
Picked up my aluminum PS tank from SxExCx a couple of weeks ago (thanks for bringing it to the meet, Sean!), and finally got it installed yesterday. It took a few slight modifications to get it to fit, since my car is a 2nd Gen car with the HR motor, but it works perfectly and looks great. Let me know if anyone wants to know what is required to modify the tank to fit a 2nd Gen car and I will post a short DIY.
Here are some pics of the tank installed.


And some updated pics of the engine bay.


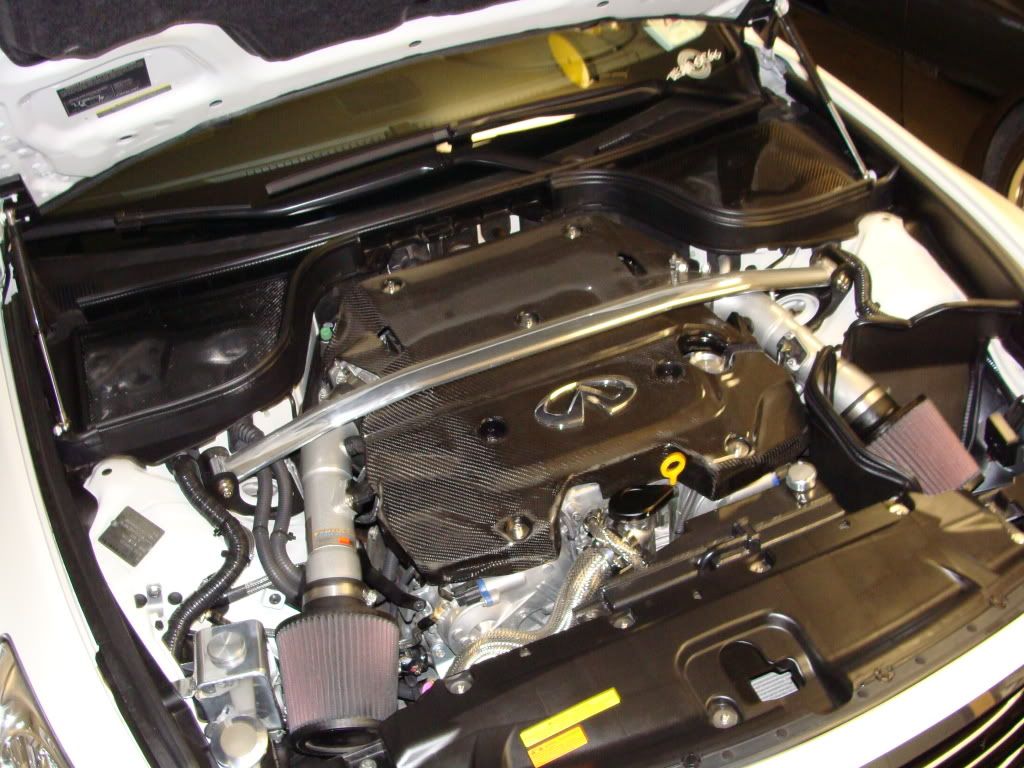
Here are some pics of the tank installed.
And some updated pics of the engine bay.

Registered User
^that is really nice for the 2nd gen set up..i am jealous of the other caps and SS hoses. looks great....anything i need to know before i do mine?
Registered User
Thanks, G37Mobbin! It's a slow progression.. I'm still working on the custom cold air box for the K&N on the passenger's side... once those are done, I'm gonna have them overlayed in CF.
Here's a little more detail on the pS tank install.
I used two mounting points using the existing brackets on the new tank I got from SxExCx. Both holes I used are existing 6mm threaded holes. One was originally used for mounting the factory air box on the passenger's side, so this one was freed up when I installed my K&N, and the second mounting hole was freed up when I removed the factory PS tank. I moved the grounding wires over one hole to one of the original PS mouting holes and used the existing ground hole point for the new PS mounting bracket. I had to bend one of the existing mounting brackets on the new tank (very easy, since it is aluminum), and also had to make a custom bracket out of 1/8" flat aluminum for the second mounting point. I also replaced the existing factory rubber power steering hose (that goes from the PS pump to the tank) with a slightly longer (and straighter) hose. The factory one would have worked, but it was just barely long enough and the all the bends made it very tough to work with. I got the replacement hose at Autozone for $2.99... It's a 5/8" power steering hose, Gates # AS260, Duralast Part # 115412.
Here are a couple of close up pics of the mounting points.

Registered User
Yay, I was gone for the weekend and worked late last night, so I finally got a chance to pick up my package today after work.
Soooooooooooooo mirror-like. Totally awesome. Completely impressed with this piece. Anxiously awaiting the other custom tanks!
Pics:


One dumb, dumb, question though. How does the cap come off? Does it screw or pop off? I tried turning really hard but ended up just kinda hurting my fingers on the side grip of the cap. I figured i'd ask first in case there was some really easy way to pop it off. I'm guessing I just didn't try hard enough. LMK, Thanks!
Soooooooooooooo mirror-like. Totally awesome. Completely impressed with this piece. Anxiously awaiting the other custom tanks!
Pics:
One dumb, dumb, question though. How does the cap come off? Does it screw or pop off? I tried turning really hard but ended up just kinda hurting my fingers on the side grip of the cap. I figured i'd ask first in case there was some really easy way to pop it off. I'm guessing I just didn't try hard enough. LMK, Thanks!
CandlestickPark
ill Sedan
close
Jul 9, 2015
- Join DateJun 2007
- LocationLong Beach, SoCal
- Posts:23,261
-
iTrader Positive Feedback100
-
iTrader Feedback Score(87)
-
Likes:1,230
-
Liked:2,688 Times in 1,449 Posts
^You gotta twist pretty hard to get the cap off the first time. I used a microfiber as a grip to get it off.