
DIY - How to fix '03 / '04 3rd Brake Light for FREE in 15 minutes


DIY - How to fix '03 / '04 3rd Brake Light for FREE in 15 minutes
Disclaimer:
PROS:
- Free fix
- Your 3rd brake light will work
- No soldering required
CONS:
- Missing 2 lights
- Breaking a plastic screw mount
DISCLAIMER:
You're gonna lose two lights using this process... or, should I say you're gonna gain four lights in this process...? A lot of people have tried soldering replacement LEDs onto the board with not a lot of luck because the metal pieces that they sit on, that the current flows through, are a PITA to get solder to stick to. Also, you're gonna break a plastic mounting hole using my method, but it doesn't really matter (to me). I advise reading the entire write-up prior to attempting this yourself.
Alright, a quick write-up:
First of all, you can remove the 3rd brake light from your trunk without taking out the seats OR drilling. I'm sure there's a DIY for the other methods somewhere, but I'm lazy. If you want to fix your 3rd brake light in 15 minutes, I assume you're kinda lazy, too.
To remove your 3rd brake without taking the seats off or drilling, get inside your trunk and find the exposed screw that's holding in the 3rd brake light. Unscrew it. Now unhook the cable that feeds the 3rd brake light power. Now, if you're like me, you can't see the 2nd screw, nor can you get a screwdriver into it from any angle. You may get close, but not close enough.
So instead, swivel the light towards the front of the car (it'll only swivel one way). When you have it swiveled out pretty far... TWIST IT and snap that damn screw off. Chances are, you're going to snap the plastic mounting hole. That's ok - it's one of two, the other screw is more than good enough to hold the light in place without it moving, even with loud subwoofers. And... you can always secure it into place using velcro if you're really **** (but this is FREE fix, so I won't be covering that here).
Now pull the brake light out of your trunk and go to your workshop (or kitchen, like I did).
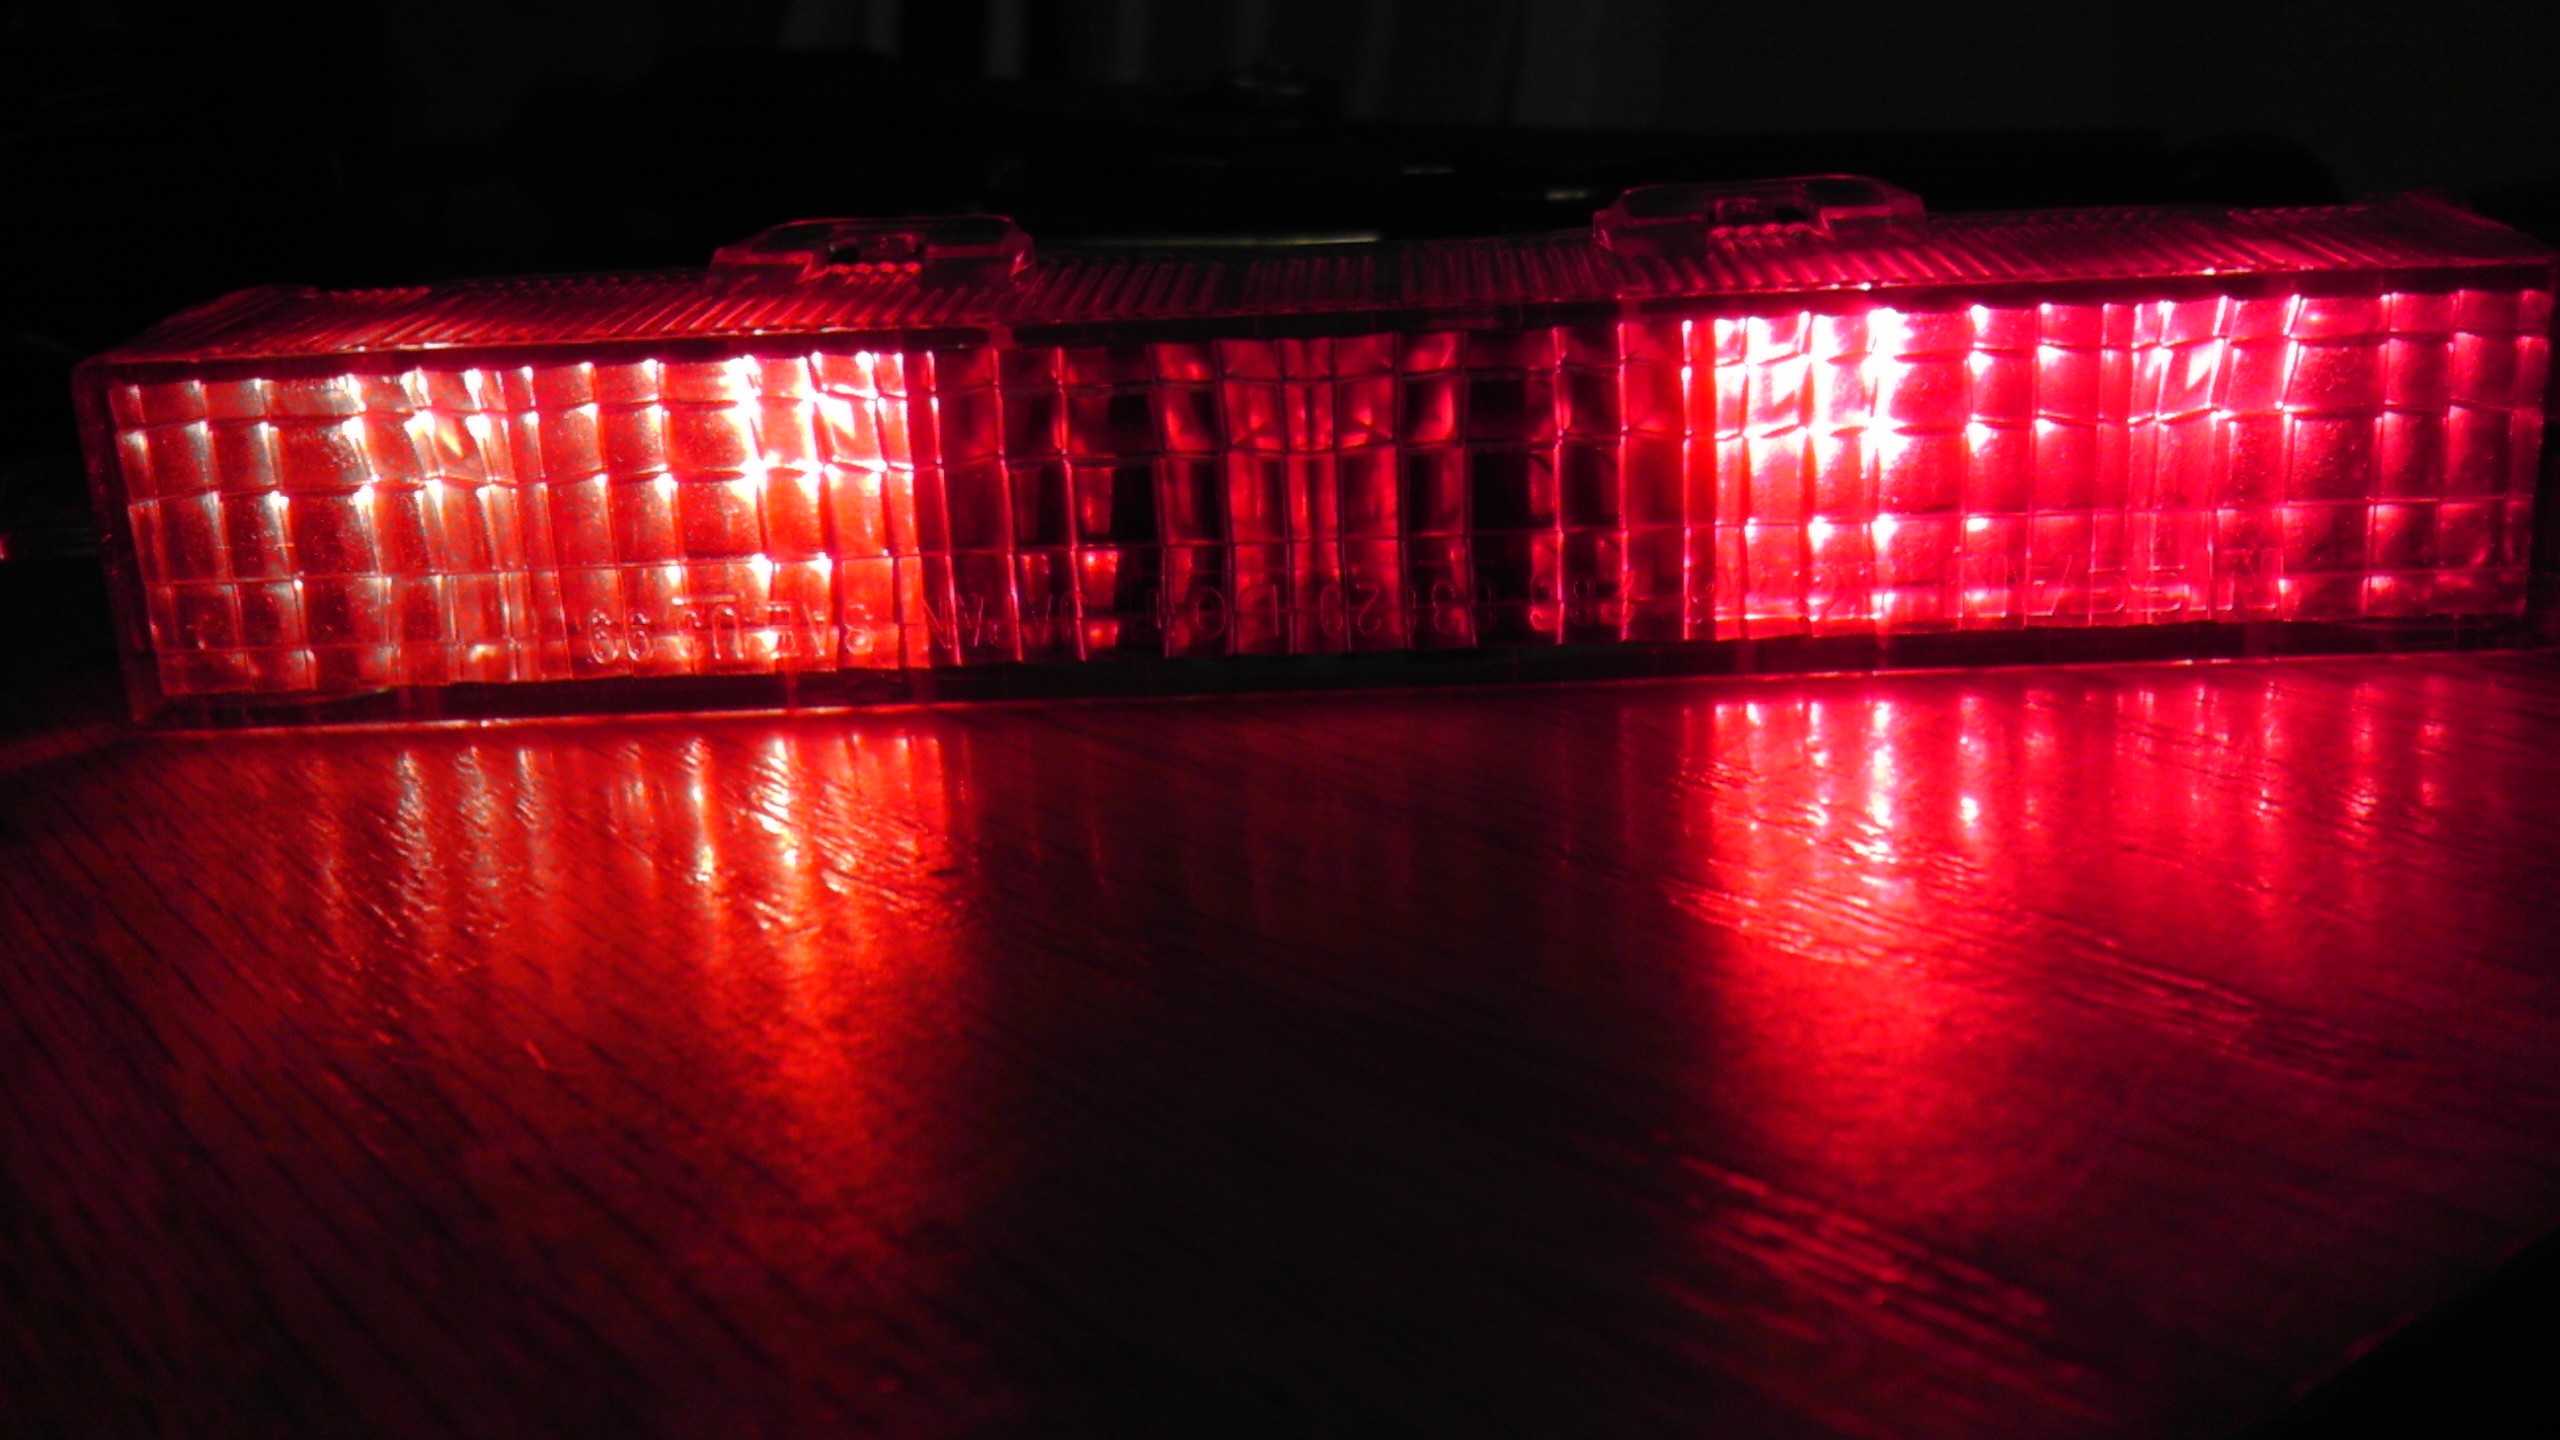
Remove the LED strip from the housing.
Now, there's SIX LED bulbs. Chances are, your two in the middle are dead (they're Diodes, Diodes can die after a while). You can test the other four by running a wire from a 12volt source (like your car battery) to one side of the diode, and the negative from the battery to the other side of the diode. LEDs (light-emitting diodes) only work one way, so if it doesn't work the first time, reverse the wires. If it still doesn't work, you may have additional LEDs that are burned out and may want to consider a different solution. You should only have to test the LEDs THREE times... These LEDs are wired in series, and on most brake lights, the two on the far left, and the two on the far right, are working. So when you touch the negative to the negative and the positive to the positive, TWO will usually light up at a time. If only one lights up, you probably have more LEDs burned out.
After you've confirmed that it is your two middle LEDs that are dead, take your needle-nose pliers and snap them off (the two in the middle), keeping the metal sheet they're soldered to as close to unchanged as possible... They are holding the metal up, so it will become flimsy as you break them off... Be careful
Continuing on..
Ahh, finally... pictures:
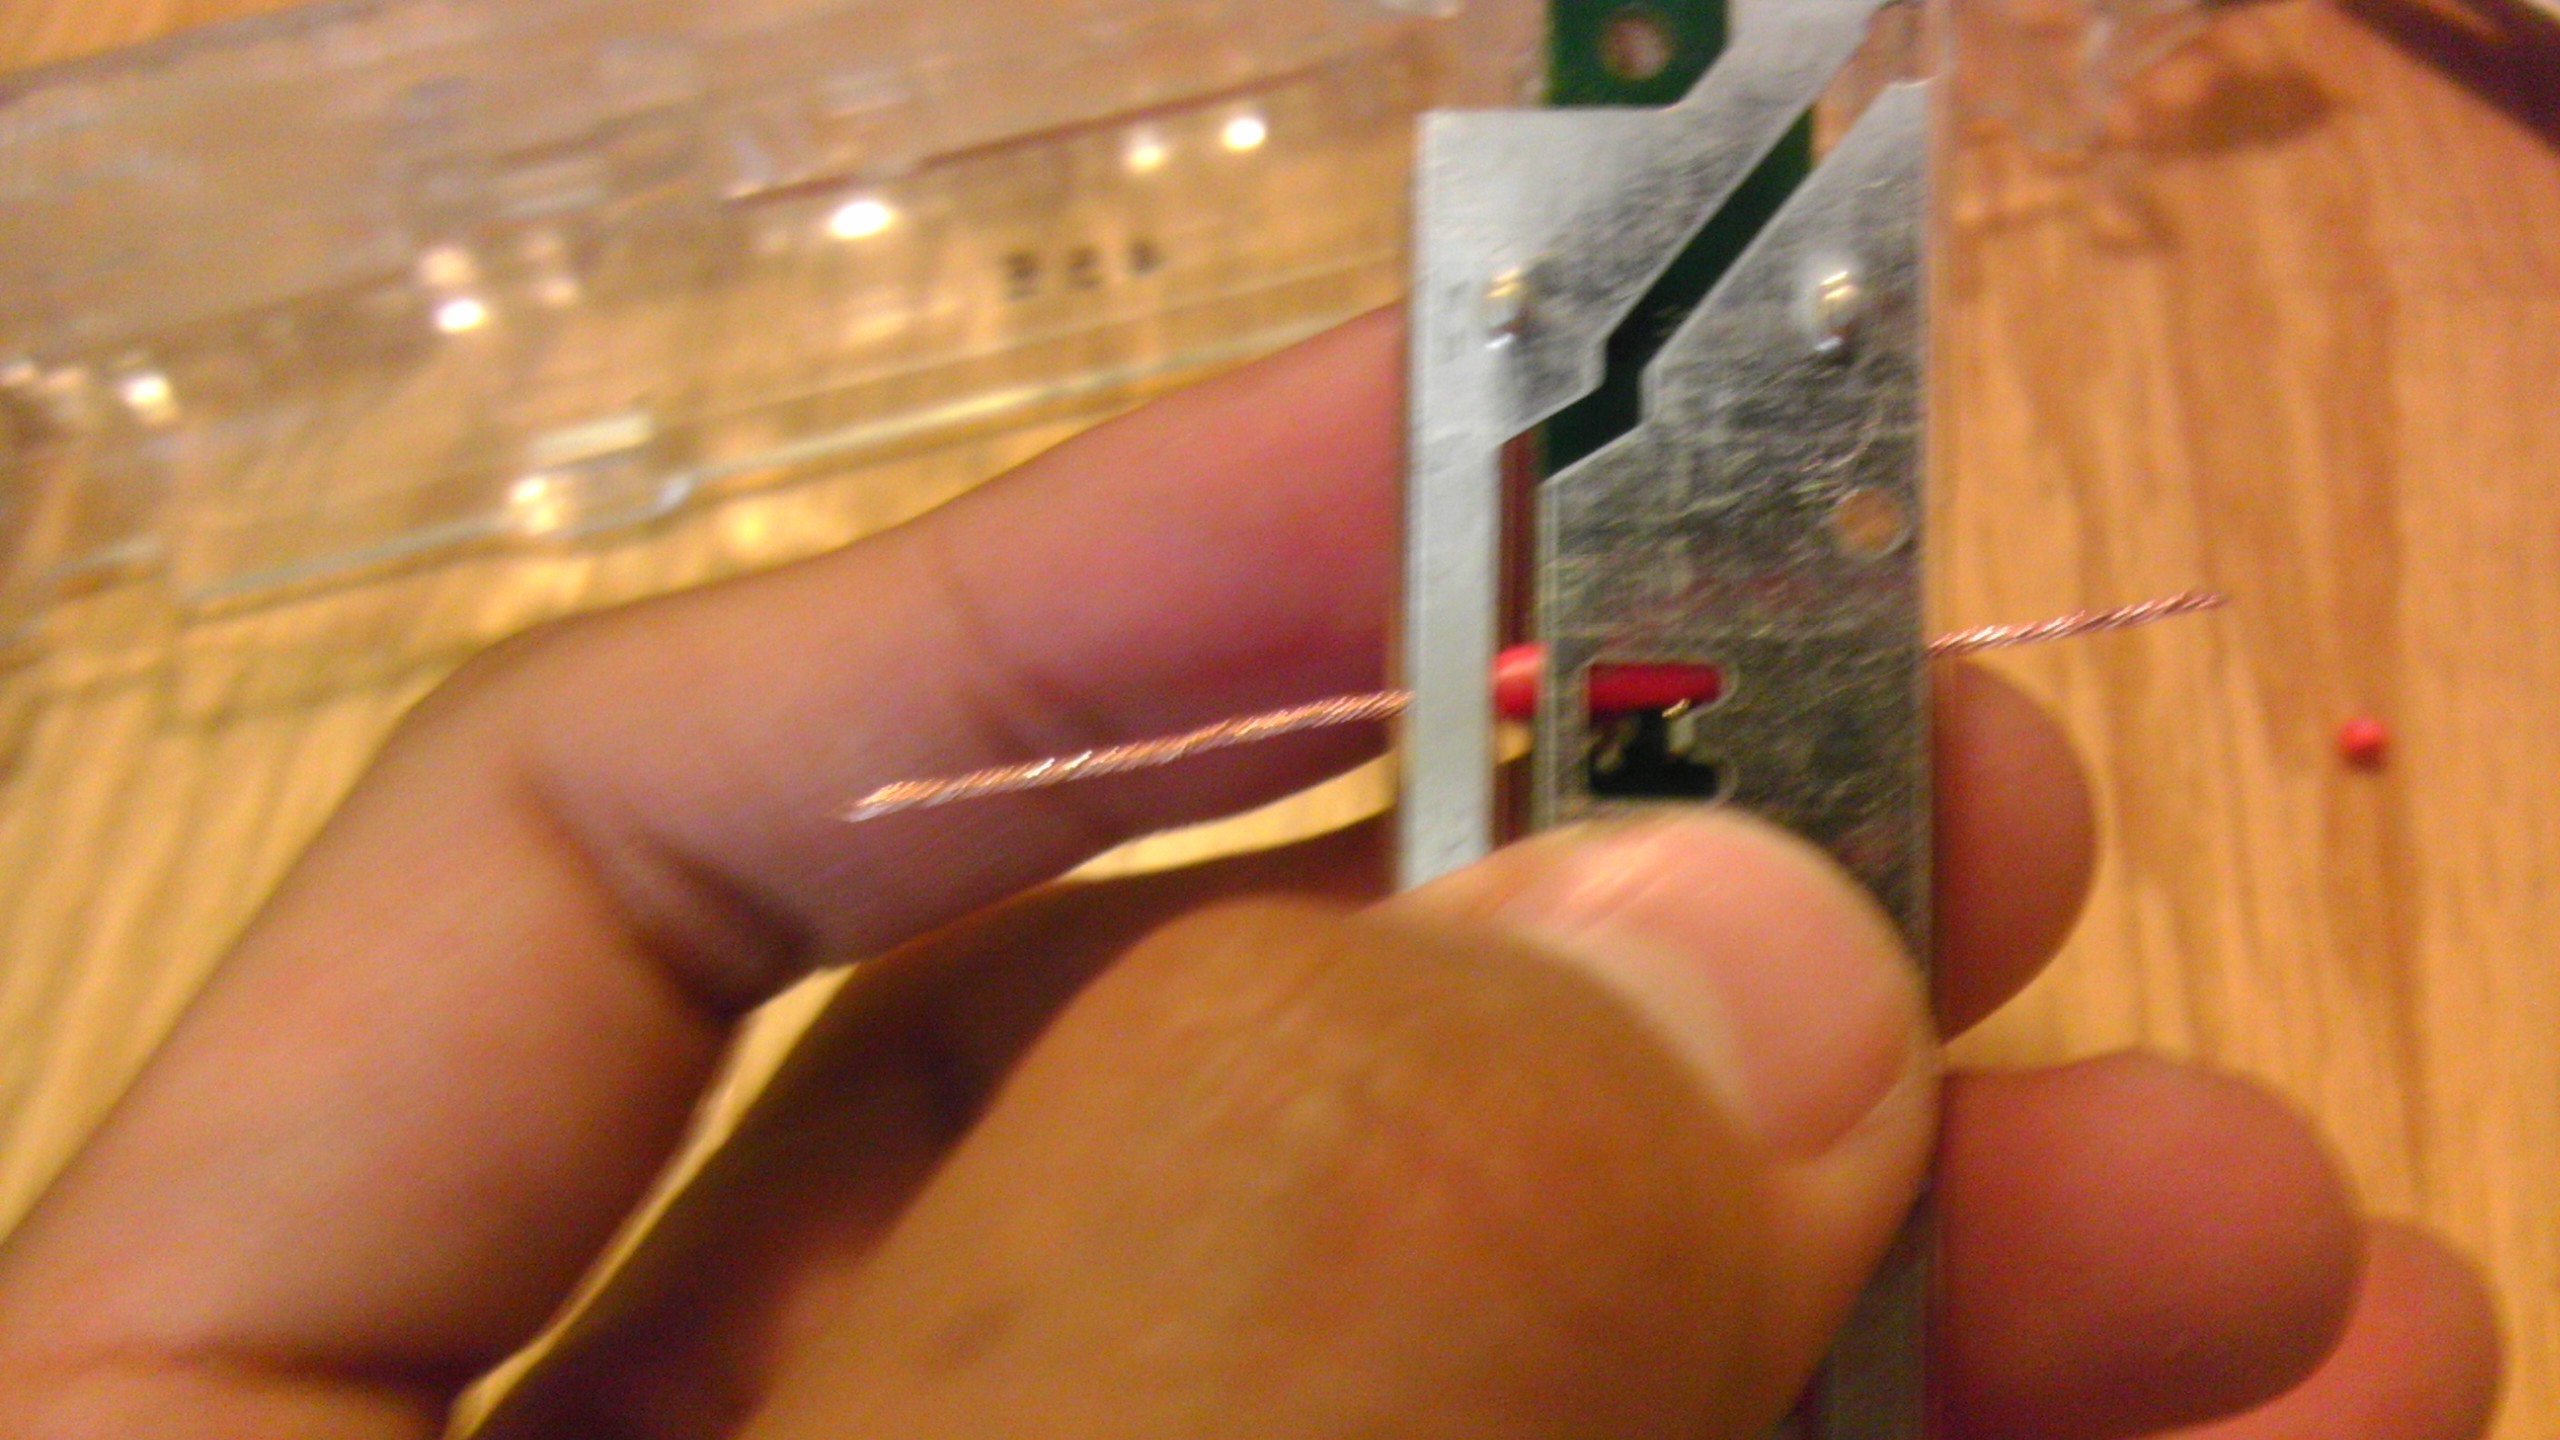
Get a junk wire, preferrably between 16 and 20 gauge, and strip it so you've got about a centimeter of insulation on it, but leave the ends exposed.. the entire wire should be about four inches long

* notice how I've got like 2 inches of wire exposed on one side and an inch on the other side? yea... try to keep 2 inches on both.
Lift up the metal in the middle, where the LEDs were (it's the part right above the silicon board with the regular diode and the resistors). Slide the wire underneath, and then rest the metal onto the insulated part of the wire
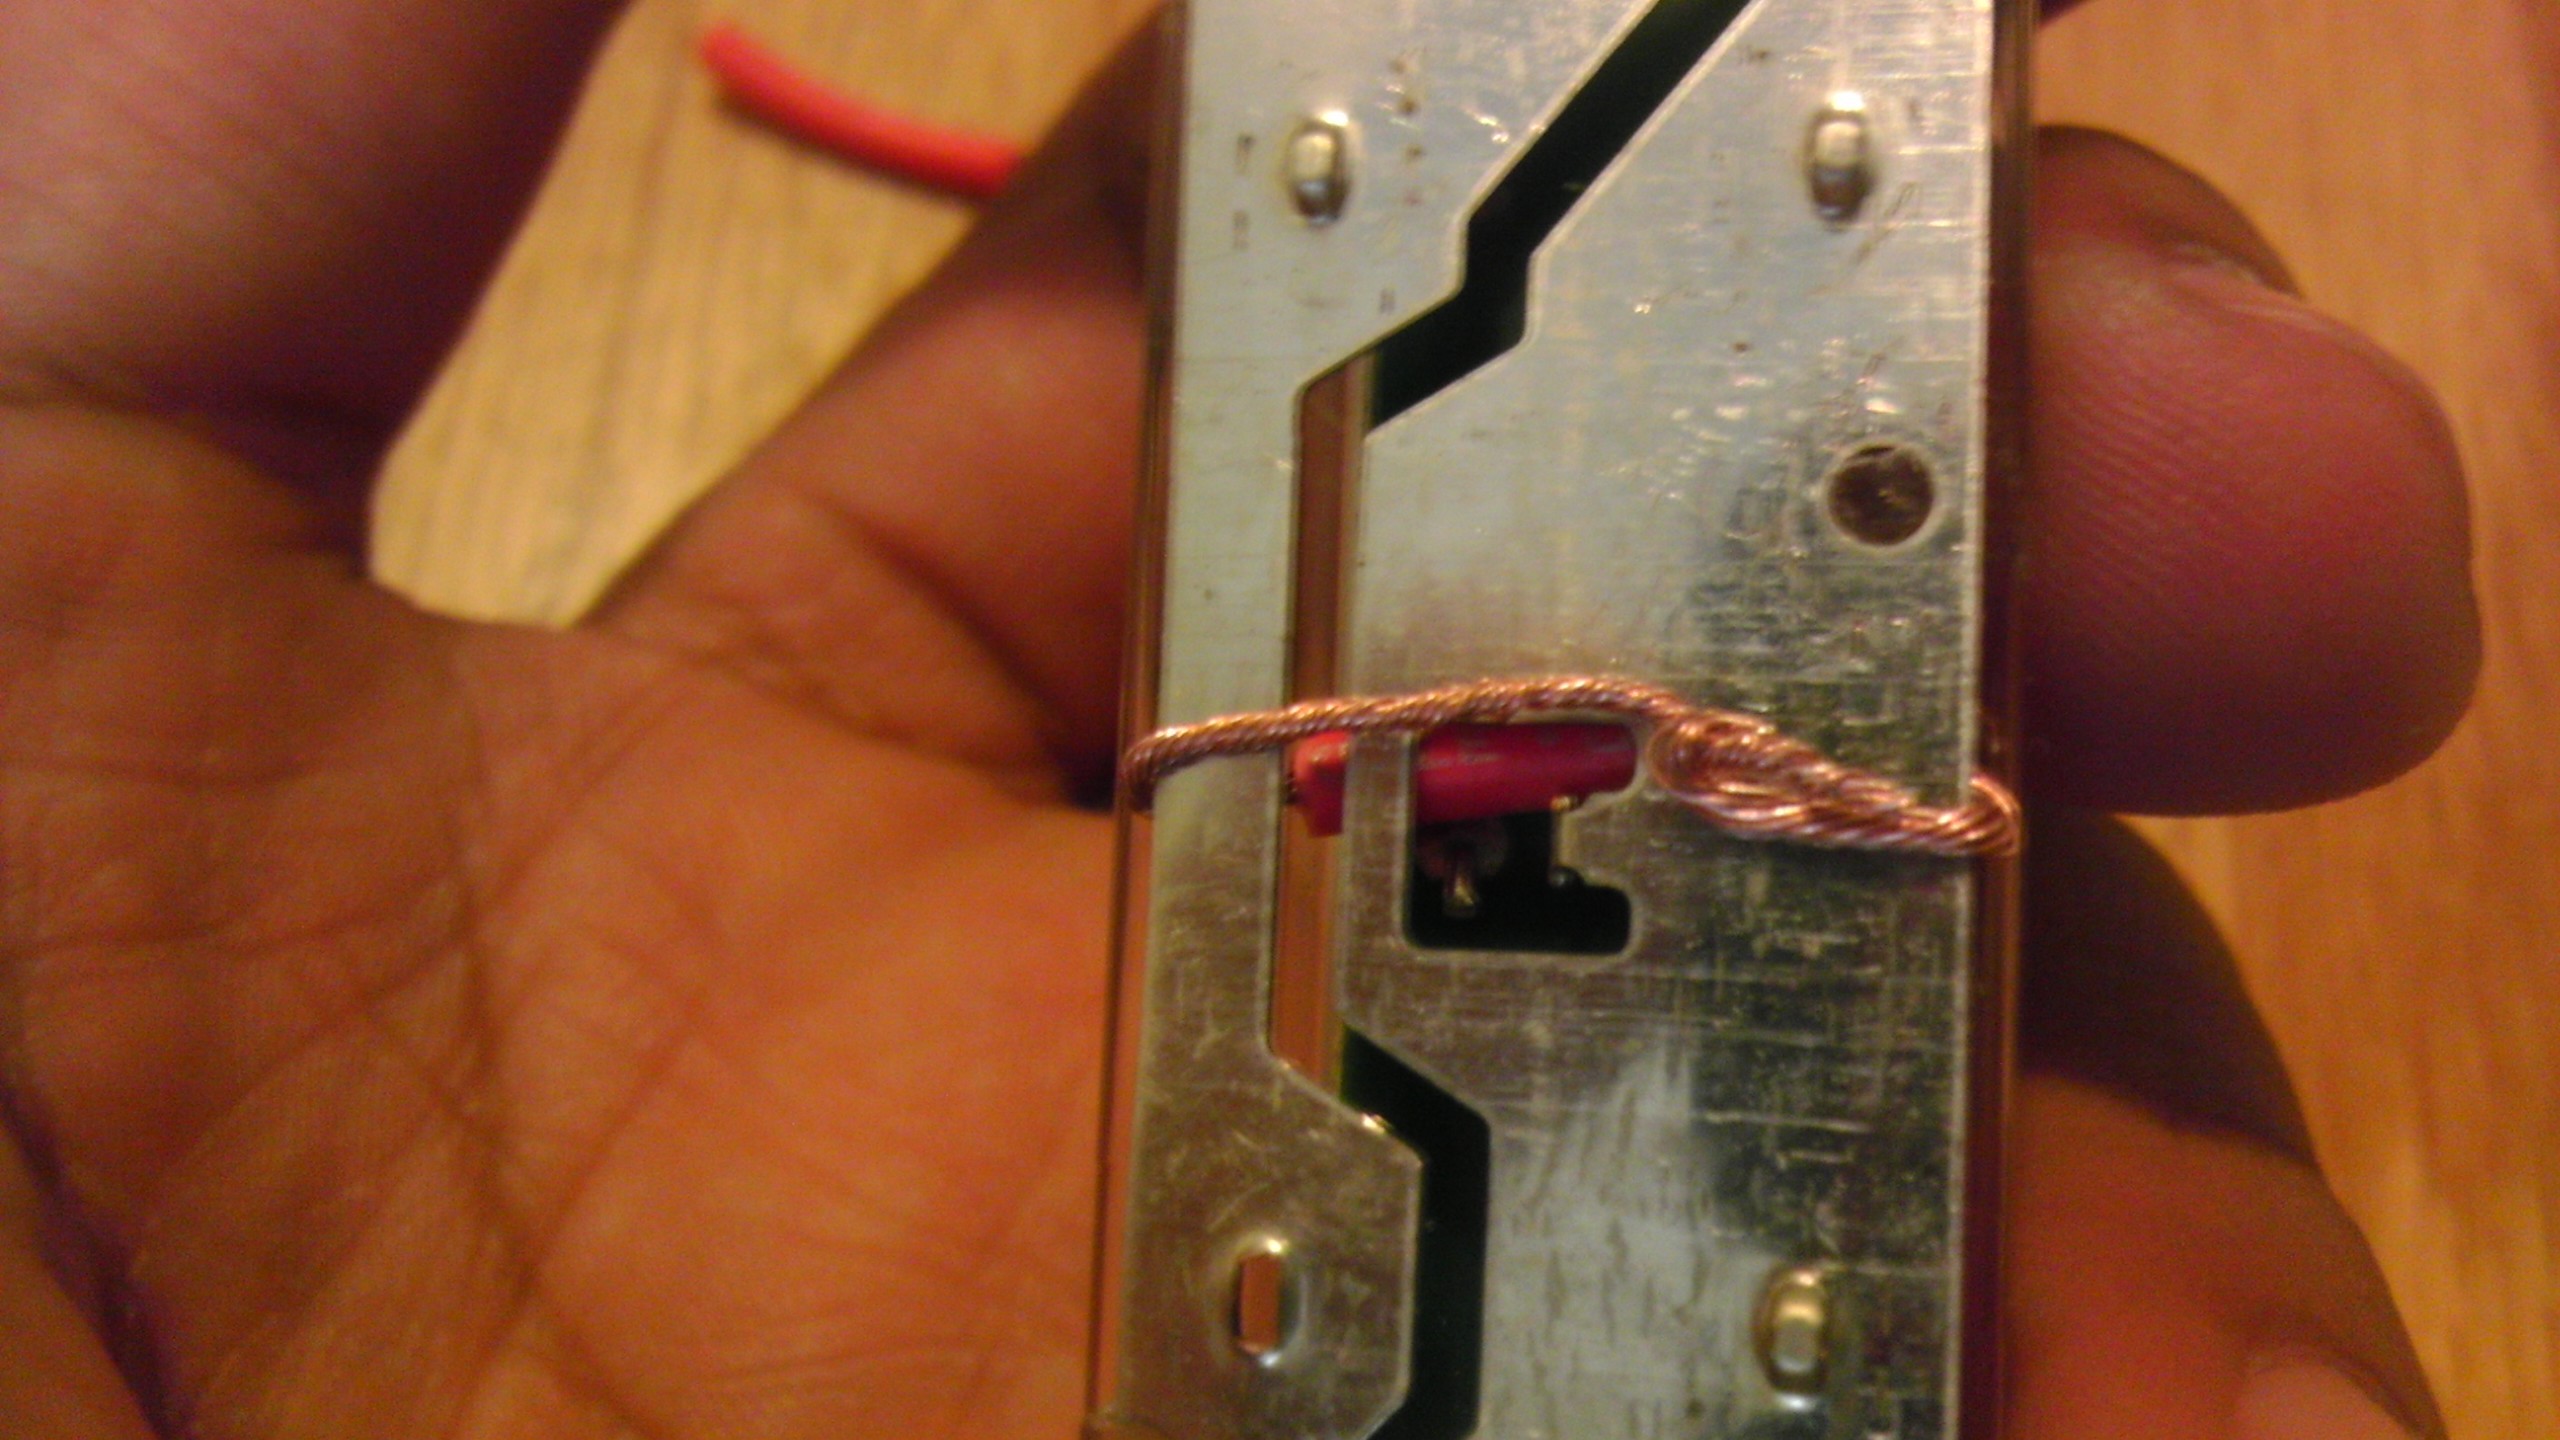
Now push the metal parts back down into place, and you'll notice the exposed wire folds upward as you push downward. This is because the metal that the LEDs are soldered to is fitted pretty tightly to the plastic housing. That's GOOD, you want it to push the wire up. Once the metal is pushed into place and the wire is sticking up, twist the wire together and lay it down across the metal. Yes, metal on metal action.. Mmmm..
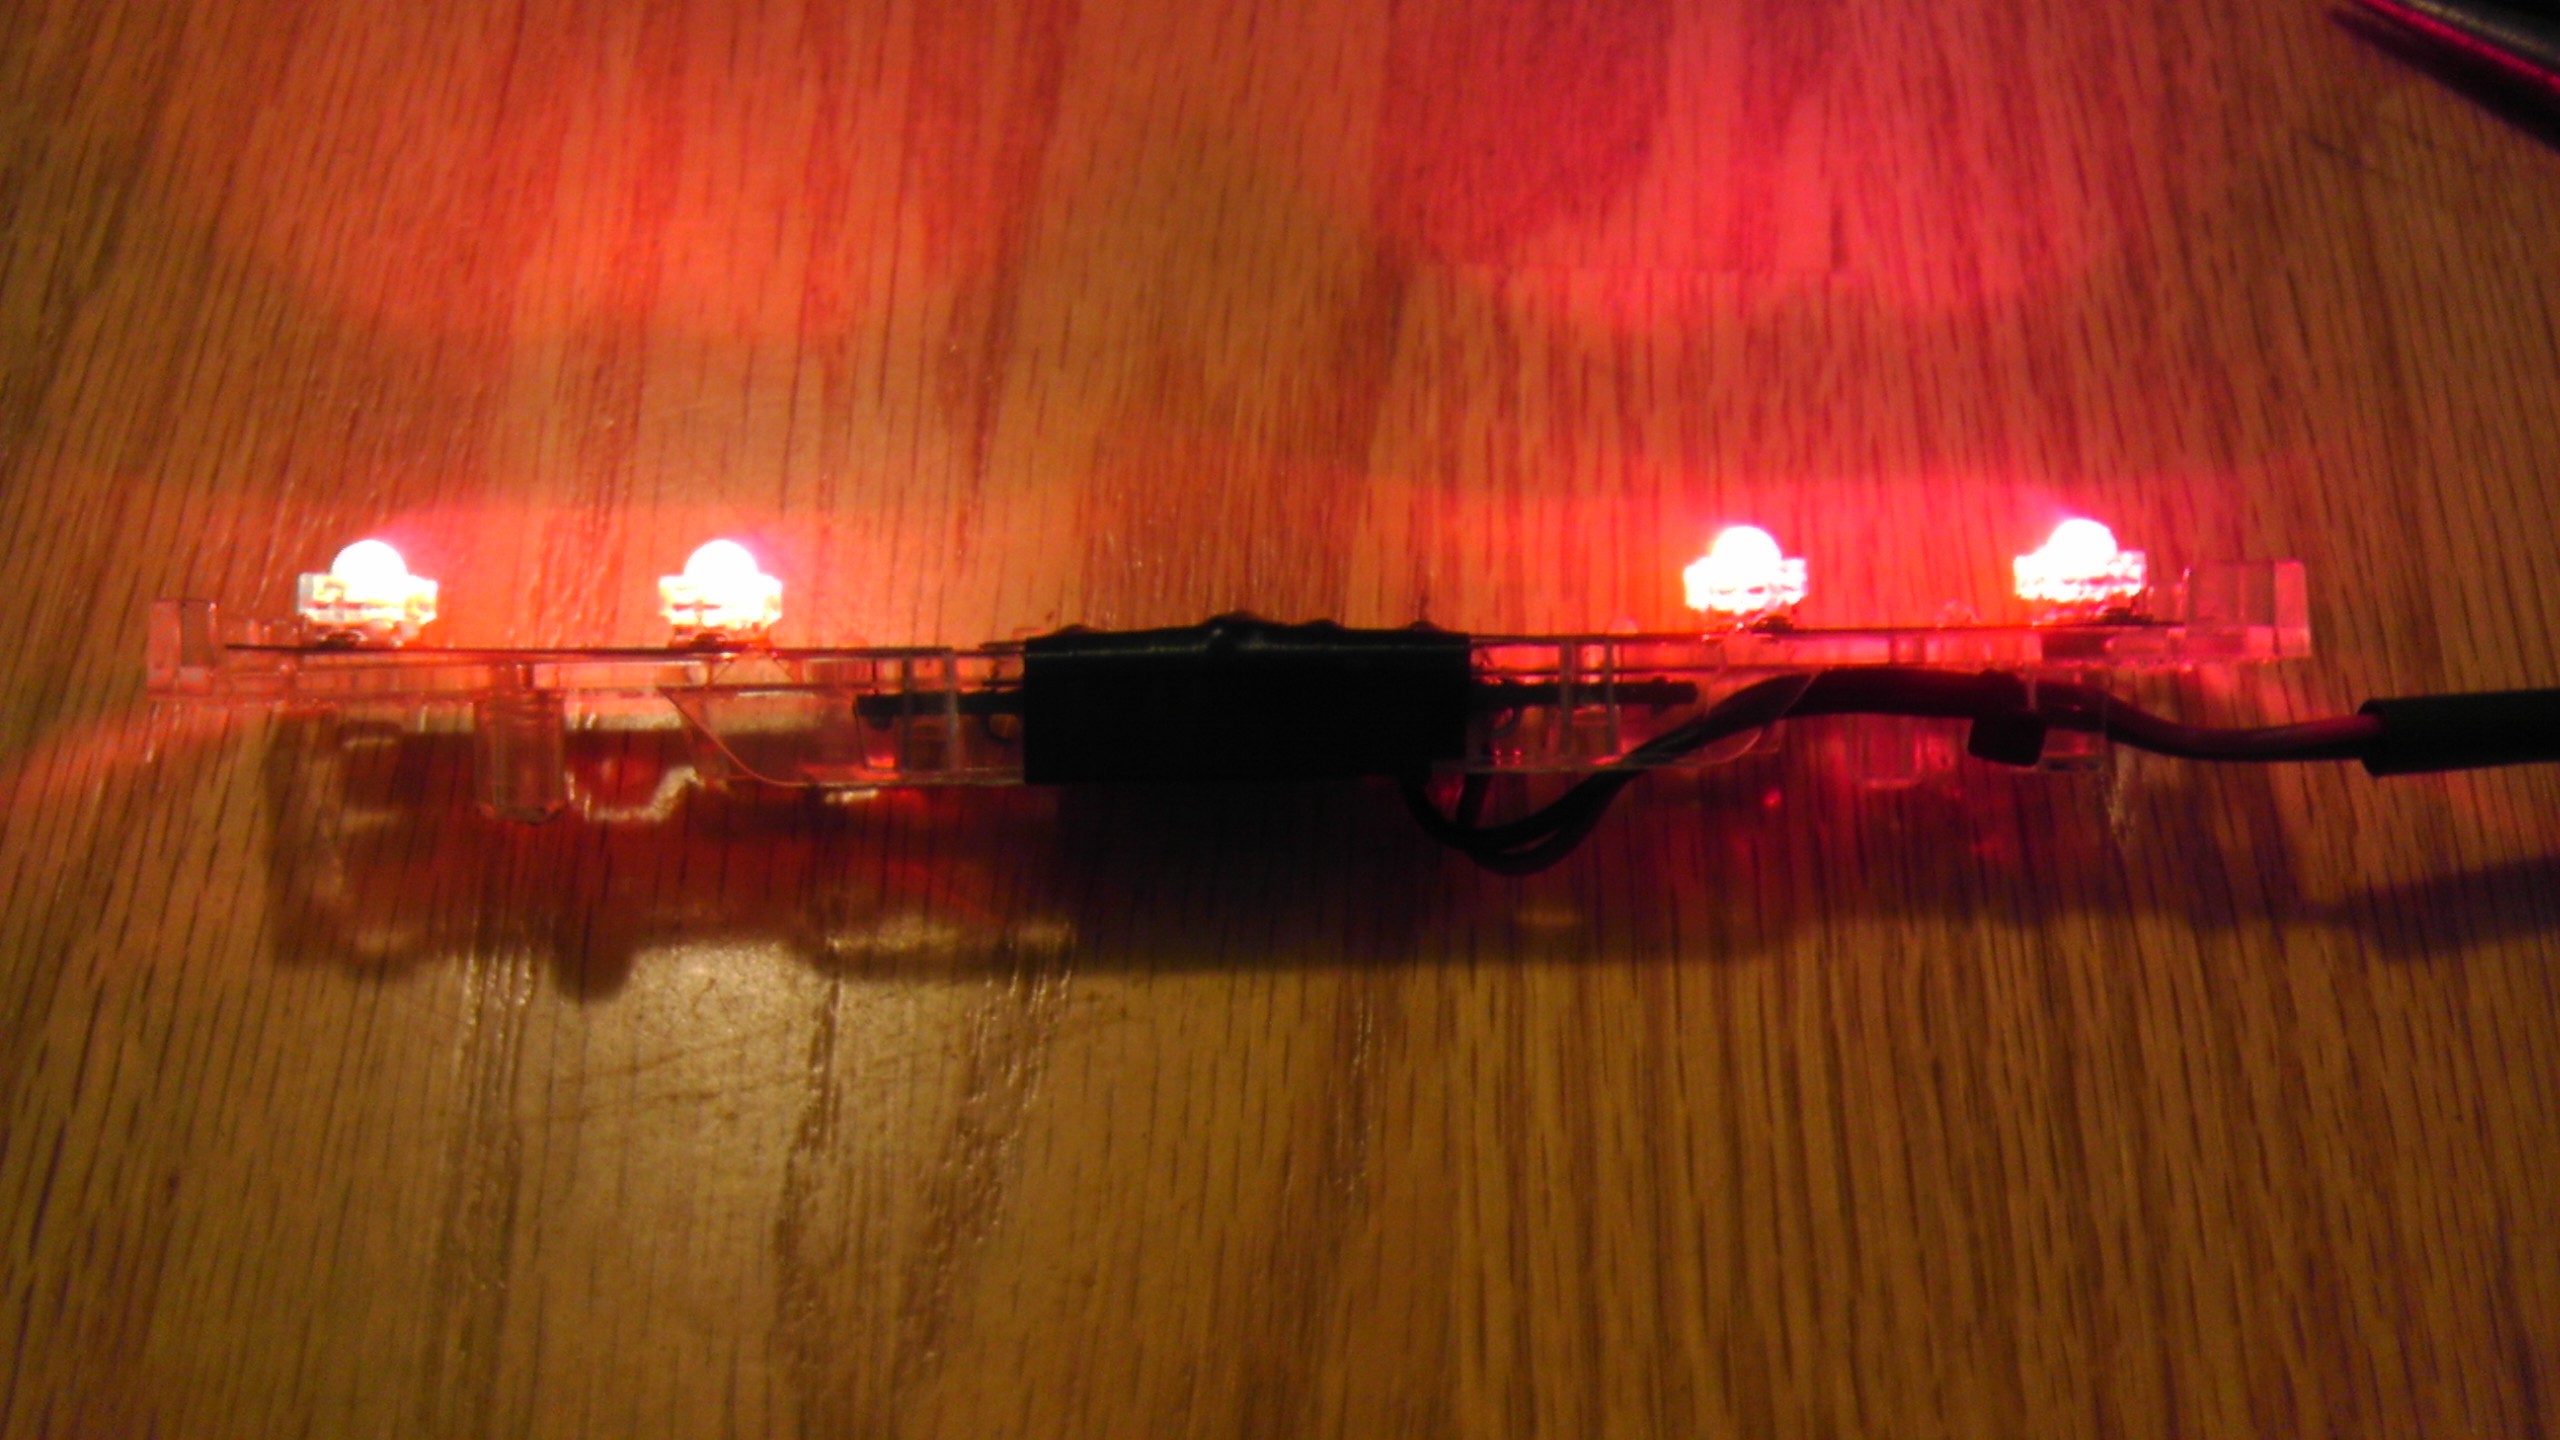
If you tested the LEDs before continuing, test again. You should see that the remaining 4 LEDs are all lighting up now! This is because we closed the circuit that was left open by the dead LEDs, so electricity can flow properly from point A to point B, illuminating all LEDs along the way:

Once you're satisfied, wrap the center part of the LED bar in electrical tape:
Test again if you'd like
And put it back in the housing
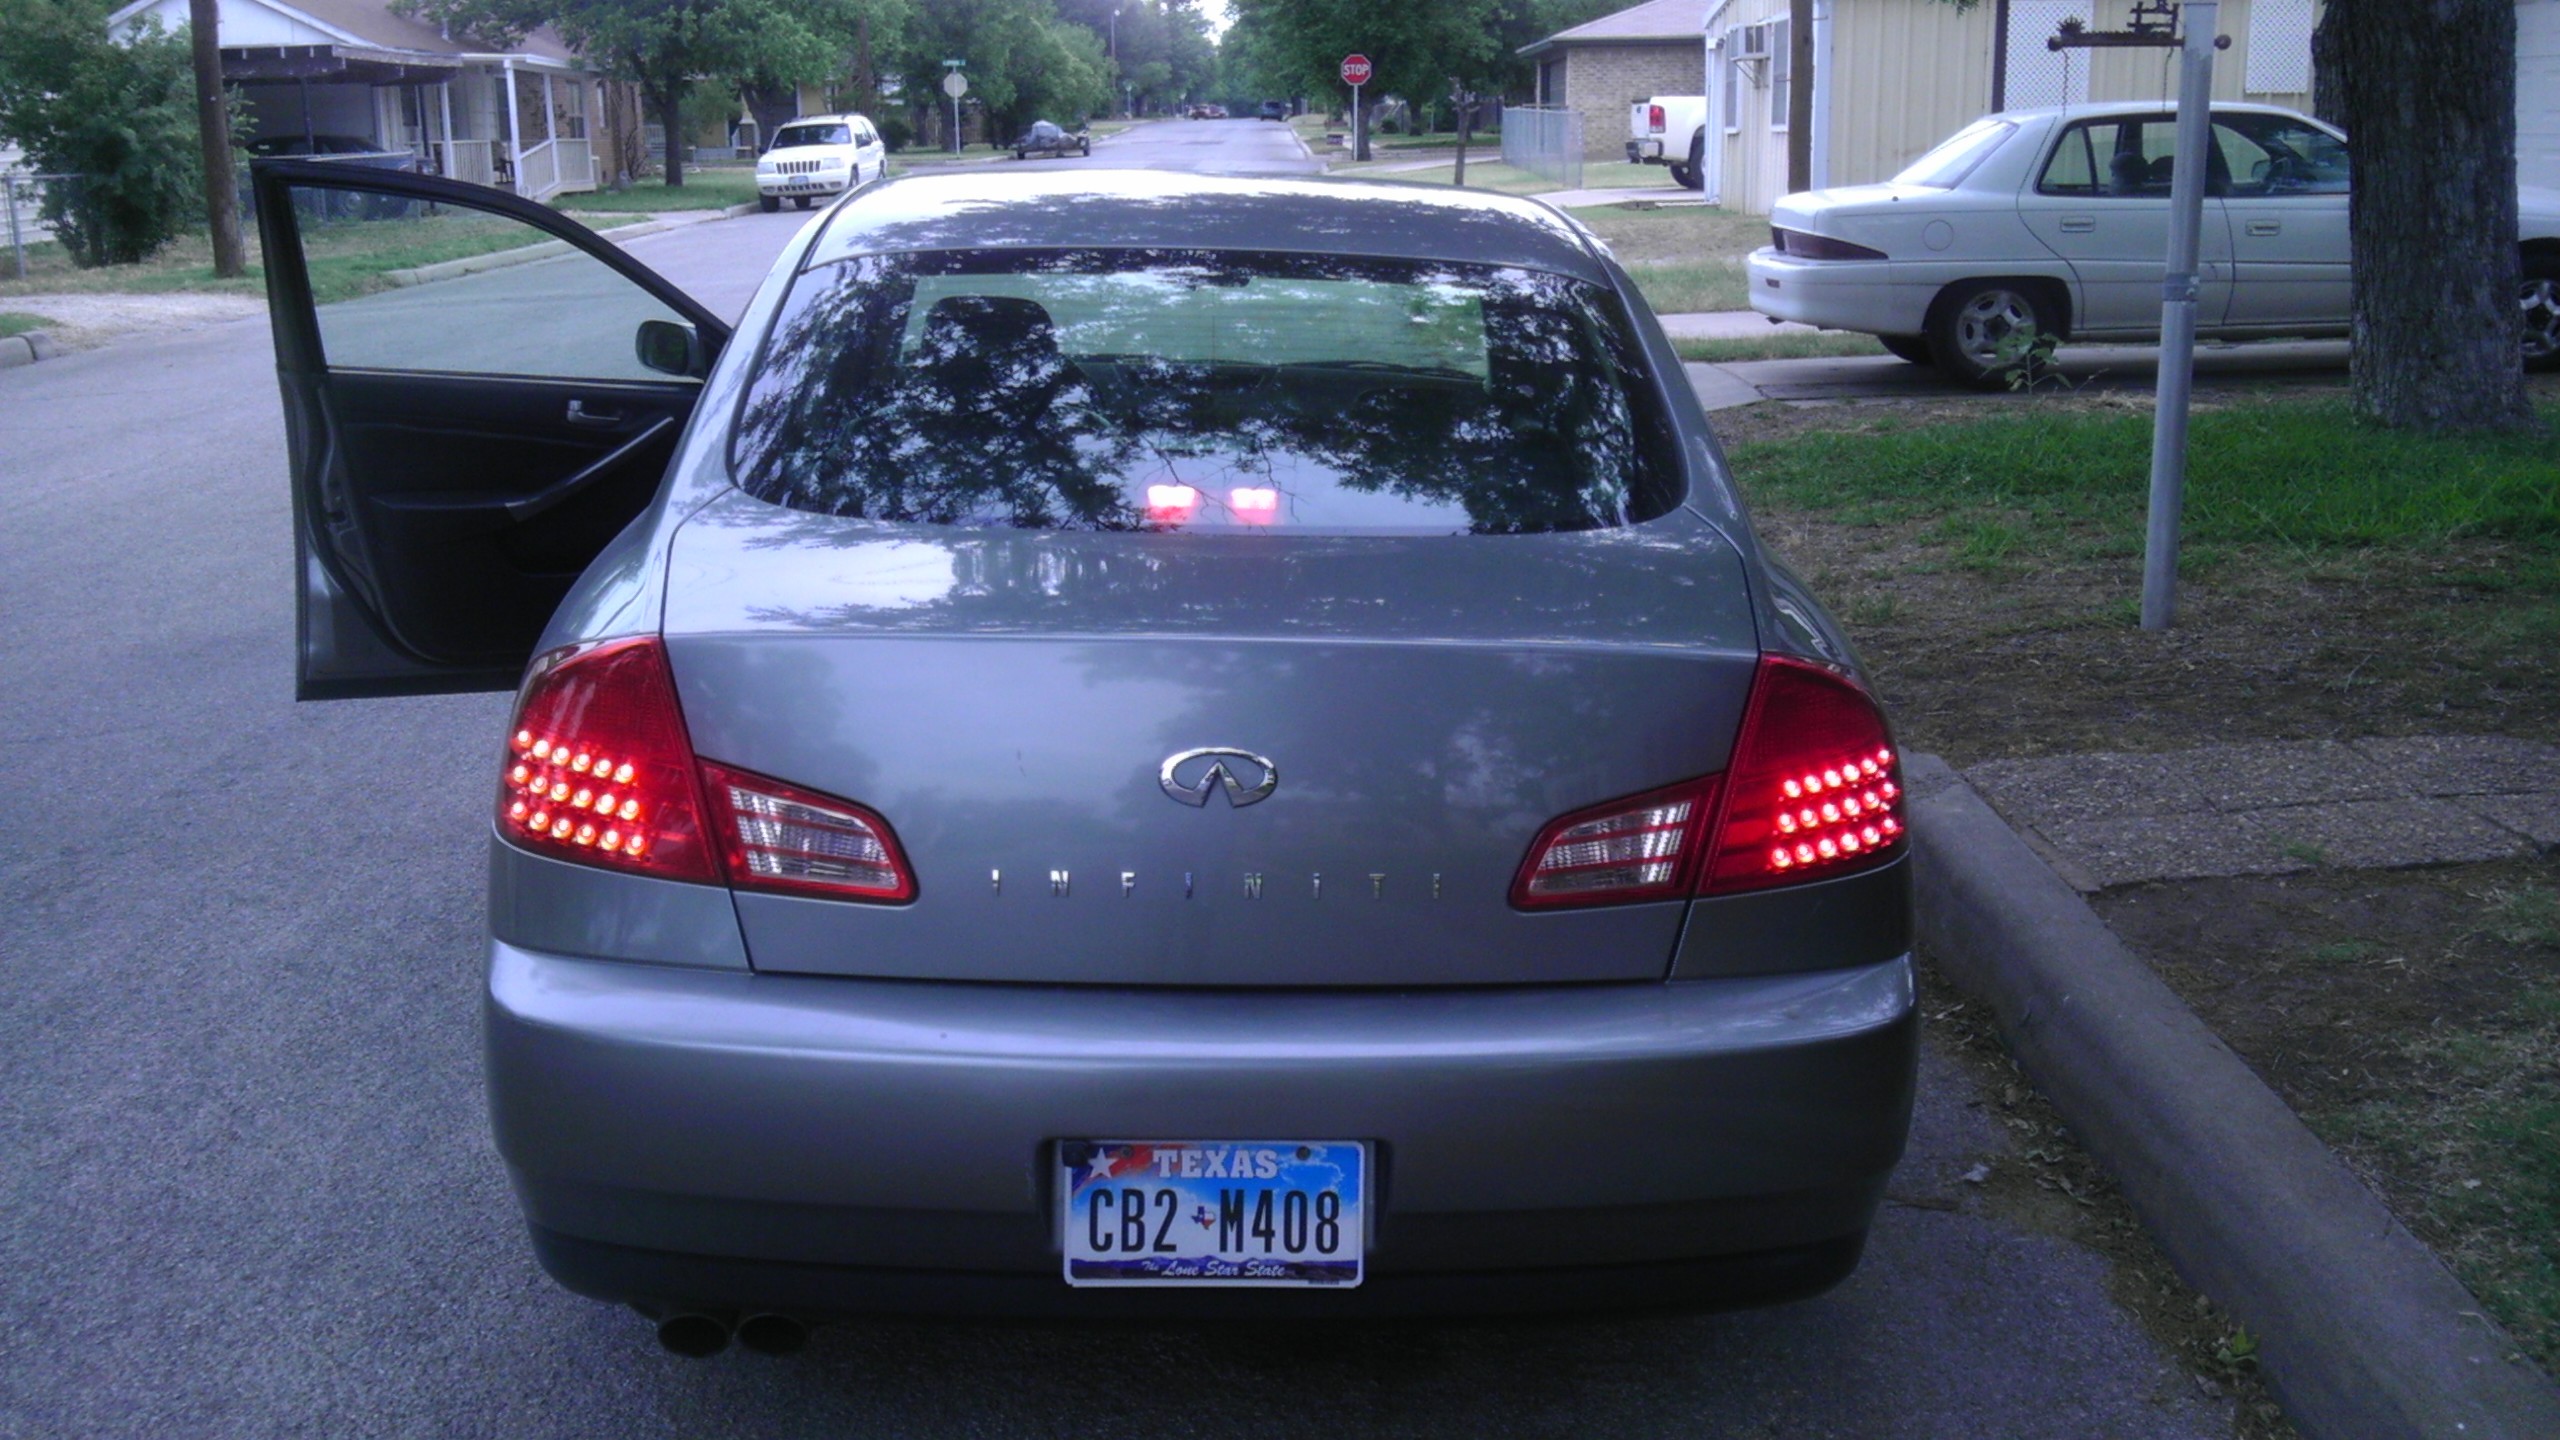
And the housing back in the car:
Push the Brake light into position, then secure the one screw that you can see, and hand tighten it BUT DO NOT OVERTIGHTEN IT. You'll find that, when properly secured, the other screw really didn't matter. If you're an **** person............ or if your light isn't secure, you can go get a velcro strip and secure it into place like that. Nobody looks up there anyway, and if they need to, they'll thank you for making it easy to remove and put back
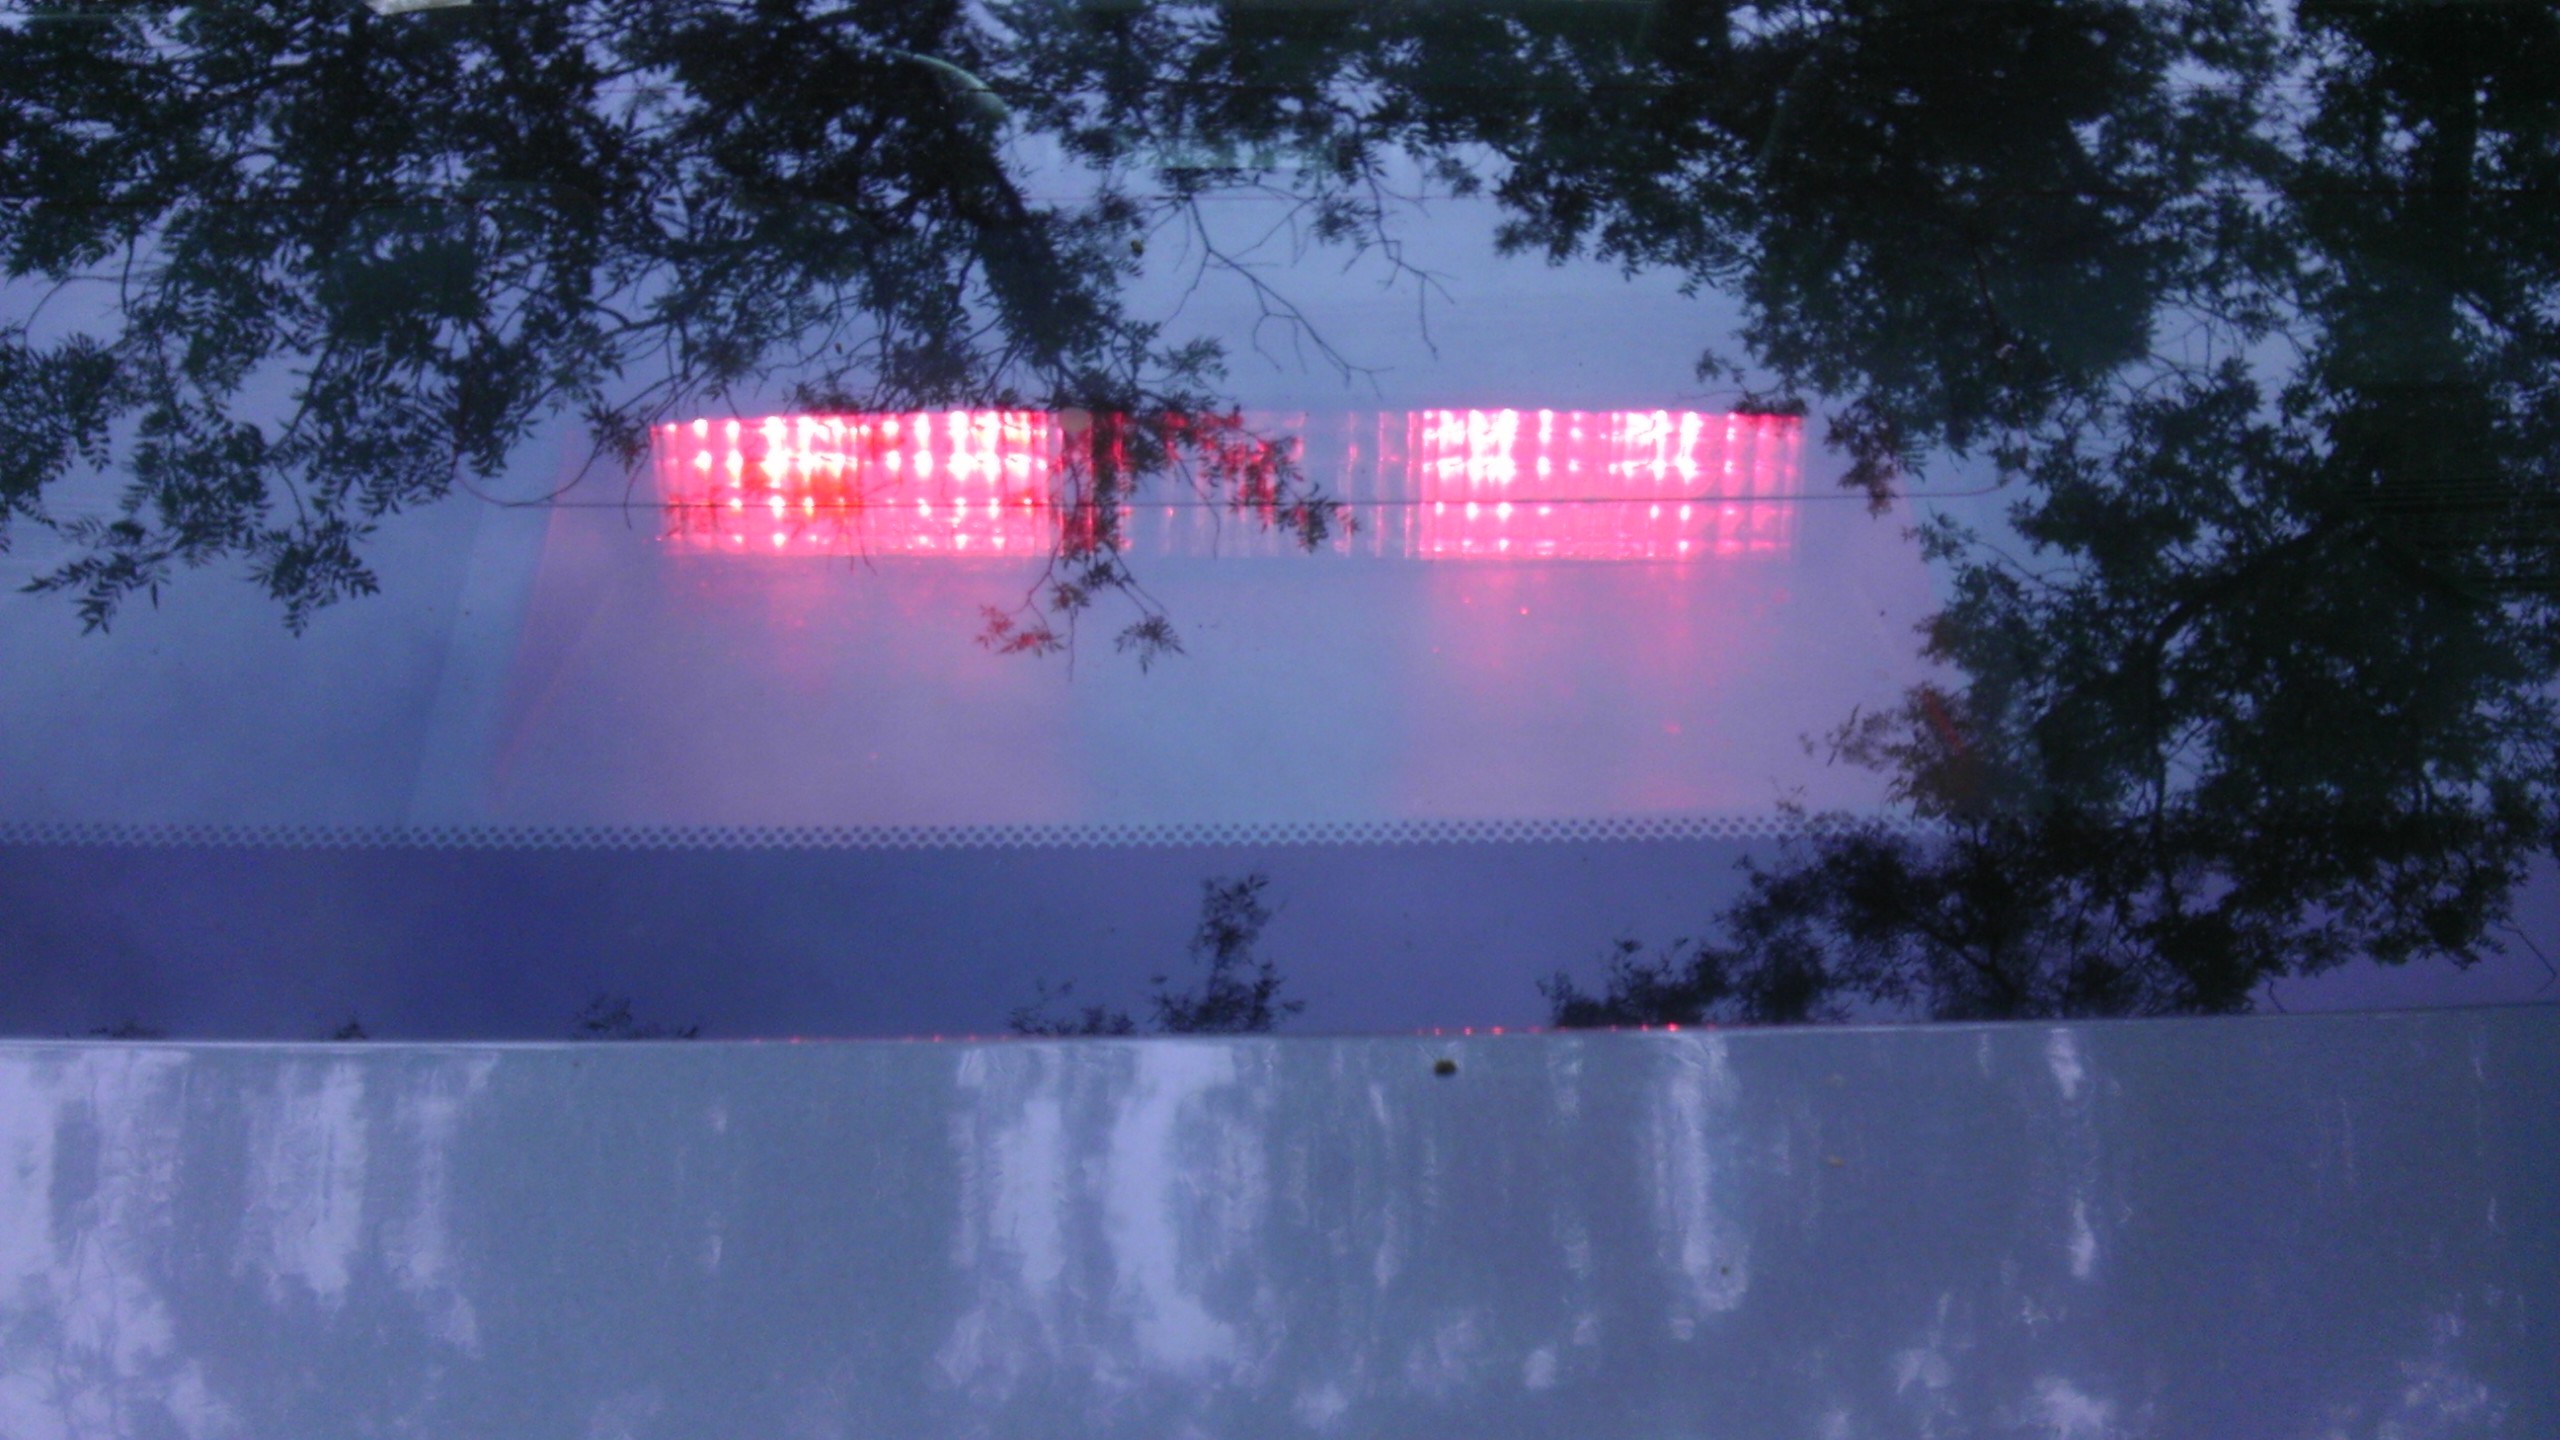
From a distance during the day... not too shabby:
And in case you want to test it yourself and you're forever alone, you can do what I did:
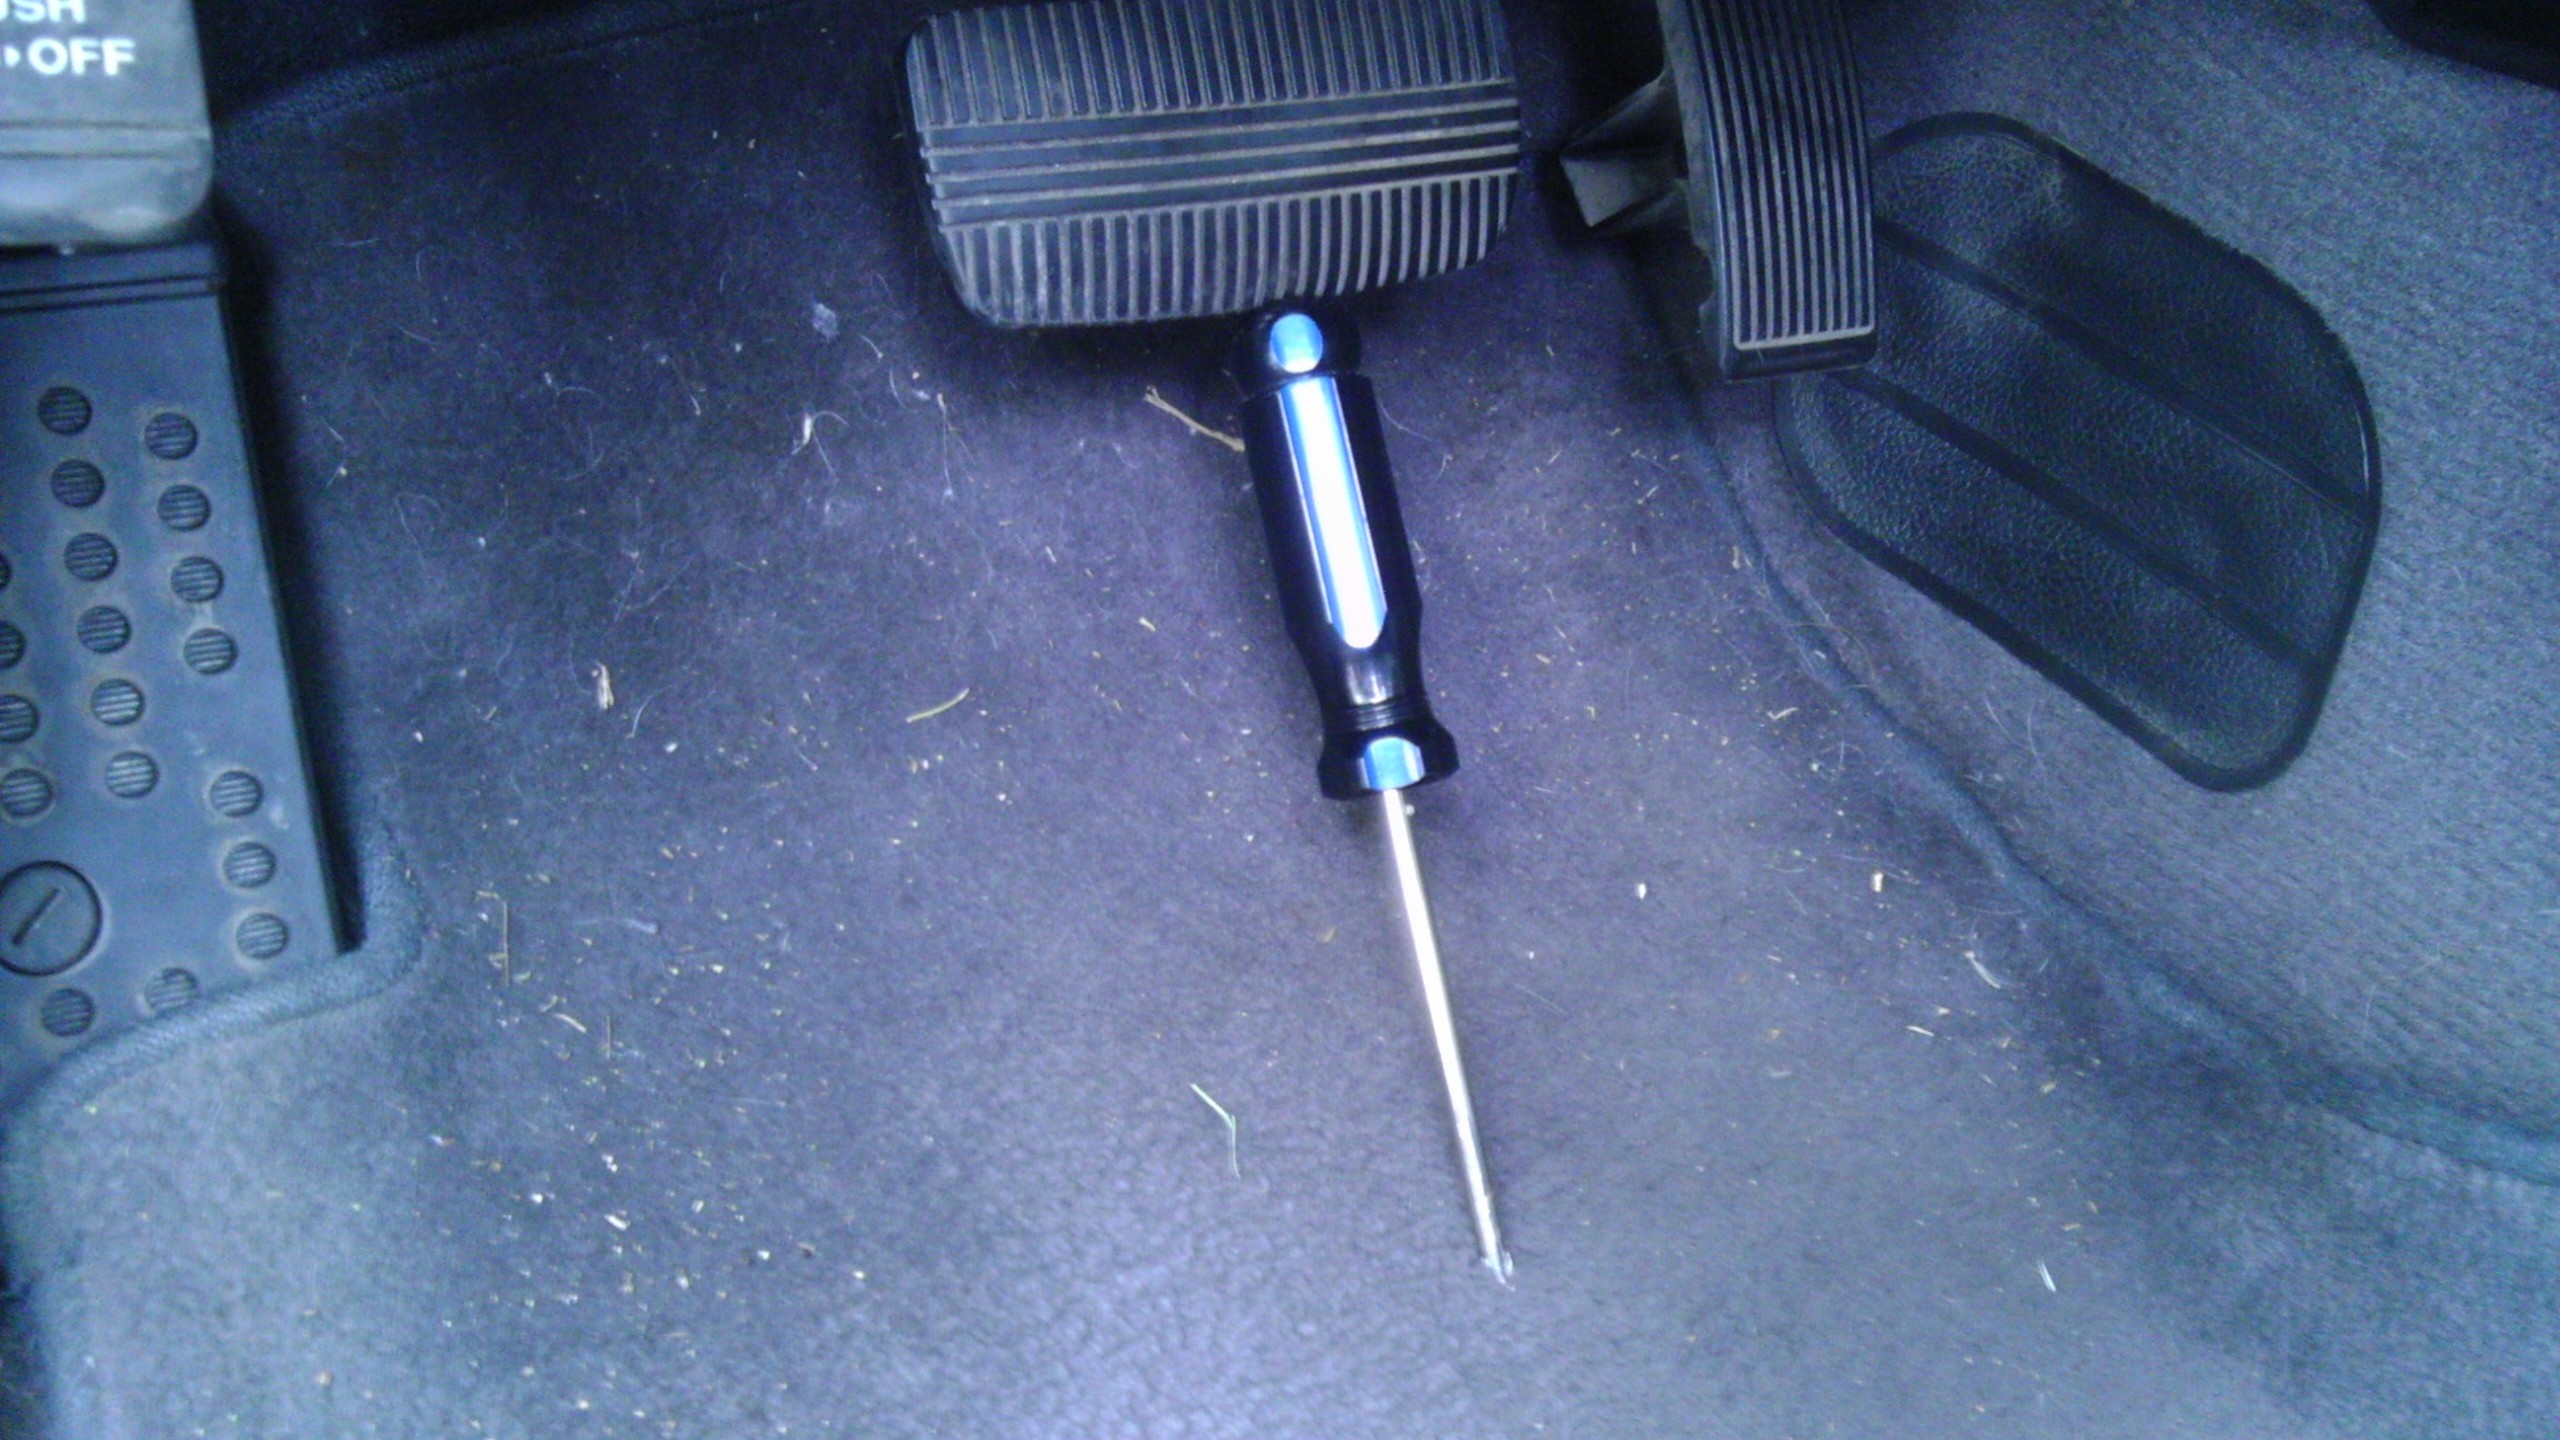
*I did this because I'm impatient, not because I'm lonely ... also, excuse the carpet :/
I might add more pictures later. Probably not... I'm still lazy.
Hope this helps someone. If I see any of you with a 3rd brake light that looks like mine, I'll assume you know of me already ;D
PROS:
- Free fix
- Your 3rd brake light will work
- No soldering required
CONS:
- Missing 2 lights
- Breaking a plastic screw mount
DISCLAIMER:
You're gonna lose two lights using this process... or, should I say you're gonna gain four lights in this process...? A lot of people have tried soldering replacement LEDs onto the board with not a lot of luck because the metal pieces that they sit on, that the current flows through, are a PITA to get solder to stick to. Also, you're gonna break a plastic mounting hole using my method, but it doesn't really matter (to me). I advise reading the entire write-up prior to attempting this yourself.
Alright, a quick write-up:
First of all, you can remove the 3rd brake light from your trunk without taking out the seats OR drilling. I'm sure there's a DIY for the other methods somewhere, but I'm lazy. If you want to fix your 3rd brake light in 15 minutes, I assume you're kinda lazy, too.
To remove your 3rd brake without taking the seats off or drilling, get inside your trunk and find the exposed screw that's holding in the 3rd brake light. Unscrew it. Now unhook the cable that feeds the 3rd brake light power. Now, if you're like me, you can't see the 2nd screw, nor can you get a screwdriver into it from any angle. You may get close, but not close enough.
So instead, swivel the light towards the front of the car (it'll only swivel one way). When you have it swiveled out pretty far... TWIST IT and snap that damn screw off. Chances are, you're going to snap the plastic mounting hole. That's ok - it's one of two, the other screw is more than good enough to hold the light in place without it moving, even with loud subwoofers. And... you can always secure it into place using velcro if you're really **** (but this is FREE fix, so I won't be covering that here).
Now pull the brake light out of your trunk and go to your workshop (or kitchen, like I did).
Remove the LED strip from the housing.
Now, there's SIX LED bulbs. Chances are, your two in the middle are dead (they're Diodes, Diodes can die after a while). You can test the other four by running a wire from a 12volt source (like your car battery) to one side of the diode, and the negative from the battery to the other side of the diode. LEDs (light-emitting diodes) only work one way, so if it doesn't work the first time, reverse the wires. If it still doesn't work, you may have additional LEDs that are burned out and may want to consider a different solution. You should only have to test the LEDs THREE times... These LEDs are wired in series, and on most brake lights, the two on the far left, and the two on the far right, are working. So when you touch the negative to the negative and the positive to the positive, TWO will usually light up at a time. If only one lights up, you probably have more LEDs burned out.
After you've confirmed that it is your two middle LEDs that are dead, take your needle-nose pliers and snap them off (the two in the middle), keeping the metal sheet they're soldered to as close to unchanged as possible... They are holding the metal up, so it will become flimsy as you break them off... Be careful
Continuing on..
Ahh, finally... pictures:
Get a junk wire, preferrably between 16 and 20 gauge, and strip it so you've got about a centimeter of insulation on it, but leave the ends exposed.. the entire wire should be about four inches long
* notice how I've got like 2 inches of wire exposed on one side and an inch on the other side? yea... try to keep 2 inches on both.
Lift up the metal in the middle, where the LEDs were (it's the part right above the silicon board with the regular diode and the resistors). Slide the wire underneath, and then rest the metal onto the insulated part of the wire
Now push the metal parts back down into place, and you'll notice the exposed wire folds upward as you push downward. This is because the metal that the LEDs are soldered to is fitted pretty tightly to the plastic housing. That's GOOD, you want it to push the wire up. Once the metal is pushed into place and the wire is sticking up, twist the wire together and lay it down across the metal. Yes, metal on metal action.. Mmmm..
If you tested the LEDs before continuing, test again. You should see that the remaining 4 LEDs are all lighting up now! This is because we closed the circuit that was left open by the dead LEDs, so electricity can flow properly from point A to point B, illuminating all LEDs along the way:
Once you're satisfied, wrap the center part of the LED bar in electrical tape:
Test again if you'd like
And put it back in the housing
And the housing back in the car:
Push the Brake light into position, then secure the one screw that you can see, and hand tighten it BUT DO NOT OVERTIGHTEN IT. You'll find that, when properly secured, the other screw really didn't matter. If you're an **** person............ or if your light isn't secure, you can go get a velcro strip and secure it into place like that. Nobody looks up there anyway, and if they need to, they'll thank you for making it easy to remove and put back
From a distance during the day... not too shabby:
And in case you want to test it yourself and you're forever alone, you can do what I did:
*I did this because I'm impatient, not because I'm lonely
... also, excuse the carpet :/I might add more pictures later. Probably not... I'm still lazy.
Hope this helps someone. If I see any of you with a 3rd brake light that looks like mine, I'll assume you know of me already ;D
Last edited by RADRaze2KX; May 6, 2012 at 11:49 AM.


lol ... I've got 6 red LED's and some breadboard coming, I might make another how-to on how to fashion a custom light, but it'll require soldering... we'll see thanks for the comments
thanks for the comments

Registered User
Joined: Feb 2015
Posts: 11
Likes: 0
From: Pittsburgh, PA
3rd brake light
So I followed this as well as another post about replacing the diode. The diode didn't sole my problem, I had 5 faint lights 1 out in the middle. I pulled the both middle LEDs and used this recommendation. It worked. I didn't like the blank spot in the middle, it was obvious that the light was not factory. I cut and measured a piece of Grey folder some super glue and...

Thread
Thread Starter
Forum
Replies
Last Post