RRYDE Custom Engine Bays
#316
 10-12-2011, 05:45 AM


#317
10-12-2011, 11:49 AM


#320
10-16-2011, 12:01 AM
#321
11-08-2011, 04:03 AM

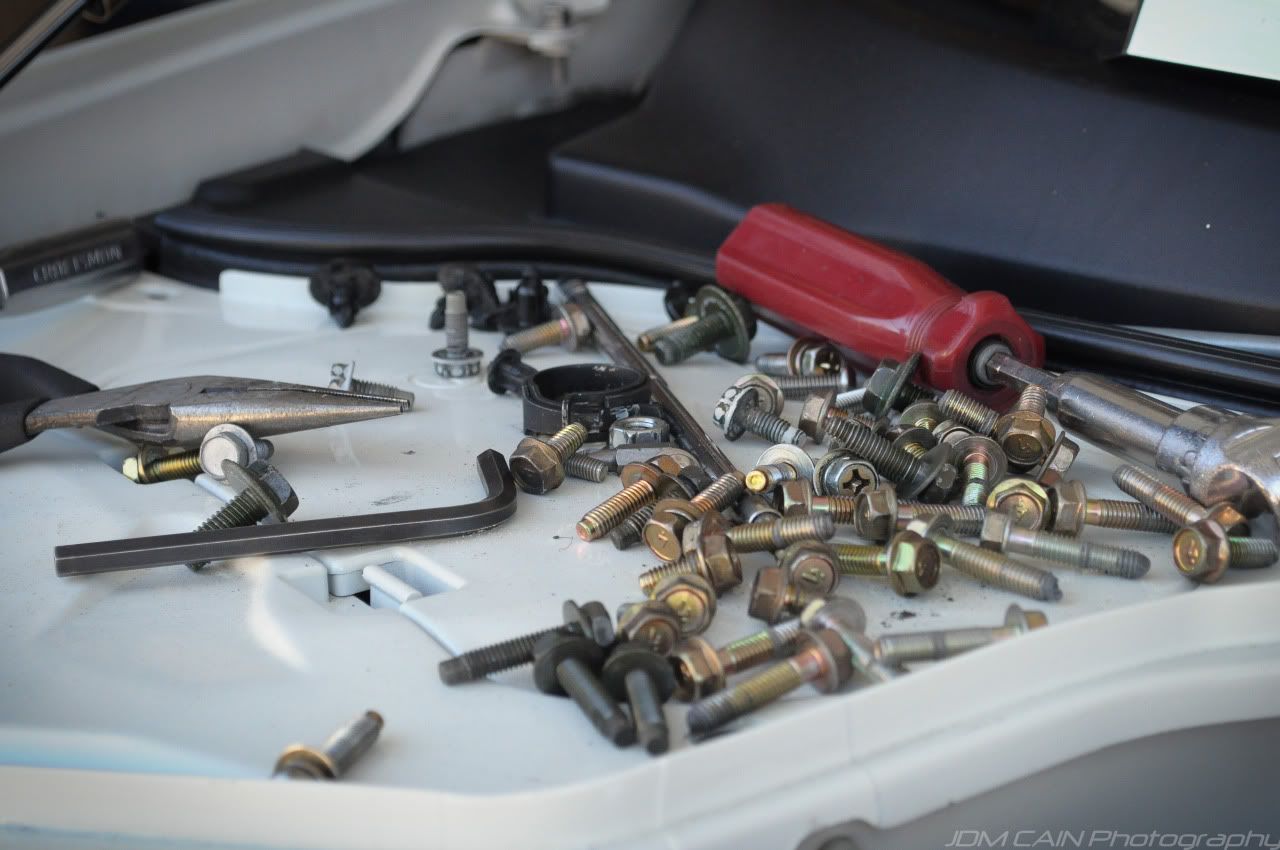
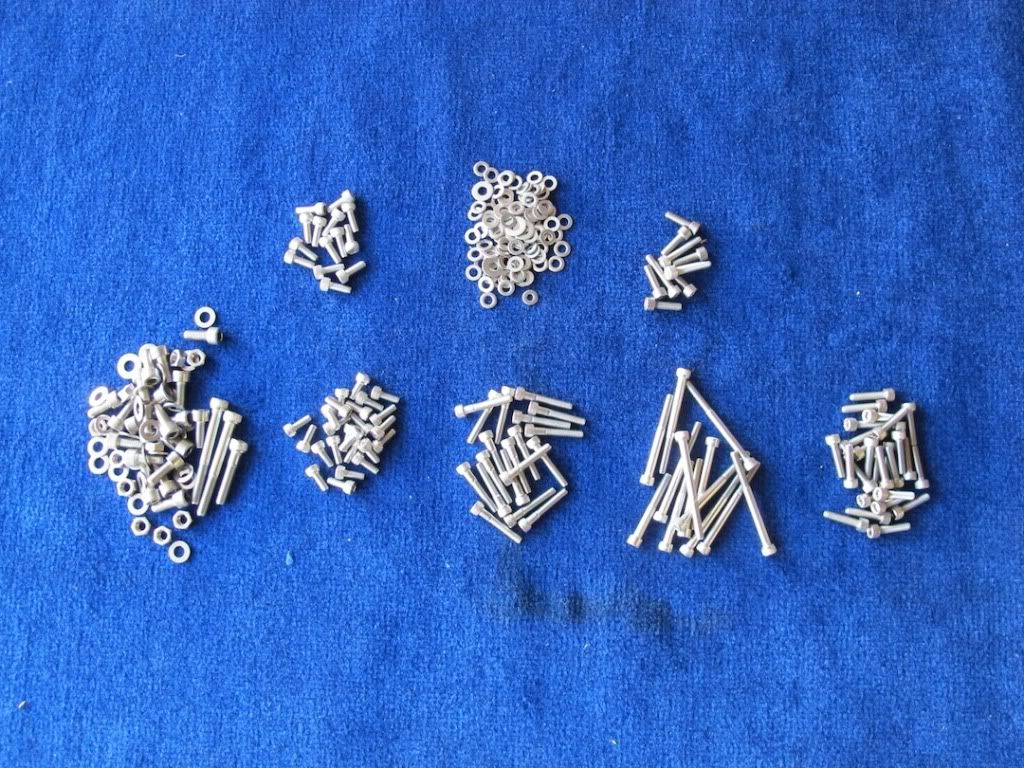
With so many people asking me about bolts. Here is the leg work done for you on sizes and quantity. Please do not take this as to being 100% accurate, but it should be damn close.
---------------------------------------(QTY) ----------Size mm
Upper Plenum : ( 9 )6mm x 25mm - (3 )6mm x 45mm - ( 4 )6mm x 60mm - (2)6mm nuts
Using a plenum spacer, add 10mm to length to all bolts
Plenum Brackets : ( 4 )6mm x 14mm
Lower Collector : ( 4 )8mm x 40mm - ( 4 )8mm nuts
Throttle Body : ( 4 )6mm x 45mm
Fuel Line bracket : ( 2 )6mm x 35mm
Dip Stick guide : ( 1 )6mm x 40mm
VTC Solenoids : X2 ( 3 )6mm x 35mm - cover bolt X2 ( 1 )6mm x 14mm
Camshaft Bracket ( what vtc solenoid is bolted to ): X2 ( 4 )6mm x 55mm * Need to reuse oem washer from oem bolt.
Coil Packs : ( 6 )6mm x 20mm
Brackets on valve covers : ( 6 )6mm x 14
Timing Cover : ( 20 )6mm x 25 * There is one that can only be replaced if crankshaft pulley is removed. - ( 2 )8mm x 70mm * lower end of cover. *( 6 )6mm x 14mm to fill empty holes.
Cam Covers : X2 ( 5 )6mm x 16mm
Cam Covers ( rev up ) : X2 ( 7 )6mm x 16mm
Water Pump cover : ( 4 )6mm x 14mm
Chain Tensioner cover : ( 3 )6mm x 14mm
Thermostat : ( 3 )6mm x 30mm
Coolant Pipe ( passenger side ) : ( 1 )8mm x 20mm
Ground Wire ( on timing cover ) : ( 1 )8mm x 20mm - ( 1 )6mm x 14mm
Ground Wire ( on frame ) : ( 2 )6mm x 14mm
Power Steering Pump : ( 2 )8mm x20 - ( 1 )8mm x 45mm
Lower Alternator bracket : ( 2 )8mm x 20mm
Drive Belt tensioner pulley bracket : ( 3 )8mm x 20mm
AC Belt tensioner pulley bracket : ( 3 )8mm x 20mm
Strut / Coilover : X2 ( 3 )8mm nuts
Hood Hinge : ( 4 )8mm nuts
Hood Pin Switch bracket : ( 2 )6mm x 14mm
Power Steering tank bracket : ( 3 )6mm x 25mm
Hood Latch : ( 3 )8mm x 20mm
Core Support : ( 4 )8mm x 20mm
Head Lights : ( 2 )6mm x 25mm
Fenders : ( 8 ) 6mm x 14mm - * if using hood dampers, only ( 6 ) are needed
Cowel : ( 1 )6mm x 14mm * at firewall
Overflow Tank : ( 1 )6mm x 14mm
The following 22 users liked this post by RRYDE:
alfhasg35 (11-08-2011),
B L U E S L A T E (11-08-2011),
bigc (11-08-2011),
CandlestickPark (11-08-2011),
Chief.Crappin.Squirrel (11-21-2011),
and 17 others liked this post.
#322
11-08-2011, 11:09 AM
#324
11-08-2011, 11:27 AM
Randy THANK YOU!! I get this question via PM at least once a week. Appreicate you sharing this with all of us.
I created a new thread and stickied it in the Tech area: https://g35driver.com/forums/engine-...olt-sizes.html
I created a new thread and stickied it in the Tech area: https://g35driver.com/forums/engine-...olt-sizes.html


#327
11-08-2011, 04:25 PM
The following users liked this post:
SDGenius (11-08-2011)
#328
11-19-2011, 05:50 PM
Finally got around to painting my core support. Thanks to JDM Cain for hooking me up with the guy who recently painted his.
Thanks to Randy (RRYDE) for waking up early this morning and going over to Eric's shop to swap it for me. Randy even took the time to clean up the area behind the core support (AC Condensor, etc.), thank you sir!

We had talked about burning my ARC titanium radiator panel a couple months ago when I got it polished, but I was undecided how I wanted to burn it. Randy suggested just a subtle line to show that its titanium, he burned it for me today (pictured sitting on unpainted core support). Thanks again homie.
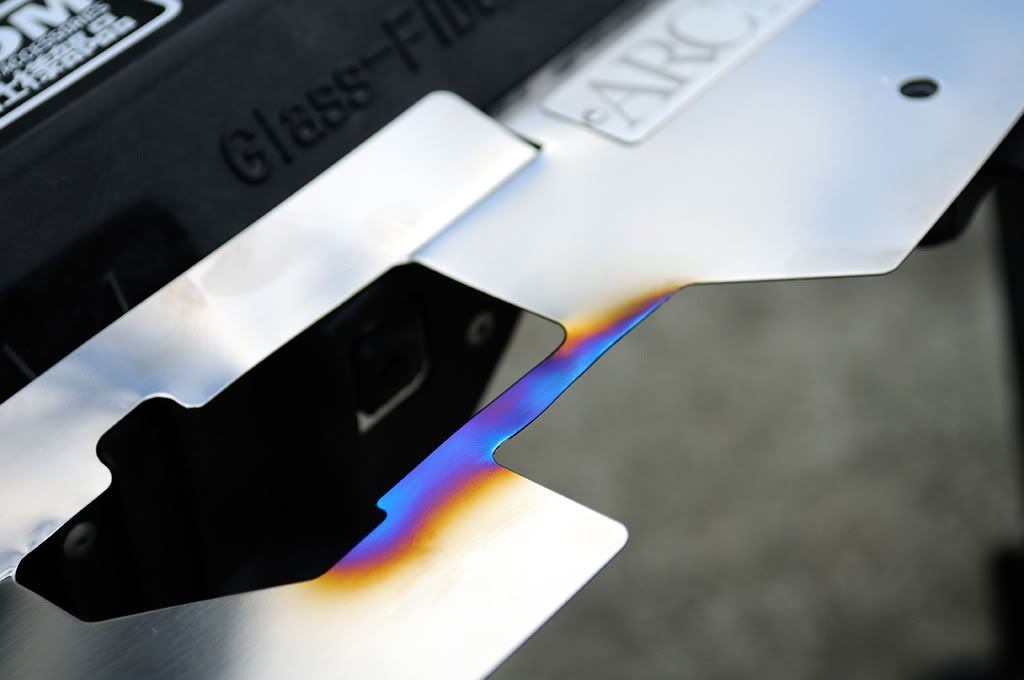
Thanks to JDM Cain for hooking me up with the guy who recently painted his.Thanks to Randy (RRYDE) for waking up early this morning and going over to Eric's shop to swap it for me. Randy even took the time to clean up the area behind the core support (AC Condensor, etc.), thank you sir!
We had talked about burning my ARC titanium radiator panel a couple months ago when I got it polished, but I was undecided how I wanted to burn it. Randy suggested just a subtle line to show that its titanium, he burned it for me today (pictured sitting on unpainted core support). Thanks again homie.
The following users liked this post:
alfhasg35 (11-19-2011)
#329
11-19-2011, 06:25 PM