
Checking Your Oil Pressure


Joined: Oct 2010
Posts: 3,945
Likes: 427
From: SF bayarea (925)
Checking Your Oil Pressure
Recent events have compelled me to post up a few tips, pics, and ideas for those who may be considering testing the oil pressure on their V36 chassis Infiniti, be it the '07-'08 G35 or an 08'-13' G37.
The primary reason why you may want to consider doing this is to detect a low oil pressure condition which is commonly the first detectable symptom of the dreaded failure of one or both of the oil galley gaskets on the rear timing cover assembly. The consequences of this condition going undetected can become quite substantial. For further background reference, please refer to these threads found here and on MyG37:
https://g35driver.com/forums/g35-sed...ous-about.html
http://www.myg37.com/forums/g37-coup...xperience.html
(If those threads don't at least make you curious about your car's current oil pressure, I don't know what will.)
I'm including two basic approaches to measuring your oil pressure. First, would be to install an aftermarket oil pressure gauge (which I did on my G35), or second, to use a gauge from an oil pressure test kit (which I did on a friend's G37).
Disclaimer: This is not intended to be the end-all thread for accomplishing this task. As you will see, in the case of the oil pressure gauge installation method, I clearly intended for it to be a temporary install which could be easily reversed afterwards. I just thought it might be helpful to share some of what I came across for both that and the test gauge methods. I also assume anyone attempting any of this has at least a rudimentary level of mechanical aptitude and an appreciation for basic safe practices when working on/under their car. (i.e. Don't get hurt or break your **** and then blame me!)
Last edited by vqsmile; Oct 23, 2014 at 11:15 PM.
Joined: Oct 2010
Posts: 3,945
Likes: 427
From: SF bayarea (925)
PART 1: Installing the gauge in the G35
There are two common types of aftermarket OP gauges (mechanical and electrical), but unless you literally want to have hot engine oil plumbed to the inside of the cabin, you'll want to go with an electric gauge. I chose this one: http://www.autometer.com/2-1-16-oil-...lack-3866.html (ignore that pricing) and one of these to mount it: http://www.glowshiftdirect.com/oil-f...15-thread.aspx
The gauge hookup is simple; just a 12V switched hot, a good engine ground, an optional 12V dash lighting signal (for dimming), and the sense wire to the actual pressure sender. (This is all basic stuff for pretty much any gauge brand)
There aren't many places to mount a gauge in the car; even for temporary purposes. I even considered just using velcro to mount it above my right leg along the inside curve where the dash transitions to the console, but in the end, I just couldn't bring myself to do it. Instead, I found that since I don't have NAV, I could JUST fit the gauge in the blank dummy panel of the console, right under the climate controls. It's just two screws and a few clips and it pops right off, so it's easily reversible. I drilled two small holes for the gauge's mounting studs right into that black plastic substrate behind where the dummy panel went. It's actually quite sturdy and doesn't interfere with shifting.


Now, moving onto the gauge sending unit portion of the install; you'll want to try and incorporate this with an oil change or, as in my case, if you recently changed your oil, you can remove just the oil filter and keep the oil in the pan. I just tilted the car severely to one side, making the oil flow to the other. Don't forget to use a jackstand before you go under!
(No comments about the bumper cover, I'm gathering parts for the conversion)

Ready to unscrew the filter

... aaaaand that's all the oil I lost in the process.

No more than a cup.

All ready to go

Here's what needs to be installed in place of the filter; it's the sandwich adapter with the OP sending unit already installed and wired up. Note: I did a few dry runs to check for best orientation/fitment and came up with this. I'd encourage you do this too, since it's much easier to install the sending unit and make the wire connections on the bench before you go under. (Not too much working room where it's going up behind the alternator)

Double checking clearances

Then just tighten it down into place with the new hollow nut/bolt. NOTE: I made two small alignment marks (scratches) right on the bottom edge of the sandwich adapter that correspond with the casting seam in the case of the upper oil pan (6:00 position). This is helpful to detect if there has been any movement later.

Now put the oil filter back on and this part is done.

Notice how much room there still is around the oil filter.

The sending unit case needs to be grounded for the gauge to work properly. It is possible to rely on its mounting threads for that, but I prefer a separate wire clamped to its case (shown in an earlier pic) and then routed to a good engine ground point. Since it was temporary, I didn't use the "eye" crimp, instead I just relied on a good ol' pipe clamp. Yes, that is the oil dipstick handle right there.

As far as specific notes about the wiring goes, it's all pretty basic stuff, but here's what I did. Mine was intended to be a temporary installation, so I didn't even bother with the dimming wire, instead I just tapped into the cigarette lighter in the console for 12V switched power, then I ran the ground and pressure sender sense wire up to behind the glove box. There, I attached the ground to the metal framework next to where the ECU is grounded, and continued on with the sense wire to the main wiring harness pass-through grommet located behind the battery. I know this is a potentially a critical water leakage area, so I wanted to make as small and tight of a hole as possible there. TO do this, I just used a straightened coat hanger wire, with the end sharpened to a fine point. I carefully pierced the grommet in an appropriate location and pushed the sharpened hanger wire on down (while carefully avoiding the wiring harness itself of course) to where it was visible from inside the cabin. Then I just taped the sense wire to the hanger wire and pulled it back up through the grommet. This resulted in a tiny hole with the grommet snugly gripping the wire where it passes through. For added protection, I smeared some ATV gasket compound around the hole as well. Once inside the engine bay, I needed to make a splice in the sense wire, as it is too short to have any hope of reaching all the way down to the sender unit.
There are two common types of aftermarket OP gauges (mechanical and electrical), but unless you literally want to have hot engine oil plumbed to the inside of the cabin, you'll want to go with an electric gauge. I chose this one: http://www.autometer.com/2-1-16-oil-...lack-3866.html (ignore that pricing) and one of these to mount it: http://www.glowshiftdirect.com/oil-f...15-thread.aspx
The gauge hookup is simple; just a 12V switched hot, a good engine ground, an optional 12V dash lighting signal (for dimming), and the sense wire to the actual pressure sender. (This is all basic stuff for pretty much any gauge brand)
There aren't many places to mount a gauge in the car; even for temporary purposes. I even considered just using velcro to mount it above my right leg along the inside curve where the dash transitions to the console, but in the end, I just couldn't bring myself to do it. Instead, I found that since I don't have NAV, I could JUST fit the gauge in the blank dummy panel of the console, right under the climate controls. It's just two screws and a few clips and it pops right off, so it's easily reversible. I drilled two small holes for the gauge's mounting studs right into that black plastic substrate behind where the dummy panel went. It's actually quite sturdy and doesn't interfere with shifting.
Now, moving onto the gauge sending unit portion of the install; you'll want to try and incorporate this with an oil change or, as in my case, if you recently changed your oil, you can remove just the oil filter and keep the oil in the pan. I just tilted the car severely to one side, making the oil flow to the other. Don't forget to use a jackstand before you go under!
(No comments about the bumper cover, I'm gathering parts for the conversion)
Ready to unscrew the filter
... aaaaand that's all the oil I lost in the process.
No more than a cup.
All ready to go
Here's what needs to be installed in place of the filter; it's the sandwich adapter with the OP sending unit already installed and wired up. Note: I did a few dry runs to check for best orientation/fitment and came up with this. I'd encourage you do this too, since it's much easier to install the sending unit and make the wire connections on the bench before you go under. (Not too much working room where it's going up behind the alternator)
Double checking clearances
Then just tighten it down into place with the new hollow nut/bolt. NOTE: I made two small alignment marks (scratches) right on the bottom edge of the sandwich adapter that correspond with the casting seam in the case of the upper oil pan (6:00 position). This is helpful to detect if there has been any movement later.
Now put the oil filter back on and this part is done.
Notice how much room there still is around the oil filter.
The sending unit case needs to be grounded for the gauge to work properly. It is possible to rely on its mounting threads for that, but I prefer a separate wire clamped to its case (shown in an earlier pic) and then routed to a good engine ground point. Since it was temporary, I didn't use the "eye" crimp, instead I just relied on a good ol' pipe clamp. Yes, that is the oil dipstick handle right there.
As far as specific notes about the wiring goes, it's all pretty basic stuff, but here's what I did. Mine was intended to be a temporary installation, so I didn't even bother with the dimming wire, instead I just tapped into the cigarette lighter in the console for 12V switched power, then I ran the ground and pressure sender sense wire up to behind the glove box. There, I attached the ground to the metal framework next to where the ECU is grounded, and continued on with the sense wire to the main wiring harness pass-through grommet located behind the battery. I know this is a potentially a critical water leakage area, so I wanted to make as small and tight of a hole as possible there. TO do this, I just used a straightened coat hanger wire, with the end sharpened to a fine point. I carefully pierced the grommet in an appropriate location and pushed the sharpened hanger wire on down (while carefully avoiding the wiring harness itself of course) to where it was visible from inside the cabin. Then I just taped the sense wire to the hanger wire and pulled it back up through the grommet. This resulted in a tiny hole with the grommet snugly gripping the wire where it passes through. For added protection, I smeared some ATV gasket compound around the hole as well. Once inside the engine bay, I needed to make a splice in the sense wire, as it is too short to have any hope of reaching all the way down to the sender unit.
Last edited by vqsmile; Mar 2, 2016 at 12:05 PM. Reason: updated oil pressure gauge link
Joined: Oct 2010
Posts: 3,945
Likes: 427
From: SF bayarea (925)
PART 2: Using a test gauge on a G37
Using a test gauge clearly has its advantages; it is faster, cheaper, and easier. The only reason I didn't go this route for my G35 was because I expected everything to be ok and that I would need to have a gauge installed so I could monitor pressure for a while and establish a baseline.
If you google "oil pressure test kit" you'll find dozens to choose from. You can also check your local auto parts stores and see if they have a loaner program that includes one. Unfortunately, none in my area do. Seeing as how I was really looking for an overt pressure discrepancy, paying for an extremely accurate gauge seemed an unnecessary expense (not to mention I'm a cheap a$$), so I just opted for this Harbor Freight kit: http://www.harborfreight.com/engine-...kit-98949.html . Hint: Pick up a 20% off coupon from virtually any auto magazine, and the price is just 20 bucks. Can't beat that. It is not the best kit; it actually has quite a few faults, but it works where it counts and will get the job done. On with the test...
To do the test, I lifted the car clear up on the passenger side (again) to minimize oil spillage. Once under the car, you will need to remove the factory oil pressure sensor which is fatter one of the two sensors, and closest the oil filter. It almost looks like it plugs right into the base of the oil filter housing (because it does).

For better access, unplug the electrical connections to both sensors and move them out of the way. Clean the exposed threads at the base of the sensor where it threads into the housing. You don't want any contamination getting into the oil system.

Have a pan underneath and get ready for some spillage as you unscrew the sensor. Although it looks somewhat rounded, the body of that sensor is actually a 27mm or 1-1/16" hex size, but there's no reason you can't just use a good crescent (adjustable) wrench, since it's not in there very tight.


... aaaaand that's all that leaked.

A look at the access point for the test

It is at this point that it's worth having a plumbing lesson (of sorts).
The thread type of that OP sensor is 1/8" BSPT or British Standard Pipe - Tapered thread (wiki: http://en.wikipedia.org/wiki/British_Standard_Pipe). It is a fairly delicate thread, easily stripped if abused, and definitely if it's made of aluminum (which it is). The thread looks VERY similar to our own 1/8" NPT or National Pipe Thread spec, but don't be fooled; it most definitely isn't. Most test gauges will have an 1/8" NPT thread provided. A male NPT thread will start in a BSP thread hole, but it will bind after just a few turns and then (if hard enough) will actually enlarge the opening of the female thread and basically ruin it for proper sealing forevermore. DON'T DO IT! What is needed is a fitting that converts 1/8" NPT to 1/8" BSPT, something like this: http://www.glowshiftdirect.com/18-np...e-adapter.aspx . I actually used a T-fitting I had on hand which accomplished the same thing:

These are commonly used to add in an additional sensor/sender unit while also keeping the factory one. I essentially used it to add in the test gauge while keeping the stock sender hooked up simultaneously.


Here's the whole setup in place for a dry run. For the actual pressure test, I didn't even use any thread sealant on either end of the Tee (both BSP threads), as they seal up extremely well all on their own (and because this is temporary), but I did use teflon tape around the NPT threads where the gauge tapped in. It WILL leak if you don't seal the NPT threads.

If you choose to use a Tee like I did, you'll need to pop this clip out that holds the wiring or you won't have enough slack to plug them back in. You should plug the other (smaller, blue and copper) sensor in before you start the car; it's for oil temp. I have read that you do not have to plug the oil pressure sensor in to start the car, but I did it anyway.

Next, I plugged in my ScanGauge2 for watching the actual water temps so I could try to estimate the oil temps. (No, they are NOT the same) Water temps will initially lead oil temps, but will normally trail them after the engine has fully warmed up. They cross paths somewhere in late warmup. This is significant because Infiniti gives the oil spec at a particular temperature (176*), but that is not a temp where either the water, nor oil, will stabilize once warmed up, so if you want to be really accurate, you kind of have to catch it as it passes by. Oil pressure varies hugely at different temperatures so it is important to get a reading at a temp near the factory spec point. Theoretically, it is possible to read the oil temp data from the ECU, but that would require writing a custom function for the ScanGauge (X-commands) and I never bothered. IF you still have enough oil pressure with the car thoroughly warmed up, then you're ok; this really only becomes critical if you are right on the edge of spec.

Ok, so here it is running at idle. At the time I took these pics, the motor had completely warmed up (i.e. radiator fans were cycling on and off), so this was with oil temps that were greater than or equal to water temps. I was seeing about 21 psi when I estimated the oil temps to be around 176*.


Don't be surprised if you find that it's very hard to stabilize throttle at 2k rpms with an AT. It was far easier with my 6MT.

After the testing was done, I removed the fittings. Clearly, you see where I used teflon tape on the NTP threads, but not on the BSP.

And here is why I didn't use the tape in the BSP threads (besides the fact that those threads sealed quite well on their own) you don't ever want to use teflon tape on any kind of oil sensor/sender that is screwed into your engine. That sliver of teflon I pulled out can remain in the hole and, upon removal and reinsertion of the sensor, can be pushed on down into the oil passages, potentially wreaking havoc on the delicate hydraulics of the variable valve timing mechanisms.

Instead, you'll want to use a thread sealant like this. Even then, you only want to apply it to the rearmost threads. You should have 3-4 threads bare threads in front of the sealant.

and here it is all back together again.

One last note about the Harbor Freight oil test kit; its packaging claims to include an 1/8" BSP fitting (see the 3rd brass fitting listed there), but it is not correct! No such fitting is included. There is 'something' that you might consider close, but it was so poorly cut that I would never install it directly into my engine for fear of permanently damaging the threads in the upper oil pan assembly. Apparently, I'm not the only one to observe this either, as I have read it mentioned in some online reviews of the product.
Like I said, the gauge works well enough where it counts to be usable, but the quality control on their fittings IS poor and should not be trusted on such a delicate and critical sealing point as the port for the oil pressure sensor. This is all the more reason you'll want to use a known, trusted, non-super-cheapo-discount-import type adapter fitting to thread directly into your engine. Let the female threads of a known-good adapter be the 'sacrificial' member, not your engine.
Another gripe I had about the test kit fittings is the seemingly random dimensions of the outer hex cut. They simply do not fit any normal wrench sizing, be it SAE or metric. It is not much of a problem here, since you can use an adjustable wrench and the tightening torques are low enough that even a poorly fitting wrench works; the quality control is really just more of an annoyance.

Happy testing.
Using a test gauge clearly has its advantages; it is faster, cheaper, and easier. The only reason I didn't go this route for my G35 was because I expected everything to be ok and that I would need to have a gauge installed so I could monitor pressure for a while and establish a baseline.
If you google "oil pressure test kit" you'll find dozens to choose from. You can also check your local auto parts stores and see if they have a loaner program that includes one. Unfortunately, none in my area do. Seeing as how I was really looking for an overt pressure discrepancy, paying for an extremely accurate gauge seemed an unnecessary expense (not to mention I'm a cheap a$$), so I just opted for this Harbor Freight kit: http://www.harborfreight.com/engine-...kit-98949.html . Hint: Pick up a 20% off coupon from virtually any auto magazine, and the price is just 20 bucks. Can't beat that. It is not the best kit; it actually has quite a few faults, but it works where it counts and will get the job done. On with the test...
To do the test, I lifted the car clear up on the passenger side (again) to minimize oil spillage. Once under the car, you will need to remove the factory oil pressure sensor which is fatter one of the two sensors, and closest the oil filter. It almost looks like it plugs right into the base of the oil filter housing (because it does).
For better access, unplug the electrical connections to both sensors and move them out of the way. Clean the exposed threads at the base of the sensor where it threads into the housing. You don't want any contamination getting into the oil system.
Have a pan underneath and get ready for some spillage as you unscrew the sensor. Although it looks somewhat rounded, the body of that sensor is actually a 27mm or 1-1/16" hex size, but there's no reason you can't just use a good crescent (adjustable) wrench, since it's not in there very tight.
... aaaaand that's all that leaked.
A look at the access point for the test
It is at this point that it's worth having a plumbing lesson (of sorts).
The thread type of that OP sensor is 1/8" BSPT or British Standard Pipe - Tapered thread (wiki: http://en.wikipedia.org/wiki/British_Standard_Pipe). It is a fairly delicate thread, easily stripped if abused, and definitely if it's made of aluminum (which it is). The thread looks VERY similar to our own 1/8" NPT or National Pipe Thread spec, but don't be fooled; it most definitely isn't. Most test gauges will have an 1/8" NPT thread provided. A male NPT thread will start in a BSP thread hole, but it will bind after just a few turns and then (if hard enough) will actually enlarge the opening of the female thread and basically ruin it for proper sealing forevermore. DON'T DO IT! What is needed is a fitting that converts 1/8" NPT to 1/8" BSPT, something like this: http://www.glowshiftdirect.com/18-np...e-adapter.aspx . I actually used a T-fitting I had on hand which accomplished the same thing:
These are commonly used to add in an additional sensor/sender unit while also keeping the factory one. I essentially used it to add in the test gauge while keeping the stock sender hooked up simultaneously.
Here's the whole setup in place for a dry run. For the actual pressure test, I didn't even use any thread sealant on either end of the Tee (both BSP threads), as they seal up extremely well all on their own (and because this is temporary), but I did use teflon tape around the NPT threads where the gauge tapped in. It WILL leak if you don't seal the NPT threads.
If you choose to use a Tee like I did, you'll need to pop this clip out that holds the wiring or you won't have enough slack to plug them back in. You should plug the other (smaller, blue and copper) sensor in before you start the car; it's for oil temp. I have read that you do not have to plug the oil pressure sensor in to start the car, but I did it anyway.
Next, I plugged in my ScanGauge2 for watching the actual water temps so I could try to estimate the oil temps. (No, they are NOT the same) Water temps will initially lead oil temps, but will normally trail them after the engine has fully warmed up. They cross paths somewhere in late warmup. This is significant because Infiniti gives the oil spec at a particular temperature (176*), but that is not a temp where either the water, nor oil, will stabilize once warmed up, so if you want to be really accurate, you kind of have to catch it as it passes by. Oil pressure varies hugely at different temperatures so it is important to get a reading at a temp near the factory spec point. Theoretically, it is possible to read the oil temp data from the ECU, but that would require writing a custom function for the ScanGauge (X-commands) and I never bothered. IF you still have enough oil pressure with the car thoroughly warmed up, then you're ok; this really only becomes critical if you are right on the edge of spec.
Ok, so here it is running at idle. At the time I took these pics, the motor had completely warmed up (i.e. radiator fans were cycling on and off), so this was with oil temps that were greater than or equal to water temps. I was seeing about 21 psi when I estimated the oil temps to be around 176*.
Don't be surprised if you find that it's very hard to stabilize throttle at 2k rpms with an AT. It was far easier with my 6MT.
After the testing was done, I removed the fittings. Clearly, you see where I used teflon tape on the NTP threads, but not on the BSP.
And here is why I didn't use the tape in the BSP threads (besides the fact that those threads sealed quite well on their own) you don't ever want to use teflon tape on any kind of oil sensor/sender that is screwed into your engine. That sliver of teflon I pulled out can remain in the hole and, upon removal and reinsertion of the sensor, can be pushed on down into the oil passages, potentially wreaking havoc on the delicate hydraulics of the variable valve timing mechanisms.
Instead, you'll want to use a thread sealant like this. Even then, you only want to apply it to the rearmost threads. You should have 3-4 threads bare threads in front of the sealant.
and here it is all back together again.
One last note about the Harbor Freight oil test kit; its packaging claims to include an 1/8" BSP fitting (see the 3rd brass fitting listed there), but it is not correct! No such fitting is included. There is 'something' that you might consider close, but it was so poorly cut that I would never install it directly into my engine for fear of permanently damaging the threads in the upper oil pan assembly. Apparently, I'm not the only one to observe this either, as I have read it mentioned in some online reviews of the product.
Like I said, the gauge works well enough where it counts to be usable, but the quality control on their fittings IS poor and should not be trusted on such a delicate and critical sealing point as the port for the oil pressure sensor. This is all the more reason you'll want to use a known, trusted, non-super-cheapo-discount-import type adapter fitting to thread directly into your engine. Let the female threads of a known-good adapter be the 'sacrificial' member, not your engine.
Another gripe I had about the test kit fittings is the seemingly random dimensions of the outer hex cut. They simply do not fit any normal wrench sizing, be it SAE or metric. It is not much of a problem here, since you can use an adjustable wrench and the tightening torques are low enough that even a poorly fitting wrench works; the quality control is really just more of an annoyance.
Happy testing.
Last edited by vqsmile; Oct 26, 2014 at 06:09 PM.
Joined: Oct 2010
Posts: 3,945
Likes: 427
From: SF bayarea (925)
All right people; I encourage anyone to add their comments here, but there's a lot of pics in there, so if you make a comment, PLEASE for the love of God, don't quote the whole damn thing. Just snip what's relevant.
Last edited by vqsmile; Oct 26, 2014 at 01:09 PM.


Joined: Oct 2010
Posts: 3,945
Likes: 427
From: SF bayarea (925)
To be honest, I just did everything by feel, but having done a good bit of this kind of work, I do have a pretty good feel. For the benefit of anyone not wanting to go by feel, the torque specs can be found in the FSM under LU-12 (or thereabouts). It looks like the test gauge fittings and/or the actual factory OP sensor has a torque spec of 11 ft.lbs. (I would say the aftermarket OP sender unit should be the same), while the bolt that attaches the oil filter sandwich plate shows 36 ft.lbs., and lastly the oil filter itself is just 13 ft. lbs.
Reading those, I have to say I doubt I torqued that sandwich adapter to a full 36 ft.lbs. though. My best guess would be that my 'feel' only took it to around 25 ft.lbs., as I naturally am always a bit cautious when torquing steel into aluminum. There is an O-ring on it (essentially like an oil filter), and it definitely compressed, so all it really has to do is be tighter than the oil filter that then attaches onto it (at just 13 ft.lbs.). This also speaks to why I made the little alignment marks to detect any movement.


Registered User
Joined: Aug 2007
Posts: 54
Likes: 13
HF gauge works great, & only costs around $28 or so. Includes the exact adapter (marked in pic) you need for the G35. Works great on Harley's too! The HF gauge & op gauge on my FXDP agree perfectly.
Trending Topics
Joined: Oct 2010
Posts: 3,945
Likes: 427
From: SF bayarea (925)

I so remember the negative comments I received when I was looking into installing volt/oil pressure gauges in my '04 coupe. My reply was "I enjoy knowing what goes on under my hood!" Interesting, using AMSOIL I was going thru a quart of their synthetic between changes. Switched back to Mobil1 and the pressure is a couple lbs less but I'm not using oil. Also, when you can see your oil pressure you can understand why warming up your car is a good idea. Even after warming up SLICK while I dust her off I hit 100+psi between shifts taking it easy under 1.5K rpm.
Gary
Gary
Joined: Oct 2010
Posts: 3,945
Likes: 427
From: SF bayarea (925)
Like I mentioned before, this has really shaken my faith in the Infiniti/Nissan brand. I'd grown tired of needless complications with German cars, and now if I can't even count on Japanese cars to be reliable, I may well consider looking back into domestic cars.
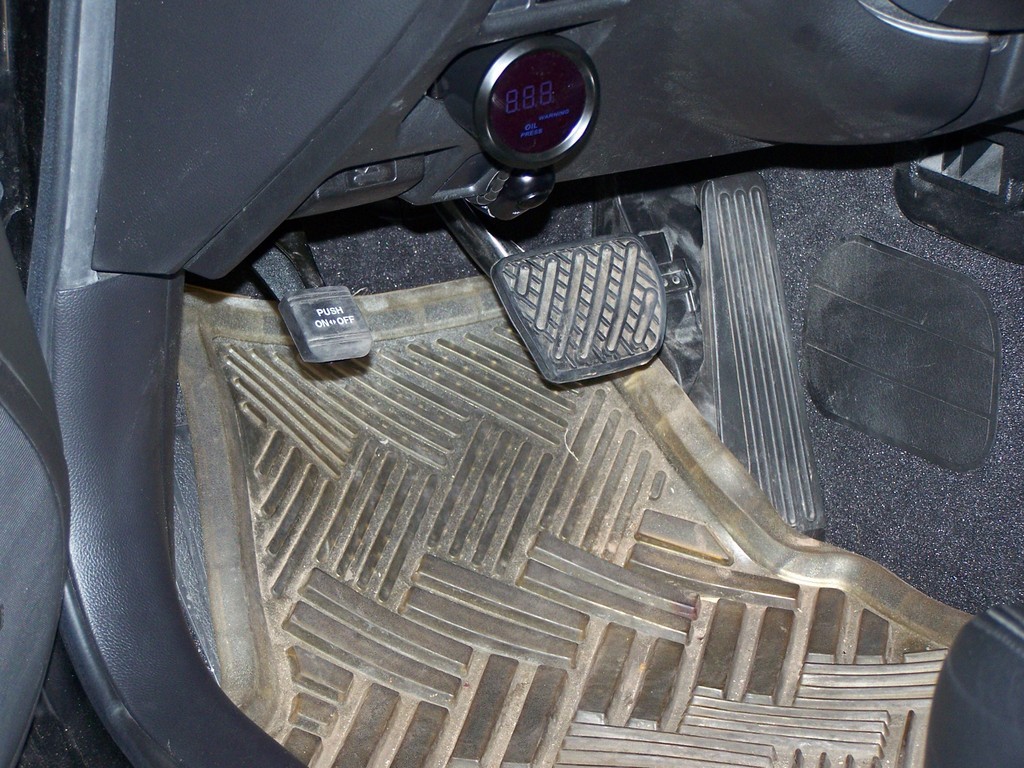
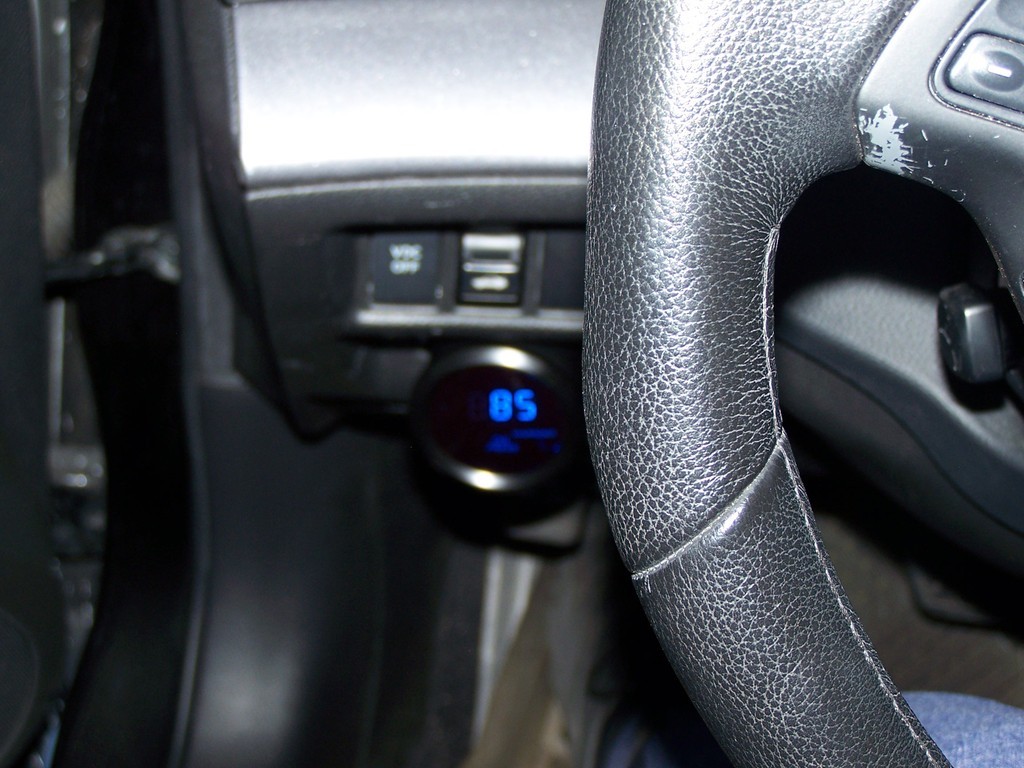
Here's an oil pressure gauge I installed into the keyfob slot, just modified one of the prongs on the bracket that came w/ the meter so it would fit snug in the slot. Out of the way and easy to remove w/ no drilling or cutting of dash/trim pieces. And thankfully my pressure is healthy at all rpms and temps. I used the glowlight adapter plate that VQSmile recommended along w/ his grounding trick on the sending unit, works well. Here's the gauge
http://www.bonanza.com/listings/2-Di...-PSI/295706160
http://www.bonanza.com/listings/2-Di...-PSI/295706160
Joined: Oct 2010
Posts: 3,945
Likes: 427
From: SF bayarea (925)
^^ That does tuck nicely out of the way there. Good job!
Now, about that steering wheel trim . . .")
(You didn't really think you were going to get away unscathed with that, did you?)
.
Now, about that steering wheel trim . . .
(You didn't really think you were going to get away unscathed with that, did you?)
.
 I pretty much only drive it on road trips and to the gas station.

Registered User
Joined: Jan 2016
Posts: 2
Likes: 0
Thanks for posting this. I was wondering if I needed to buy an aftermarket Oil Pressure Sending Unit for this install. I tried clicking on the link for the OP gauge but it just goes to the Autometer home page so I wasn't sure if that came with the gauge.
Joined: Oct 2010
Posts: 3,945
Likes: 427
From: SF bayarea (925)
It does come with the sending unit included.