DIY~Window trim vinyl wrap 07-current Sedans


Joined: Aug 2007
Posts: 1,699
Likes: 137
From: New Mexico
DIY~Window trim vinyl wrap 07-current Sedans
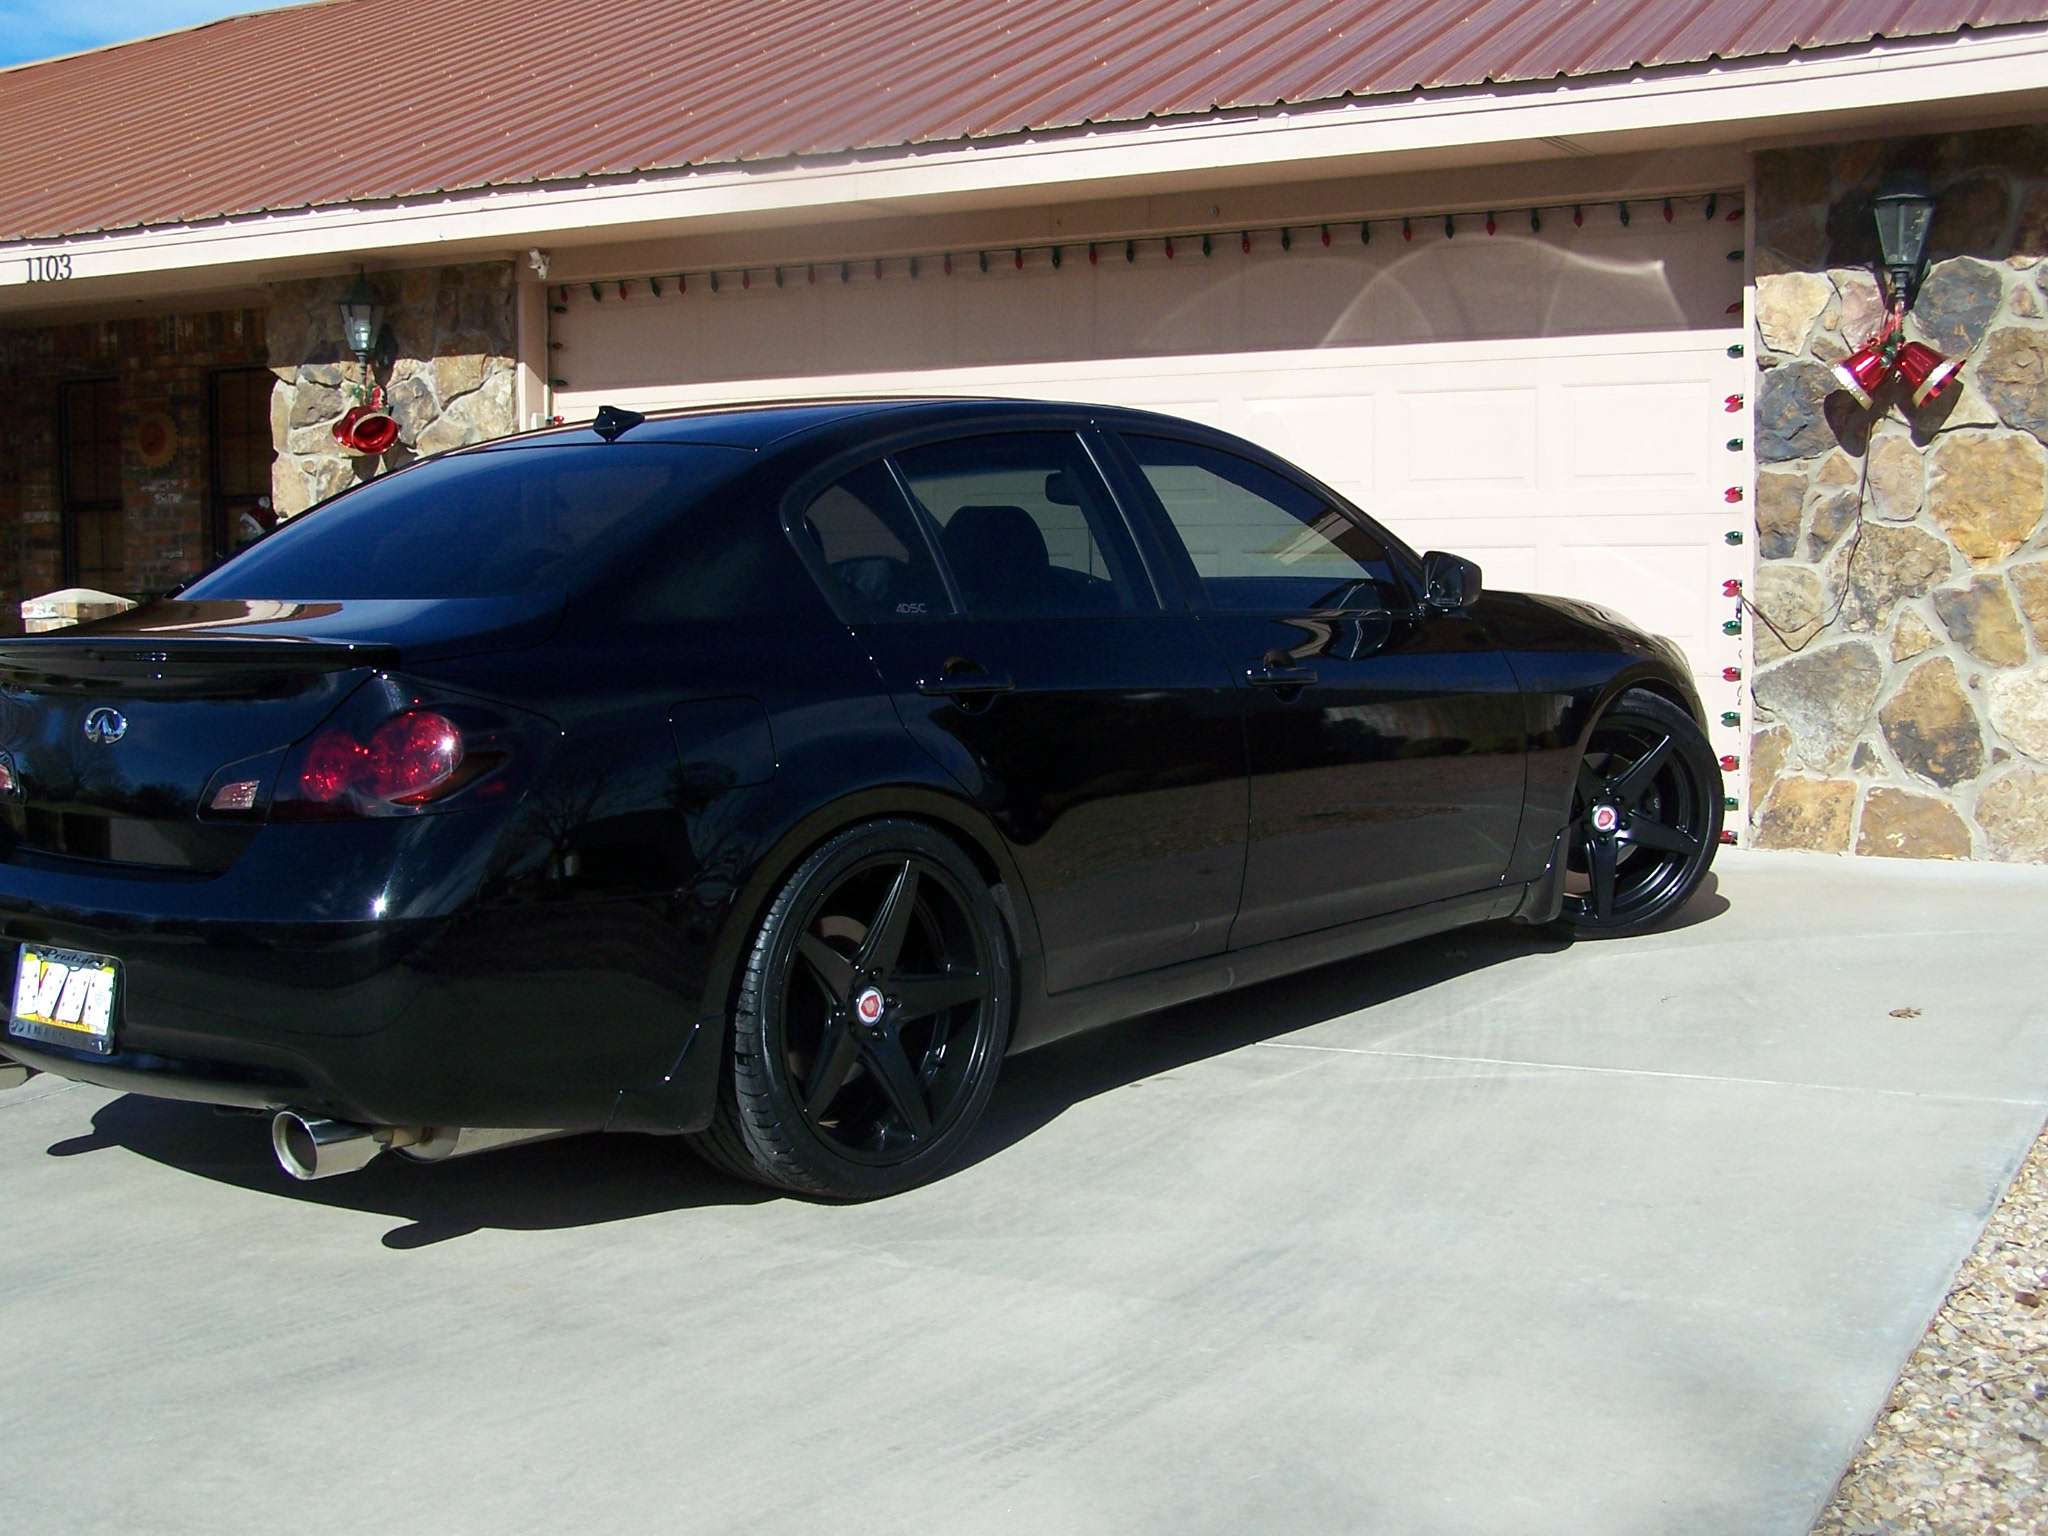
Installing vinyl trim around your window chrome is something anyone can do w/ just a few tools and 3 hours (give or take) that results in a factory finish that will match your existing black door pillars perfectly (these are vinyl wrapped from the factory). No need to mask tape your vehicle, no risk of overspray or inconsistant paint results or running paint, no sanding of the chrome, and you can always return back to stock chrome if you want to later. It's also very affordable at about 20 dollars at the time of this DIY thread.
Here's a great video that will detail the process and then I'll detail the specifics for our
2007-current G35 & 37 Sedans
First you'll need the gloss black vinyl, w/ my cut sheet layout detailed below you'll only need one 12"x60" sheet. The best source I've found that sells the best vinyl product (3M Scotchprint 1080 wrap vinyl) is~ http://www.avsstore.com/3M-1080-Scot...m?productId=22
It's also available in matte black and some other colors if that's your thing
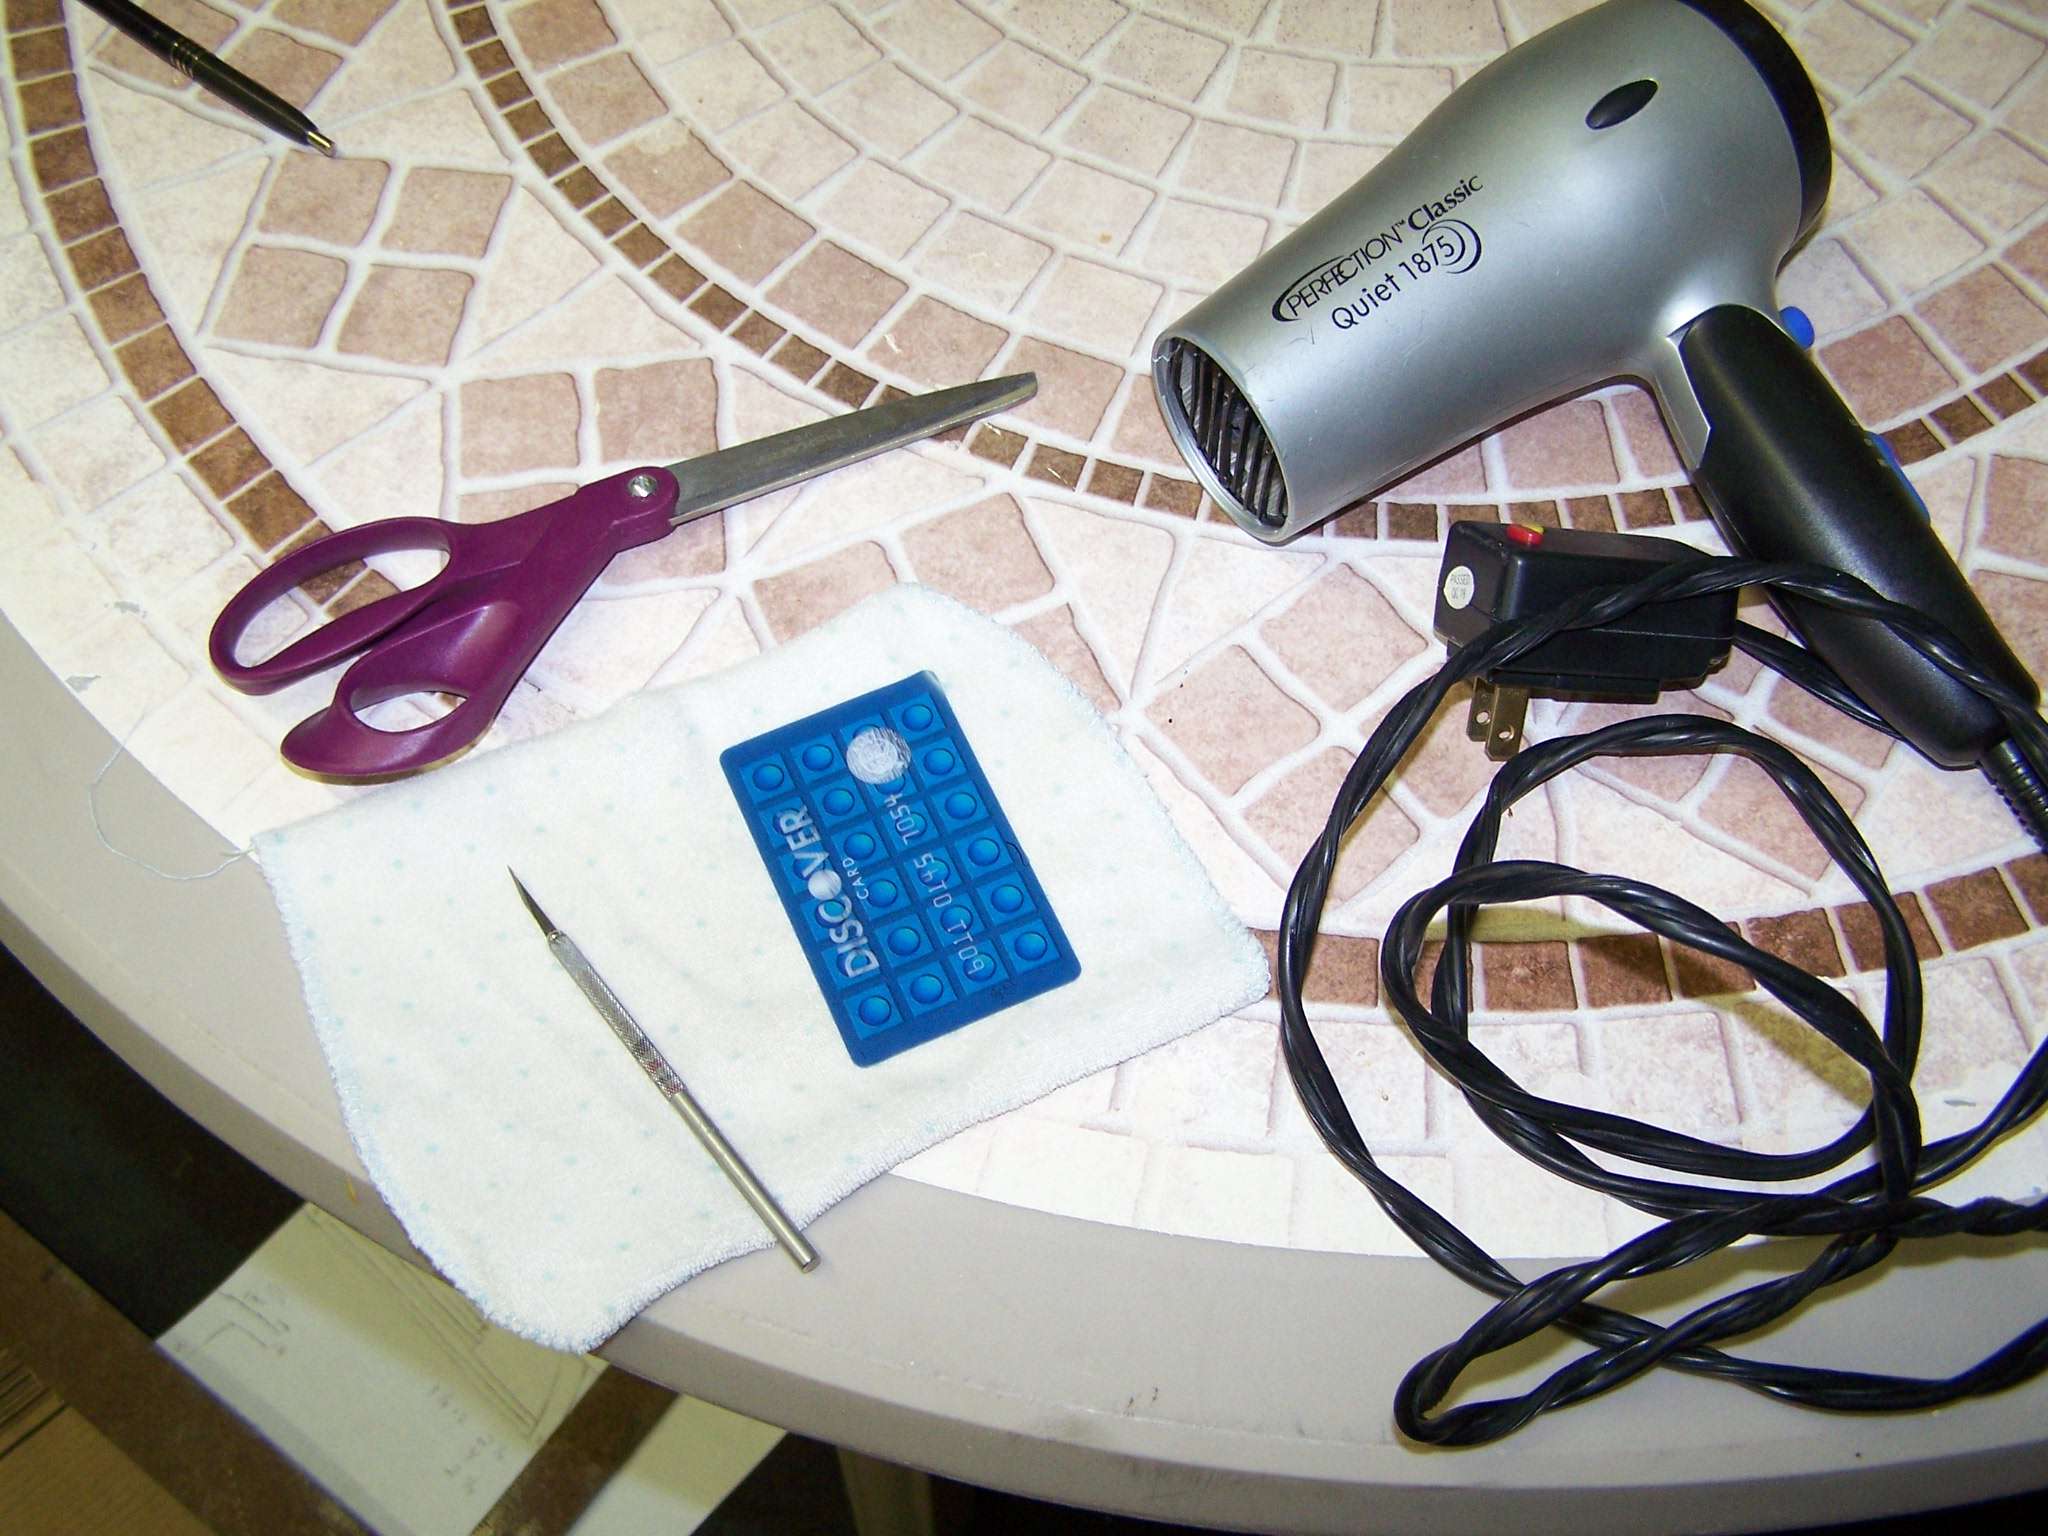
The tools you'll need are sharp quality scissors, a sharp exacto type knife w/ fresh blade, a flexible "fake" credit card or something of similar flexibility, a hair dryer, a good straight edge, a 90 degree angle, and measuring tape.
Here's the 4 trim sections detailed (section A is the drivers side like section E)

Here's the rough drawing of the cuts needed, it's not to scale but you'll get the idea
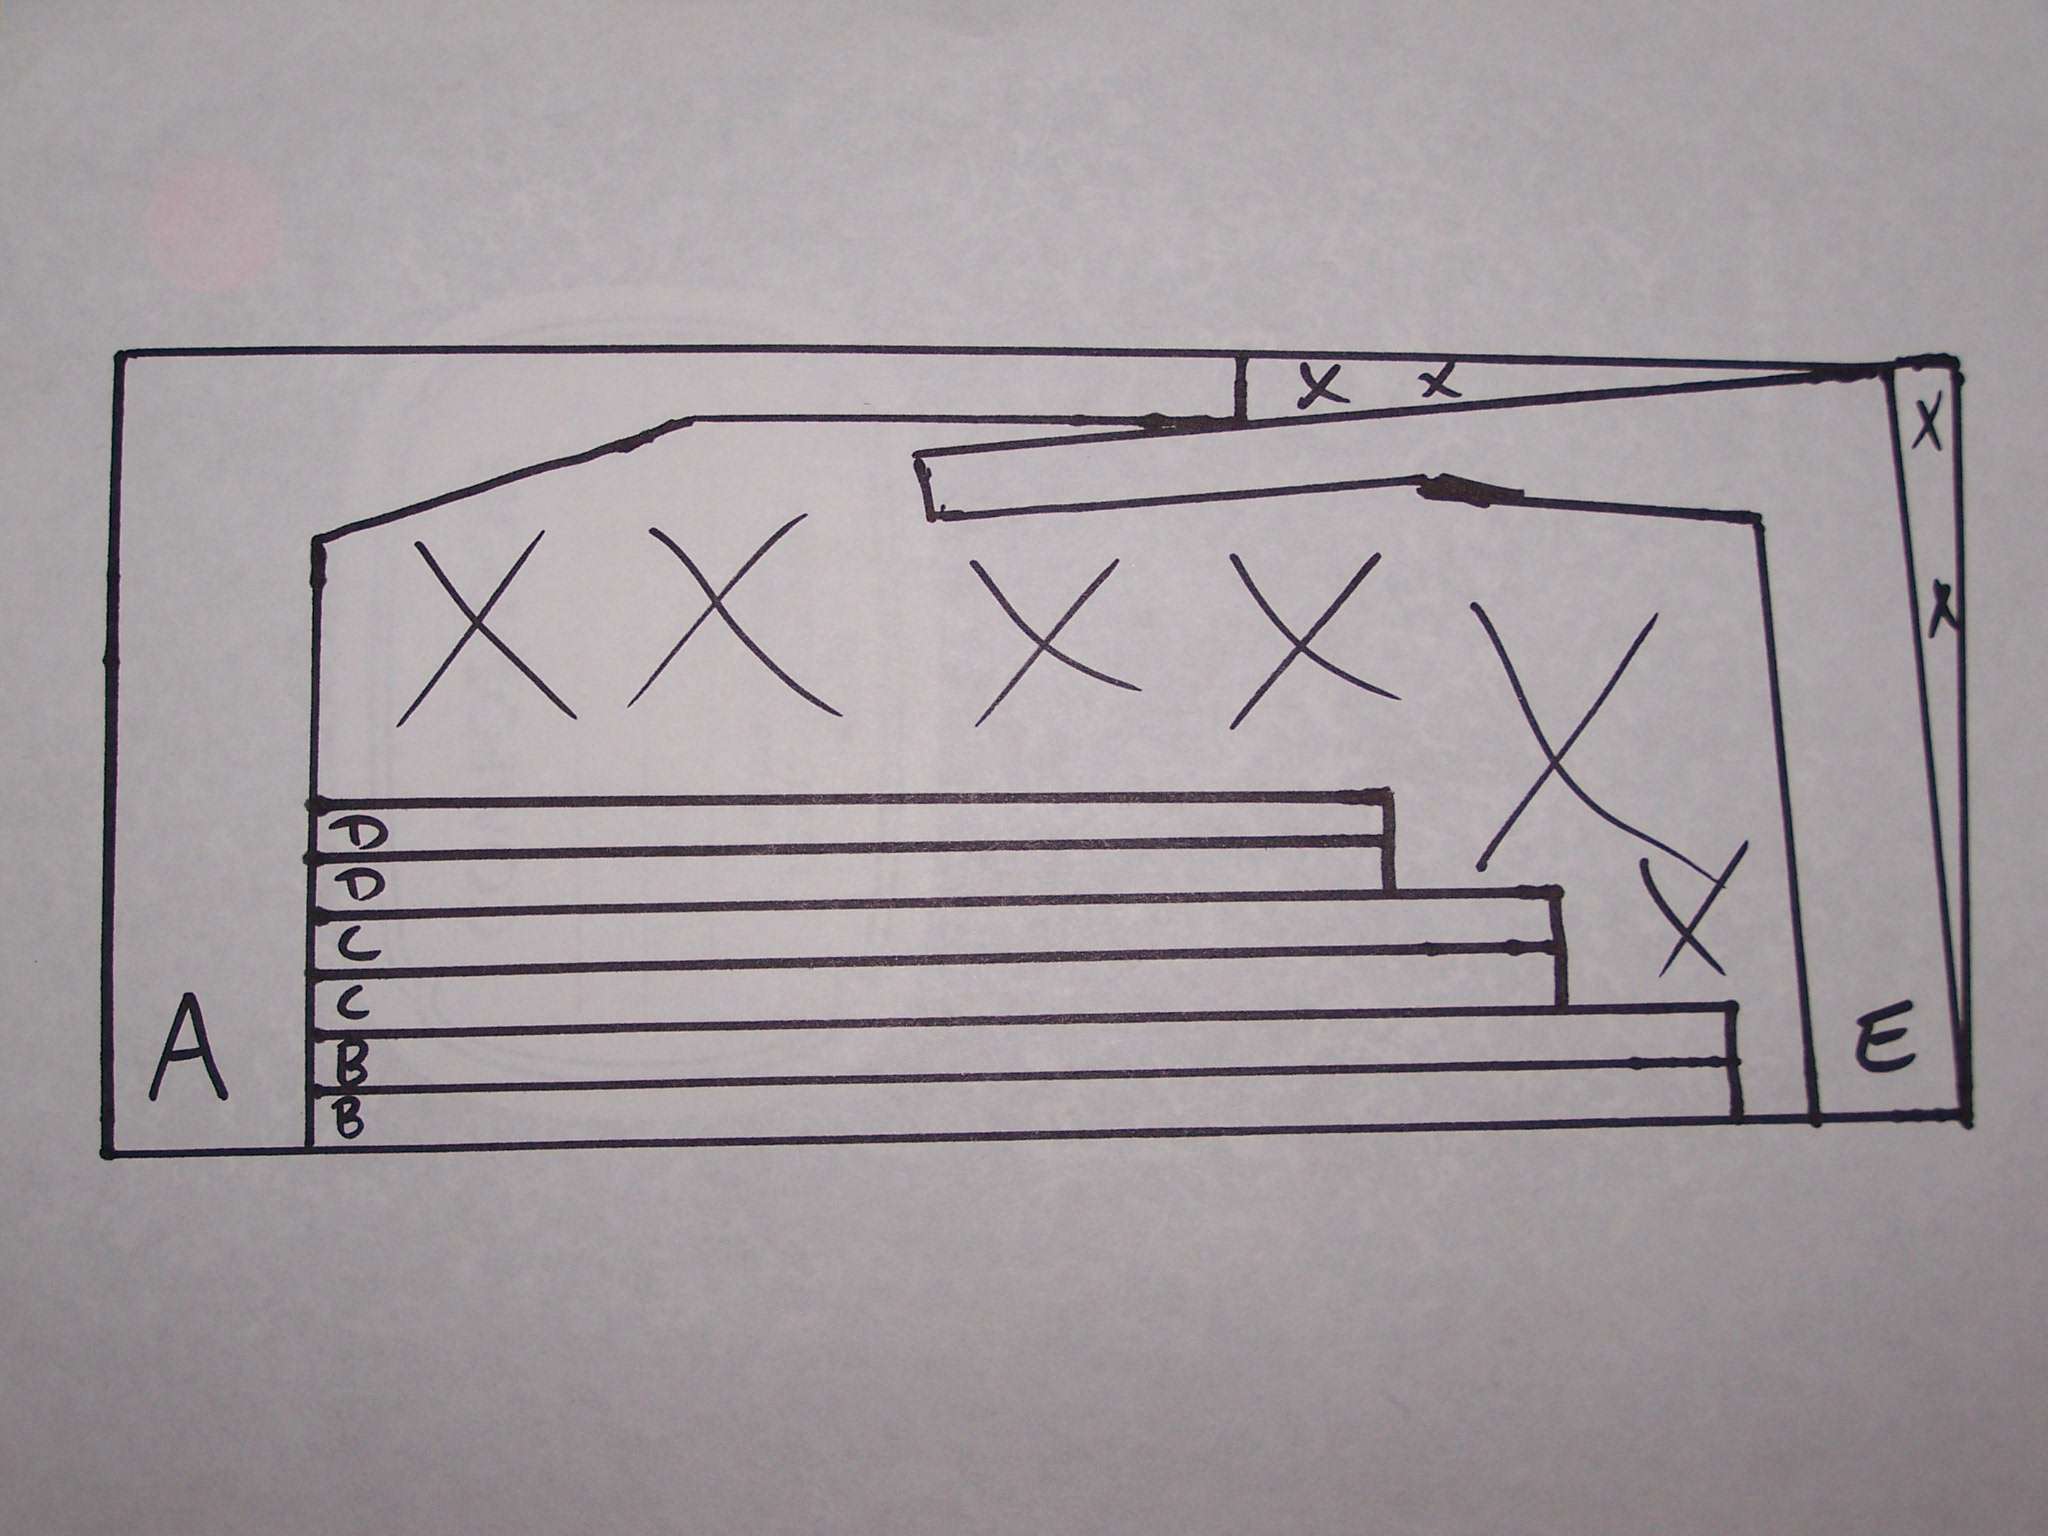
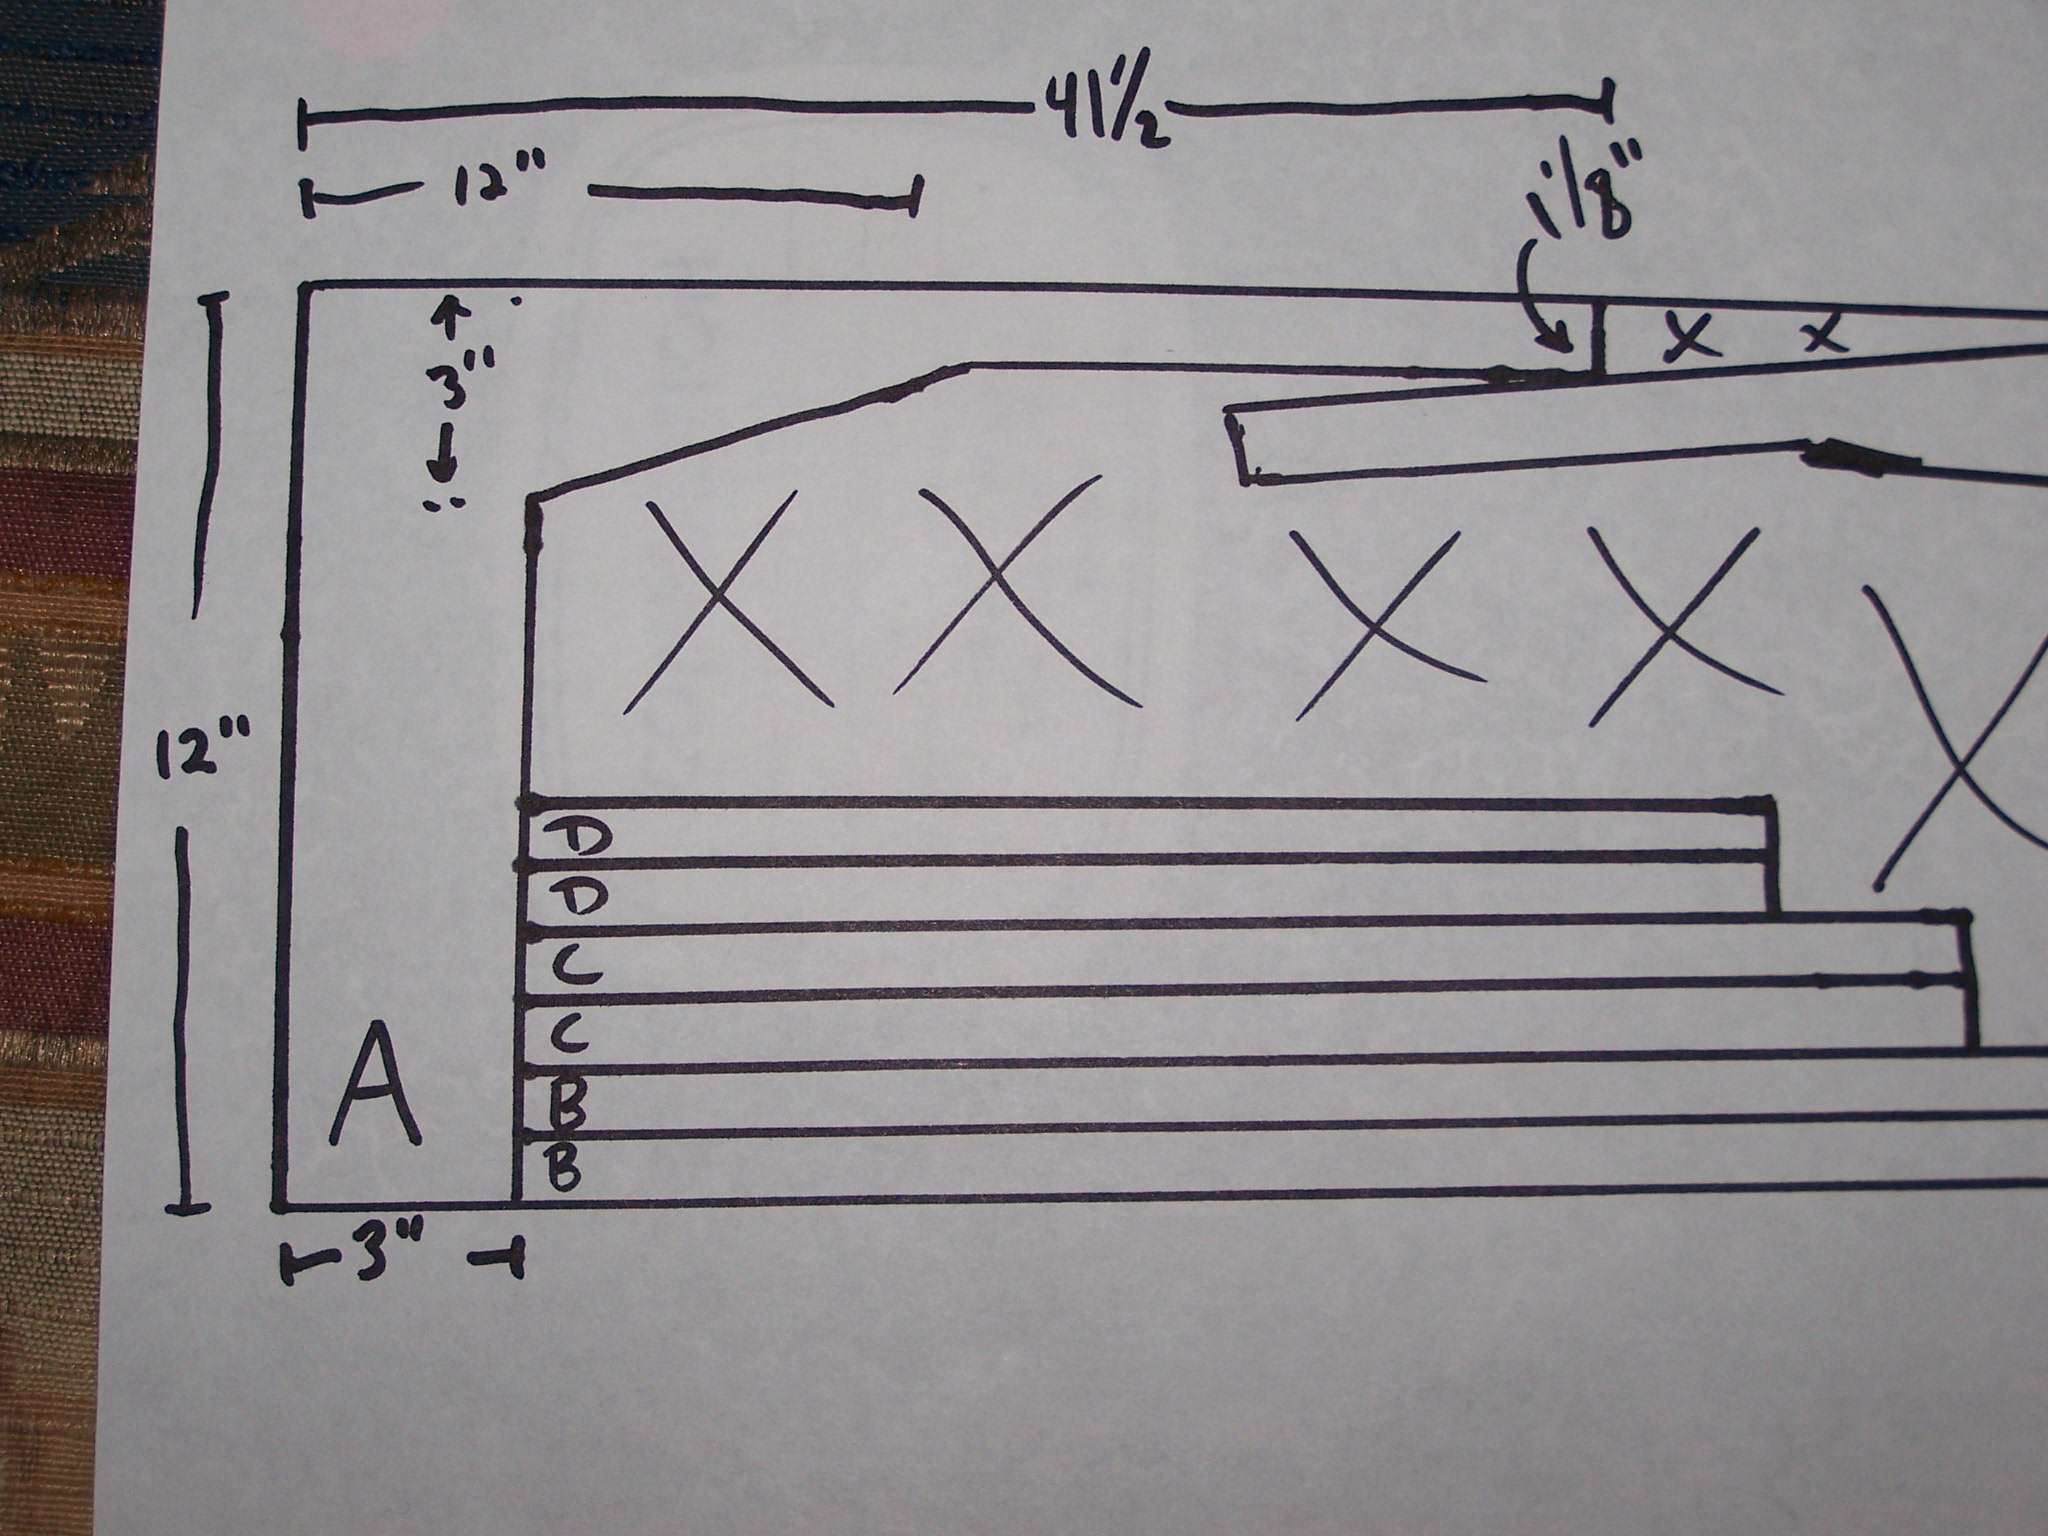
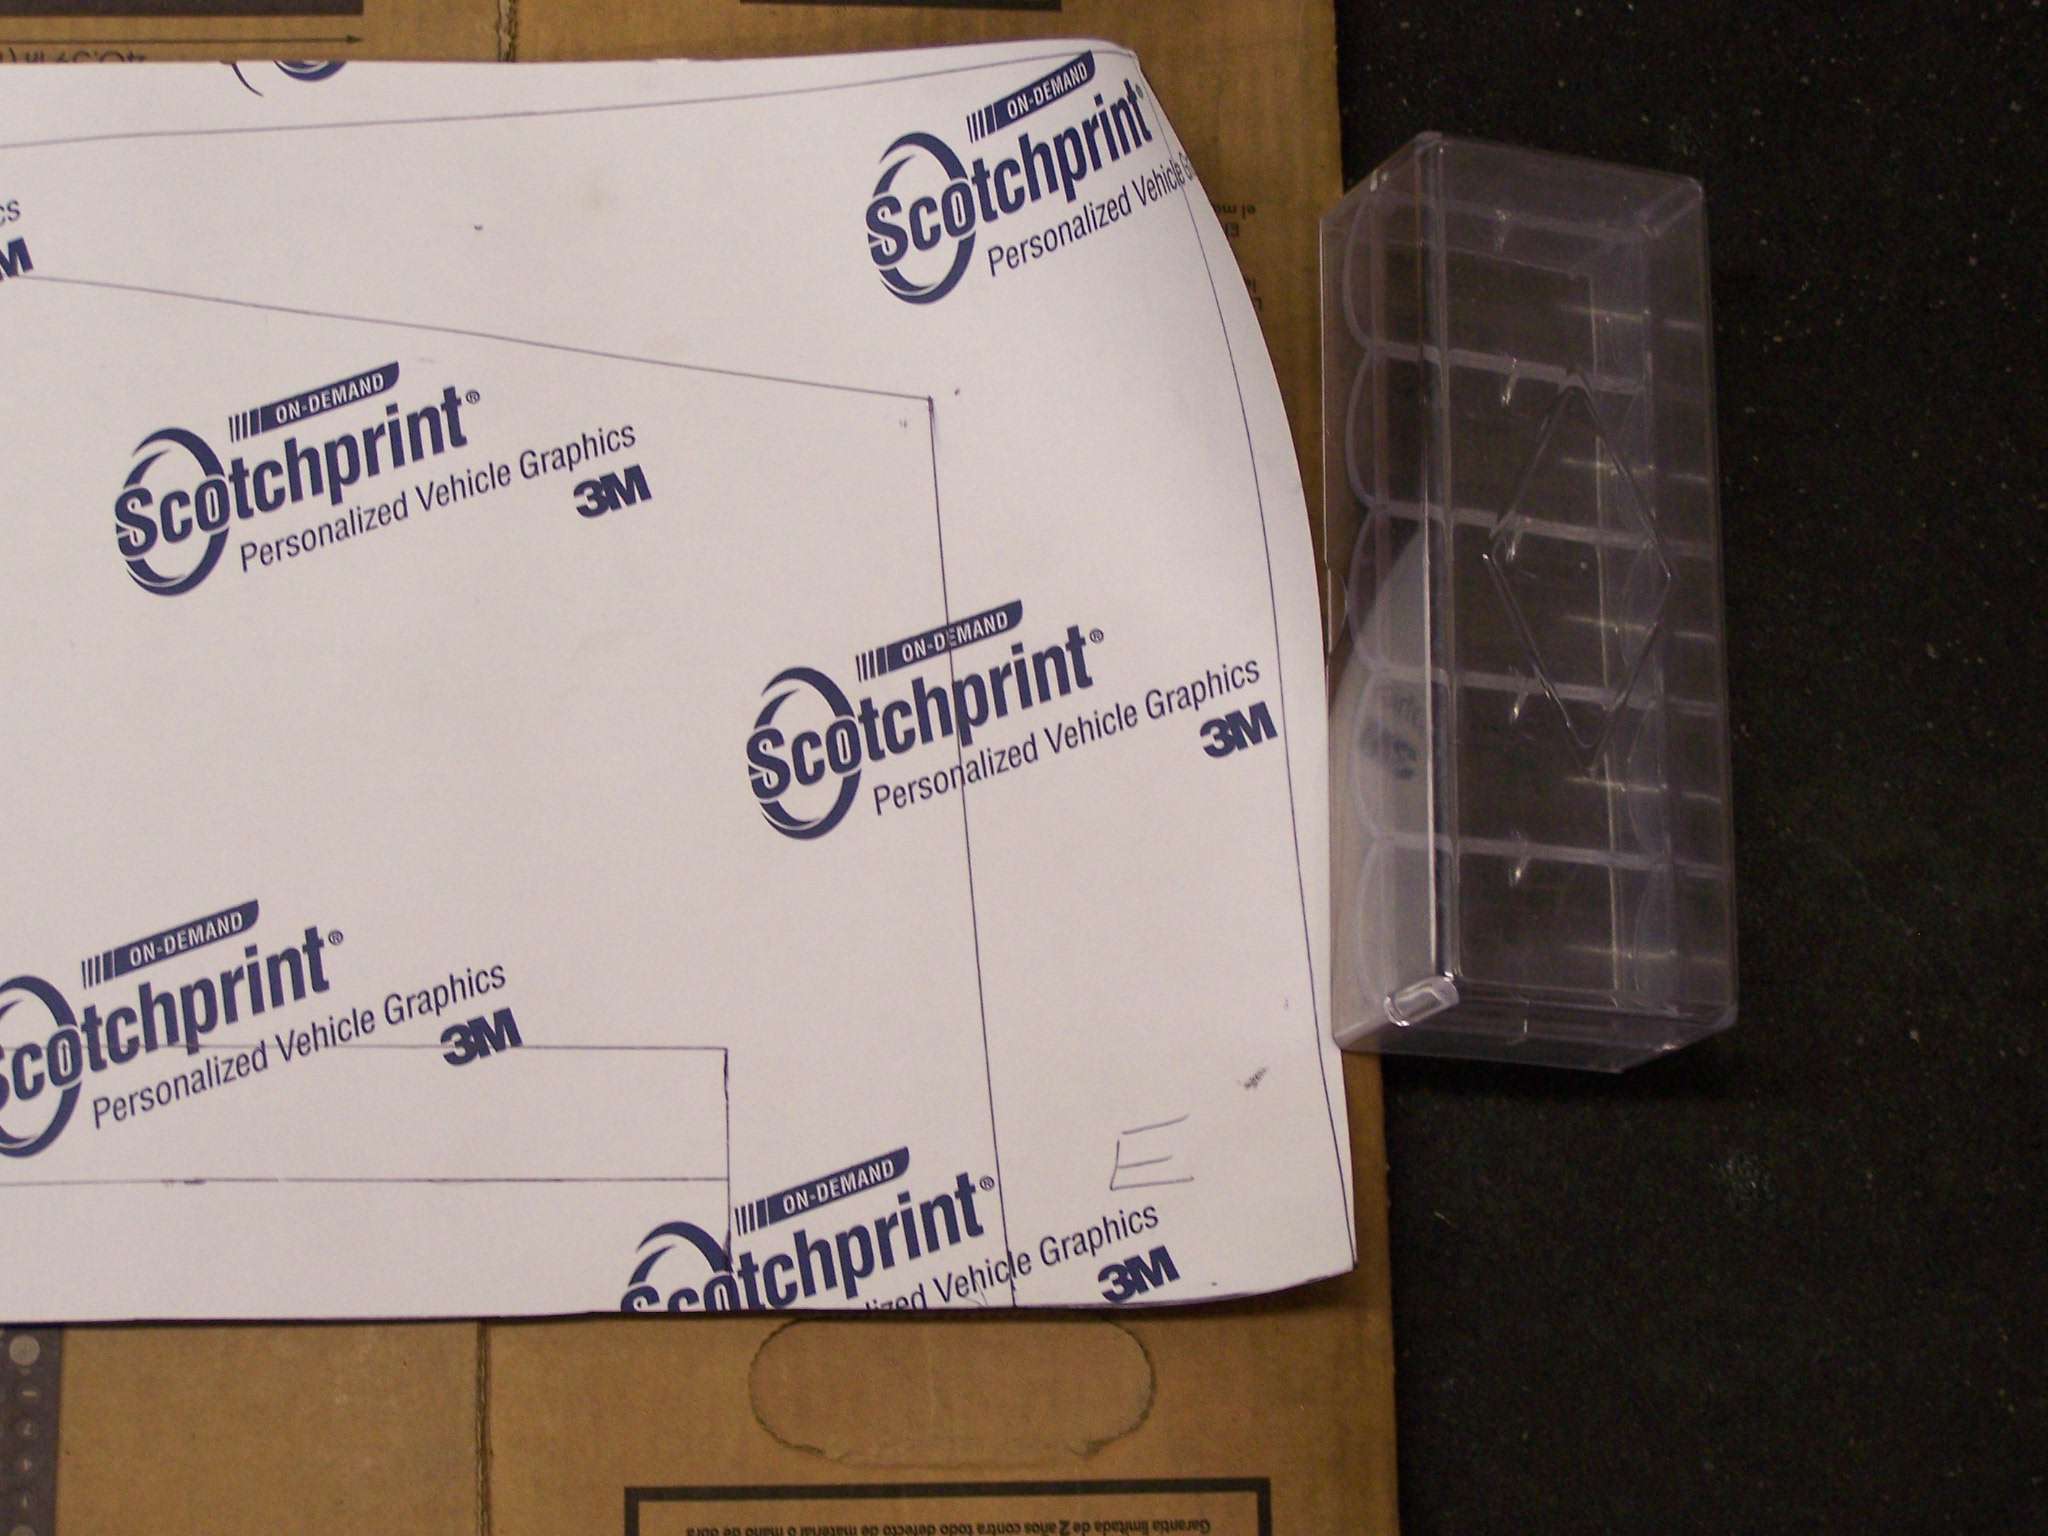
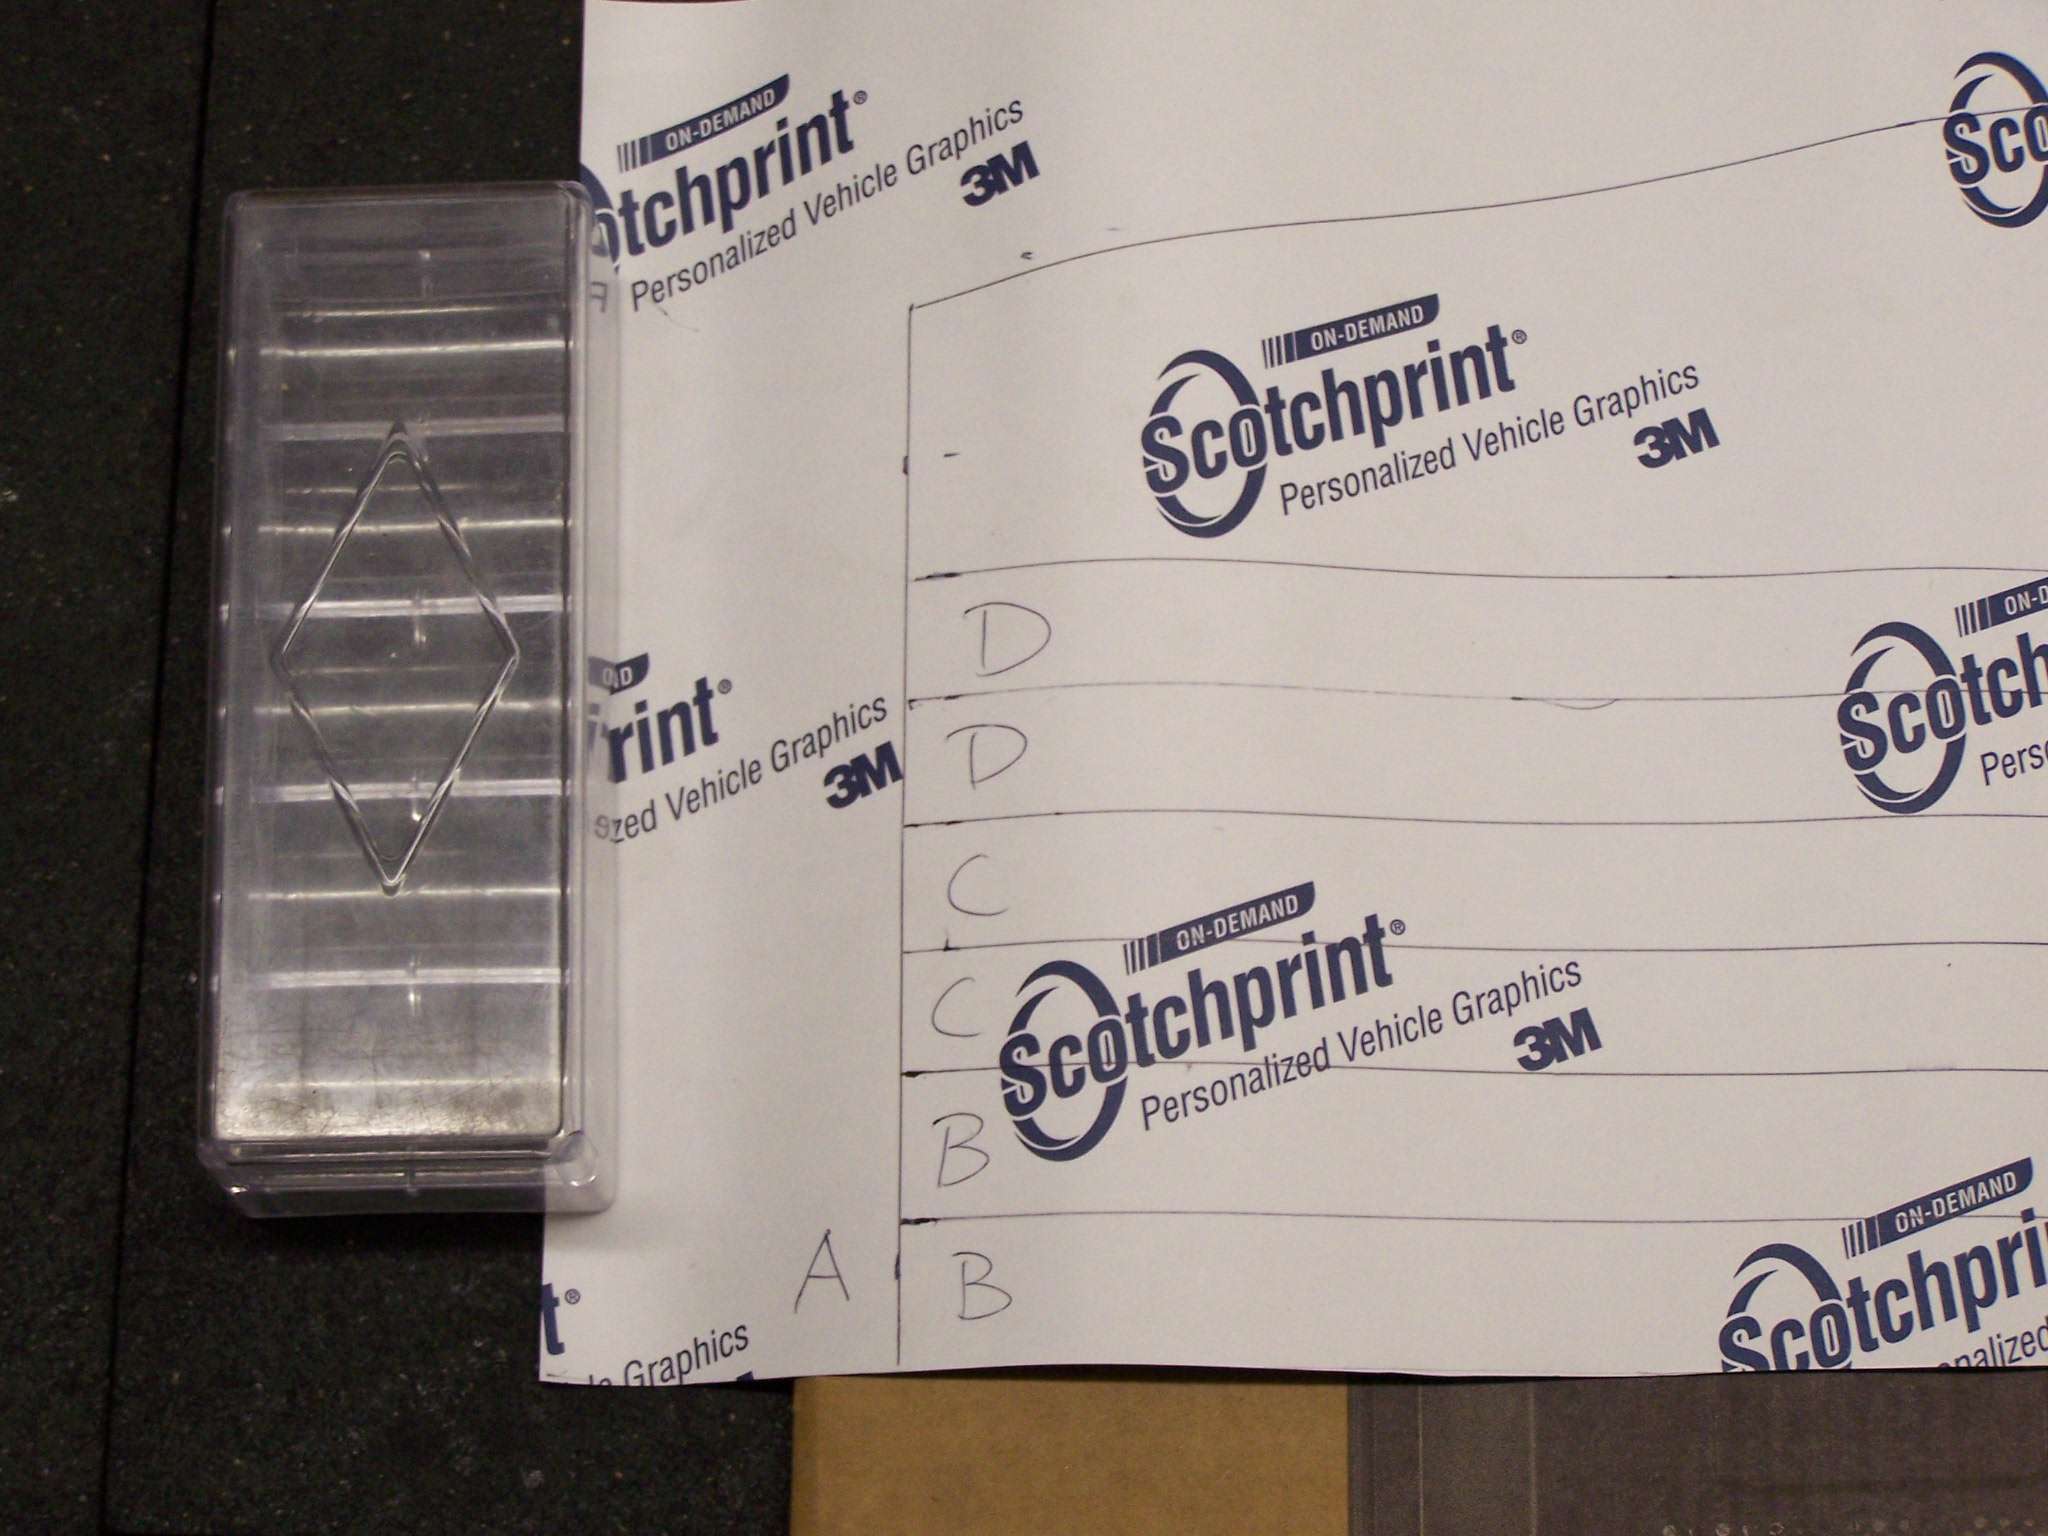
Section A & E are the only sections that have odd cuts so here's a closeup of the cuts you'll need, just do the same for section E on opposite side, you'll angle section E w/ your right angle so the upper long strip angles under the upper long strip of section A. The second photo below shows the real vinyl sheet w/ the markings (if you look closely) so you'll see how everything lays out. It's 3" wide on the bottom, going up the full 12" on the side then over 41 1/2" along the top, it tapers from 3" wide at the upper corner to 1 1/8" after a foot, then continues at 1 1/8" to the end of the 41 1/2" top strip (hope that makes sense, the diagram should make it clear).
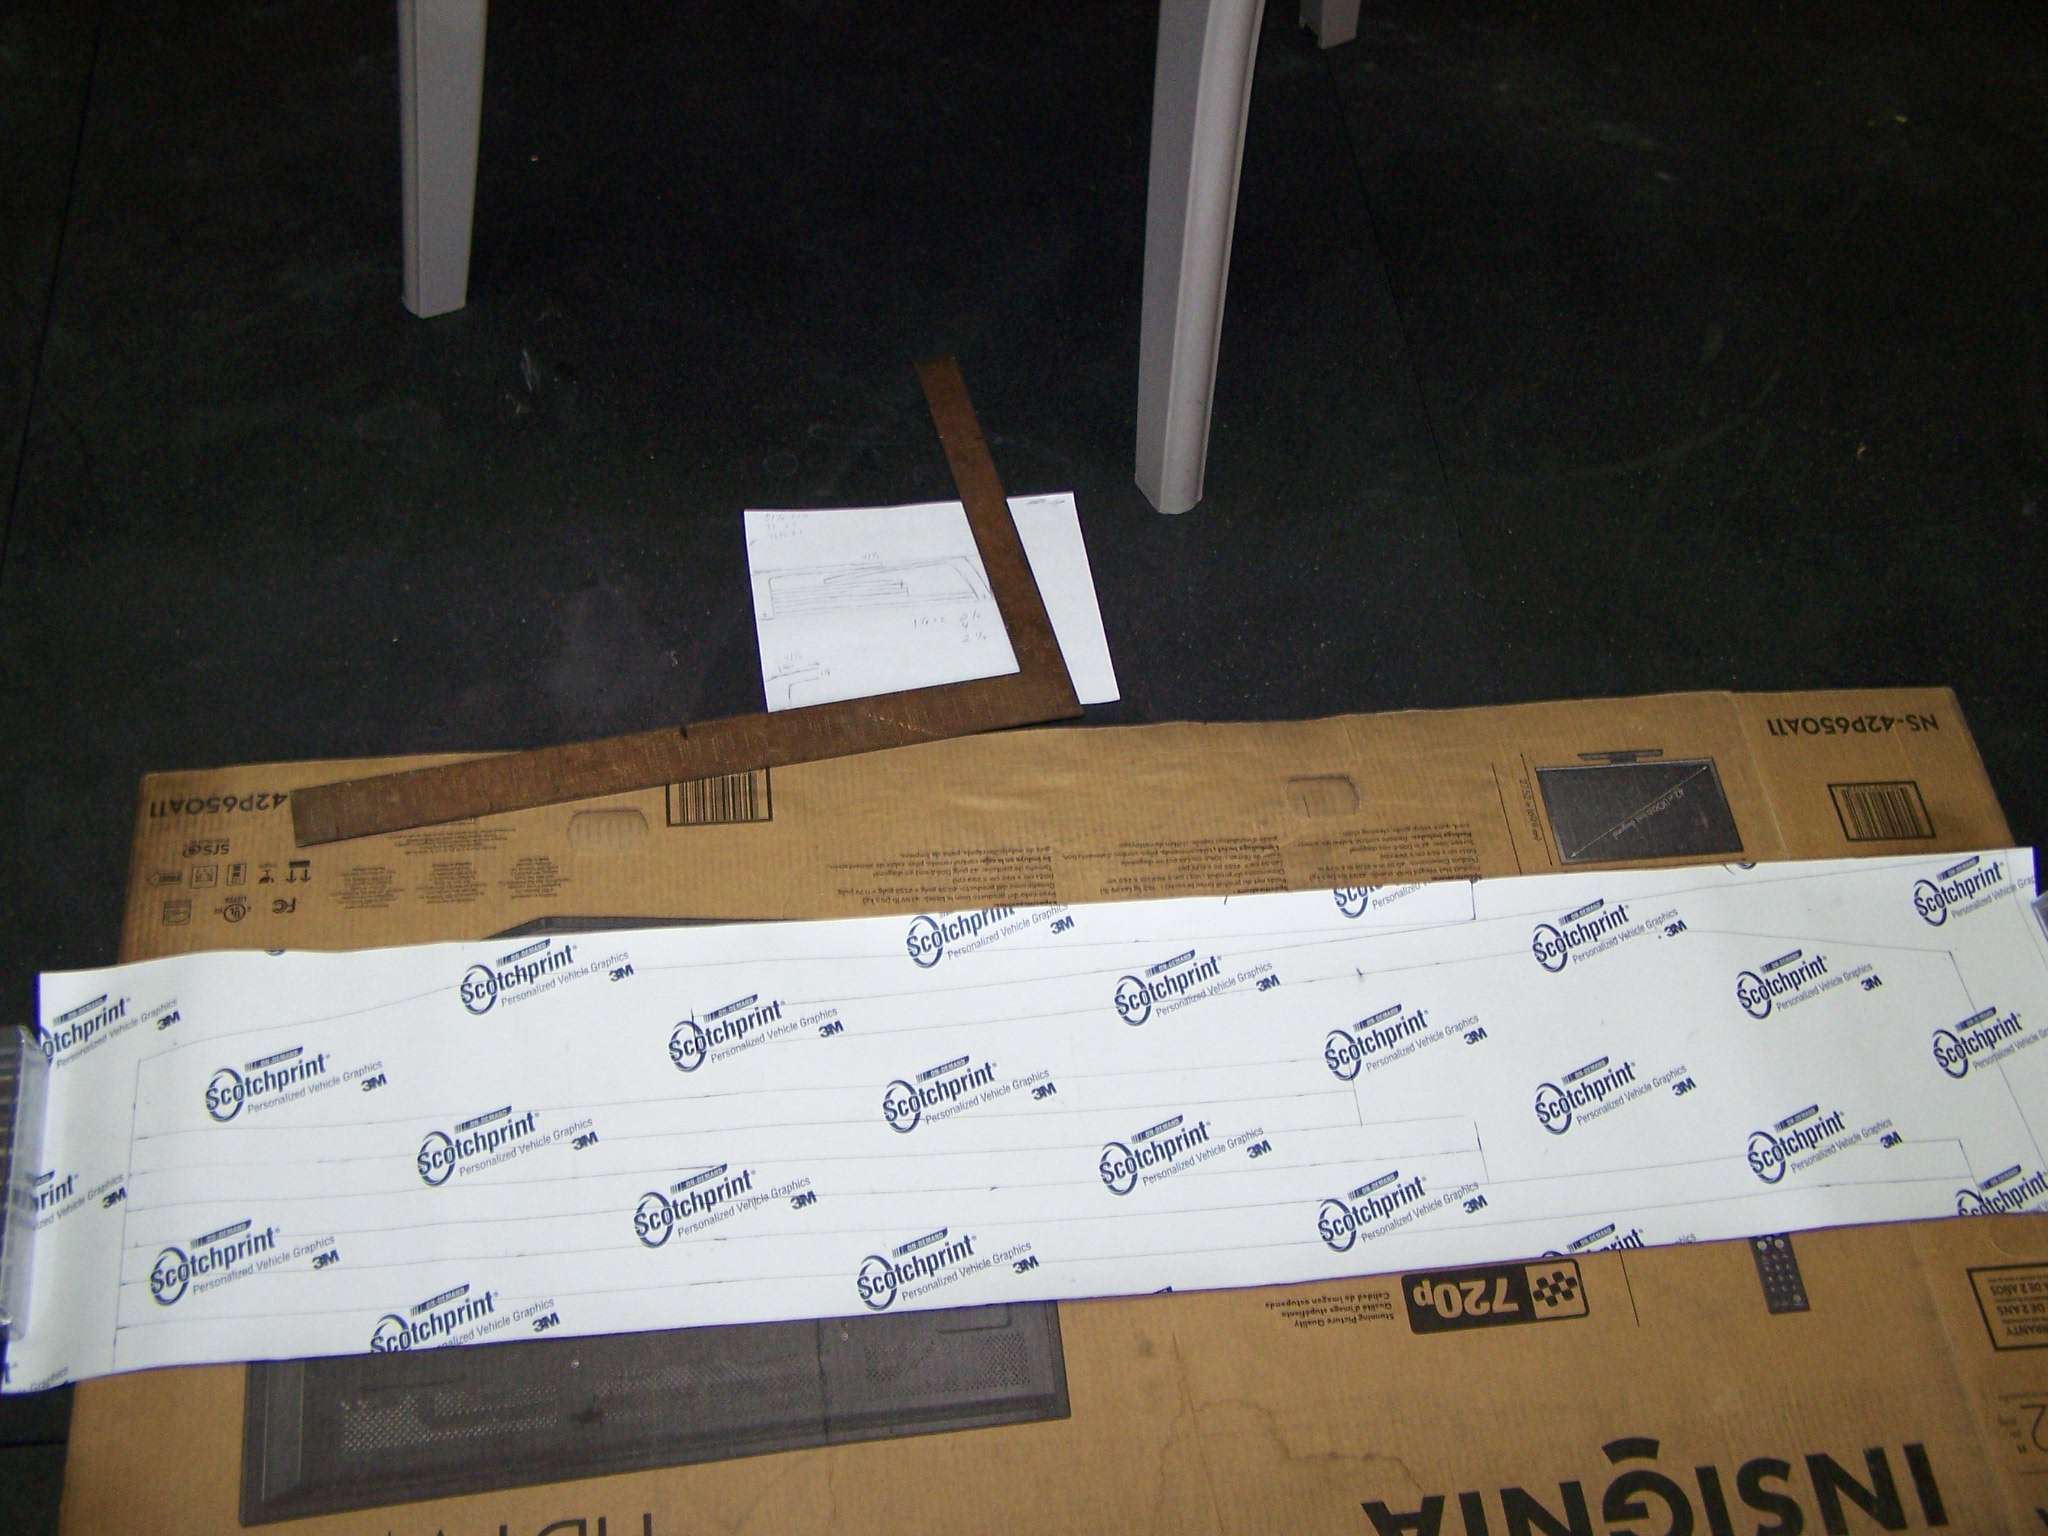
Here's a better pic of both sides of the vinyl to clarify
Here's the cut lengths of the reaming 6 pieces~
Sections B~51 1/4"x1 1/8"
Sections C~37"x1"
Sections D~33 3/4"x 1"
Be sure to cut your pieces as exact as possible, if you get off your line or have a bit of a wavy cut you'll have to make your strips a bit wider to make up for any sloppy cuts. Using a quality scissor will make it a breeze, just take your time here, it's time well spent.
Before applying any vinyl be sure to clean your chrome and remove any fingerprints, oils, etc. Using something like 409 cleaner followed by a damp towel making sure everything is clean & dry will ensure a good job.
The first section you'll apply is section D, this is the shortest section and is a good place to learn to apply the vinyl. You'll want to start w/ the front (under the mirror). You'll cut the vinyl at a slight angle to align w/ the angle where the chrome meets the mirror mount. You want this cut exact since it'll be flush and you don't want any gaps for the base chrome to show through. Pull off the backing paper and pull the strip tight and align it w/ the bottom part of the chrome piece, you want JUST ENOUGH vinyl hanging below the chrome to tuck it under the chrome piece, about 1/8" is enough, if you have too much vinyl to tuck in it'll require trimming and it's tougher to trim it on the underside. Once you have the vinyl tight along the trim just start tacking it down w/ a sliding finger from the front toward the back, just press it lightly along the flat side of the chrome making sure to not have any vinyl bunching up, wrinkling or bubbling. This 1080 vinyl has air release technology so air bubbles aren't really a concern, if you see any just press them out and they should come out no problem. If you start to have some bunching or wrinkles in the vinyl just pull it back up and work the slack down the strip. As long as you just stay patient and keep it tight as you go down the strip you won't have any issues. The key is to lightly work it down then come back and apply more pressure once you're happy w/ how it's placed. Once you've got the flat side firmly tacked down you'll want to run your finger along the top edge pushing from the front rolling edge back toward the window to tack the top edge ot the trim. Once you get the top edge tacked down you'll want to get the back end edge (back by the door handle) cut & tacked. Open the door and just trim that edge so there's enough vinyl to cover the end. You'll use your hair dryer to heat the corners of the trim, press them down and they're done. JUST DON'T USE TOO MUCH HEAT, the hair dryer applies more than enough heat to shrink & stretch the vinyl so just get it hot enough to stick it down. The part in the corners that sticks out will shrink down when you use the heat, once it shrinks a bit just push i down w/ your finger and it'll stay there. trim any excess. Now you should have everything down and the back edge tucked in and done. Now you'll use you fingernail to make an indent where the top chrome lip meets the rubber seal. You'll run your fingernail all the way down this seam leaving a slight crease, this is where you'll be using your exacto knife to cut the vinyl at the exact point where the chrome meets the rubber, this and the other lower trim piece are the few points where you WON'T be tucking the vinyl between the chrome and rubber. Once you've cut the vinyl flush you'll then use your hair dryer to seal the edge. Just run the hair dryer ahead of your finger heating the section as you press down for the seal, you'll have to change fingers as you go since it'll be too hot to keep the same finger going along the edge, trust me on this one
Once you've got the top edge sealed you'll then tuck and seal the lower edge by wrapping it under the trim piece. First just run your finger under the edge getting the vinyl to start rolling under, if your vinyl is sticking to your paint just run your flexi plastic under it to release the tack. You may need your flexi plastic to wedge the vinyl into the crack in some places, don't worry, it'll tuck in there as long as you don't have too much vinyl under there. Once you've got all your vinyl nicely tucked under the trim run your hair dryer along the underside along w/ your flexi plastic tucking and pressing up under the trim to tightly seal the underside. If you've got any excess vinyl underneath it'll need to be carefully trimmed out, be sure to keep your sharp blade away from your paint. If you lined up everything as I detailed above you shouldn't have any excess.
Continued.........
Here's a great video that will detail the process and then I'll detail the specifics for our
2007-current G35 & 37 Sedans
First you'll need the gloss black vinyl, w/ my cut sheet layout detailed below you'll only need one 12"x60" sheet. The best source I've found that sells the best vinyl product (3M Scotchprint 1080 wrap vinyl) is~ http://www.avsstore.com/3M-1080-Scot...m?productId=22
It's also available in matte black and some other colors if that's your thing
The tools you'll need are sharp quality scissors, a sharp exacto type knife w/ fresh blade, a flexible "fake" credit card or something of similar flexibility, a hair dryer, a good straight edge, a 90 degree angle, and measuring tape.
Here's the 4 trim sections detailed (section A is the drivers side like section E)
Here's the rough drawing of the cuts needed, it's not to scale but you'll get the idea
Section A & E are the only sections that have odd cuts so here's a closeup of the cuts you'll need, just do the same for section E on opposite side, you'll angle section E w/ your right angle so the upper long strip angles under the upper long strip of section A. The second photo below shows the real vinyl sheet w/ the markings (if you look closely) so you'll see how everything lays out. It's 3" wide on the bottom, going up the full 12" on the side then over 41 1/2" along the top, it tapers from 3" wide at the upper corner to 1 1/8" after a foot, then continues at 1 1/8" to the end of the 41 1/2" top strip (hope that makes sense, the diagram should make it clear).
Here's a better pic of both sides of the vinyl to clarify
Here's the cut lengths of the reaming 6 pieces~
Sections B~51 1/4"x1 1/8"
Sections C~37"x1"
Sections D~33 3/4"x 1"
Be sure to cut your pieces as exact as possible, if you get off your line or have a bit of a wavy cut you'll have to make your strips a bit wider to make up for any sloppy cuts. Using a quality scissor will make it a breeze, just take your time here, it's time well spent.
Before applying any vinyl be sure to clean your chrome and remove any fingerprints, oils, etc. Using something like 409 cleaner followed by a damp towel making sure everything is clean & dry will ensure a good job.
The first section you'll apply is section D, this is the shortest section and is a good place to learn to apply the vinyl. You'll want to start w/ the front (under the mirror). You'll cut the vinyl at a slight angle to align w/ the angle where the chrome meets the mirror mount. You want this cut exact since it'll be flush and you don't want any gaps for the base chrome to show through. Pull off the backing paper and pull the strip tight and align it w/ the bottom part of the chrome piece, you want JUST ENOUGH vinyl hanging below the chrome to tuck it under the chrome piece, about 1/8" is enough, if you have too much vinyl to tuck in it'll require trimming and it's tougher to trim it on the underside. Once you have the vinyl tight along the trim just start tacking it down w/ a sliding finger from the front toward the back, just press it lightly along the flat side of the chrome making sure to not have any vinyl bunching up, wrinkling or bubbling. This 1080 vinyl has air release technology so air bubbles aren't really a concern, if you see any just press them out and they should come out no problem. If you start to have some bunching or wrinkles in the vinyl just pull it back up and work the slack down the strip. As long as you just stay patient and keep it tight as you go down the strip you won't have any issues. The key is to lightly work it down then come back and apply more pressure once you're happy w/ how it's placed. Once you've got the flat side firmly tacked down you'll want to run your finger along the top edge pushing from the front rolling edge back toward the window to tack the top edge ot the trim. Once you get the top edge tacked down you'll want to get the back end edge (back by the door handle) cut & tacked. Open the door and just trim that edge so there's enough vinyl to cover the end. You'll use your hair dryer to heat the corners of the trim, press them down and they're done. JUST DON'T USE TOO MUCH HEAT, the hair dryer applies more than enough heat to shrink & stretch the vinyl so just get it hot enough to stick it down. The part in the corners that sticks out will shrink down when you use the heat, once it shrinks a bit just push i down w/ your finger and it'll stay there. trim any excess. Now you should have everything down and the back edge tucked in and done. Now you'll use you fingernail to make an indent where the top chrome lip meets the rubber seal. You'll run your fingernail all the way down this seam leaving a slight crease, this is where you'll be using your exacto knife to cut the vinyl at the exact point where the chrome meets the rubber, this and the other lower trim piece are the few points where you WON'T be tucking the vinyl between the chrome and rubber. Once you've cut the vinyl flush you'll then use your hair dryer to seal the edge. Just run the hair dryer ahead of your finger heating the section as you press down for the seal, you'll have to change fingers as you go since it'll be too hot to keep the same finger going along the edge, trust me on this one
Once you've got the top edge sealed you'll then tuck and seal the lower edge by wrapping it under the trim piece. First just run your finger under the edge getting the vinyl to start rolling under, if your vinyl is sticking to your paint just run your flexi plastic under it to release the tack. You may need your flexi plastic to wedge the vinyl into the crack in some places, don't worry, it'll tuck in there as long as you don't have too much vinyl under there. Once you've got all your vinyl nicely tucked under the trim run your hair dryer along the underside along w/ your flexi plastic tucking and pressing up under the trim to tightly seal the underside. If you've got any excess vinyl underneath it'll need to be carefully trimmed out, be sure to keep your sharp blade away from your paint. If you lined up everything as I detailed above you shouldn't have any excess.
Continued.........
Joined: Aug 2007
Posts: 1,699
Likes: 137
From: New Mexico
Now it's on to section C, the same as the last piece except both ends will be rolled, no flush cuts. (like against the mirror mount in the previous section). Before applying the vinyl get a screwdriver and lightly spread the two trim sections a bit where they meet (where section C meets section E) this will give you a bigger gap to tuck in the vinyl at that point. Start by again pulling the vinyl tight but BE SURE to start w/ the back so you'll have enough to roll over the back leading edge (the top is angled back so it's longer) allow about 1/8" to tuck in the seam between the two chrome sections). Everything else will be the same as the last section.
Now it's on to section B, this is the longest section so you may want to only pull back half the backing paper, work about a third the way down just lightly tacking it in place then removing the rest of the paper and tacking it down. Since this section has an arc you'll have to work on the inside of the arc, the lower half of the chrome strip. It's easier to cut the top of the vinyl so try your best to keep your vinyl about 1/8" below the chrome to tuck between the chrome and the rubber, any more than this and you'll be trimming excess. As I said, just slowly work your vinyl on the LOWER HALF of the chrome keeping it smooth as you go and keeping it CONSISTANTLY 1/8"" below the chrome all the way down the strip. You can push and/or pull the mirror to get it out of the way if needed. Once you get the lower half smooth and tight push up and away as you go along the top half of the chrome, the vinyl will curve as you go and you shouldn't have any slack. Just don't wait until you get a sharp wrinkle before pulling it up and reapplying certain areas, if you see it getting wavy you'll have to pull it up and tighten things up a bit. If you go slowly you shouldn't have this problem though. That's why you want to lightly tack everything first so it's easy to address any problem areas. I didn't have any on the first three sections but don't be afraid to pull it back and retry if you do run into anything questionable. Once you get the flat side all tacked down it's time to tuck in the bottom edge. Where the two doors meet there's a section where you cut the vinyl flush w/ the first ripple edge on the pillar, there is nowhere to tuck the vinyl in here. Use your fingernail to make an indent so you can easily cut it flush w/ your blade. You can see it here in this pic (you'll have to click on this one)
http://imageshack.us/photo/my-images/508/1001169x.jpg/
The rest of the lower vinyl shouldn't need trimming if you kept it consistant along the edge. As you continue toward the mirror you'll notice some stiffer rubber that surrounds the mirror mount, the vinyl will still fit between the rubber but you must use more force to get it in there and your plastic piece should be pretty thin. Once you get it tucked in run your heat along the edge as you press rubber against the vinyl to seal it.
The upper vinyl edge you only need about 1/8" to tuck it in but you can get by w/ a bit more, just don't cut it too short. The rubber pulls back easily here, just don't pull it off the track since it's a bit of a pain to get it seated again. Pulling it back slightly is all you'll need to do and just roll over the edge w/ your finger to form the vinyl onto the edge. Again, apply heat to seal the edge. Once this is done just trim the ends to allow for enough vinyl to fold over to cover all the end chrome and heat the corners, press it down, trim any excess and you're done.
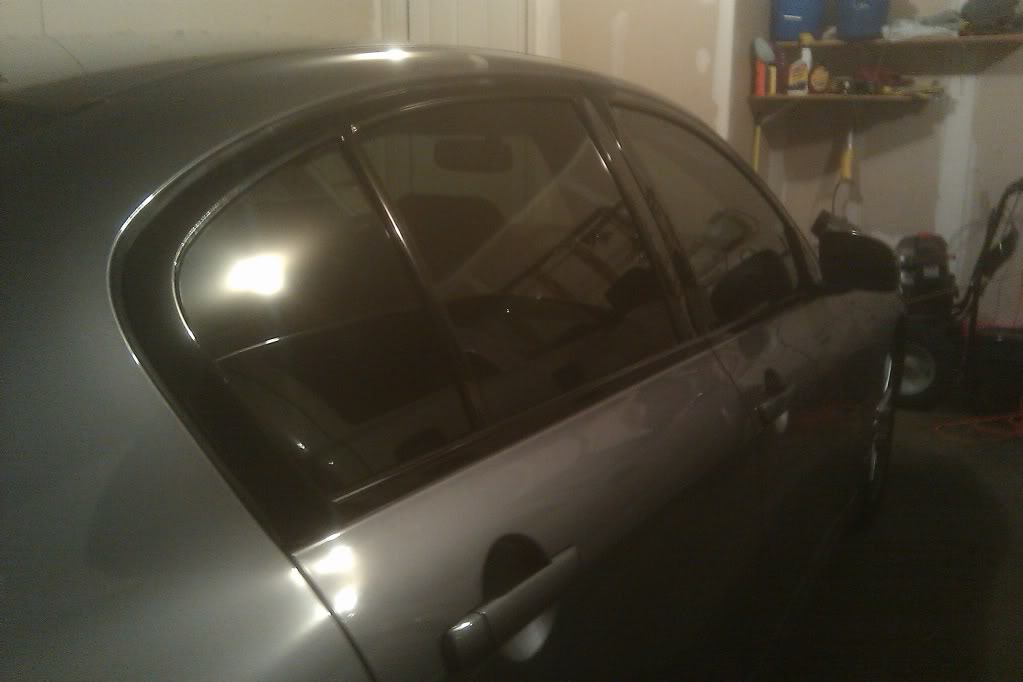
Now it's on to section E (or A depending on what side you're on )
This section can be a bit tricky, but not bad at all since you're now an experienced
vinyl-wrapper. Take a look at the photo~
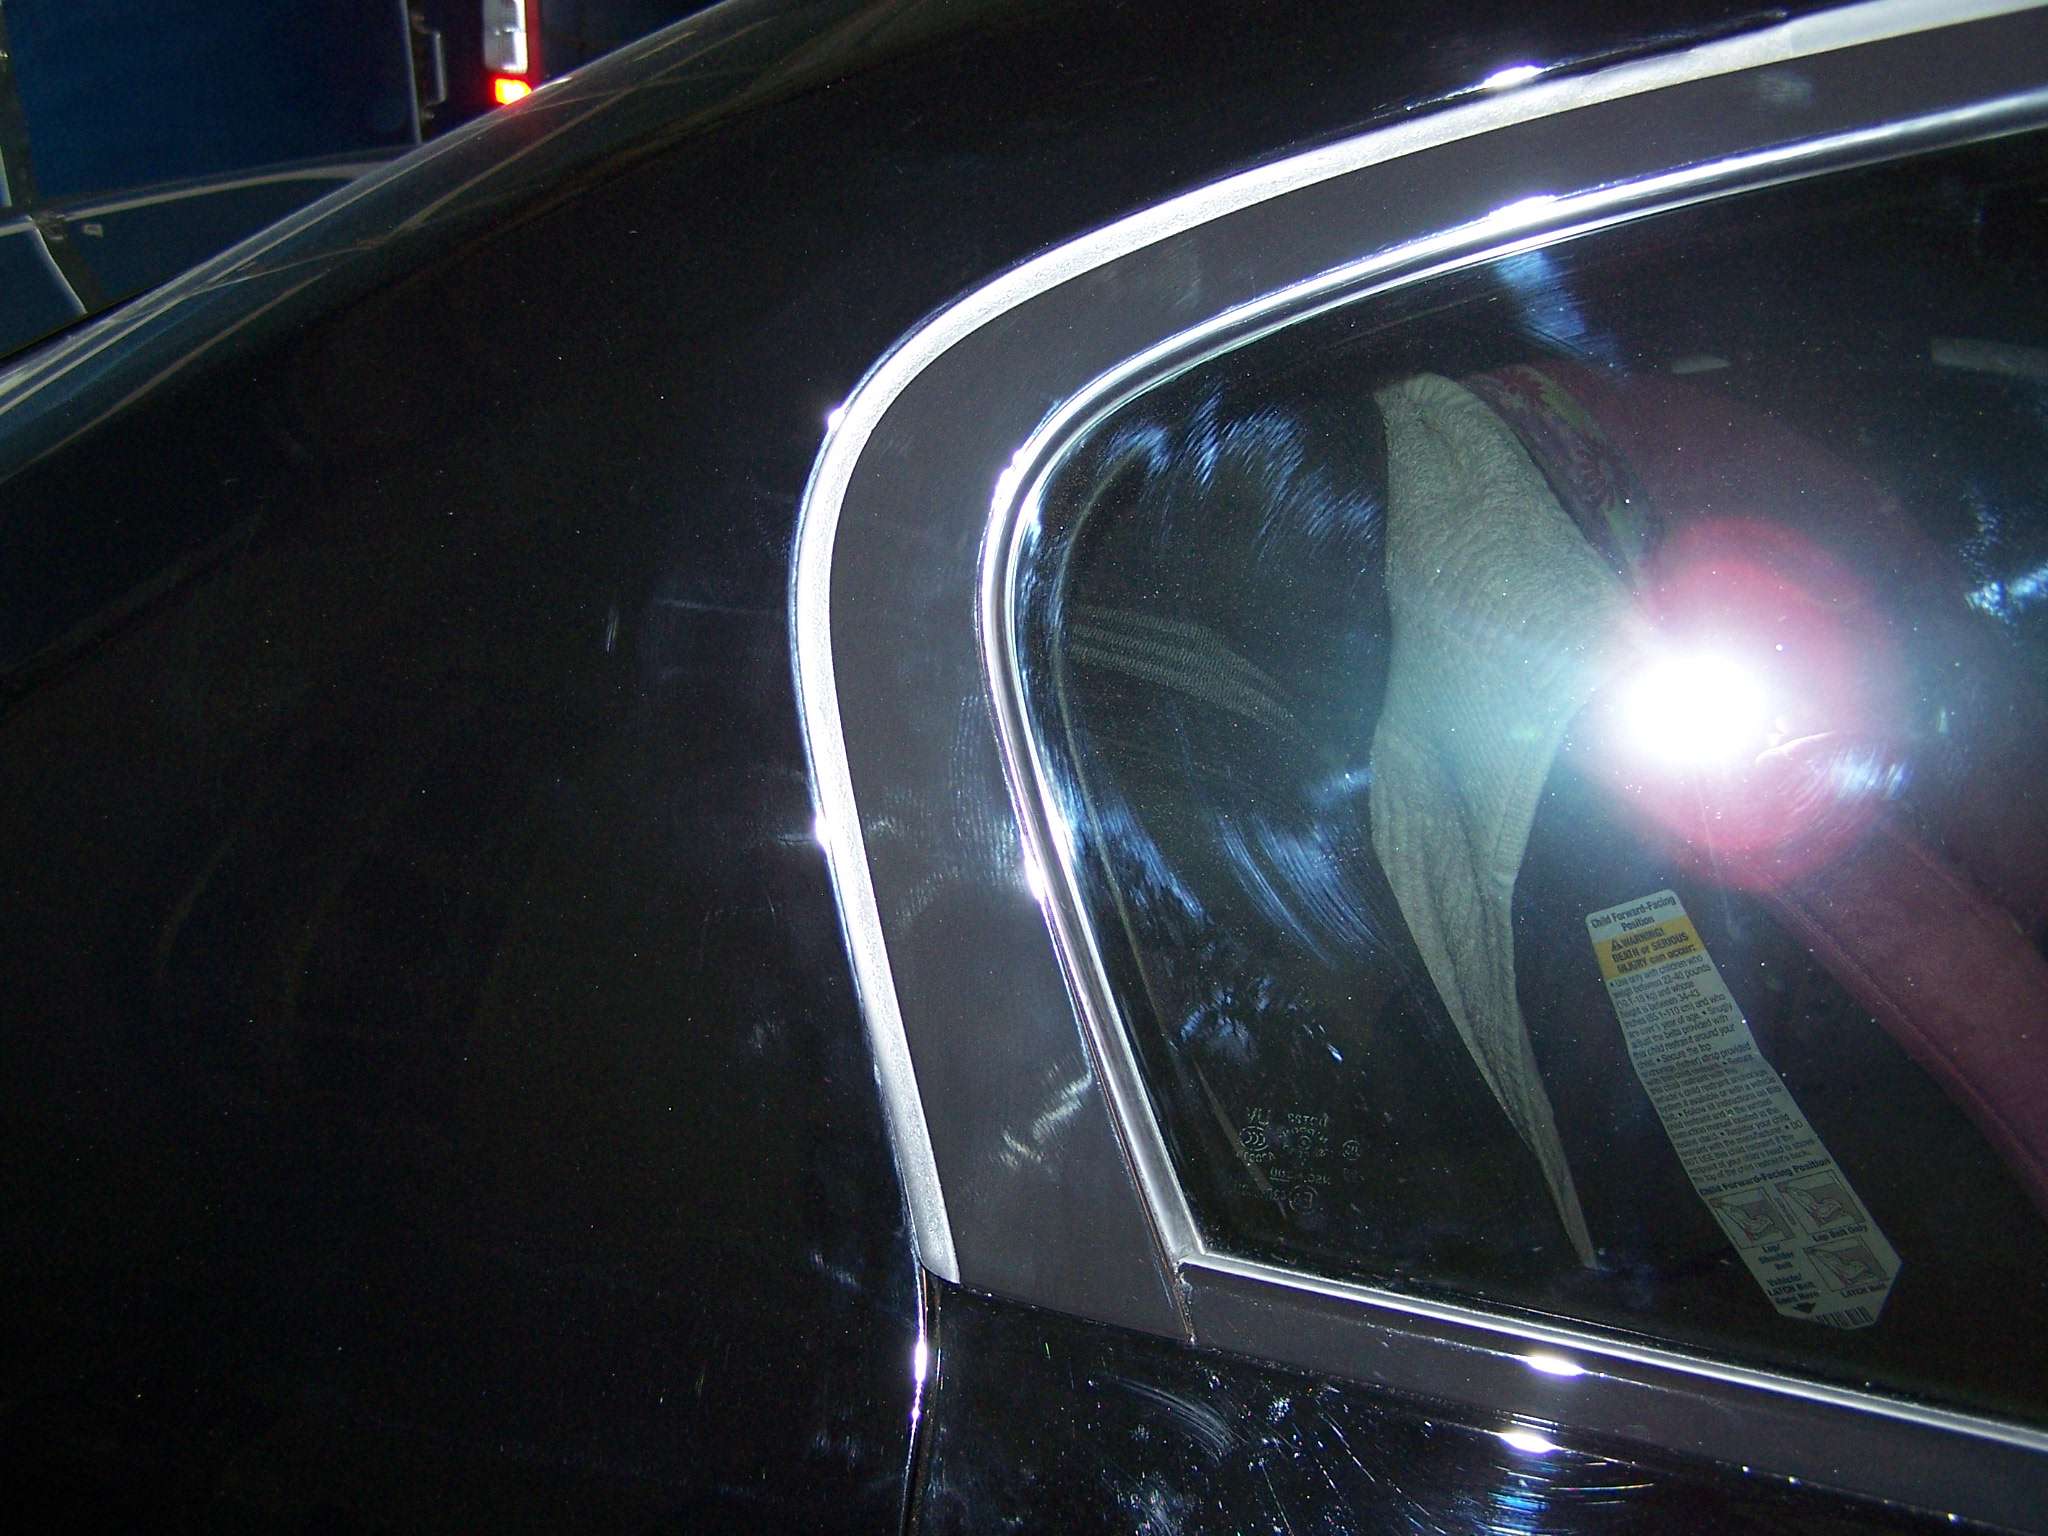
Notice on your Gs trim that the lower inside rolled edge of the section that goes up has more chrome showing at the bottom and gradually decreases as it goes up the window. DON'T FORGET THIS! You may assume as you're trimming that it's all rubber under there and you'll be very upset when you find out you've now got chrome showing. Be sure to place your vinyl piece on the section before remove the backing paper just to get a feel for how it's going to line up, you want to be sure to allow for that inside edge I was just warning you about, also the rather large angle at the bottom of the trim piece. The vinyl is oversized to alllow for easy placement, just be sure to have everything covered without ending up having to "bend" the vinyl anywhere to make it "fit". It worked perfect for me, I just took a bit more time making sure I had the vinyl in the optimum place. You're going to have excess vinyl everwhere as you go up through the curve but when it gets to the 1 1/8" section you'll want it to be right where it needs to be so kind of line it up from the top down would be my advice and make a mental note of where it should be. This is one section where you really want to just barely tack it as you go since you'll be having to readjust it a few times to get the best position. Once you find the best placement you'll want to again work the inside of the arc, you'll only be smooting out about 1/2 an inch of the inside arc, keeping it smooth all the way around and up to the door edge. Keep the widest part of this section (the bottom 4 inches) lightly tacked since you'll have to lift it a bit to tuck in the edges and trim for that sectrion I warned you about. You may run into some rippling here so just be patient and pull it up and rework as needed, again just go lightly until it's all good. Once you get the inside to your liking you'll then start slowly smoothing it upward (or outward) working to the middle of the chrome strip and eventually all the way to the outer or upper edge. Pulling outward on the slighlty rippled areas removed any problems for me, but your results may vary. This vinyl is very easy to work with and you'll amaze yourself w/ how potential problem areas easily dissappear. I didn't have to apply any heat except to seal the edges and press in the end-corner vinyl but you can use heat to shrink down some rippled areas but I would only do this as a last resort. Once you get the flat area just right you'll need to trim aroung the inside of the window, remember as you get down toward the lower end to allow for that extra chrome I keep warning you about. Just keep 1/8" to tuck in the rubber and you'll be fine until you get about 4" from the bottom, that's when you'll need to gradually get wider, you can always leave it pretty wide at the bottom and cut that very end last just so you can see firsthand how wide you'll need it. Once you get the entire lower inside edge trimmed you'll need to tuck it into the rubber, this rubber is quite stiff once you get to the back window that doesn't roll down, you need to pry it open a bit at a time and tuck just small sections as you go. As you get to the big curve the tucked edge may ripple in places, a little heat and a press by your finger will get rid of those ripples and once you do the final heat while pressing the window rubber against the vinyl you shouldn't have any ripples anywhere. The upright pillar between the roll down window and the stationary far back window is one place where you'll have to do a flush cut, just use your fingernail again to make the indent and cut it flush (it's about an inch). The upper edge is the same as the front upper seal that you did in section B except you may have soem rippling around the big curve, again, more heat and some pressing will get rid of them. When you get the top and bottom edges tucked & sealed then do the upper end-edge end then go down to the wide bottom edge. You may need to pry the chrome sections again w/ a screwdriver (be more careful now since one's got vinyl on it) to get the gap wider to tuck in the vinyl. Get it trimmed so that no chrome will be showing and you'll have enough to tuck into all the edges. Apply heat in the end corners once you've got it trimmed up to get all the loose ends melted flush and you're ready to show off your new trim!


Now it's on to section B, this is the longest section so you may want to only pull back half the backing paper, work about a third the way down just lightly tacking it in place then removing the rest of the paper and tacking it down. Since this section has an arc you'll have to work on the inside of the arc, the lower half of the chrome strip. It's easier to cut the top of the vinyl so try your best to keep your vinyl about 1/8" below the chrome to tuck between the chrome and the rubber, any more than this and you'll be trimming excess. As I said, just slowly work your vinyl on the LOWER HALF of the chrome keeping it smooth as you go and keeping it CONSISTANTLY 1/8"" below the chrome all the way down the strip. You can push and/or pull the mirror to get it out of the way if needed. Once you get the lower half smooth and tight push up and away as you go along the top half of the chrome, the vinyl will curve as you go and you shouldn't have any slack. Just don't wait until you get a sharp wrinkle before pulling it up and reapplying certain areas, if you see it getting wavy you'll have to pull it up and tighten things up a bit. If you go slowly you shouldn't have this problem though. That's why you want to lightly tack everything first so it's easy to address any problem areas. I didn't have any on the first three sections but don't be afraid to pull it back and retry if you do run into anything questionable. Once you get the flat side all tacked down it's time to tuck in the bottom edge. Where the two doors meet there's a section where you cut the vinyl flush w/ the first ripple edge on the pillar, there is nowhere to tuck the vinyl in here. Use your fingernail to make an indent so you can easily cut it flush w/ your blade. You can see it here in this pic (you'll have to click on this one)
http://imageshack.us/photo/my-images/508/1001169x.jpg/
The rest of the lower vinyl shouldn't need trimming if you kept it consistant along the edge. As you continue toward the mirror you'll notice some stiffer rubber that surrounds the mirror mount, the vinyl will still fit between the rubber but you must use more force to get it in there and your plastic piece should be pretty thin. Once you get it tucked in run your heat along the edge as you press rubber against the vinyl to seal it.
The upper vinyl edge you only need about 1/8" to tuck it in but you can get by w/ a bit more, just don't cut it too short. The rubber pulls back easily here, just don't pull it off the track since it's a bit of a pain to get it seated again. Pulling it back slightly is all you'll need to do and just roll over the edge w/ your finger to form the vinyl onto the edge. Again, apply heat to seal the edge. Once this is done just trim the ends to allow for enough vinyl to fold over to cover all the end chrome and heat the corners, press it down, trim any excess and you're done.
Now it's on to section E (or A depending on what side you're on
)This section can be a bit tricky, but not bad at all since you're now an experienced
vinyl-wrapper. Take a look at the photo~
Notice on your Gs trim that the lower inside rolled edge of the section that goes up has more chrome showing at the bottom and gradually decreases as it goes up the window. DON'T FORGET THIS! You may assume as you're trimming that it's all rubber under there and you'll be very upset when you find out you've now got chrome showing. Be sure to place your vinyl piece on the section before remove the backing paper just to get a feel for how it's going to line up, you want to be sure to allow for that inside edge I was just warning you about, also the rather large angle at the bottom of the trim piece. The vinyl is oversized to alllow for easy placement, just be sure to have everything covered without ending up having to "bend" the vinyl anywhere to make it "fit". It worked perfect for me, I just took a bit more time making sure I had the vinyl in the optimum place. You're going to have excess vinyl everwhere as you go up through the curve but when it gets to the 1 1/8" section you'll want it to be right where it needs to be so kind of line it up from the top down would be my advice and make a mental note of where it should be. This is one section where you really want to just barely tack it as you go since you'll be having to readjust it a few times to get the best position. Once you find the best placement you'll want to again work the inside of the arc, you'll only be smooting out about 1/2 an inch of the inside arc, keeping it smooth all the way around and up to the door edge. Keep the widest part of this section (the bottom 4 inches) lightly tacked since you'll have to lift it a bit to tuck in the edges and trim for that sectrion I warned you about. You may run into some rippling here so just be patient and pull it up and rework as needed, again just go lightly until it's all good. Once you get the inside to your liking you'll then start slowly smoothing it upward (or outward) working to the middle of the chrome strip and eventually all the way to the outer or upper edge. Pulling outward on the slighlty rippled areas removed any problems for me, but your results may vary. This vinyl is very easy to work with and you'll amaze yourself w/ how potential problem areas easily dissappear. I didn't have to apply any heat except to seal the edges and press in the end-corner vinyl but you can use heat to shrink down some rippled areas but I would only do this as a last resort. Once you get the flat area just right you'll need to trim aroung the inside of the window, remember as you get down toward the lower end to allow for that extra chrome I keep warning you about. Just keep 1/8" to tuck in the rubber and you'll be fine until you get about 4" from the bottom, that's when you'll need to gradually get wider, you can always leave it pretty wide at the bottom and cut that very end last just so you can see firsthand how wide you'll need it. Once you get the entire lower inside edge trimmed you'll need to tuck it into the rubber, this rubber is quite stiff once you get to the back window that doesn't roll down, you need to pry it open a bit at a time and tuck just small sections as you go. As you get to the big curve the tucked edge may ripple in places, a little heat and a press by your finger will get rid of those ripples and once you do the final heat while pressing the window rubber against the vinyl you shouldn't have any ripples anywhere. The upright pillar between the roll down window and the stationary far back window is one place where you'll have to do a flush cut, just use your fingernail again to make the indent and cut it flush (it's about an inch). The upper edge is the same as the front upper seal that you did in section B except you may have soem rippling around the big curve, again, more heat and some pressing will get rid of them. When you get the top and bottom edges tucked & sealed then do the upper end-edge end then go down to the wide bottom edge. You may need to pry the chrome sections again w/ a screwdriver (be more careful now since one's got vinyl on it) to get the gap wider to tuck in the vinyl. Get it trimmed so that no chrome will be showing and you'll have enough to tuck into all the edges. Apply heat in the end corners once you've got it trimmed up to get all the loose ends melted flush and you're ready to show off your new trim!
Last edited by blnewt; Jan 15, 2013 at 09:43 PM.

Awesome DIY! I wish I had this to go on before I did mine. Love how you mapped out the pieces on your material--I probably ordered and used way more than was needed. I used matte black but your gloss black looks way, way better!!! Although the process is easy, I think it is hard to get things perfect. I had some spots where I cut a little too close and a sliver of chrome was showing. Ended up using touch up pain to cover those.
BTW: I would avoid getting anything from sticker city. They sent my order in a beat up mailer and there was a big nasty scrunge in the middle. When I called them, they said it was fine, that's normal!
BTW: I would avoid getting anything from sticker city. They sent my order in a beat up mailer and there was a big nasty scrunge in the middle. When I called them, they said it was fine, that's normal!
Last edited by mishmosh; Nov 13, 2011 at 07:59 PM.


Joined: Aug 2007
Posts: 1,699
Likes: 137
From: New Mexico
Awesome DIY! I wish I had this to go on before I did mine. Love how you mapped out the pieces on your material--I probably ordered and used way more than was needed. I used matte black but your gloss black looks way, way better!!! Although the process is easy, I think it is hard to get things perfect. I had some spots where I cut a little too close and a sliver of chrome was showing. Ended up using touch up pain to cover those.
BTW: I would avoid getting anything from sticker city. They sent my order in a beat up mailer and there was a big nasty scrunge in the middle. When I called them, they said it was fine, that's normal!
BTW: I would avoid getting anything from sticker city. They sent my order in a beat up mailer and there was a big nasty scrunge in the middle. When I called them, they said it was fine, that's normal!
I got my vinyl from www.autovinylsolutions.com awesome service, product and price. The stickercity video was used for general installation terchniques. Good to know there's better vinyl sources


Trending Topics
Joined: Aug 2007
Posts: 1,699
Likes: 137
From: New Mexico
Yep, very easy and a great match.
You're welcome, glad you found it helpful
You're welcome, glad you found it helpful


Registered User
Joined: Oct 2008
Posts: 184
Likes: 13
From: Minnesota
Wasn't too bad at all. It does require a bit of time if you want to get it right though. Sections D / E are by far the hardest. The actual tracing and cutting takes more time than you might think as well. Thanks again for the write up!!!!!