
DIY: Coilover Install


Thread Starter
|
Registered User
Joined: Sep 2008
Posts: 2,568
Likes: 55
Box arrived, heavy fugger:

Inside the cover, everything very well packed for the long journey:

Rear components:


Nice rubber bushing:

Rear shock:

Rear top plate:

Rear adjustment ****:

Front assembly:


Front lower mounting point:

Front top plate:

As I unpacked everything, I couldn't help but notice how well engineered everything was, and how sturdy everything felt in the hand. One cosmetic notation is that I received these black/charcoal springs instead of their trademark purple ones. Me personally, I don't care either way but now people will know they do have a choice in spring color.
Inside the cover, everything very well packed for the long journey:
Rear components:
Nice rubber bushing:
Rear shock:
Rear top plate:
Rear adjustment ****:
Front assembly:
Front lower mounting point:
Front top plate:
As I unpacked everything, I couldn't help but notice how well engineered everything was, and how sturdy everything felt in the hand. One cosmetic notation is that I received these black/charcoal springs instead of their trademark purple ones. Me personally, I don't care either way but now people will know they do have a choice in spring color.
Last edited by E-Ticket Ride; Jul 26, 2010 at 04:28 AM.
Thread Starter
|
Registered User
Joined: Sep 2008
Posts: 2,568
Likes: 55
Installation instructions
Installation instructions
A lift would be the best, but we did the installation on jack stands.
Ramps would also be fine.
Do not (under any circumstances) rely only on a jack to keep the car lifted.
Sockets:
12, 14, 17, 19mm sockets
Air gun (if you have)
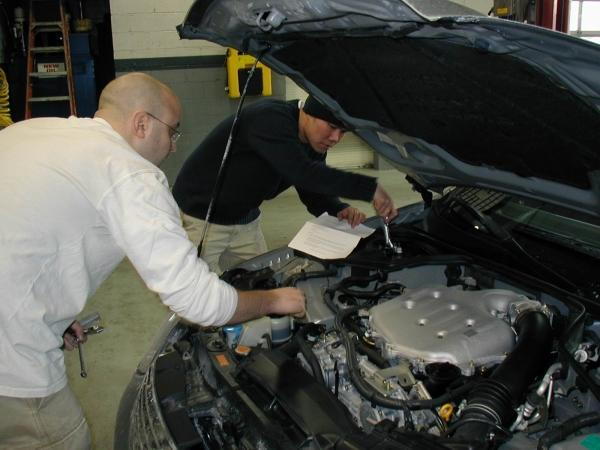
Front installation
1. Jack up the front of the car (we did front and then back separately), secure with jackstands or ramps
2. Remove wheels
3. Remove the brake line from the strut. It is attached with a 12mm nut (I did my best to circle the nut/bolts in question with a red circle, and each picture where you remove a part should have a red circle):

4. Remove the bolt (17mm) that attaches the strut to the lower control arm:

Rear of bolt shown in above picture. Remove endlink. Remove the sway bar from the endlink bolt (19mm):

5: Remove the 3 bolts that secure the strut plate to the lower suspension (14mm bolts):

6. Remove the 3 nuts that secure the top plate to the shock towers (12mm nuts):

7. Fish the stock strut/spring out from between the brake lines. Be careful when you do this so you don't damage the brake lines nor the ABS lines. Stock strut/spring removed:

8. Reverse the procedure to install the new units:


Brake line bracket installed on strut body (it works, but not my preferred method. I guess it saves on tooling and manufacturing costs):

Rear installation
1. Jack up car under diff cover, secure car with jackstands or ramps.
2. Remove wheels.
3. The rear is super easy compared to the front. Use a jack to support the lower suspension arm in order to remove the stock spring.
4. Remove this bolt (17mm bolt, 17mm nut) to free the lower spring mount cup:

5. Slowly lower jack and the spring will drop and can be easily removed:

New spring and seat installed:
**EDITED**
Correct orientation, new adjustable spring perch should be on the top (thanks to Shane for the correction!)


Incorrect method:
6. Remove the 17mm nut that secures the bottom of the strut to the suspension assembly:

7. Remove the two upper nuts (12mm) that secure the strut to the strut tower:

**Footnote***
The top area of the rear strut is totally enclosed, meaning that once you set the stiffness of the rear strut (not applicable to an "EDFC" type unit or an inverted strut), there is no way to adjust it after it's mounted. Something to think about if you're the type that likes to constantly "tinker" with the strut stiffness settings.
**Footnote 2***
I solved the problem of how to adjust the rear without having to remove the strut each time. See pics below. It does involve removing the rear lower seat cushion and seat back cushion, but it's a 5 minute job tops so it's super easy.
8. Reverse the procedure. Remove the strut, replace with new unit
(Ignore the orientation of the spring, refer to picture in #9 below):
9. Rear completed:
10. Rear spring/strut height adjustment
(Thanks to Ian for the info from JIC)
I received this set up info from JIC-Magic tech support,
which seems like a logical procedure to keep damper stroke near max. length.
1. Adjust the spring height FIRST.
2. after your spring ride height^ is set, adjust the damper length.
- place car on jack stands
- measure height to bottom of spring cup
- with a floor jack raise the spring cup 10mm (pre-load)
- adjust the damper length to fit this position.
I did mess up and forgot to measure the car before I lowered it. I also forgot to take a picture of the car prior to lowering.
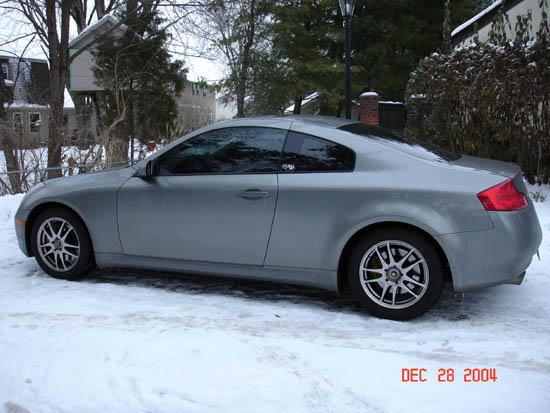
Here's the new measurements. If you're expecting a "slammed" ride, that's not me and that's not how to properly set up a suspension (IMO). I'm not sure how much it lowered the car in the end, so if anyone has any measurements of a stock sport suspension, please post them up.
Rear:
Front:

Side profile (sorry, bad pic):

IIRC, from the top of the wheel centercap to the fenders was 13 3/4" all the way around. Again, if anyone can measure their car that's stock, I'd appreciate it.
If anyone has any questions, post them here. I'll be doing a review of the suspension ride after about a week of driving it. As it is right now, the struts are set to #10 out of 15 (15 being the stiffest). The car does ride stiff, so when my friend comes back we'll probably lower the stiffness all around to maybe 7 or 8 (the car's a daily driver).
Stay tuned for impressions.
A lift would be the best, but we did the installation on jack stands.
Ramps would also be fine.
Do not (under any circumstances) rely only on a jack to keep the car lifted.
Sockets:
12, 14, 17, 19mm sockets
Air gun (if you have)
Front installation
1. Jack up the front of the car (we did front and then back separately), secure with jackstands or ramps
2. Remove wheels
3. Remove the brake line from the strut. It is attached with a 12mm nut (I did my best to circle the nut/bolts in question with a red circle, and each picture where you remove a part should have a red circle):
4. Remove the bolt (17mm) that attaches the strut to the lower control arm:
Rear of bolt shown in above picture. Remove endlink. Remove the sway bar from the endlink bolt (19mm):
5: Remove the 3 bolts that secure the strut plate to the lower suspension (14mm bolts):
6. Remove the 3 nuts that secure the top plate to the shock towers (12mm nuts):
7. Fish the stock strut/spring out from between the brake lines. Be careful when you do this so you don't damage the brake lines nor the ABS lines. Stock strut/spring removed:
8. Reverse the procedure to install the new units:
Brake line bracket installed on strut body (it works, but not my preferred method. I guess it saves on tooling and manufacturing costs):
Rear installation
1. Jack up car under diff cover, secure car with jackstands or ramps.
2. Remove wheels.
3. The rear is super easy compared to the front. Use a jack to support the lower suspension arm in order to remove the stock spring.
4. Remove this bolt (17mm bolt, 17mm nut) to free the lower spring mount cup:
5. Slowly lower jack and the spring will drop and can be easily removed:
New spring and seat installed:
**EDITED**
Correct orientation, new adjustable spring perch should be on the top (thanks to Shane for the correction!)
Incorrect method:
6. Remove the 17mm nut that secures the bottom of the strut to the suspension assembly:
7. Remove the two upper nuts (12mm) that secure the strut to the strut tower:
**Footnote***
The top area of the rear strut is totally enclosed, meaning that once you set the stiffness of the rear strut (not applicable to an "EDFC" type unit or an inverted strut), there is no way to adjust it after it's mounted. Something to think about if you're the type that likes to constantly "tinker" with the strut stiffness settings.
**Footnote 2***
I solved the problem of how to adjust the rear without having to remove the strut each time. See pics below. It does involve removing the rear lower seat cushion and seat back cushion, but it's a 5 minute job tops so it's super easy.
8. Reverse the procedure. Remove the strut, replace with new unit
(Ignore the orientation of the spring, refer to picture in #9 below):
9. Rear completed:
10. Rear spring/strut height adjustment
(Thanks to Ian for the info from JIC)
I received this set up info from JIC-Magic tech support,
which seems like a logical procedure to keep damper stroke near max. length.
1. Adjust the spring height FIRST.
2. after your spring ride height^ is set, adjust the damper length.
- place car on jack stands
- measure height to bottom of spring cup
- with a floor jack raise the spring cup 10mm (pre-load)
- adjust the damper length to fit this position.
I did mess up and forgot to measure the car before I lowered it. I also forgot to take a picture of the car prior to lowering.
Here's the new measurements. If you're expecting a "slammed" ride, that's not me and that's not how to properly set up a suspension (IMO). I'm not sure how much it lowered the car in the end, so if anyone has any measurements of a stock sport suspension, please post them up.
Rear:
Front:
Side profile (sorry, bad pic):
IIRC, from the top of the wheel centercap to the fenders was 13 3/4" all the way around. Again, if anyone can measure their car that's stock, I'd appreciate it.
If anyone has any questions, post them here. I'll be doing a review of the suspension ride after about a week of driving it. As it is right now, the struts are set to #10 out of 15 (15 being the stiffest). The car does ride stiff, so when my friend comes back we'll probably lower the stiffness all around to maybe 7 or 8 (the car's a daily driver).
Stay tuned for impressions.
Last edited by E-Ticket Ride; Aug 12, 2009 at 03:06 PM.


Thread Starter
|
Registered User
Joined: Sep 2008
Posts: 2,568
Likes: 55
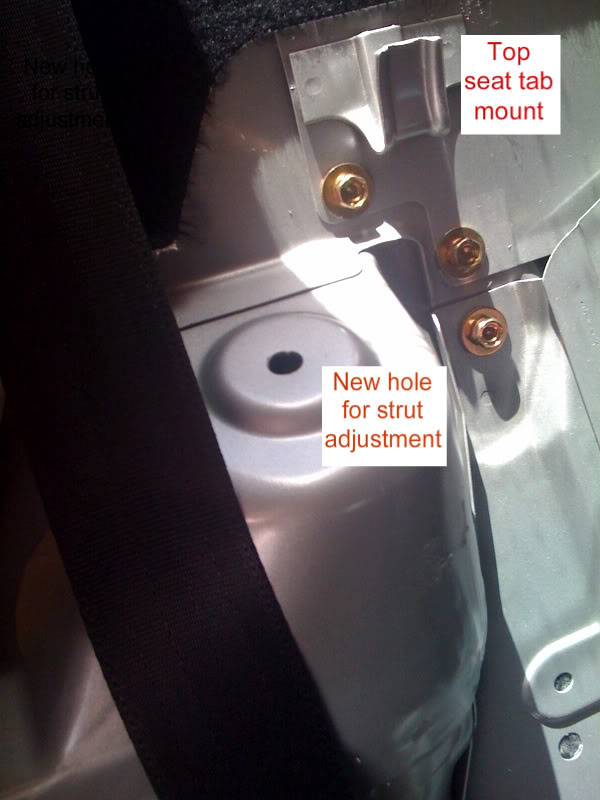
UPDATE: How to adjust the rear strut stiffness without removing the struts
Here's how I solved adjusting the rears w/o having to constantly remove the strut:
1. The seat is super easy to remove. There's 2 tabs on the lower seat cushion where your calves would touch the cushion. Pull them out toward the front of the car and the cushion will pop up.
2. There's 4 bolts that hold each side of the seat back onto the frame (2 per seat cushion). IIRC, they were about a 17mm or so, and there's 2 on each side. The seat backs are independent of each other, and the center arm rest area will stay mounted to the car. Once you remove the 4 bolts, pivot the lower seat back portion (where the bolts were) up to about 70*ish, and they will release from the tabs that hold the top part of the seat back to the frame.
3. I used a drill driver and 2 uni-bits to make the hole. I centered the hole, but in retrospect the hole should be slightly inset more toward the middle of the car (the strut nut isn't exactly "centered")
4. I IM'd Adrian at JIC about the extenders, but once I opened up the seat, I saw what Alan was talking about how the extender would get kinked by the seat back, and removing the seat would still be necessary. So, save yourself the 85 bux and just make the hole for adjustment.
4. Now you can make easy adjustments using the JIC allen wrench tool once you remove the seat. Once you get the hang of removing the seat, it'll take you 5 minutes, tops.
Last edited by E-Ticket Ride; Apr 2, 2009 at 08:32 PM.
Trending Topics

Great write-up! Thank you.
Quick question, in step 7, since the area is totally enclosed, i take it there's no possible way that one could accidentally push those bolts up and away from reach, right?
Quick question, in step 7, since the area is totally enclosed, i take it there's no possible way that one could accidentally push those bolts up and away from reach, right?
Thread Starter
|
Registered User
Joined: Sep 2008
Posts: 2,568
Likes: 55
I should have been more descriptive in my explaination. The area you see in step #7 in the wheel well is not enclosed. You will see the two mounting bolts (as shown in the pic) that secure the strut and a hole where the top of the strut inserts into. In theory you "could" lose a nut into the area where the hole is, but it would be almost impossible. Once you remove the old strut and replace it with the new one (and snug it up onto the two mounting bolts), you would then screw on the two nuts to secure the strut. At that point, you wouldnt even see the hole where the top gets inserted into.
When I said the area is "totally enclosed" I meant the area where the top of the strut inserts into. That area where the adjustment **** is now located would be inaccessable without drilling the holes like I did in the last update.
Thanks! I should've clarified myself (unless i still don't get it, sorry!).
The two bolts, i didn't see you mention going into the trunk to keep the heads of those bolts in place, so i'm guessing they're either loose (and hope it doesn't push in when trying to thread the damper back on) or is permanently held in its place. By the sound of it, it's probably the latter. Right?
The two bolts, i didn't see you mention going into the trunk to keep the heads of those bolts in place, so i'm guessing they're either loose (and hope it doesn't push in when trying to thread the damper back on) or is permanently held in its place. By the sound of it, it's probably the latter. Right?

anyone help me out with this??
Thread Starter
|
Registered User
Joined: Sep 2008
Posts: 2,568
Likes: 55
Sorry, didn't see your question. The answer is no, refer to this pic (the first time I installed it, we did it wrong):
**EDIT**
I should specify that you will not use the rubber cone with coil overs, but you will use them when doing just a spring change.
This is the wrong way to mount the rears:

**EDIT**
I should specify that you will not use the rubber cone with coil overs, but you will use them when doing just a spring change.
This is the wrong way to mount the rears:
Last edited by E-Ticket Ride; Apr 4, 2009 at 03:35 PM.
Thread Starter
|
Registered User
Joined: Sep 2008
Posts: 2,568
Likes: 55
Thanks! I should've clarified myself (unless i still don't get it, sorry!).
The two bolts, i didn't see you mention going into the trunk to keep the heads of those bolts in place, so i'm guessing they're either loose (and hope it doesn't push in when trying to thread the damper back on) or is permanently held in its place. By the sound of it, it's probably the latter. Right?
The two bolts, i didn't see you mention going into the trunk to keep the heads of those bolts in place, so i'm guessing they're either loose (and hope it doesn't push in when trying to thread the damper back on) or is permanently held in its place. By the sound of it, it's probably the latter. Right?
In that pic, the bolts have that orange "security" paint on them. They're actually welded to the frame, and you only remove/replace the two nuts.
HTH
