
DIY: Satellite shark fin install with headliner removal


Joined: May 2006
Posts: 1,240
Likes: 1
From: Edmond, OK
DIY: Satellite shark fin install with headliner removal
To avoid the "dead rat" look for my Sirius antenna on the rooftop, I placed it on the rear shelf wedged up against the glass but still lost reception due to limited visibility. I relocated it to the corner of the windshield shield by the defroster vent but would still get signal loss so I decided to get the '07 OEM fin. Thanks goes out to Surfed80 and iamag35man for their info. My color code which is Brilliant Silver but they have dropped that name going into '07 and it's called Liquid Platinum. Ordered the cover in LP and it matches perfectly. The antenna has a short lead with a connector. Dealers have a harness but are $150 to connect the tuner to the antenna. If you can splice your old lead, it will work just fine and save $. Service manual states to not bend the headliner too much, which is flexible but if it kinks, it may leave a permanent crease. Service manual also states to remove rear seat cushions and 4 rear finisher panels but I couldn't figure out the seat removal but still managed to pull out the headliner. I will periodically updated MSRP's. P/N's are from a sedan with build date of 8/06-8/07.
Time to complete:
1 full day
3 Parts needed (prices through 8/16/10):
Shark fin cover ($42.83):
INF 28228-EH005 (Liquid Platinum/Brilliant Silver)
INF 28228-EH000 (White Pearl)
INF 28228-EH002 (Twilight Blue)
INF 28228-EH004 (Black Obsidian)
INF 28228-EH006 (Serengeti Sand)
INF 28228-EH007 (Diamond Graphite)
Nut ($6.85 MSRP):
INF 28219-EM30A Supercedes part # INF 28219-ED000
Antenna ($167.03 MSRP):
INF 28208-EH100 (Sirius)
INF 28208-EH000 (XM, see later post regarding XM antenna)

Tools needed:
Tape measure
Cordless drill
Tape
Drill bits
Unibit (or flute reamers up to 9/16")
X-Long, Medium and small flathead screwdrivers
Medium Phillips screwdriver
7/8" or crescent wrench
Marker
Jewelers round and flat files
Large round file
Curved pick
Wire strippers
Touch-up paint (optional)
2 zip ties
Beer (as required)

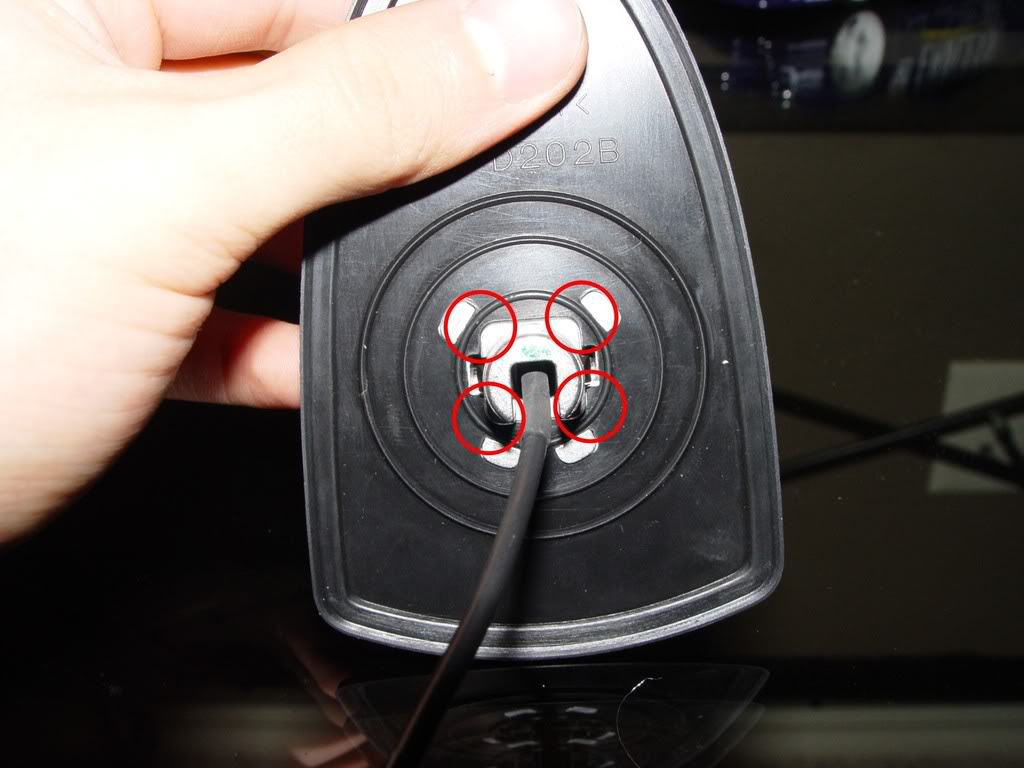
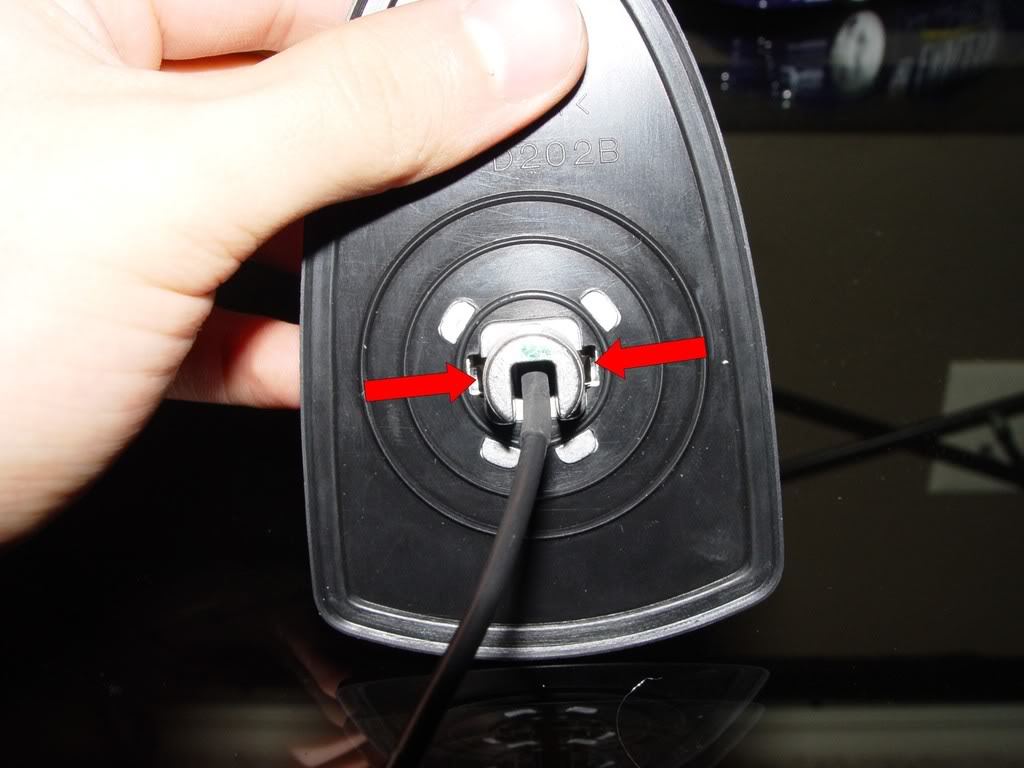
First, cut off connector and end of old antenna wires:
Starting from the outside, the wires are: 1-plastic outer jacket, 2-braided lead, 3-thin aluminum shield, 4-hard plastic jacket, 5-main lead
For each cut end: strip about 2 inches of #1, un-braid the exposed #2. Cut and discard exposed length of #3. Strip off about 1 inch of #4. Braid #5 together and tape off the splice. Braid #2 then tape up the rest of the splice.
Take your time unbraiding #2 as patience will avoid broken wires. don't use too much tape to keep the splice thin. This is what #2 looks like.
Completed splice:
Remove trunk mat, spare and left wheel well cover (held on by one nut). Plug in newly spliced antenna to verify it works.
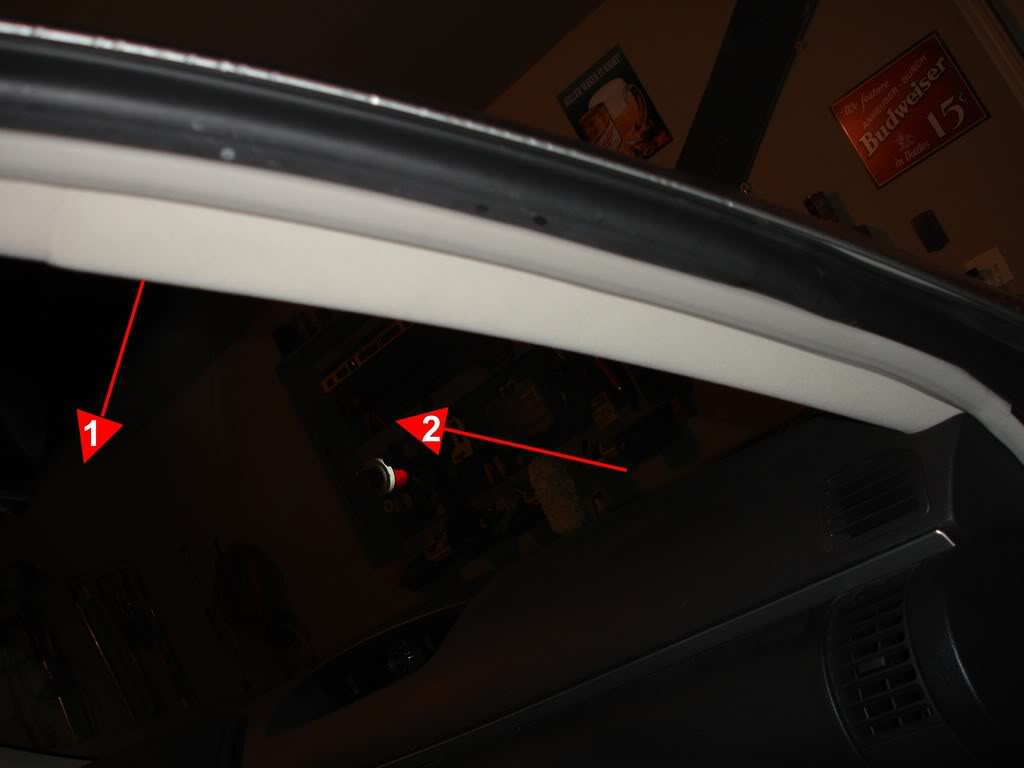
Once you have signal, consider yourself a master electrician. Pull off trim piece covering seal at bottom of doorway:
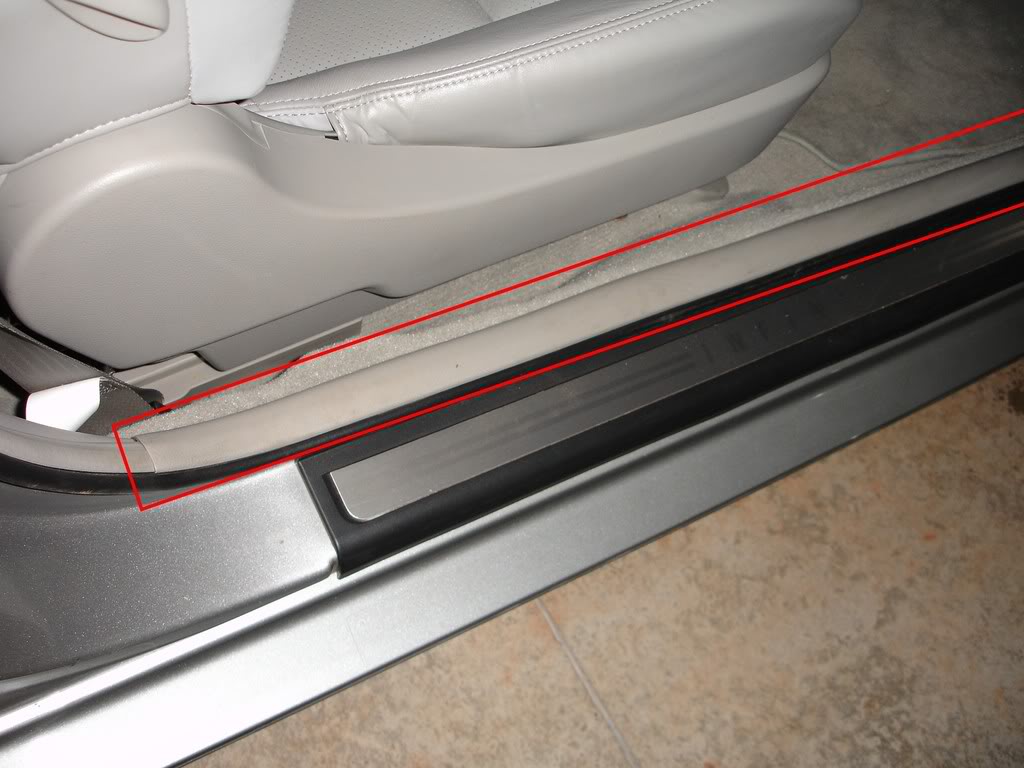
Mark your seal against a trim piece with a marker so you know where they line up during assembly:
Pull out seal (and repeat steps for other side):
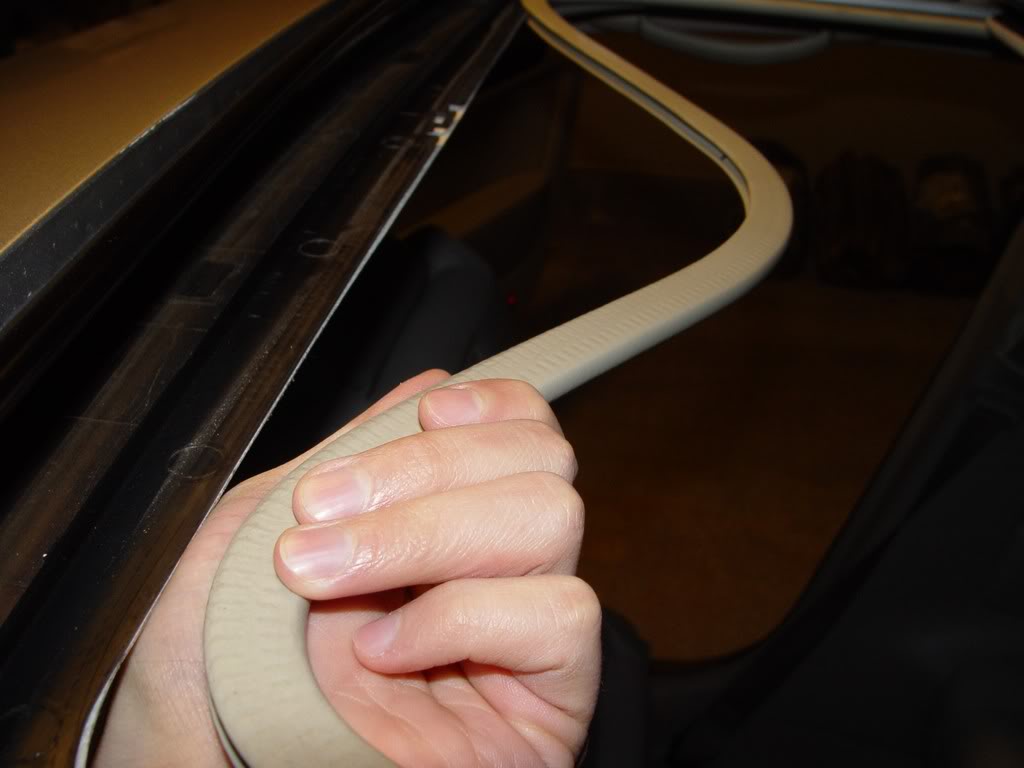
Pull out sunroof trim:
Pull down sunvisors forward as if the sun was hitting your eyes. Pry trim piece at swivel elbow to reveal screws. Trim pieces have 3 small tabs behind them:
Remove screws and disengage visor from the catch. Wiggle connector out from behind headliner, disconnect visor. Repeat for other side. With taped off flathead screwdriver, push in through opening on visor catch to desengage tab on visor catch, turn 90 degrees. Then pull down. Repeat for other side:
With taped off screwdriver, pry map lights out at 4 points:
I removed the clear lens covers with the small flathead but may not be necessary. Disconnect 2 harnesses behind map lights. One was very taught so the curved pick came in very handy to press in the connector release tab:
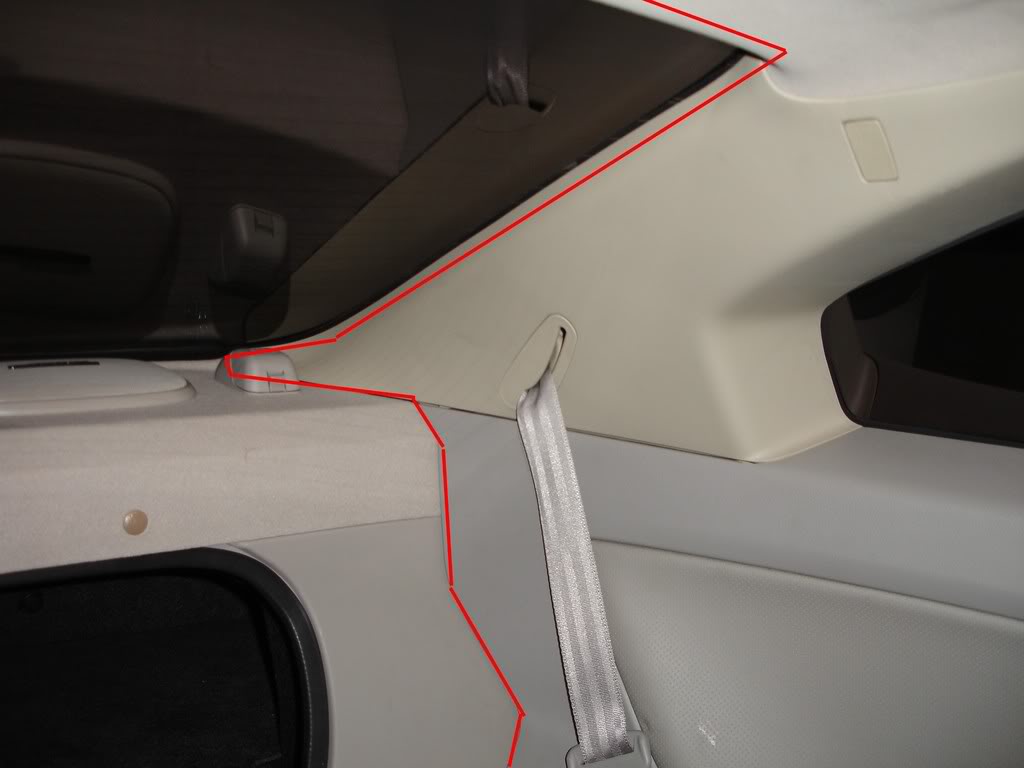
Pry out SRS covers and remove screw behind them. This will allow some bending at the top to slide out sunroof. Be careful not to drop them behind the finisher panel or you'll be buying a new one or pulling out rear seats to get off the panels. Pull along the top of the panel near the headliner to disengage the top clips and repeat for other side:
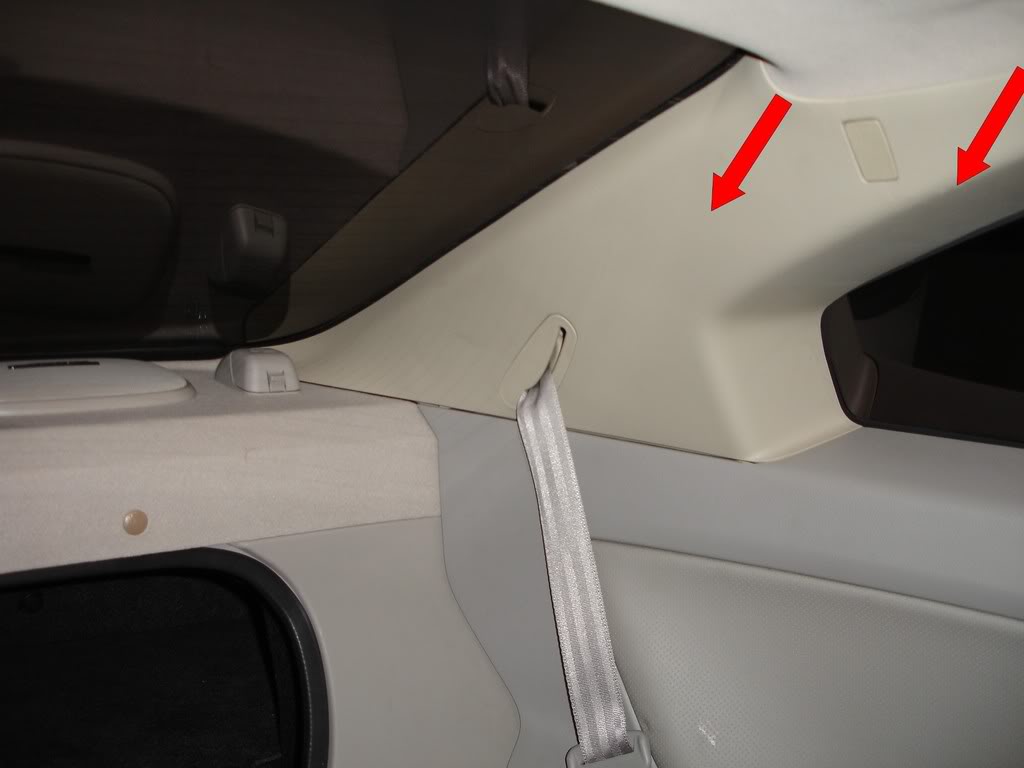
Remove front pillar finishers by pulling the top end toward inside of car. There is a flat tab on the lower end that slides into a slot at the corner of the dash. Pull up on trim to slide it out:
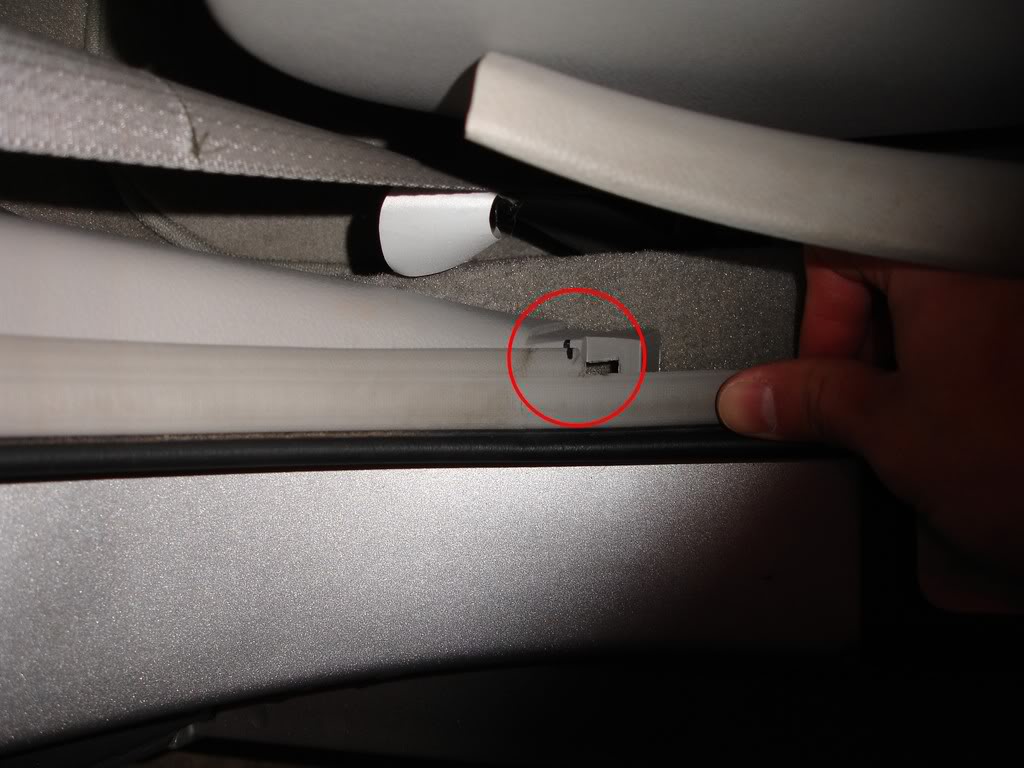
The headliner is held up by velcro, clips in the back, clips above sunglass holder, "oh ****!" handle and card holder behind passenger visor. With the curved pick, pull top and bottom of the trim covers of the "oh ****!" handle ends:
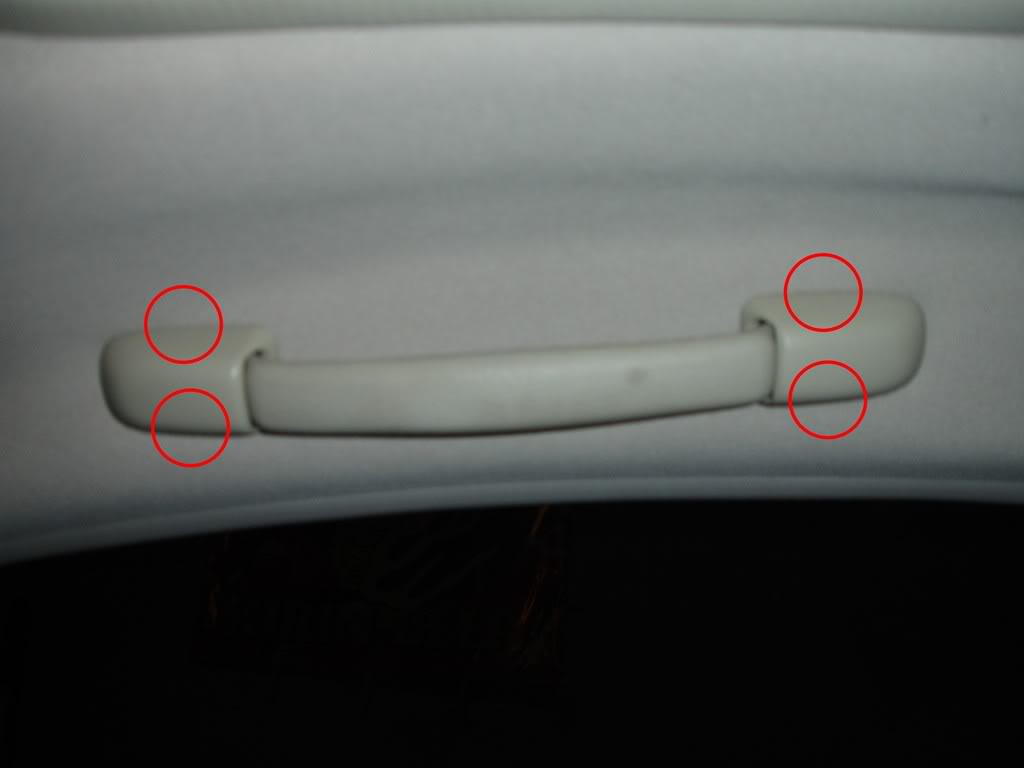
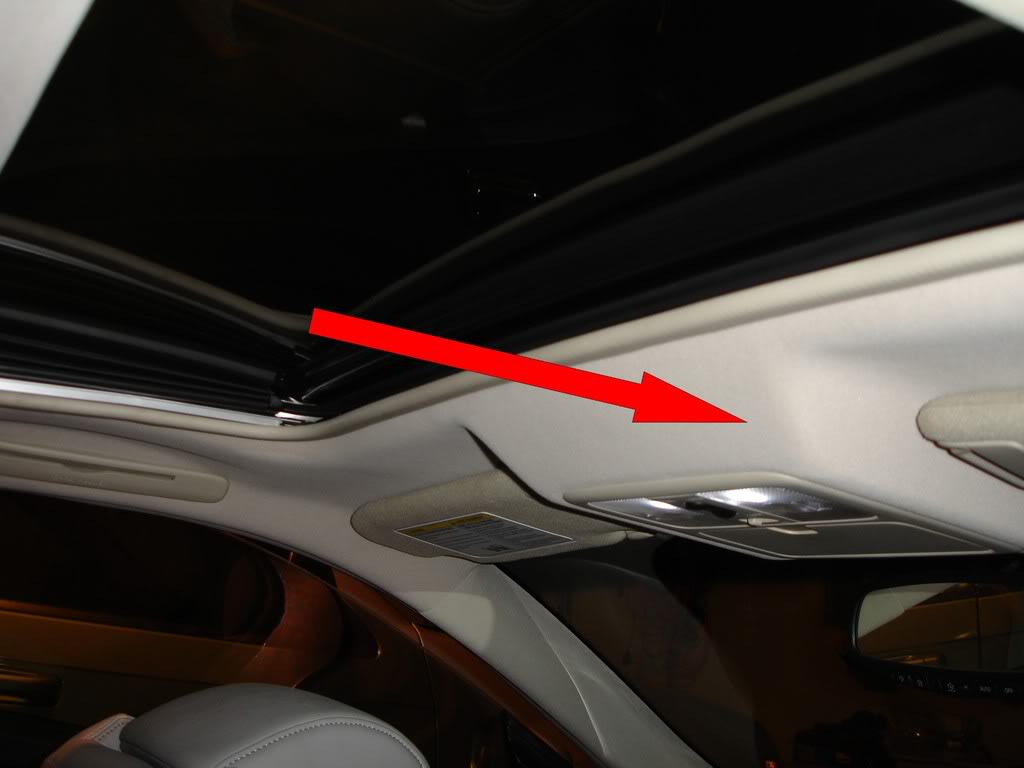
Wiggle the covers toward the center of handle and remove screws (x2). Remove white plastic blocks with flat blade screwdriver and set aside. For the card holder, pull down the front side and slide forward. Two connectors meet behind there and one attaches to rear of cardholder. Hold connectors in one hand and slide holder sideways. Disconnect harnesses apart from each other. Pull down the liner at the front of the sunroof area slightly to see towards the front. You'll be able to see to clips behind the sunroof area. Use the long flat head screw driver to slide in there and twist it either way to pry the sunglass holder from the roof:
At the back of the headliner, give it a tug down to remove 3 clips that run from left to right near the back. Again, be careful not to kink the headliner:
You should be ready to remove the headliner now. I would use the seats pushed all the way forward and reclined forward to let the front of the headliner rest against the seat headrests. You'll have to wiggle out from the rear panel finishers and is quite easy. Once down, rotate headliner 90 degrees and pull out through passenger side with sunglass holder end out first. I measured the center of roof from outside. The defroster lines that run from top to bottom are centered so you can draw an imaginary line from the inside of the car to know where you'll be drilling:
Mark your center if necessary, and drill from the inside out with a 1/8 or larger drill bit.
Tape a bag on the inside to prevent shavings from getting all over the felt carpeting:

Here is a picture using a drill gage and the threaded fitting is a little over 1/2" so I'll be stepping it up to a 9/16" using the unibit. I would HIGHLY advise against trying to step up the hole using just drill bits because the sheetmetal will kink up and bend/warp once you start getting to some of the larger size bits. It started doing that on me so I had to run to Lowe's for the Unibit ($33):
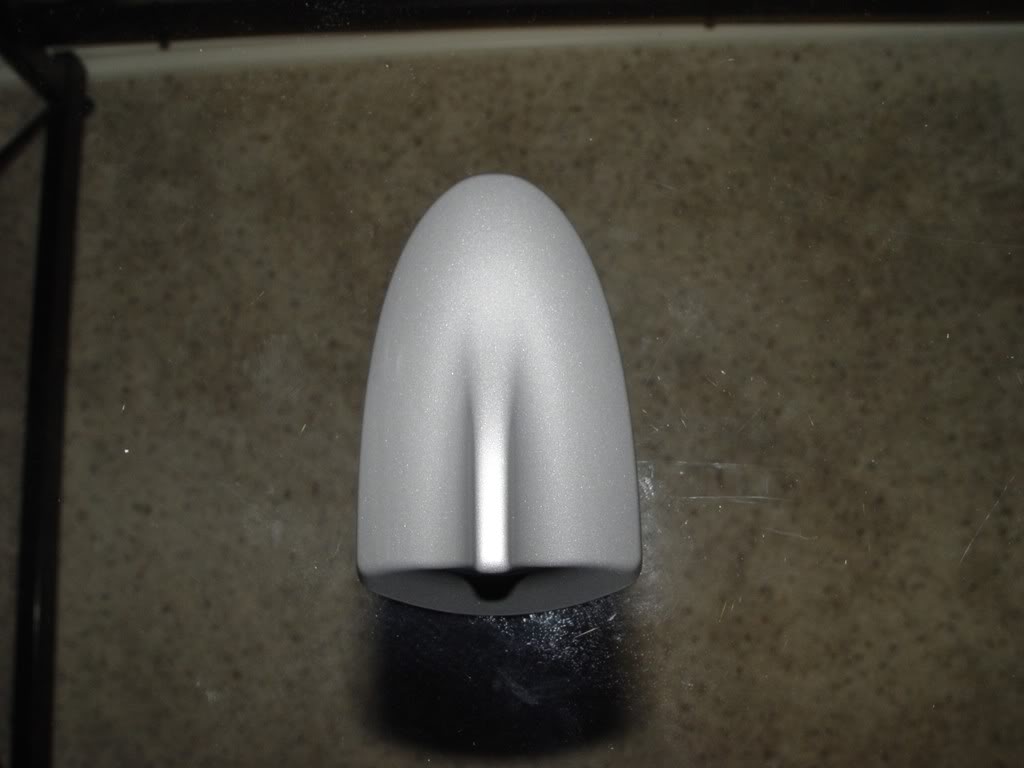
The antenna has a slightly square base:
..and clips on the side to catch on the sheetmetal once it's seated.
After the hole is drilled to size, tape off a square just a hair larger. I used the large round file to file corners as much as possible. Chuck the small jewelers file and with the drill on high speed, file out the corners to have a little sharper corner, but still round. Deburr any sharp edges:
After hole is cleaned up, apply touch-up paint for protection if you'd like (I did not). Take apart the connector end of the antenna (going to the tuner). Mine has a small blue clip on the side. Pull that out and pull out wire from connector. Run wire through hole and reattach connector with clip. Set antenna in through hole and while bracing surrounding area of hole, pop in antenna. The 2 side tabs should lock it in place:

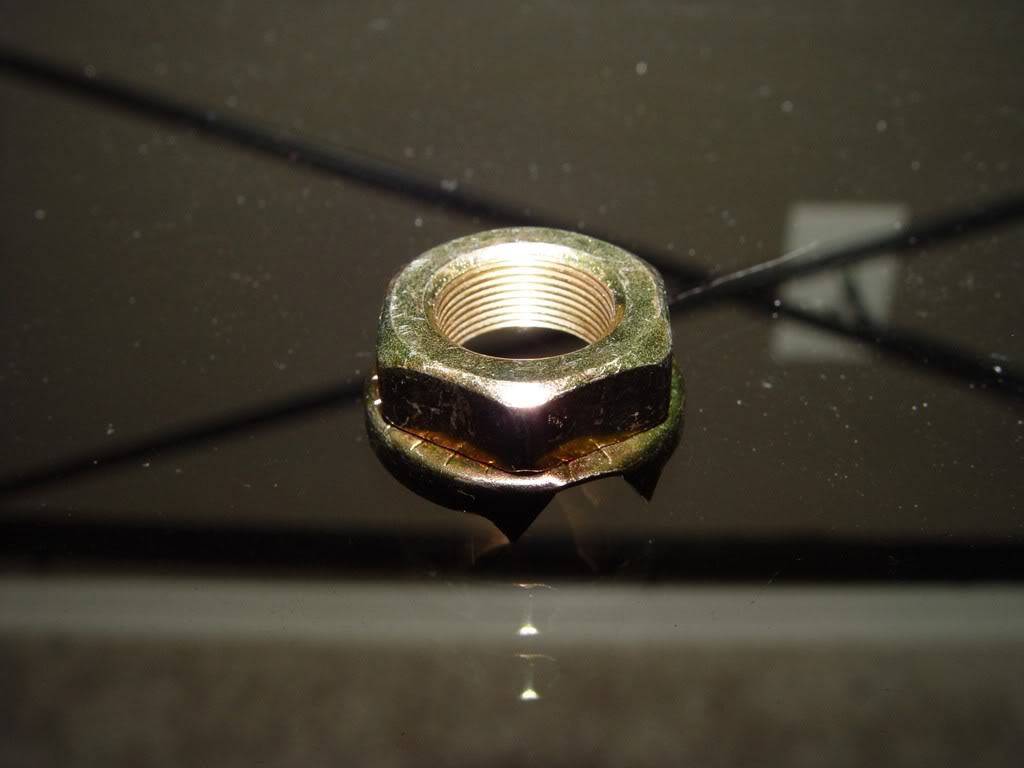
Route lead toward back of vehicle and thread nut onto antenna, aligning tab in nut with slot on threaded male end. Snug it down with wrench:
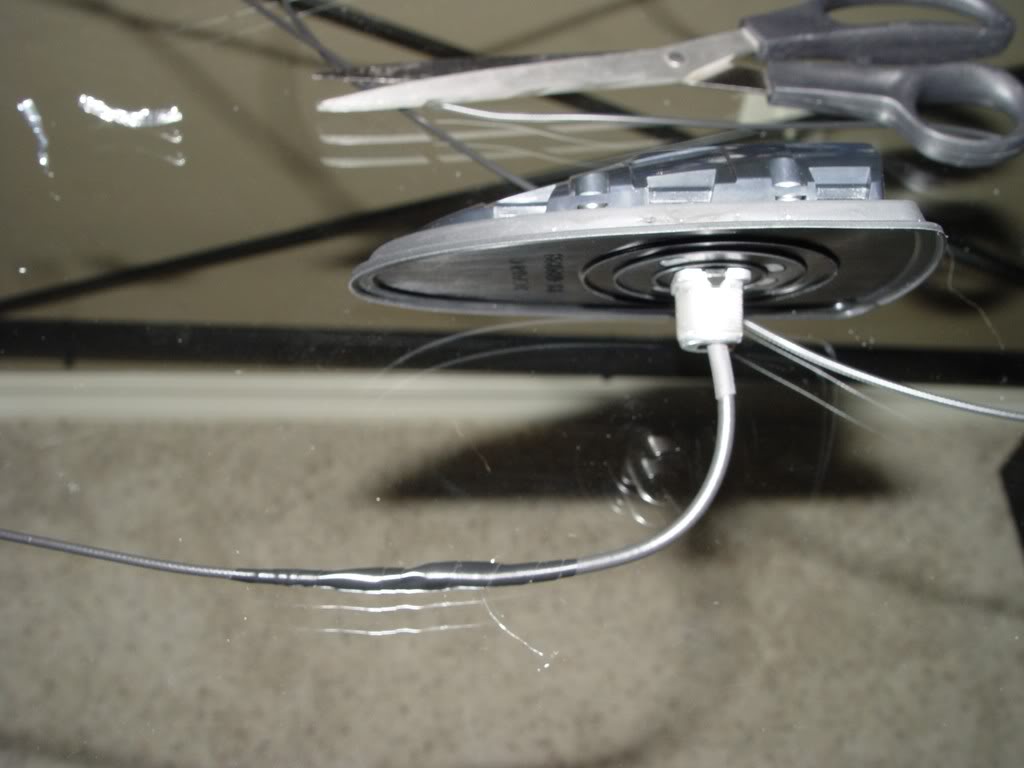
Tuck antenna wire behind finisher running against back glass along left side of car, then along rear shelf:
Plug in connector. I zip-tied the antenna lead to the clear drain tube at the back of left rear sunroof assembly and to the big harness in the trunk. Pop on shark fin cover. Assembly is in reverse order.
Time to complete:
1 full day
3 Parts needed (prices through 8/16/10):
Shark fin cover ($42.83):
INF 28228-EH005 (Liquid Platinum/Brilliant Silver)
INF 28228-EH000 (White Pearl)
INF 28228-EH002 (Twilight Blue)
INF 28228-EH004 (Black Obsidian)
INF 28228-EH006 (Serengeti Sand)
INF 28228-EH007 (Diamond Graphite)
Nut ($6.85 MSRP):
INF 28219-EM30A Supercedes part # INF 28219-ED000
Antenna ($167.03 MSRP):
INF 28208-EH100 (Sirius)
INF 28208-EH000 (XM, see later post regarding XM antenna)
Tools needed:
Tape measure
Cordless drill
Tape
Drill bits
Unibit (or flute reamers up to 9/16")
X-Long, Medium and small flathead screwdrivers
Medium Phillips screwdriver
7/8" or crescent wrench
Marker
Jewelers round and flat files
Large round file
Curved pick
Wire strippers
Touch-up paint (optional)
2 zip ties
Beer (as required)
First, cut off connector and end of old antenna wires:
Starting from the outside, the wires are: 1-plastic outer jacket, 2-braided lead, 3-thin aluminum shield, 4-hard plastic jacket, 5-main lead
For each cut end: strip about 2 inches of #1, un-braid the exposed #2. Cut and discard exposed length of #3. Strip off about 1 inch of #4. Braid #5 together and tape off the splice. Braid #2 then tape up the rest of the splice.
Take your time unbraiding #2 as patience will avoid broken wires. don't use too much tape to keep the splice thin. This is what #2 looks like.
Completed splice:
Remove trunk mat, spare and left wheel well cover (held on by one nut). Plug in newly spliced antenna to verify it works.
Once you have signal, consider yourself a master electrician. Pull off trim piece covering seal at bottom of doorway:
Mark your seal against a trim piece with a marker so you know where they line up during assembly:
Pull out seal (and repeat steps for other side):
Pull out sunroof trim:
Pull down sunvisors forward as if the sun was hitting your eyes. Pry trim piece at swivel elbow to reveal screws. Trim pieces have 3 small tabs behind them:
Remove screws and disengage visor from the catch. Wiggle connector out from behind headliner, disconnect visor. Repeat for other side. With taped off flathead screwdriver, push in through opening on visor catch to desengage tab on visor catch, turn 90 degrees. Then pull down. Repeat for other side:
With taped off screwdriver, pry map lights out at 4 points:
I removed the clear lens covers with the small flathead but may not be necessary. Disconnect 2 harnesses behind map lights. One was very taught so the curved pick came in very handy to press in the connector release tab:
Pry out SRS covers and remove screw behind them. This will allow some bending at the top to slide out sunroof. Be careful not to drop them behind the finisher panel or you'll be buying a new one or pulling out rear seats to get off the panels. Pull along the top of the panel near the headliner to disengage the top clips and repeat for other side:
Remove front pillar finishers by pulling the top end toward inside of car. There is a flat tab on the lower end that slides into a slot at the corner of the dash. Pull up on trim to slide it out:
The headliner is held up by velcro, clips in the back, clips above sunglass holder, "oh ****!" handle and card holder behind passenger visor. With the curved pick, pull top and bottom of the trim covers of the "oh ****!" handle ends:
Wiggle the covers toward the center of handle and remove screws (x2). Remove white plastic blocks with flat blade screwdriver and set aside. For the card holder, pull down the front side and slide forward. Two connectors meet behind there and one attaches to rear of cardholder. Hold connectors in one hand and slide holder sideways. Disconnect harnesses apart from each other. Pull down the liner at the front of the sunroof area slightly to see towards the front. You'll be able to see to clips behind the sunroof area. Use the long flat head screw driver to slide in there and twist it either way to pry the sunglass holder from the roof:
At the back of the headliner, give it a tug down to remove 3 clips that run from left to right near the back. Again, be careful not to kink the headliner:
You should be ready to remove the headliner now. I would use the seats pushed all the way forward and reclined forward to let the front of the headliner rest against the seat headrests. You'll have to wiggle out from the rear panel finishers and is quite easy. Once down, rotate headliner 90 degrees and pull out through passenger side with sunglass holder end out first. I measured the center of roof from outside. The defroster lines that run from top to bottom are centered so you can draw an imaginary line from the inside of the car to know where you'll be drilling:
Mark your center if necessary, and drill from the inside out with a 1/8 or larger drill bit.
Tape a bag on the inside to prevent shavings from getting all over the felt carpeting:
Here is a picture using a drill gage and the threaded fitting is a little over 1/2" so I'll be stepping it up to a 9/16" using the unibit. I would HIGHLY advise against trying to step up the hole using just drill bits because the sheetmetal will kink up and bend/warp once you start getting to some of the larger size bits. It started doing that on me so I had to run to Lowe's for the Unibit ($33):
The antenna has a slightly square base:
..and clips on the side to catch on the sheetmetal once it's seated.
After the hole is drilled to size, tape off a square just a hair larger. I used the large round file to file corners as much as possible. Chuck the small jewelers file and with the drill on high speed, file out the corners to have a little sharper corner, but still round. Deburr any sharp edges:
After hole is cleaned up, apply touch-up paint for protection if you'd like (I did not). Take apart the connector end of the antenna (going to the tuner). Mine has a small blue clip on the side. Pull that out and pull out wire from connector. Run wire through hole and reattach connector with clip. Set antenna in through hole and while bracing surrounding area of hole, pop in antenna. The 2 side tabs should lock it in place:
Route lead toward back of vehicle and thread nut onto antenna, aligning tab in nut with slot on threaded male end. Snug it down with wrench:
Tuck antenna wire behind finisher running against back glass along left side of car, then along rear shelf:
Plug in connector. I zip-tied the antenna lead to the clear drain tube at the back of left rear sunroof assembly and to the big harness in the trunk. Pop on shark fin cover. Assembly is in reverse order.
Last edited by Bigd2k6; Aug 16, 2010 at 11:52 AM.


Very nice writeup, I've been thinking about doing this for the sedan. Hope you don't mind, but I'd add one thing. When the hole you drill is how you want it, hit the bare meatal with a couple coats of touch-up paint to give it a little rust protection.
Again, thanks a lot for the DIY.
Again, thanks a lot for the DIY.
Joined: May 2006
Posts: 1,240
Likes: 1
From: Edmond, OK
Thanks. It was a lot easier to do than I thought. I put touch up paint to the parts needed which may give you some peace of mind but I wouldn't worry too much about it rusting on its own. If you're worried about water getting in, the antenna has multiple seals to keep water out.


Originally Posted by Bigd2k6
Why would you tape it up before drilling?
Trending Topics
Joined: May 2006
Posts: 1,240
Likes: 1
From: Edmond, OK
Well, drilling produces very little fine shavings and most fall into the bag I taped to the inside. Any that work their way up and out, I just blow off toward the back window often and finished by lightly dusting with a MF towel. I had a VERY miniscule scratch that could probably have been buffed out but it was covered by the antenna.

Joined: May 2006
Posts: 1,240
Likes: 1
From: Edmond, OK
Originally Posted by OBG3506
could you not put that thing on the trunk? seems that would be easier!
Joined: May 2006
Posts: 1,240
Likes: 1
From: Edmond, OK
Originally Posted by OBG3506
not smack dab in the middle! Closer to the rear glass!

Registered User
Joined: Jun 2006
Posts: 279
Likes: 4
From: MD
Really great write up I didnt really read all of it so I might have missed it but just wanted to ask one question..or comment...to me i think its a bad idea to cut the antenna wire, just because its never the same. For some reason it doesnt work after or 'weaken' the signal..what i would have to say to that is make the hole bigger so the harness can go thu so u dont have to cut the wire. But putting the gold nut on might be a problem too...just thought id add my .02 in...good work taking everything part tho...haha i had to find it out my doing it myself when i did my headliner in suede.
Joined: May 2006
Posts: 1,240
Likes: 1
From: Edmond, OK
Originally Posted by lmSteveO
Really great write up I didnt really read all of it so I might have missed it but just wanted to ask one question..or comment...to me i think its a bad idea to cut the antenna wire, just because its never the same. For some reason it doesnt work after or 'weaken' the signal..what i would have to say to that is make the hole bigger so the harness can go thu so u dont have to cut the wire. But putting the gold nut on might be a problem too...just thought id add my .02 in...good work taking everything part tho...haha i had to find it out my doing it myself when i did my headliner in suede.
Thanks for the comments. To answer your question, the harness that hooks up to the antenna connector is around 150 bucks, which is WAY overpriced and with mine being spliced, I have little to no signal loss except going through long overpasses. Splicing it shouldn't weaken the signal as long as you're not breaking off numerous single wires. There's no way to really measure the signal strength before or after, but if it makes you feel better, I can get a Sirius signal with my garage door closed with no cutout.

Last edited by Bigd2k6; Aug 22, 2008 at 12:30 PM.

Registered User
Joined: Jun 2006
Posts: 413
Likes: 0
From: Phoenix
BigD, Awesome install and great documentation, many thanks. I do have one question for you about the 'rear shelf against glass' setup. If one were to cut a small window in the tint for the antenna signal to get through, would that suffice do you think?
Guys are installing their Avic-D3 nav/sat antennas in the dash behind the glove box and I have no idea how they get good reception if just tint messes things up.
Guys are installing their Avic-D3 nav/sat antennas in the dash behind the glove box and I have no idea how they get good reception if just tint messes things up.