
Making some progress

Making some progress
Figured I'd share what I've been working on. My last thread dealt with the issues of wiring up the front doors, but that's been resolved, so today I'm moving on to the trunk. Took a couple pictures of my first test fit to try and see how I'd lay it out before I start making brackets and finalize the wiring and wouldn't mind some feedback, let me know what you all think so far.
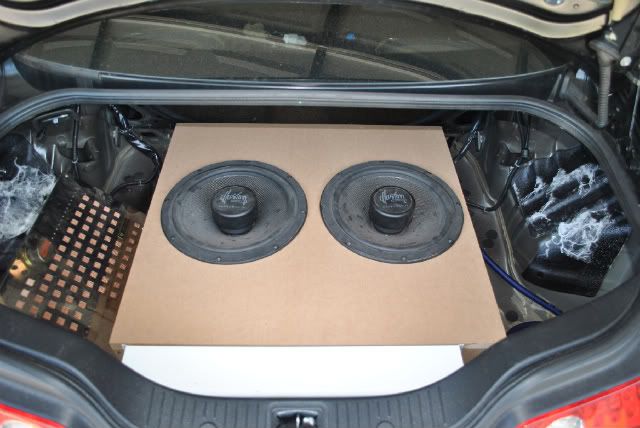
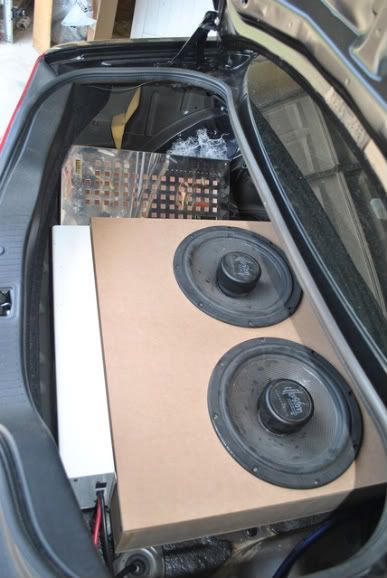
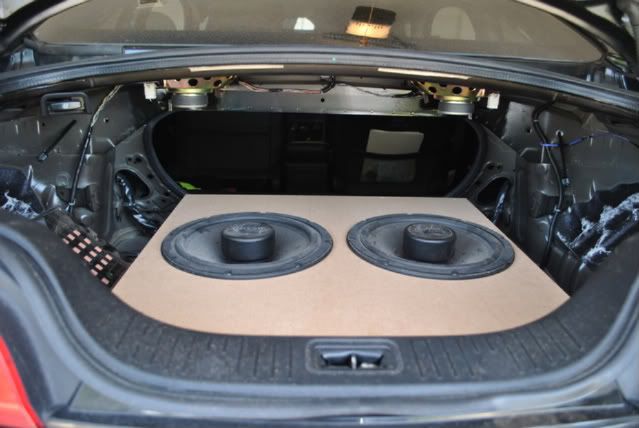
Couple notes: The box is off center, justified slightly to the passenger side so that there's room for an amplifier on the drivers side of it, it's about the most extreme angle it can be because of the arches in the trunk and I had to slide the box over so I can build something (plexiglass window maybe?) to keep the floor of the trunk flat. I'm hoping that once it's all said and done and the trunk is re-carpeted you won't be able to tell, but we'll see. The large white amp that you can only see the depth of between the box and rear of the trunk is a very old PPI art series 2350DM to run the subs and is also off center because of the contour on that rear wall. The subs are fairly shallow (about 4" give or take) so the box - considering 1.5" of MDF between the top and bottom - will raise the floor of the trunk by only by about 3 inches, not sure if you can tell but that worked out to be the exact width of that PPI amp so that it can be mounted to the box. No carpeting is done yet because I'll mounting the subs inside the box (to offset the front mounted magnet and keep the floor even) before I seal the top and I'm not quite there yet. All the dead space on the right side of the trunk will be used for the power/ground distribution blocks and possibly an XM or HD Radio tuner at a later date. And yes, everything is dusty, but only for a bit longer. This is all pretty old equipment (minus the Z-120BT in the dash) but it's been with me for quite a while and I see no reason to buy new stuff when this all works pretty well
Enough ramble, here's what we got so far:
Thanks for looking, more to come soon (I hope)


Yup, that's been done since that first pic, I won't be reusing any of the rear speaker locations and pulled the 6x9s to get just a little more trunk space
Moved on to the front doors today, got everything mounted and snapped some pictures in case anyone else is having a hard time figuring out how to get things in place. First we'll look at a standard aftermarket 1" tweeter vs the stock (probably 3/4"?) tweeter, this won't fly as is so some modification is in order..
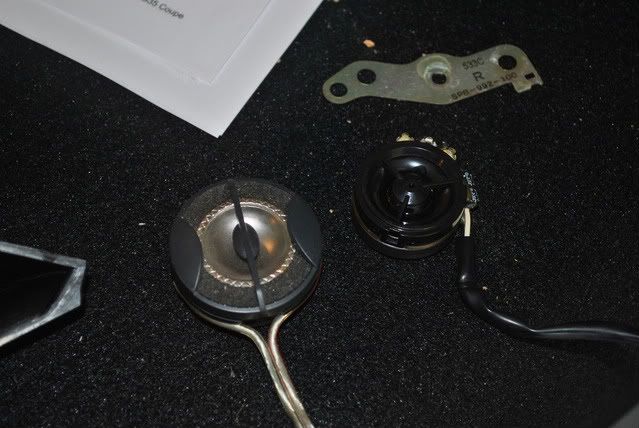
When you remove the stock tweeter panel you can see 2 screw mounts and a 3rd hollow post used to line up the factory bracket. If you take a pair of pliers you can grab and twist the mount for the 2nd screw and break it off, that's the one I'm pointing to
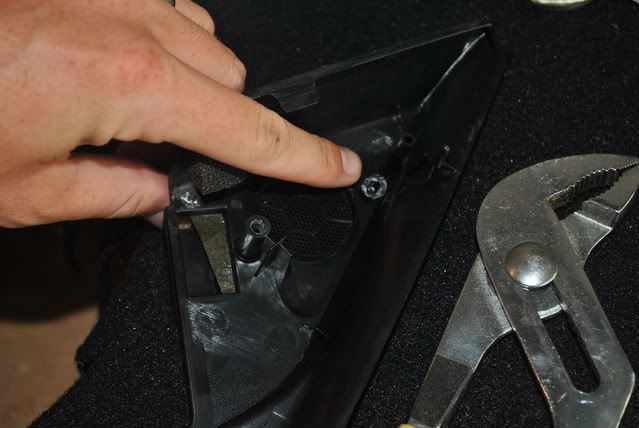
Once that's out of the way your aftermarket tweeter will drop in but probably have more room around it than you need, so if you pull that factory tweeter bracket off the stock tweeter and fine a thin screw, you can bolt it into that 3rd post used originally to make sure the bracket is on the correct side.
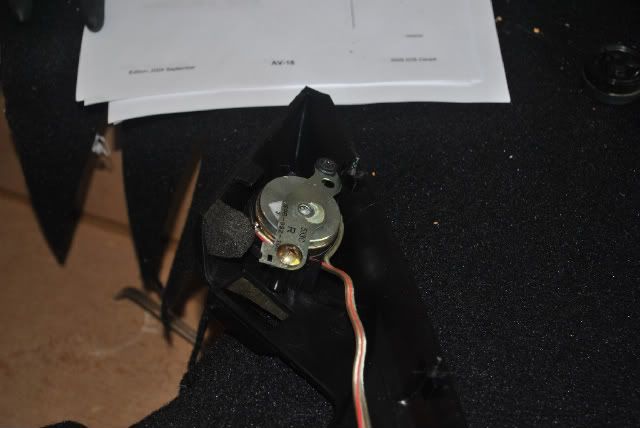
Then just put it back in like you took it out, and spend an hour looking for the damn plastic pops that held it in place and went flying when you removed it because you started drinking too early... or maybe that's just a personal issue.
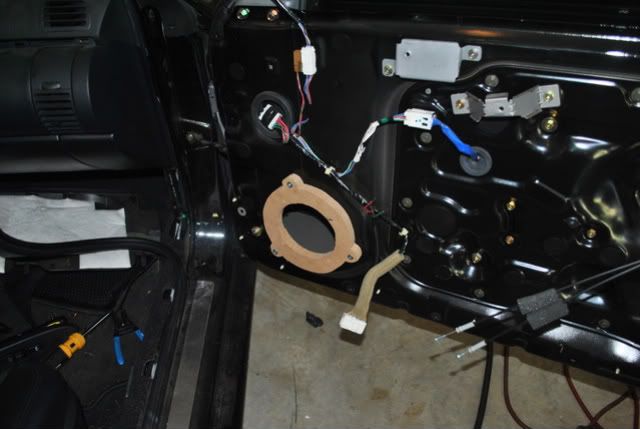
And making the speaker adapters out of MDF is very easy, pull the factory speakers, trace them out on a piece of MDF, then grab whatever mounting rings came with your replacements, trace them inside of your first pattern, and cut everything out and mount them, piece of cake.
More to come, I might get back to the trunk today but it's going to be about 103 outside and the garage isn't air conditioned
When you remove the stock tweeter panel you can see 2 screw mounts and a 3rd hollow post used to line up the factory bracket. If you take a pair of pliers you can grab and twist the mount for the 2nd screw and break it off, that's the one I'm pointing to
Once that's out of the way your aftermarket tweeter will drop in but probably have more room around it than you need, so if you pull that factory tweeter bracket off the stock tweeter and fine a thin screw, you can bolt it into that 3rd post used originally to make sure the bracket is on the correct side.
Then just put it back in like you took it out, and spend an hour looking for the damn plastic pops that held it in place and went flying when you removed it because you started drinking too early... or maybe that's just a personal issue.
And making the speaker adapters out of MDF is very easy, pull the factory speakers, trace them out on a piece of MDF, then grab whatever mounting rings came with your replacements, trace them inside of your first pattern, and cut everything out and mount them, piece of cake.
More to come, I might get back to the trunk today but it's going to be about 103 outside and the garage isn't air conditioned


Thanks for posting up the work log, can't wait to see the finished product.
Last edited by Wrathernaut; Jul 23, 2011 at 10:17 PM.
Just a quick off-topic note for anyone who thinks bypassing the factory amp is as easy as it should be...
Once I tapped into the factory wiring I thought I could remove the factory amp but alas, I was wrong. Mind you, I've got RCAs from the head unit to the amp and tapped the factory wires out of the plug for the factory bose amp so it shouldn't have been an issue to remove it, but without it plugged in I had no sound. I changed nothing from no sound to plugging the amp in and had music, so there's something on the factory speaker lines powered off that factory amp, just as a word to the wise. Confused me for a bit because I wasn't using anything from the original OEM install aside from the wires, but there you have it, that needs to stay in unless you're running your own wire to the doors. Hope that helps someone else who was/is/would be as baffled by that as I was, can't say I understand it but that's what's up.
Once I tapped into the factory wiring I thought I could remove the factory amp but alas, I was wrong. Mind you, I've got RCAs from the head unit to the amp and tapped the factory wires out of the plug for the factory bose amp so it shouldn't have been an issue to remove it, but without it plugged in I had no sound. I changed nothing from no sound to plugging the amp in and had music, so there's something on the factory speaker lines powered off that factory amp, just as a word to the wise. Confused me for a bit because I wasn't using anything from the original OEM install aside from the wires, but there you have it, that needs to stay in unless you're running your own wire to the doors. Hope that helps someone else who was/is/would be as baffled by that as I was, can't say I understand it but that's what's up.
Trending Topics

They're Illusion Audio carbon ND12s. Not sure if they're still in business, I've been using this pair off and on since around 2001. Very accurate sub with good frequency response, doesn't hit the hardest or take a ton of power but sounds good.
Won't have any updates for a while, not happy with he sound up front so need to rework some things. Sticking with the Focal passive crossover isn't going to cut it so I'm back to the drawing board. Need 1) active processing in some fashion or another 2) either new speaker location (kick panels/a-pillar) or more wire run into the front doors. Not sure what I'm going to about either of those so taking a couple days to sort my options. Maybe something will happen next weekend.

Thread
Thread Starter
Forum
Replies
Last Post
rezendvous420
G35 Sedan V35 2003-06
10
May 31, 2020 01:26 PM
zcherub
Engine, Drivetrain & Forced-Induction
1
Aug 30, 2015 05:04 PM