
Fatmat Install V1.2


Thread Starter
|
Registered User
Joined: Feb 2005
Posts: 500
Likes: 1
From: DFW, TX
Fatmat Install V1.2
Can someone explain to me why my pictures aren't showing up?
Hey everyone,
I'd just like to share my experience with the installation of Fatmat (Dynatmat alternative) to my doors and trunk. This is an ongoing process, I have the two passenger doors done so far.
A. This is the rear passenger door. Removal of the door panel is fairly straightforward.
1. There is a square-shaped plastic disc in the space of the door handle. Use a flathead to pop it out, and a screw sould be revealed. Use a philips screwdriver to unscrew that.
2. Pop off the trim on the arm rest / handle by using a flathead underneath the bottom of the trim. There should be a small notch shaped for a flathead. two screws should be revealed. Repeat step 1 with those two screws.
3. Just pop the door panel off by pulling up and out. Hold it from the sides (works best for me) and try and squeeze your fingers in the small gaps. Make sure they pop out and nothing breaks.
4. The panel should still be connected by the door handle attachment and the window controller. Just unscrew the screws that attach them to the panel, and wa-lah! Door panel is removed.
[IMG]http://photobucket.com/albums/a86/mr_ecktid/?action=view¤t=07_15_0.jpg
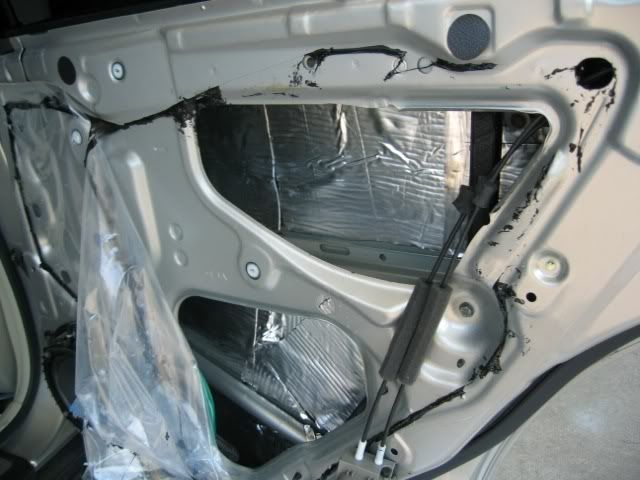
B. This is how it looks without the door panel. There is a plastic film covering the main holes. This is different from the front passenger door.
1. I simply pulled the plastic to the side and went to town with the Fatmat.
http://photobucket.com/albums/a86/mr...nt=07_15_1.jpg
C. This is a view of the inside of the door. I wasn't sure how much Fatmat to use. I double layered most of it since I bought 100sq. ft. I also put some fatmat on the horizontal arm across the door, not sure if it helps or not. It's also not the "cleanest" of installs, but I'm still a rookie at this so bear with me.
http://photobucket.com/albums/a86/mr_ecktid/?action=view¤t=07_15_4.jpg[/IMG]
That's all the pics I have for now. I'll be updating this regularly so be sure to look for it.
I'd also like to say that the front passenger door is a bit trickier. There is a panel that is in the place of the plastic film. The panel is attached to the door by 16 bolts, so it's just annoying to take off. Reinstalling the panel is even harder, but I'll explain this more in detail with pictures when I do the driver side.
-Mark
Hey everyone,
I'd just like to share my experience with the installation of Fatmat (Dynatmat alternative) to my doors and trunk. This is an ongoing process, I have the two passenger doors done so far.
A. This is the rear passenger door. Removal of the door panel is fairly straightforward.
1. There is a square-shaped plastic disc in the space of the door handle. Use a flathead to pop it out, and a screw sould be revealed. Use a philips screwdriver to unscrew that.
2. Pop off the trim on the arm rest / handle by using a flathead underneath the bottom of the trim. There should be a small notch shaped for a flathead. two screws should be revealed. Repeat step 1 with those two screws.
3. Just pop the door panel off by pulling up and out. Hold it from the sides (works best for me) and try and squeeze your fingers in the small gaps. Make sure they pop out and nothing breaks.
4. The panel should still be connected by the door handle attachment and the window controller. Just unscrew the screws that attach them to the panel, and wa-lah! Door panel is removed.
[IMG]http://photobucket.com/albums/a86/mr_ecktid/?action=view¤t=07_15_0.jpg
B. This is how it looks without the door panel. There is a plastic film covering the main holes. This is different from the front passenger door.
1. I simply pulled the plastic to the side and went to town with the Fatmat.
http://photobucket.com/albums/a86/mr...nt=07_15_1.jpg
C. This is a view of the inside of the door. I wasn't sure how much Fatmat to use. I double layered most of it since I bought 100sq. ft. I also put some fatmat on the horizontal arm across the door, not sure if it helps or not. It's also not the "cleanest" of installs, but I'm still a rookie at this so bear with me.
http://photobucket.com/albums/a86/mr_ecktid/?action=view¤t=07_15_4.jpg[/IMG]
That's all the pics I have for now. I'll be updating this regularly so be sure to look for it.
I'd also like to say that the front passenger door is a bit trickier. There is a panel that is in the place of the plastic film. The panel is attached to the door by 16 bolts, so it's just annoying to take off. Reinstalling the panel is even harder, but I'll explain this more in detail with pictures when I do the driver side.
-Mark
Last edited by mr_ecktid; Jul 15, 2005 at 10:16 AM.


Thread
Thread Starter
Forum
Replies
Last Post
350z, alternative, car, diy, door, doors, fatmat, inside, install, installation, installing, intall, panel, panels, pics