
Hamsar Daytime Running lights Install to pass federal inspection


Joined: Dec 2006
Posts: 584
Likes: 0
From: Calgary, Alberta
Hamsar Daytime Running lights Install to pass federal inspection
Well here is the quick and dirty install of the hamsar DRL module from canadian tire for all you canadian importers. It's ugly I know but it get's the job done and that's what counts!
First thing I did was remove my headlights completly. After doing my brother's 350z I didn't want to cramp and scrape up my hands in the fenders trying to splice into the lights.
https://g35driver.com/forums/body-in...g-removal.html
I'll explain briefly why I did it this way before I post the pics. The hamsar unit comes with a very strange green wire that is supposed to be triggered by the spark of the engine to tell the unit it's time to turn on. I was totally unable to get this to work on my brothers 350z after hours of trial and FAIL. So we decided that the "trigger wire would just be tied into the regular wires.
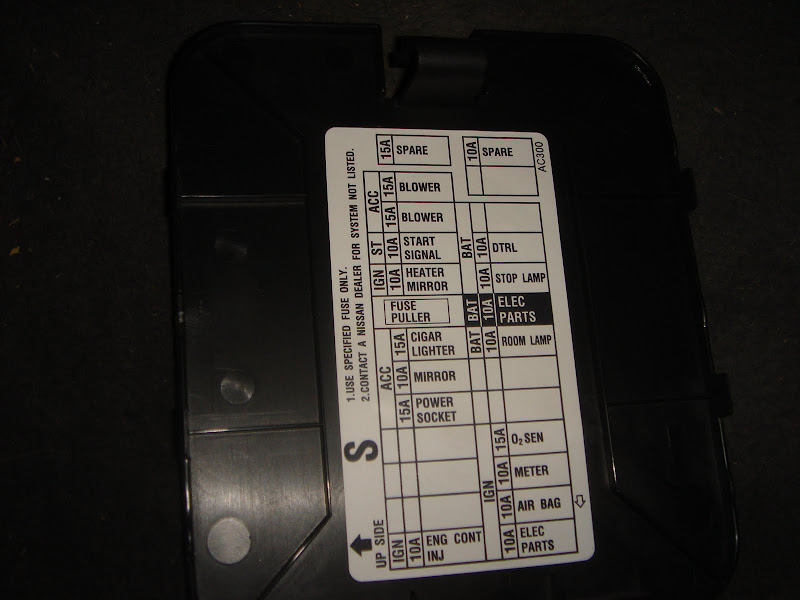
So the first thing that I did was go into the car's cabin into the fusebox to find a slot that only had power when the key was on but was not used.
So I looked on the fuse diagram and I took the spare fuse in the top left corner.
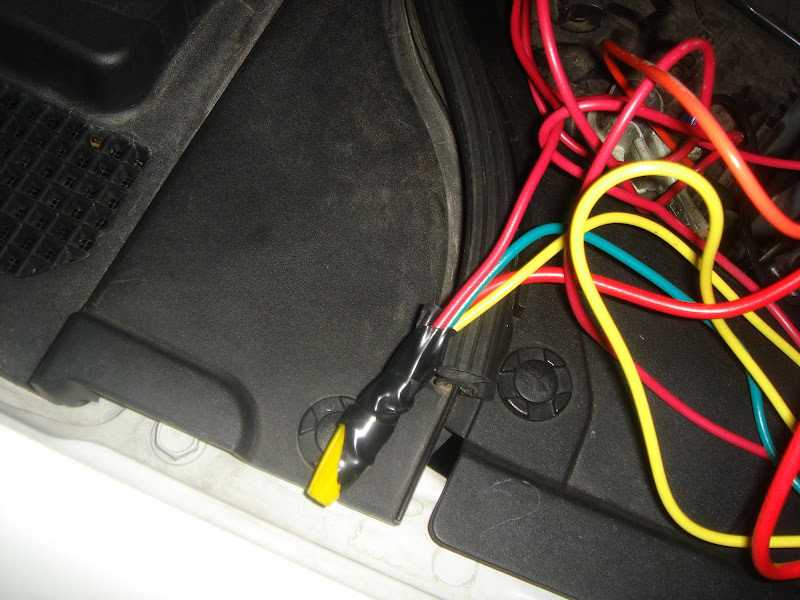
Next thing I did was I ran a wire from under the hood into the cab so that I could power the hamsar unit. It took some work to get it through but It's not that tough!

Next I pulled the spare fuse and stuck it in a empty socket that was live when the key was set to on. You can see I simply stuck the wire with the fuse into the socket.. It's low budget but it works! This is going to power the whole unit.

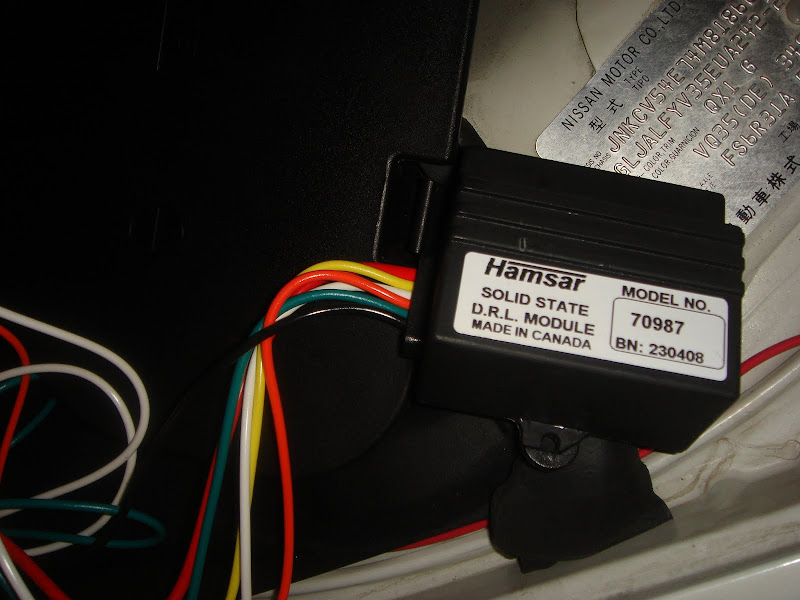
So once you have your power source secured you want to have that wire run all the way to the battery compartment. To be honest you don't really need the battery at all for this but who wants a bunch of wires all over the place looking ugly under the hood!
Set the hamsar unit around the battery and take the wire that you hooked up inside and splice it like the following. I have to apologise becaue the only wires I had were red and black. SO! The red from the car is spliced into the green trigger wire, the thicker red power wire and the yellow wire. This will provide power and the trigger for the unit once the key is turned to on.
This is where my DIY sux a little. I'm going to try to link to some other peoples pics here to show you what you want to do. What I did next was take a wire and splice it into the foglight in the pic below (#3). I used the wire splicer provided in the kit and I did the yellow wire. So what I did exactly was use a spare piece of wire and tap into the foglight on each side of the car so that the fog's where on all the time. DRL's lol.

Once the 2 yellow wires are spliced you need to run the wires back to the unit. You tap these 2 wires into the white wire because white is the "low beam" wire and the H4's that our car's use (should or may have) both capabilities.

Ok so now you have basically a mess of wires all over! But this is good. I tried to test the fog's with the hamsar unit before I plugged the harness back in and it didn't work. Of course because it wasn't grounded! Once I hooked the headlights back up to the car it worked.
Here is the hamsar unit with all the wires stuffed down the side of the battery compartment!
Last but not least you need to wire the ground (black wire) to the battery.
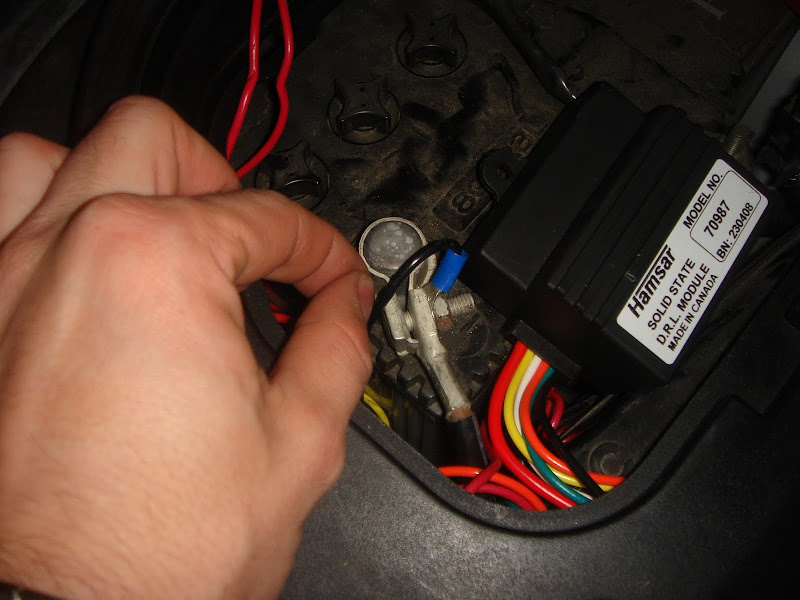
I tucked all the wires in beside the battery and I was able to close the battery cover but it was tight.

After wiring all the items as such all you need to do is place the enclosed fuse into the hamsar unit and turn the key to the on/accessory position. Your foglights should now be on whenever the key is on. I almost forgot! The orange wire is not used at all so you can cut the end off and electrial tape the end so it dosen't touch anthing!
If you have any questions please feel free to ask me. This literally took me 15min and was an instant pass for my federal inspection!. I will subscribe to this thread for any help!
Thanks to G35driver and it's forums! Without the initial headlight removal thread I would not have been able to do this mod in just a few minutes!
I didn't take a finished pic of what it does but if you request such a thing I think I can take a pic!
Adam.
First thing I did was remove my headlights completly. After doing my brother's 350z I didn't want to cramp and scrape up my hands in the fenders trying to splice into the lights.
https://g35driver.com/forums/body-in...g-removal.html
I'll explain briefly why I did it this way before I post the pics. The hamsar unit comes with a very strange green wire that is supposed to be triggered by the spark of the engine to tell the unit it's time to turn on. I was totally unable to get this to work on my brothers 350z after hours of trial and FAIL. So we decided that the "trigger wire would just be tied into the regular wires.
So the first thing that I did was go into the car's cabin into the fusebox to find a slot that only had power when the key was on but was not used.
So I looked on the fuse diagram and I took the spare fuse in the top left corner.
Next thing I did was I ran a wire from under the hood into the cab so that I could power the hamsar unit. It took some work to get it through but It's not that tough!
Next I pulled the spare fuse and stuck it in a empty socket that was live when the key was set to on. You can see I simply stuck the wire with the fuse into the socket.. It's low budget but it works! This is going to power the whole unit.
So once you have your power source secured you want to have that wire run all the way to the battery compartment. To be honest you don't really need the battery at all for this but who wants a bunch of wires all over the place looking ugly under the hood!
Set the hamsar unit around the battery and take the wire that you hooked up inside and splice it like the following. I have to apologise becaue the only wires I had were red and black. SO! The red from the car is spliced into the green trigger wire, the thicker red power wire and the yellow wire. This will provide power and the trigger for the unit once the key is turned to on.
This is where my DIY sux a little. I'm going to try to link to some other peoples pics here to show you what you want to do. What I did next was take a wire and splice it into the foglight in the pic below (#3). I used the wire splicer provided in the kit and I did the yellow wire. So what I did exactly was use a spare piece of wire and tap into the foglight on each side of the car so that the fog's where on all the time. DRL's lol.
Once the 2 yellow wires are spliced you need to run the wires back to the unit. You tap these 2 wires into the white wire because white is the "low beam" wire and the H4's that our car's use (should or may have) both capabilities.
Ok so now you have basically a mess of wires all over! But this is good. I tried to test the fog's with the hamsar unit before I plugged the harness back in and it didn't work. Of course because it wasn't grounded! Once I hooked the headlights back up to the car it worked.
Here is the hamsar unit with all the wires stuffed down the side of the battery compartment!
Last but not least you need to wire the ground (black wire) to the battery.
I tucked all the wires in beside the battery and I was able to close the battery cover but it was tight.
After wiring all the items as such all you need to do is place the enclosed fuse into the hamsar unit and turn the key to the on/accessory position. Your foglights should now be on whenever the key is on. I almost forgot! The orange wire is not used at all so you can cut the end off and electrial tape the end so it dosen't touch anthing!
If you have any questions please feel free to ask me. This literally took me 15min and was an instant pass for my federal inspection!. I will subscribe to this thread for any help!
Thanks to G35driver and it's forums! Without the initial headlight removal thread I would not have been able to do this mod in just a few minutes!
I didn't take a finished pic of what it does but if you request such a thing I think I can take a pic!
Adam.
Last edited by zeadlots; Jul 8, 2010 at 12:11 PM. Reason: Updated Picture Links

Registered User
Joined: May 2009
Posts: 2
Likes: 0
 I tried this method on a '04 Honda Odyssey and it fried the unit. It blew in two.
  The yellow wire is not for power it's for markerlights. So the yellow and the orange can be sniped if you are only wanting to pass the federal inspection. After much frustaration, I completed the install by tapping into the under the hood fuse box with the red, tapping into the wiper motor harness with the green, a separate wire from each headlight to the white, and of course grounded the black.
Joined: Dec 2006
Posts: 584
Likes: 0
From: Calgary, Alberta
Well I'm sorry you had trouble my friend but this walkthough is clearly for a G35 coupe. I would never attempt to wire another vehicle using this walkthrough. This method worked flawlessly for me and I passed my federal inspection in a snap. I wish I wouldn't have only had a bunch of red wire kicking around to keep the color scheme nicer for the walkthrough... but I can assure you that I personally wired both an american imported 350Z and my imported G35 and both still work to this day. (though I pulled the fuse on my unit cause I like to play my stereo in the garage without killing the battery)
Again sorry for your trouble but it's a DIY for G's.
Again sorry for your trouble but it's a DIY for G's.
Registered User
Joined: May 2009
Posts: 2
Likes: 0
I thought I had my install complete but the fuse on the red wire coming off the module continues to blow.
Yes I understand this isn't a honda site but the instructions for getting fire to the Hamsar unit are pretty generic. Thanks for your concern and I'm glad you had better success than I.
Yes I understand this isn't a honda site but the instructions for getting fire to the Hamsar unit are pretty generic. Thanks for your concern and I'm glad you had better success than I.

Thread
Thread Starter
Forum
Replies
Last Post