
DIY hitch for 03-06 g35 sedan


Thread Starter
|
Registered User
Joined: Oct 2010
Posts: 12
Likes: 1
From: ORLANDO,FL
DIY hitch for 03-06 g35 sedan
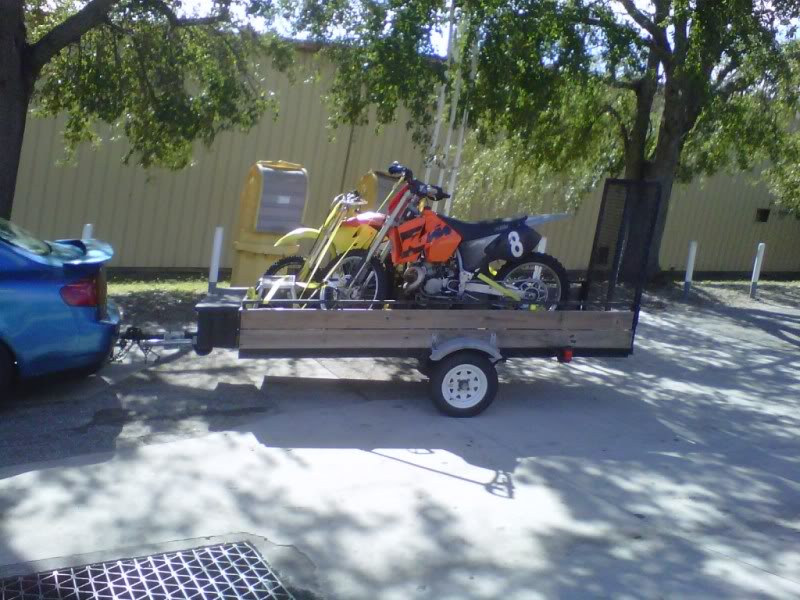
I know that alot of people will probably not like the idea of having a hitch on a g35 bu trust me the car is totally capable of pulling a trailer with a couple of bikes, atv's ,etc..... I love my G so instead of replacing it with a truck or suv i put a hitch on it..
Instructions are provided when you purchase the hitch but is not as easy as they describe,
on the installation instructions it says that it only takes 45min and that you do not need to remove the bumper but is nearly impossible to install it without doing that. It actually takes about 2hrs with help from a buddy...
Anyways this is what i did:
1) Purchase the curt hitch and taillight converter through your preferred site (i chosed Amazon):
this hitch can handle a 2,000lb towing capacity and a 200lb tongue weight.
2) Jack up your G
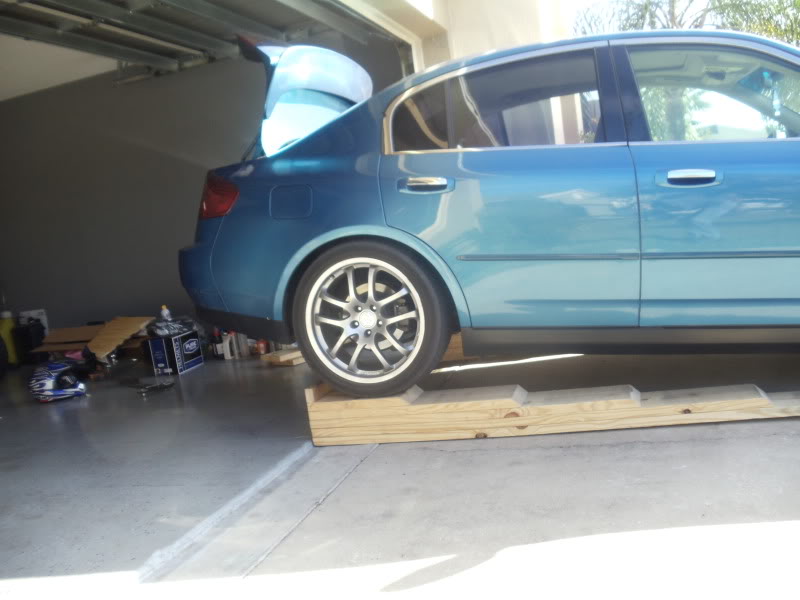
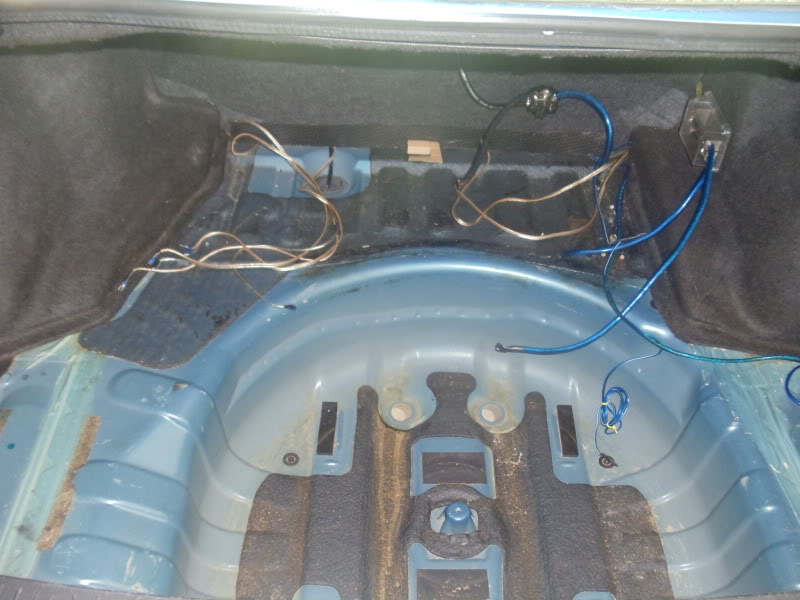
3) Clear out your trunk floor
4)Trim bumper fascia (specs are in the instruction sheet)

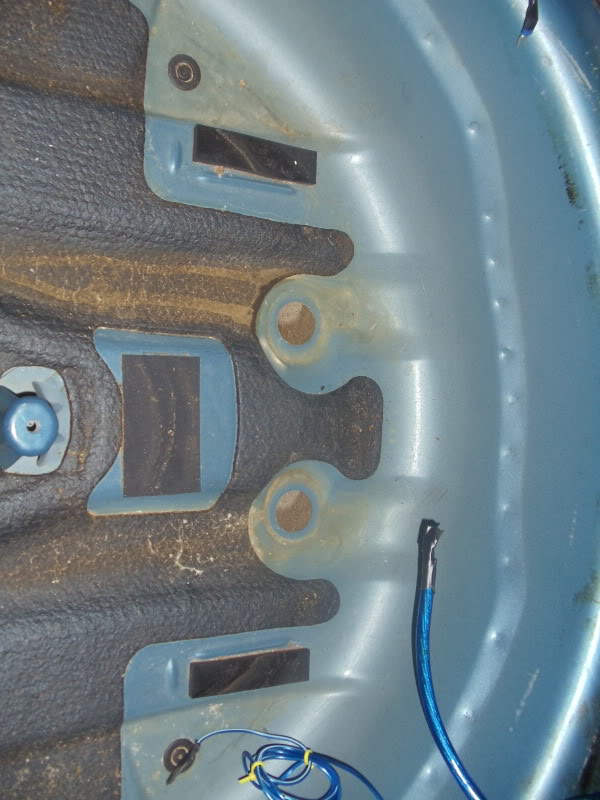
5)Remove rubber grommets from spare tire floor and remove taillights and bumper
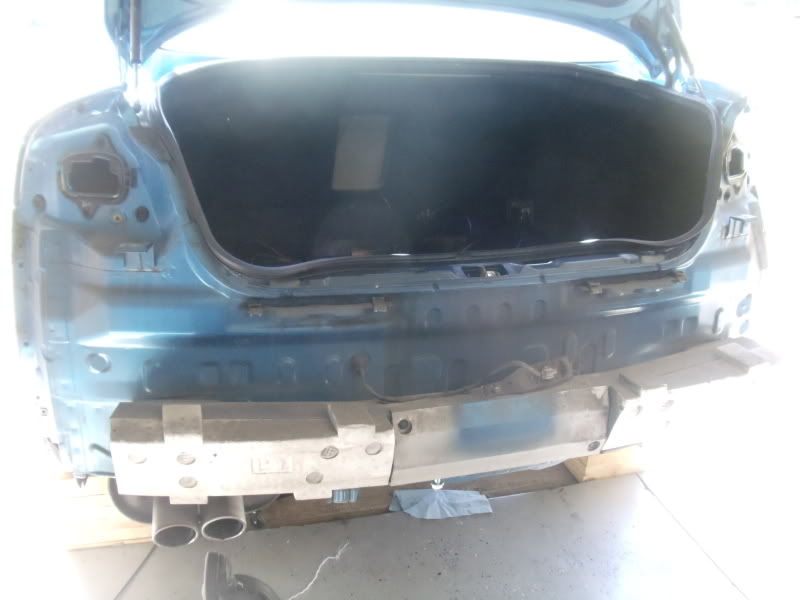
6) Drill 2 -1/2 '' holes through bumper support, make sure you align the hitch first so you know where to make the holes.
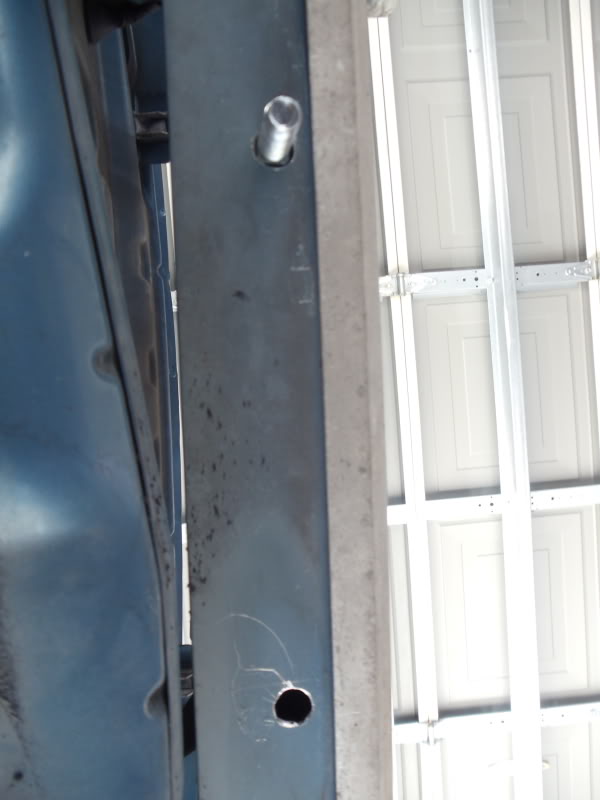
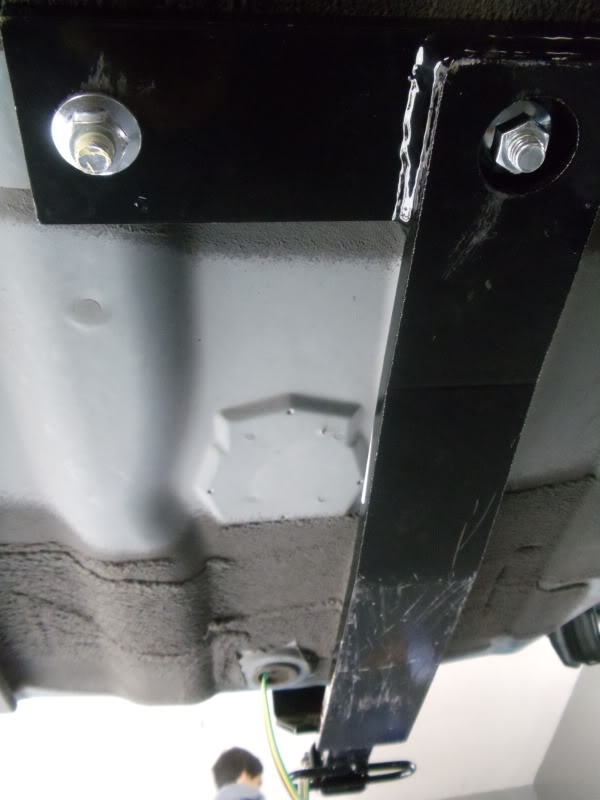
7) Now you can proceed to install the hitch. Fishwire the bolts and spacer through the inside of the bumper support; align everything correctly and tighten the bolts to the specified torque. It would be a good idea to keep the original rubber grommets by cutting them to make the bolt fit within them and seal with silicone.

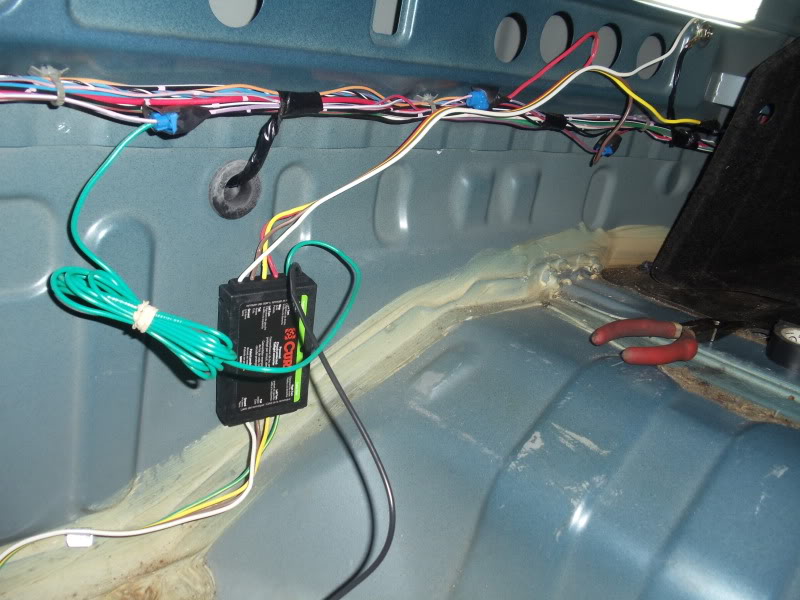
8) Go ahead and reinstall bumpers and taillights; now is time to install the taillight converter so your trailer can have functioning brake lights and signals. You would need to run a cable from the positive battery terminal to the back for the converter. For the negative just look for a good ground somewhere along trunk. For the brake lights and turn signal wires you would have to test the wires that come out of the taillight with a tester while someone is inside of the vehicle pressing the brake, same thing for your left and right signals.
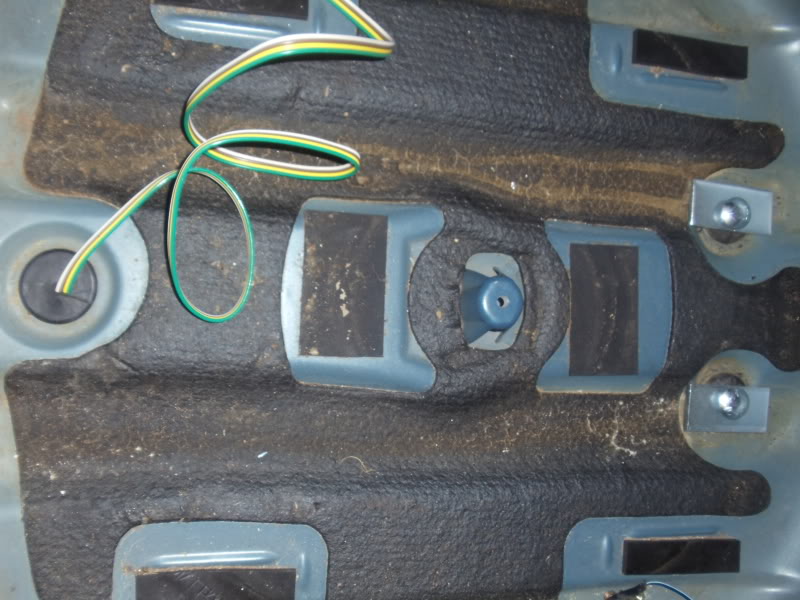
9) I Passed the trailer connecting plug through a small rubber grommet located near the end of the trunk floor.
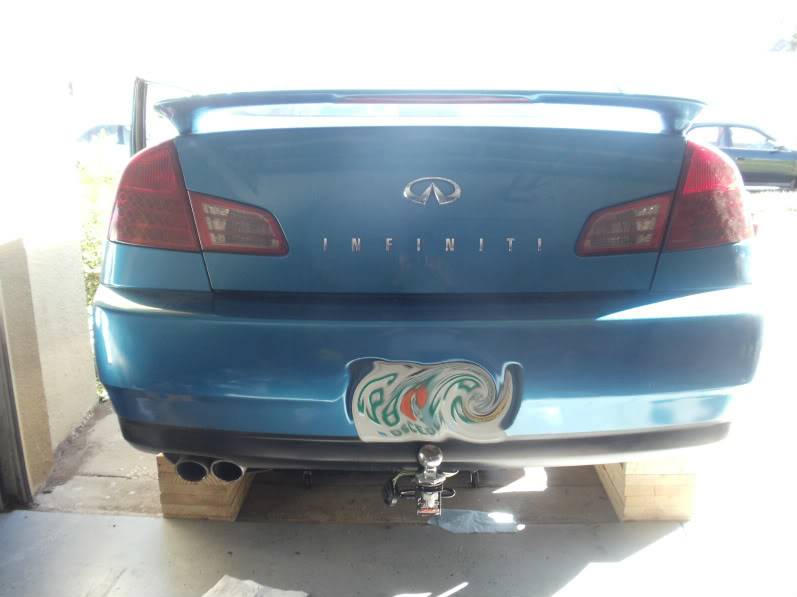
This is how your end results should look:
Yeah the hitch ball does look ugly but obviously your not going to have that on unless your towing. When the the receiver is removed you barely notice the car has a hitch...
REASON WHY I NEED A HITCH:
Instructions are provided when you purchase the hitch but is not as easy as they describe,
on the installation instructions it says that it only takes 45min and that you do not need to remove the bumper but is nearly impossible to install it without doing that. It actually takes about 2hrs with help from a buddy...
Anyways this is what i did:
1) Purchase the curt hitch and taillight converter through your preferred site (i chosed Amazon):
this hitch can handle a 2,000lb towing capacity and a 200lb tongue weight.
2) Jack up your G
3) Clear out your trunk floor
4)Trim bumper fascia (specs are in the instruction sheet)
5)Remove rubber grommets from spare tire floor and remove taillights and bumper
6) Drill 2 -1/2 '' holes through bumper support, make sure you align the hitch first so you know where to make the holes.
7) Now you can proceed to install the hitch. Fishwire the bolts and spacer through the inside of the bumper support; align everything correctly and tighten the bolts to the specified torque. It would be a good idea to keep the original rubber grommets by cutting them to make the bolt fit within them and seal with silicone.
8) Go ahead and reinstall bumpers and taillights; now is time to install the taillight converter so your trailer can have functioning brake lights and signals. You would need to run a cable from the positive battery terminal to the back for the converter. For the negative just look for a good ground somewhere along trunk. For the brake lights and turn signal wires you would have to test the wires that come out of the taillight with a tester while someone is inside of the vehicle pressing the brake, same thing for your left and right signals.
9) I Passed the trailer connecting plug through a small rubber grommet located near the end of the trunk floor.
This is how your end results should look:
Yeah the hitch ball does look ugly but obviously your not going to have that on unless your towing. When the the receiver is removed you barely notice the car has a hitch...
REASON WHY I NEED A HITCH:
Last edited by chris_u_diaz; Nov 19, 2011 at 11:26 PM.

Just sharing my information and a few other tips here as well. I should point out that this thread has some other great tips too which I used and will reference here. The only thing is that example does NOT remove the bumper cover and I just don't see how that's possible since my 03 does not have access holes and you have you utilize the end of the bumper beam to insert the bolts.
There's already lots of good information in these threads, but I ran across a few key things so trying to recall from memory for others to use. In particular I found details of removing panels, tail lights and bumper needing some comments. Plus a few tips.
0) Empty out your trunk fully (trunk mats, spare tire, etc). Back the car onto ramps or jack (with jackstands) to allow easier access.
1) I used the service manual and the section of how to remove tree pin clips as removing the panels in the trunk and the bumper cover was almost the worst part. See details there, but basically you will see the center pin can be pushed up with a screwdriver and then I used a specialty trim remover tool, but really you can use a needle nose if you are careful and use it to pry (not pull). I actually removed most by just pulling the center pin most of the way out and then fully separated before re-install, but best to fully pull the center pin to avoid breaking. Be sure to get them all (I recall the bumper cover itself only had one of these on the very bottom.
2) With the pins out you can now pop out the plastic trim at the bottom of the trunk lid. It just pops out, the specialty trim remover I have helped a lot, but careful use with a large screwdriver should work too. Try to find where the metal tabs are and apply pressure there. You'll now also be able to pull out the inside trim panels inside the trunk to get to the needed bolts/nuts for tail light and bumper removal.
3) Next disconnect the tail light wire harnesses and remove the nuts on the back of the tail lights and then simply pull the tail lights straight out. At the same time you can now remove the bolts holding the sides of the bumper cover in place as they are just past the tail lights inside the trunk.
4) Removing the bumper from here was a bit scary since the clips the hold it in place can be tough to disconnect and pretty much just pull straight out the back. Easy going and working from one side to the other helped.
5) I followed the details in the other thread and first temporarily mounted the back of the hitch to the holes in the trunk pan after removing the rubber plugs. I then used a jack to hold the end of the hitch in place to mark the holes for drilling. This made it very easy to use the hitch mount edge and line up straight on the bumper edge for proper fitment. Once marked, remove and drill.
6) I also used a center line marked on the bumper and used tin snips to cut the side cuts into the bumper as mentioned. I actually just did 5" wide and later test fit and adjusted as needed later. For the back cut others mentioned using dremel for clean cut, but you can actually just use a straight edge and utility knife to score and then bend and cut again (drywall cutting style). I also did not go the full 3" as it is not needed.
7) As mentioned in the other thread if you insert the rectangular washer and bolt in the end of the bumper with the rectangular washer pointing up and bolt thread touching the bottom of the inside of the bumper it will make it way easier to allow it to fall in the hole as you pull it though. Extending the length of the pull wire was needed for me as well. Also, if you do later lose the bolts in the bumper (be careful during final mount so you don't push it back up) you can use a powerful magnet to pull the bolt towards the edge so you can grab with a tool or fingers.
8) Much of the other details are listed in this thread for the final steps.
I will just mention that using the jack again for final assembly was a huge help. Using silicone sealant and red thread locker were good ideas also. Also I saw in youtube video for install on a 350z that the bumper brackets are light duty and just tack welded (he removed them and fully welded). This is important especially if you factor in that Infiniti claims the car is rated for 100/1,000 towing while the hitch itself is 200/2,000. This is why I plan to use the lower of the numbers myself. As you can see in the photos I also used label maker to print out the max towing ability as the 100/1,000 and placed inside trunk and on hitch itself. I have no problem going over this in a pinch, but based on my needs if I remind myself and others it's 100/1,000 and take care if over doing it.
PHOTOS

Thread
Thread Starter
Forum
Replies
Last Post
Tolboothwilley�
Exterior-Vendor
6
Jul 28, 2016 12:42 AM
laksjd84
Exterior - Body Parts
1
Jul 24, 2015 05:12 PM