

Timing Chain and.


Timing Chain Replacement and Removal DIY/Notes
For those of you who don't know I started off with a very loud whining/grinding noise that ended up being a faulty water pump and possible PS pump. I then went to change my water pump and tensioner and accidentally skipped a tooth most likely didn't even take much effort. Nissan wanted 1175 to just fix the timing for me not including any additional parts, so I figured I would do this myself. Set TDC and re-align the primary chain, so I just figured I would create a thread with some things I came across in case anyone has to perform this or remove certain parts.
I put about 8-10 hours in so far just going slow, taking breaks, and figuring things out.
Tools I used:
PB Blaster (I love this stuff)
Strap wrench
Chain Wrench - Use the one from Harbor Freight it fits snug. Don't buy the AutoZone one it's to short!
Old belt
Valve stem remover
Engine compression tester
Hose clamp
Putty knife
Screwdriver
1/4, 3/8, and 1/2 inch sockets and ratchets
Breaker bar
3/8 and 1/2
Torque Wrench
ft-lbs
in-lbs
Gasket scraper
3M Gasket remover roloc discs
Zip lock bags to label bolts and keep things together.
Catch pan
M8 bolts for water pump
Nissan separator - Some places sell it for like 80-100 bucks, but I found it on eBay for 40 and it has made this job so much easier.

Part Numbers (As I get/remember them):
Primary Chain - 13028-JK00A - $98.28
Timing Cover Lower Gasket - 11121-31U00 - $11.18
Chain Guide - 13085-AL511 -- $9.33
Slack Guide (Updated Part) - 13091-JK20A - $45.42
O-Ring for VVT (x2) - 15066-5E510 - $6.10
O-Ring Case (x2) - 15066-ZL80A - $5.30
Crankshaft Seal - 13510-31U10 - $11.35
Thermostat Gasket - 13050-31U00 - $3.38
Spacer for Idle Pulley Delete Mod - 13298-4P10A - $3.02
New Belt - 11720-4P10A
Upper Chain Guide (Updated Part) - 13085-JK20A - $19.87
Primary Tensioner
Water Pump
Fel-Pro lower oil pan gasket. I bought this for the fact I will be doing two or three oil changes/pan cleanings afterwards to help remove any residual coolant or debris that may remain. I figured it would be easier to leave a gasket in place for these changes and then on the final oil change RTV the pan back on.
Coolant
Cheap oil/filter (A good amount of coolant got in my engine when I forgot to empty the block and I think coolant was getting past it anyway. The o-rings were pretty much destroyed when I pulled out the old one). So, I plan on doing two or three oil changes with cheap oil and then putting Mobil 1 back in afterwards. Unless I have a blown head gasket then I am just going to junk the damn thing, lol.
Good oil/filter
This is the order that I removed everything in and was able to use my 1/2 in breaker bar for just about everything.
I also took that air tube off on top of the grille, coolant reservoir, Z-Tube, and pop charger to have more room.
Fan assembly - Disconnect electrical connection on bottom, two bolts, and unscrew AC lines on driver side it won't move otherwise.
*I would put a heavy blanket or tape cardboard or something over your radiator! I forgot to do this and being clumsy banged a bunch of fins!
Remove drive belts.
Drain oil and coolant.
Idler Pulley Next to PS Pump - Use a strap wrench wrap it around the pulley, use ratchet on each four screws and it should pull off. Mine was rusted to hell, so I shot a bunch of PB Blaster inside the screw holes and it eventually came off. Since, mine was rusty and didn't sound to good I just decided to do the pulley delete mod while I have everything torn down.
Power Steering Pump - Pretty easy to unbolt and it can safely hang without much worry. I believe this was two bolts.
Oil Filter - Unscrew it
Oil Cooler - 22MM deep socket and it comes off pretty easily. I needed to replace the gasket and I would recommend it if you haven't done it already. The newer gasket looks a little bigger and fits more snug.
Old vs. New on top of each other

Alternator - Three bolts hold it in place, electrical connector, one bolt attaches the terminal, and there is a bracket as well with two 8mm bolts. I would recommend disconnecting your power steering reservoir temporarily, removing your oil filter, and oil cooler. The terminal "B" nut was hard to reach, so I removed the two 8MM bolts and stuck a small 1/4 in ratchet with a 12MM bolt and managed to get it out. Then just pull down on the alternator and it comes off pretty easily.
Power Steering Bracket - The bracket on the other hand was a PITA to remove. It has four bolts and two of which are blocked by the alternator, so I recommend taking that off and unscrewing the bracket on the alternator. I used my 3/8 breaker bar to free the two nuts that are hidden by the alternator.
Remove idler pulley brackets
Harmonic balancer - new reply created to add pictures.
Oil Pan - Unscrew 10x10mm bolts. I was able to get this off in literally 5 minutes using the seal cutter. I tapped it into place put a small pry bar and it popped right off. I found small bits of things that looked like gravel and think it's plastic from the guides. Other then that my pan was pretty clean. Keep your catch can under to catch any run-off.
Timing cover - New reply.
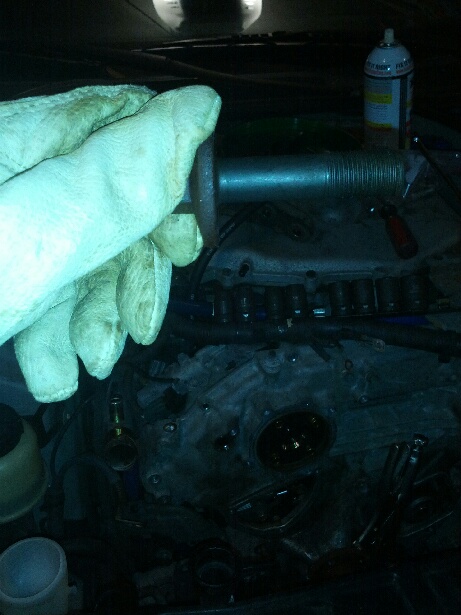
I made a tool to help find TDC at compression stroke. I took an engine compression tester I have, unscrewed the Schrader valve, and clamped the finger portion of a nitrile glove on the end.
I put about 8-10 hours in so far just going slow, taking breaks, and figuring things out.
Tools I used:
PB Blaster (I love this stuff)
Strap wrench
Chain Wrench - Use the one from Harbor Freight it fits snug. Don't buy the AutoZone one it's to short!
Old belt
Valve stem remover
Engine compression tester
Hose clamp
Putty knife
Screwdriver
1/4, 3/8, and 1/2 inch sockets and ratchets
Breaker bar
3/8 and 1/2
Torque Wrench
ft-lbs
in-lbs
Gasket scraper
3M Gasket remover roloc discs
Zip lock bags to label bolts and keep things together.
Catch pan
M8 bolts for water pump
Nissan separator - Some places sell it for like 80-100 bucks, but I found it on eBay for 40 and it has made this job so much easier.
Part Numbers (As I get/remember them):
Primary Chain - 13028-JK00A - $98.28
Timing Cover Lower Gasket - 11121-31U00 - $11.18
Chain Guide - 13085-AL511 -- $9.33
Slack Guide (Updated Part) - 13091-JK20A - $45.42
O-Ring for VVT (x2) - 15066-5E510 - $6.10
O-Ring Case (x2) - 15066-ZL80A - $5.30
Crankshaft Seal - 13510-31U10 - $11.35
Thermostat Gasket - 13050-31U00 - $3.38
Spacer for Idle Pulley Delete Mod - 13298-4P10A - $3.02
New Belt - 11720-4P10A
Upper Chain Guide (Updated Part) - 13085-JK20A - $19.87
Primary Tensioner
Water Pump
Fel-Pro lower oil pan gasket. I bought this for the fact I will be doing two or three oil changes/pan cleanings afterwards to help remove any residual coolant or debris that may remain. I figured it would be easier to leave a gasket in place for these changes and then on the final oil change RTV the pan back on.
Coolant
Cheap oil/filter (A good amount of coolant got in my engine when I forgot to empty the block and I think coolant was getting past it anyway. The o-rings were pretty much destroyed when I pulled out the old one). So, I plan on doing two or three oil changes with cheap oil and then putting Mobil 1 back in afterwards. Unless I have a blown head gasket then I am just going to junk the damn thing, lol.
Good oil/filter
This is the order that I removed everything in and was able to use my 1/2 in breaker bar for just about everything.
I also took that air tube off on top of the grille, coolant reservoir, Z-Tube, and pop charger to have more room.
Fan assembly - Disconnect electrical connection on bottom, two bolts, and unscrew AC lines on driver side it won't move otherwise.
*I would put a heavy blanket or tape cardboard or something over your radiator! I forgot to do this and being clumsy banged a bunch of fins!
Remove drive belts.
Drain oil and coolant.
Idler Pulley Next to PS Pump - Use a strap wrench wrap it around the pulley, use ratchet on each four screws and it should pull off. Mine was rusted to hell, so I shot a bunch of PB Blaster inside the screw holes and it eventually came off. Since, mine was rusty and didn't sound to good I just decided to do the pulley delete mod while I have everything torn down.
Power Steering Pump - Pretty easy to unbolt and it can safely hang without much worry. I believe this was two bolts.
Oil Filter - Unscrew it
Oil Cooler - 22MM deep socket and it comes off pretty easily. I needed to replace the gasket and I would recommend it if you haven't done it already. The newer gasket looks a little bigger and fits more snug.
Old vs. New on top of each other

Alternator - Three bolts hold it in place, electrical connector, one bolt attaches the terminal, and there is a bracket as well with two 8mm bolts. I would recommend disconnecting your power steering reservoir temporarily, removing your oil filter, and oil cooler. The terminal "B" nut was hard to reach, so I removed the two 8MM bolts and stuck a small 1/4 in ratchet with a 12MM bolt and managed to get it out. Then just pull down on the alternator and it comes off pretty easily.
Power Steering Bracket - The bracket on the other hand was a PITA to remove. It has four bolts and two of which are blocked by the alternator, so I recommend taking that off and unscrewing the bracket on the alternator. I used my 3/8 breaker bar to free the two nuts that are hidden by the alternator.
Remove idler pulley brackets
Harmonic balancer - new reply created to add pictures.
Oil Pan - Unscrew 10x10mm bolts. I was able to get this off in literally 5 minutes using the seal cutter. I tapped it into place put a small pry bar and it popped right off. I found small bits of things that looked like gravel and think it's plastic from the guides. Other then that my pan was pretty clean. Keep your catch can under to catch any run-off.
Timing cover - New reply.
I made a tool to help find TDC at compression stroke. I took an engine compression tester I have, unscrewed the Schrader valve, and clamped the finger portion of a nitrile glove on the end.


Last edited by coffeysm; Dec 14, 2013 at 05:23 PM.
Harmonic Balancer:
I took out my starter and was looking into maybe blocking that wheel from turning, but I decided to use the below method. The starter was a pain in the *** to take out also.
If you don't have an air tool, can't fit one in there, or if you can't crank your engine because your timing if off.
Here is how to do it:
Buy the chain clamp from Habor Freight it's 10 bucks! AutoZone sells one that is the same length apparently, however it's one link short!
Attach just the bracket from the idler pulley to the case.
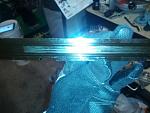
Cut your old belt to the circumference of the balancer.
Tape it in three spots so it looks like this:
Connect the wrench and keep the screw very loose.
Wiggle it around the balancer then tighten the screw as far as you can.
Stick your breaker bar and turn it until the clamp is wedged against the pulley bracket. (I attached the handle from one of my jacks for more levereage)
Keep turning it and it comes right off!

The balancer isn't pressed on either you just need to wiggle it back and forth.
I took out my starter and was looking into maybe blocking that wheel from turning, but I decided to use the below method. The starter was a pain in the *** to take out also.
If you don't have an air tool, can't fit one in there, or if you can't crank your engine because your timing if off.
Here is how to do it:
Buy the chain clamp from Habor Freight it's 10 bucks! AutoZone sells one that is the same length apparently, however it's one link short!
Attach just the bracket from the idler pulley to the case.
Cut your old belt to the circumference of the balancer.
Tape it in three spots so it looks like this:

Connect the wrench and keep the screw very loose.
Wiggle it around the balancer then tighten the screw as far as you can.
Stick your breaker bar and turn it until the clamp is wedged against the pulley bracket. (I attached the handle from one of my jacks for more levereage)

Keep turning it and it comes right off!
The balancer isn't pressed on either you just need to wiggle it back and forth.
Last edited by coffeysm; Dec 10, 2013 at 01:42 AM.
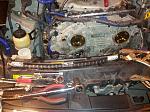
Timing Cover:
Remove all twenty-two bolts (20x10mm and 2x12mm).
Remove two bolts in the lower oil pan.
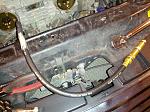
There are two notches on the top of the cover filled with RTV. I scraped the RTV banged a small screwdriver and larger fine screwdriver. There is enough clearance where you can't really damage the cover a whole lot. I then put the larger screwdriver and turned a little bit side to side to get a little play. I stuck a very wide thin putty knife in between the covers and it split through the RTV like butter.
Keep moving the putty knife around the case and it will eventually pop off.
I also sprayed the two dowels on the bottom of the cover with PB blaster.
Gently pry it off.
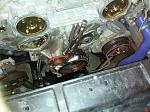
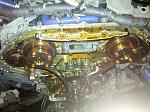
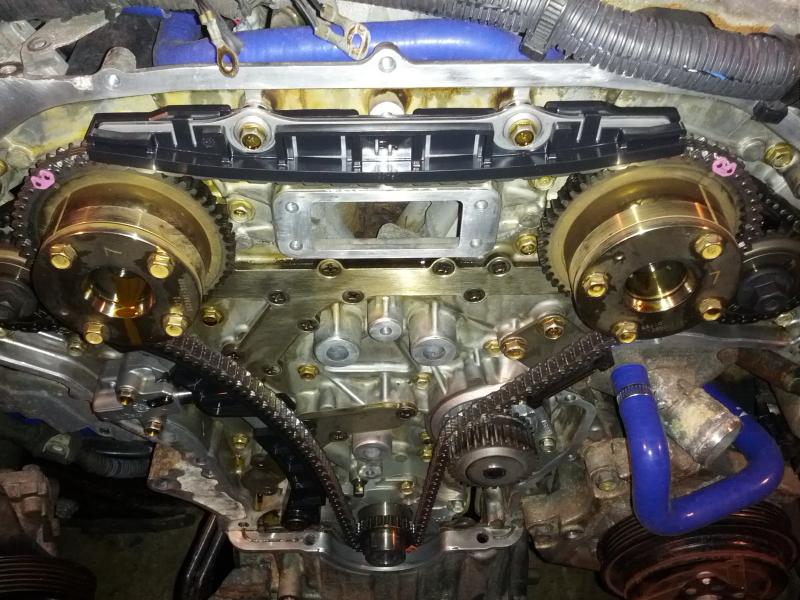
Isn't it beautiful!

Now I was told by a Nissan/Infiniti tech you should put the balancer and nut back on when setting TDC (it's possible to break the crankshaft were his words). So, that is what I did.
Getting TDC I left my modified compression tester or you can just feel for air coming out.
I then stuck the handle of an inspection mirror down the spark plug hole to get a better idea where TDC occurs (watch the handle move up or down and adjust accordingly).
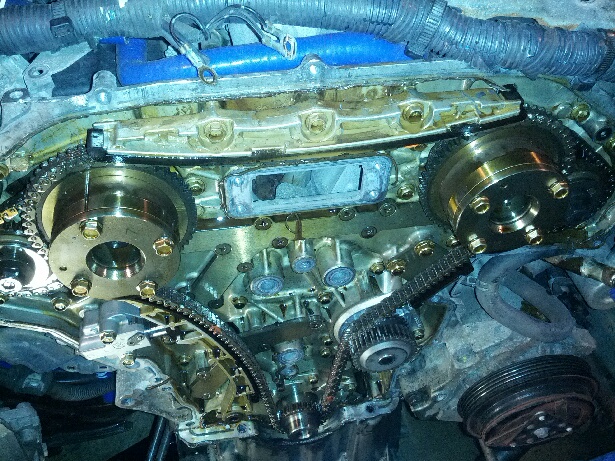
If you're lucky like me you will see that my chain skipped four teeth!
*The Infiniti/Nissan tech told me that engine damage occurs with more then two teeth skipped usually, but I wouldn't want to take that chance.
Most of my timing parts seemed in good order, but I'm replacing them anyway.
*Also if you take the variable timing covers off from the front cover. There are two gaskets in the center of it. I was told they are not replaced and if they are missing you have to buy a new cover and costs about 40 bucks online.
Remove all twenty-two bolts (20x10mm and 2x12mm).
Remove two bolts in the lower oil pan.
There are two notches on the top of the cover filled with RTV. I scraped the RTV banged a small screwdriver and larger fine screwdriver. There is enough clearance where you can't really damage the cover a whole lot. I then put the larger screwdriver and turned a little bit side to side to get a little play. I stuck a very wide thin putty knife in between the covers and it split through the RTV like butter.
Keep moving the putty knife around the case and it will eventually pop off.
I also sprayed the two dowels on the bottom of the cover with PB blaster.
Gently pry it off.
Isn't it beautiful!
Now I was told by a Nissan/Infiniti tech you should put the balancer and nut back on when setting TDC (it's possible to break the crankshaft were his words). So, that is what I did.
Getting TDC I left my modified compression tester or you can just feel for air coming out.
I then stuck the handle of an inspection mirror down the spark plug hole to get a better idea where TDC occurs (watch the handle move up or down and adjust accordingly).
If you're lucky like me you will see that my chain skipped four teeth!

*The Infiniti/Nissan tech told me that engine damage occurs with more then two teeth skipped usually, but I wouldn't want to take that chance.
Most of my timing parts seemed in good order, but I'm replacing them anyway.
*Also if you take the variable timing covers off from the front cover. There are two gaskets in the center of it. I was told they are not replaced and if they are missing you have to buy a new cover and costs about 40 bucks online.
Last edited by coffeysm; Dec 10, 2013 at 01:31 AM.


Nope! I just got everything off and awaiting my replacement parts. I'm going to try and document everything I come across and hope it helps someone out there. This is my first job ever like this and this site has given me a lot of confidence to tackle this, so I figured I would give something back!
Cleanup
I used 3M roloc discs attached my drill on a low setting to remove gasket residue after using a scraper. The kit is 20 bucks and can be purchased at AutoZone/Advance auto and comes with 6 pads. I used the blue (very fine) to remove most of the gasket material, but on the lower oil pan I used the red, which is slightly more coarse, but still safe for aluminum parts. The other two pads below the red should not be used for this. I tried blocking any access points for debris to enter. Then sprayed brake cleaner over the areas I cleaned and allowed enough time to evaporate.
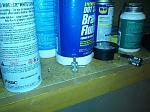
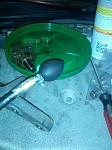
To remove the RTV from most of the bolt holes I used some small picks. I then soaked most of the bolts in brake fluid for a little while and used a brass or steel detail brush cleaning in back and forth across the threads.
I replaced my primary chain, tensioner, water pump, slack guide, and upper guide rail. The slack guide unscrews with a hex bit. I'm not sure the size, but my bit had the label S2 8 imprinted on it. The slack guide and upper have been modified from the original design and the upper guide requires only two bolts now for mounting.
Old Slack Guide
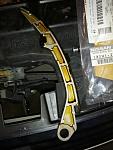
New Slack Guide
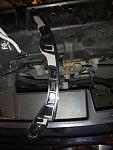
My upper chain guide was torn into pretty bad.
Old vs New

To remove the chain and guides I did the following:
Loosed one bolt on the tensioner
Removed the other bolt on the tensioner and pivoted it down.
Then removed the tensioner and slack guide.
Chain comes out fairly easy.
Removed bad guides and water pump.
I used 3M roloc discs attached my drill on a low setting to remove gasket residue after using a scraper. The kit is 20 bucks and can be purchased at AutoZone/Advance auto and comes with 6 pads. I used the blue (very fine) to remove most of the gasket material, but on the lower oil pan I used the red, which is slightly more coarse, but still safe for aluminum parts. The other two pads below the red should not be used for this. I tried blocking any access points for debris to enter. Then sprayed brake cleaner over the areas I cleaned and allowed enough time to evaporate.
To remove the RTV from most of the bolt holes I used some small picks. I then soaked most of the bolts in brake fluid for a little while and used a brass or steel detail brush cleaning in back and forth across the threads.
I replaced my primary chain, tensioner, water pump, slack guide, and upper guide rail. The slack guide unscrews with a hex bit. I'm not sure the size, but my bit had the label S2 8 imprinted on it. The slack guide and upper have been modified from the original design and the upper guide requires only two bolts now for mounting.
Old Slack Guide

New Slack Guide

My upper chain guide was torn into pretty bad.

Old vs New

To remove the chain and guides I did the following:
Loosed one bolt on the tensioner
Removed the other bolt on the tensioner and pivoted it down.
Then removed the tensioner and slack guide.
Chain comes out fairly easy.
Removed bad guides and water pump.
Last edited by coffeysm; Dec 16, 2013 at 04:30 AM.
Installation was in the following order and I found it easiest to get perfect alignment doing the following:
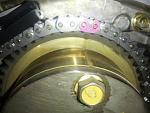
Make sure it's set to TDC as close as possible.
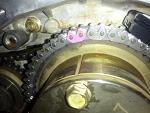
Align single color link to crankshaft thread up past water pump hole, over secondary guide, and onto the right (your right sprocket). Both links should line up perfectly and without much effort. Put the water pump in it's socket, but keep extremely loose for now. Thread the remaining chain over the other sprocket and again it should be fairly easily to line up. Push the slack guide up against the chain and then re-install the tensioner, but keep it compressed. Attach the upper chain guide pressing slightly down so it lines up correctly. Tighten everything down and use the correct torque settings most of them are in-lbs and then release the tensioner.
Crankshaft
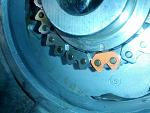
Camshaft - Your right looking at front of engine
Camshaft - Your left looking at front of engine
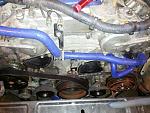
Completed

Make sure it's set to TDC as close as possible.
Align single color link to crankshaft thread up past water pump hole, over secondary guide, and onto the right (your right sprocket). Both links should line up perfectly and without much effort. Put the water pump in it's socket, but keep extremely loose for now. Thread the remaining chain over the other sprocket and again it should be fairly easily to line up. Push the slack guide up against the chain and then re-install the tensioner, but keep it compressed. Attach the upper chain guide pressing slightly down so it lines up correctly. Tighten everything down and use the correct torque settings most of them are in-lbs and then release the tensioner.
Crankshaft

Camshaft - Your right looking at front of engine

Camshaft - Your left looking at front of engine

Completed
Trending Topics
I'm also going to replace my radiator while everything is down. I think it had a small leak anyway and it was pretty worn out anyway.
I have it out already, but I'll try to add some pics.
Fans and hoses should be disconnected.
If you have an AT like I do disconnect the AT fluid lines. I plugged them up with some of the RTV caps.
Remove two hidden 10MM bolts above the grille.
Twist the two plastic tabs.
It's a little finicky to remove I had to push down slightly and then pull up. Just be careful with the condenser and the AC lines. But, it comes out fairly easily.
I bought a new one off Ebay for 63 dollars and hopefully it's not junk, lol.
http://www.ebay.com/itm/370739511192...84.m1439.l2649


Registered User
Joined: Aug 2010
Posts: 5
Likes: 0
nice post. I have a squealing noise when I first start the car but as the car warms up the squealing noise seem to be more quiet. At first I thought it was the serpentine belt. Do you think my squealing noise could be the same issue as you with a faulty water pump and power steering pump?
I feel you man my car is almost at 128K. But, buying a new one is out of the question and I honestly still love it as much as I did when I first bought it, lol. It is extremely time consuming especially getting the RTV off. It's also my fault though I had to end up doing this since I jumped timing trying to swap out a water pump. But, in the end it's obvious this needed to be done.
nice post. I have a squealing noise when I first start the car but as the car warms up the squealing noise seem to be more quiet. At first I thought it was the serpentine belt. Do you think my squealing noise could be the same issue as you with a faulty water pump and power steering pump?
For your squealing I would do the following:
Check your tension first make sure it's not to tight or too loose. I bought a 30 dollar gauge still not sure how to use it, but it's called a Krikit and is supposed to be accurate for getting tension readings.
Remove both belts, turn off all electronics, and start the car. BUT only keep it running enough to see if you hear the noise! You'll be running straight from the battery. This is how I narrowed it down to my water pump.
Put the serpentine belt on listen for the noise.
Put the AC belt on and listen for the noise.
The tensioner usually sounds like a loud rattle and happens when not enough oil pressure is built up. So, if it goes away after the car is warm it's possible that is what your are experiencing.
The water pump literally sounds like a banshee screaming, but didn't go away at all. I have videos posted on another thread of mine if you want to listen and compare. Just search my name that might help you.

Hey bro just a word of caution, those felpro gaskets I found they can **** up the lower oil pan. Try using half the recommended torque on the bolts otherwise the gasket will compress only where the bolts on an it will bend the pan. Might be leak free but pan will be ruined.
Hey bro just a word of caution, those felpro gaskets I found they can **** up the lower oil pan. Try using half the recommended torque on the bolts otherwise the gasket will compress only where the bolts on an it will bend the pan. Might be leak free but pan will be ruined.
I didn't take to many pictures of re-assembly, but it's basically in the reverse.
Prepare to get messy with the RTV. I used Nissan RTV with a regular caulk gun I had around the house.
If you took off the water pump and tensioner access ports put these back on first.
Put the two small o-rings on the rear timing cover.
Put a liberal amount of RTV around the back of the front timing case, a little bit on the lower oil seal, and on the top of the upper oil pan. You then want to put the timing case on at a slight angle. The top lines up pretty easily and the bottom protrudes out a good amount and this is normal. I put a bolt in the top center and then bolted in the bottom two first, so the two sides would connect. I then torqued them down to the value in the FSM. Pay attention to the oil gasket on the bottom of the cover it's a PITA and can kink up or get crooked very easily.
You want to put your idle pulley bracket back on and tighten the harmonic balancer. I bought a 10 dollar torque angle gauge from Pep Boys. Then do the same trick with the chain wrench. You torque it to 33 or 36 ft-lbs I don't remember the exact number and then it calls for a 90 degree torque angle. I've read that you're supposed to do the angle with one swing, but I was limited on clearance. I just did it far as I could then re-positioned my breaker bar and finished until the dial read 90 degrees. The dial has an L shaped black bar that you put somewhere that doesn't move and allows you to read the angle.
I then re-installed everything else in the reverse order, but I did have some difficulty putting the alternator back in.
I saved my lower oil pan for last just so I could allow everything drain as much as possible. Plus, I didn't want to lay on my back getting rid of RTV until I had no other choice, lol. Safety Goggles!
Double/triple check your TDC my crankshaft moved a little when I tightened the harmonic balancer. Re-install the spark plug and ignition coil in spark plug #1.
Fill her back up with oil.
I also finished installing my Z1 hoses on the power steering and oil cooler lines while I had everything disassembled.
Almost done!
I'm waiting for my radiator
Fill up with coolant.
Build up oil pressure before starting car will post how to do that when I do it.
Bleed the coolant. Hopefully the hose won't break again and explode in my face like last time!
Prepare to get messy with the RTV. I used Nissan RTV with a regular caulk gun I had around the house.
If you took off the water pump and tensioner access ports put these back on first.
Put the two small o-rings on the rear timing cover.
Put a liberal amount of RTV around the back of the front timing case, a little bit on the lower oil seal, and on the top of the upper oil pan. You then want to put the timing case on at a slight angle. The top lines up pretty easily and the bottom protrudes out a good amount and this is normal. I put a bolt in the top center and then bolted in the bottom two first, so the two sides would connect. I then torqued them down to the value in the FSM. Pay attention to the oil gasket on the bottom of the cover it's a PITA and can kink up or get crooked very easily.
You want to put your idle pulley bracket back on and tighten the harmonic balancer. I bought a 10 dollar torque angle gauge from Pep Boys. Then do the same trick with the chain wrench. You torque it to 33 or 36 ft-lbs I don't remember the exact number and then it calls for a 90 degree torque angle. I've read that you're supposed to do the angle with one swing, but I was limited on clearance. I just did it far as I could then re-positioned my breaker bar and finished until the dial read 90 degrees. The dial has an L shaped black bar that you put somewhere that doesn't move and allows you to read the angle.
I then re-installed everything else in the reverse order, but I did have some difficulty putting the alternator back in.
I saved my lower oil pan for last just so I could allow everything drain as much as possible. Plus, I didn't want to lay on my back getting rid of RTV until I had no other choice, lol. Safety Goggles!
Double/triple check your TDC my crankshaft moved a little when I tightened the harmonic balancer. Re-install the spark plug and ignition coil in spark plug #1.
Fill her back up with oil.
I also finished installing my Z1 hoses on the power steering and oil cooler lines while I had everything disassembled.
Almost done!

I'm waiting for my radiator
Fill up with coolant.
Build up oil pressure before starting car will post how to do that when I do it.
Bleed the coolant. Hopefully the hose won't break again and explode in my face like last time!
Last edited by coffeysm; Dec 16, 2013 at 04:57 AM.