
DIY: Battey removal and replace Optima

Joined: Feb 2005
Posts: 35,605
Likes: 2,116
From: South Texas
Wanted to do this for a while now. Mods feel free to move this where you think it goes, just PM me and let me know where you put it. 
My old OEM battery finally bit the dust a couple of weeks ago, so I thought I would replace it with an Optima Red Top. Why Optima? I have had very good luck with them over the years. I have used them in my Ford Exploder with GOBS of electronics and auxiliary lighting. I have used them in an electric fork lift and as a power supply for my Ham Radio gear. They are very vibration resistant and the are SEALED (no acid anywhere) and they do not "off gas" any dangerous Hydrogen that can cause explosions.
Please forgive how dirty my G is, I didn't see any point in detailing it BEFORE I did this.
The twist here is; this is how to do is without losing your radio presets, clock settings and ECM settings.
Tools you will need (BIG LIST)
small screw driver
10mm socket wrench
synthetic grease
a small 12v battery
two jumper clips about 24" long
Size 35 Optima battery
ANYONE CAN DO THIS!

Start by removing the little plugs (red arrows) that hold the battery cover on and then the weather stripping (yellow arrows) and lay them on the engine cover or some other suitable surface.

Next remove the upper weather stripping (yellow arrows) about half way over and set it on top of the engine cover. Observe the wires in this picture that are marked by the red arrows, you will not have them, they power my Ham Radios so don't worry about them. Also notice the black rubber tube marked by the red arrows, that is the windshield washer fluid line. Remember it's there, you will need to watch for it when you remove and replace the battery later. The little things in the green circle are the plastic rivets that hold the battery cover on.

Here you see everything laying out.

Next you will remove the rivet here....

...and here.
Now everything is exposed. You can see the fresh air intake for the air conditioning system. If you look inside you can see the cabin filter. You can now remove the 10mm nut from the battery bracket in the front.

DO NOT remove the back nut all the way! It is just a "J" hook that hangs in a hole in the back of the battery compartment. Just loosen it and let it hang from the battery bracket.

This step is optional, but if you dont want to lose your settings, this is what you need to do. Get a small battery and some jumper clips. Attach them to the auxillary battery....

...and to the CABLE CLAMPS of the main battery. This will supply 12v to the car so no setting will be lost.

OK, now you can remove the battery clamps, always negative first, being careful not to remove the auxillary battery clips.

Another view with the battery out.

This is the battey I got from Amazon.com. It is a size 35 Optima Red Top. I chose a red top because I have Ham Gear that needs lots of juice and the Red Top has a 36 month "no questions asked" REPLACEMENT warrantee. The Yellow Top (hybrid starting/deep cycle) is only waranted for 12 months in automotive applications. Ther is a bracket on top of the battery as it comes out of the box. Save it, you will need it later.

Separate the two pieces of the braket and save the larger one.

Snap it to the bottom of the battery. That will make it as tall as the OEM battery. Now drop it in place in the battery compartment.
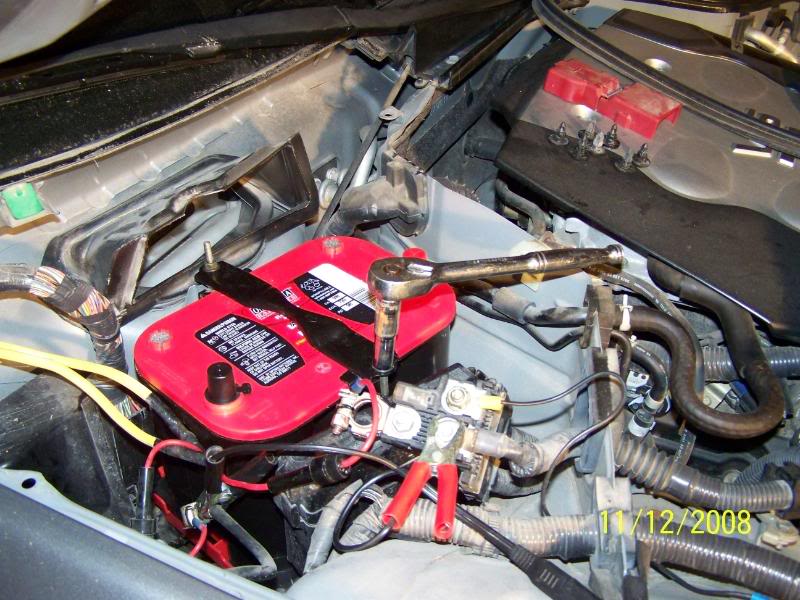
Now replace the battery clamp. Hook the little "J" hook in the hole at the back and slide the clamp over the front bar. Replace the 10mm nut and tighten both snug but not too tight.

You need to protect the battery terminals so use some grease on them. I used this synthetic from Radio shack.

Grease both terminals.

Now replace the battery clamps (this time Positive first!) and remove the auxillary battery clips.

Put the back cover on first look for the little "C" clips that hold the washer hose here....

...and here.

Replace the battery cover and weather stripping.

FIRE THAT PUPPY UP!
Now where is that wash bucket.
My old OEM battery finally bit the dust a couple of weeks ago, so I thought I would replace it with an Optima Red Top. Why Optima? I have had very good luck with them over the years. I have used them in my Ford Exploder with GOBS of electronics and auxiliary lighting. I have used them in an electric fork lift and as a power supply for my Ham Radio gear. They are very vibration resistant and the are SEALED (no acid anywhere) and they do not "off gas" any dangerous Hydrogen that can cause explosions.
Please forgive how dirty my G is, I didn't see any point in detailing it BEFORE I did this.
The twist here is; this is how to do is without losing your radio presets, clock settings and ECM settings.
Tools you will need (BIG LIST)
small screw driver
10mm socket wrench
synthetic grease
a small 12v battery
two jumper clips about 24" long
Size 35 Optima battery
ANYONE CAN DO THIS!
Start by removing the little plugs (red arrows) that hold the battery cover on and then the weather stripping (yellow arrows) and lay them on the engine cover or some other suitable surface.
Next remove the upper weather stripping (yellow arrows) about half way over and set it on top of the engine cover. Observe the wires in this picture that are marked by the red arrows, you will not have them, they power my Ham Radios so don't worry about them. Also notice the black rubber tube marked by the red arrows, that is the windshield washer fluid line. Remember it's there, you will need to watch for it when you remove and replace the battery later. The little things in the green circle are the plastic rivets that hold the battery cover on.
Here you see everything laying out.
Next you will remove the rivet here....
...and here.
Now everything is exposed. You can see the fresh air intake for the air conditioning system. If you look inside you can see the cabin filter. You can now remove the 10mm nut from the battery bracket in the front.
DO NOT remove the back nut all the way! It is just a "J" hook that hangs in a hole in the back of the battery compartment. Just loosen it and let it hang from the battery bracket.
This step is optional, but if you dont want to lose your settings, this is what you need to do. Get a small battery and some jumper clips. Attach them to the auxillary battery....
...and to the CABLE CLAMPS of the main battery. This will supply 12v to the car so no setting will be lost.
OK, now you can remove the battery clamps, always negative first, being careful not to remove the auxillary battery clips.
Another view with the battery out.
This is the battey I got from Amazon.com. It is a size 35 Optima Red Top. I chose a red top because I have Ham Gear that needs lots of juice and the Red Top has a 36 month "no questions asked" REPLACEMENT warrantee. The Yellow Top (hybrid starting/deep cycle) is only waranted for 12 months in automotive applications. Ther is a bracket on top of the battery as it comes out of the box. Save it, you will need it later.
Separate the two pieces of the braket and save the larger one.
Snap it to the bottom of the battery. That will make it as tall as the OEM battery. Now drop it in place in the battery compartment.
Now replace the battery clamp. Hook the little "J" hook in the hole at the back and slide the clamp over the front bar. Replace the 10mm nut and tighten both snug but not too tight.
You need to protect the battery terminals so use some grease on them. I used this synthetic from Radio shack.
Grease both terminals.
Now replace the battery clamps (this time Positive first!) and remove the auxillary battery clips.
Put the back cover on first look for the little "C" clips that hold the washer hose here....
...and here.
Replace the battery cover and weather stripping.
FIRE THAT PUPPY UP!
Now where is that wash bucket.


Good write-up. I also have the Red Top and I can vouch for how strong and reliable these batteries are.
Trending Topics
Joined: Feb 2005
Posts: 35,605
Likes: 2,116
From: South Texas
Originally Posted by Kazaam
Why red and not yellow?? That's my question.
That's one reason. The other was a Yellow Top is only warranted for 12 months in a automotive installation, a Red Top is warranted for 36 months OVER THE COUNTER SWAP, no pro rating.

Registered User
Joined: Sep 2004
Posts: 43
Likes: 0
Need some help on changing battery
Can anyone help with answers to these two questions before I get started:
1. Does the G35 Bose radio require an anti-theft code after I disconnect the battery?
2. Do you normally remove the battery lift strap from a new battery after installation?
Thank You
1. Does the G35 Bose radio require an anti-theft code after I disconnect the battery?
2. Do you normally remove the battery lift strap from a new battery after installation?
Thank You

Can anyone help with answers to these two questions before I get started:
1. Does the G35 Bose radio require an anti-theft code after I disconnect the battery? Nope
2. Do you normally remove the battery lift strap from a new battery after installation? Optional I leave mine on
Thank You
1. Does the G35 Bose radio require an anti-theft code after I disconnect the battery? Nope
2. Do you normally remove the battery lift strap from a new battery after installation? Optional I leave mine on
Thank You

Registered User
Joined: Sep 2004
Posts: 43
Likes: 0
Thanks, with the DIY guide here it was super easy. Done in 15 minutes.
I left the battery strap on so removing the battery in the future will be easier.
The bracket fits easily under the strap and there's plenty of clearance between
the strap and the battery door cover.
I didn't have a 12 volt battery so I skipped those steps. Not a problem, resetting the clock and radio presets was quick.