
DIY LED headlight thread


DIY LED headlight thread
So, I think this may be the first DIY LED headlight thread on the internet. I searched everywhere and couldn't find anything ANYWHERE! I really wanted this mod and didn't want to pay $1,000+ for someone else to do this, my end cost for this whole thing was just under $100, including soldering tools.
As a precursor, I had ZERO experience with soldering, LEDs, or painting my headlights, I learned this all on my own. So, if I messed up on anything, please let me know and I'll correct it. All I know is I had a wiring guy check it out and he said it was good to go.
---------------------
Equipment:
10mm socket w/ extenders
Soldering gun
Solder (I used 60/40)
5mm super bright LEDs (mine were 3v a piece)
100 ohm resistors
Black and red 22 gauge stranded wire
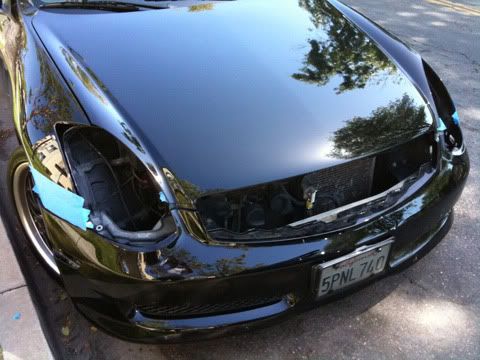
1.) First step is to pull off your bumper and get your lights out (there's other DIYs for this, so I wont go over it)
REMEMBER TO TAPE YOUR BUMPER!!!!! You WILL scratch it if you don't!! I doubled up the tape because I'm paranoid.
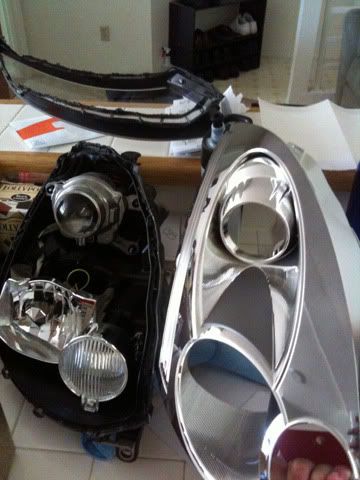
2.) Next is to bake your headlights and pull them apart (There's also another DIY for this as well)
REMEMBER TO REMOVE YOUR HID BALASTS BEFORE BAKING!!! Also, you don't have to remove all your bulbs, go ahead and leave them in.
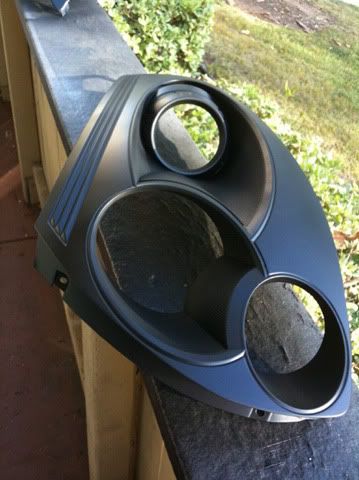
3.) Here's my housing painted
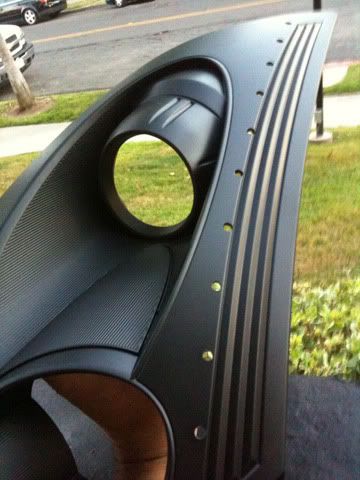
4.) Next, pick your spot and drill your holes. The picture was my first attempt using graph paper and lining it up along the strip, obviously I wasn't very precise, but I fixed it later.
A lot of people asked me why I didn't put the LEDs IN the strip; first off, I like them better beside it, and also, LED's are directional. The more you cover up on the LED the less you'll be able to see of it unless you're in its line of fire. On the strip, more of the LED was covered up than if I had it beside the strip, showing more light from different angles.
5.) Now you're ready to start running your LEDs.
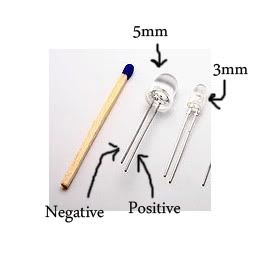
LEDs are not like regular lights. They need positive to positive and negative to negative, if the polarity is reversed, they simply will not turn on.
Remember, the longer side is the positive and the shorter side is negative.
6.) Next thing you want to do is to solder your 100 ohm resistor on to the positive side of your first LED (I forgot to take a picture of this, I found this picture on the internet, so this may or may not be a 100 ohm resistor in this picture)

7.) Now for the meat of it. You have aprox. a 12v source coming from your battery, with each of my LEDs being 3v a piece, you would connect them in series of 4 (Which means you would do your first LED with the 100 ohm resistor soldered on it as your first LED, then LED 2, 3, and 4 in a series soldered on to each other going positive to negative, positive to negative)
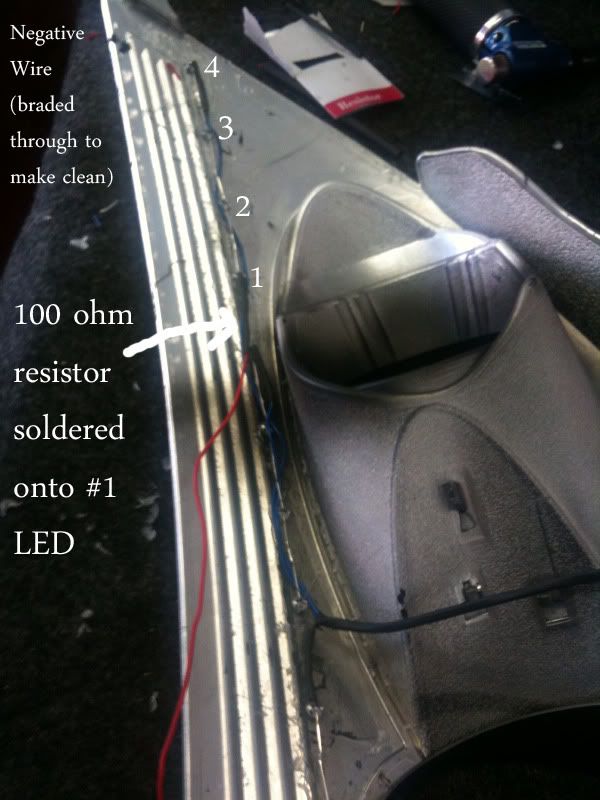
In this picture, I braided the negative wire down the LEDs just to keep a clean look, you don't have to do this, but it does make it cleaner with less wires to get tangled.
I ran two sets of four LEDs (The picture shows my first set of 1, 2, 3, and 4), and my last set was only 3 LEDs. I still used the 100 ohm resistor on the bottom three mostly because those are the forward firing ones and I wanted them the brightest.
So, you'll have how ever many sets of 4 LEDs you chose to do.
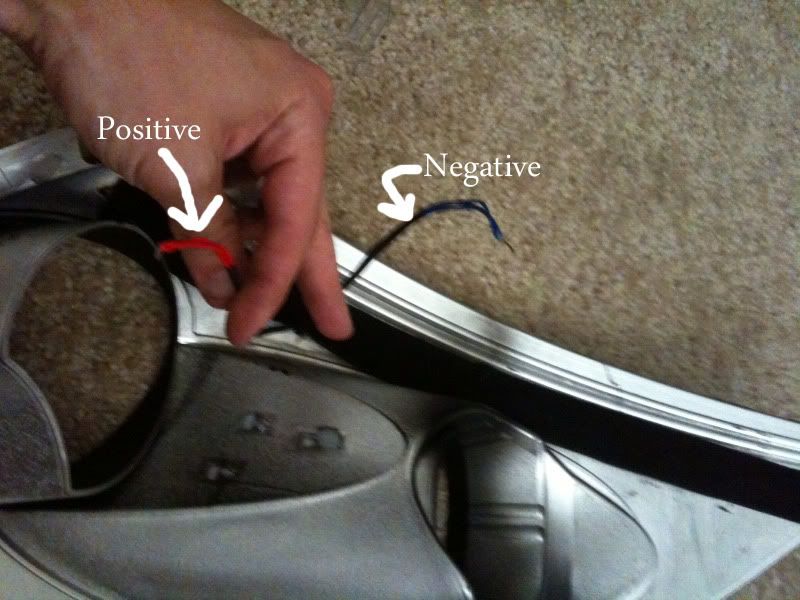
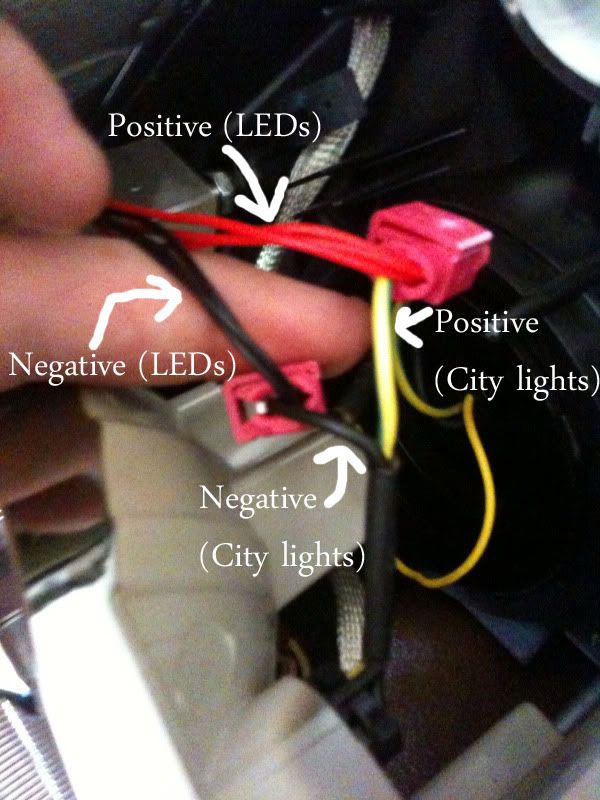
FOR EVERY SET OF 4 LEDS, YOU'LL HAVE A POSITIVE AND NEGATIVE WIRE!!! Basically, if you had 3 sets of 4 LEDs, you'd have 3 positive wires and 3 negative wires. Just twist them together and it looks like this:
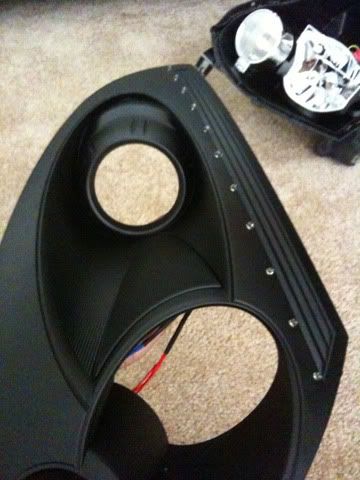
To keep the LEDs in place, make SURE you use something that you can remove!! Since the LEDs are in series, they are like christmas lights; if one of them goes out, the remaining ones in that series will go out as well! I made the mistake of using silicone the first time and had to cut them all out. I used a velcro strip because its really sticky and will keep them in place, but you can use duct tape or something similar.
8.) I wanted my LEDs to turn on with my city lights, so I tap spliced them into them. For the city light, the yellow/green wire is the positive and the black is the negative
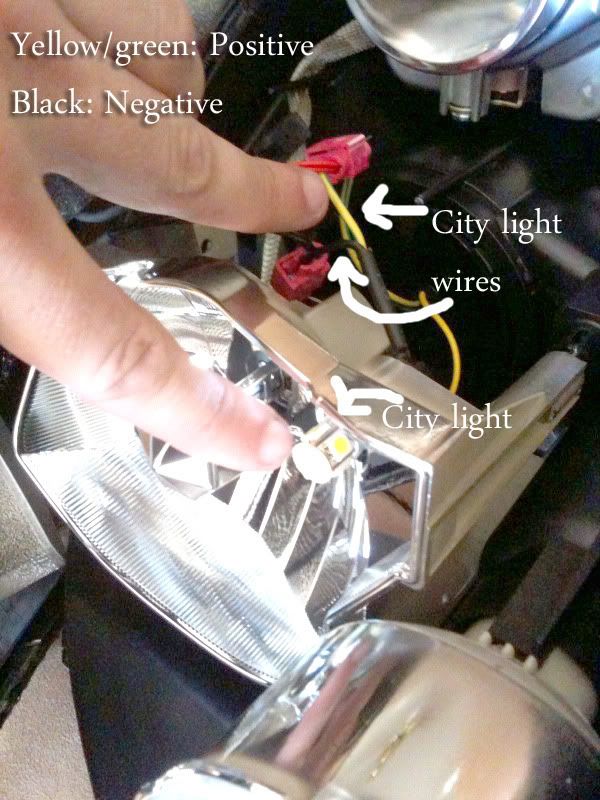
9.) Tap splice them in (or whatever method of getting power to them you want. If you want them to blink, tap splice them into your turn signals)
10.) Test them before you bake them to make sure they work(made this mistake myself the first time). You can test them with a drill battery, that's what I used.
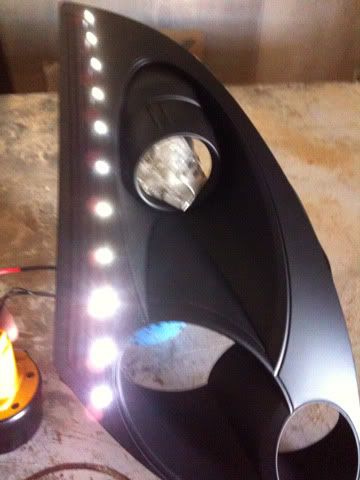
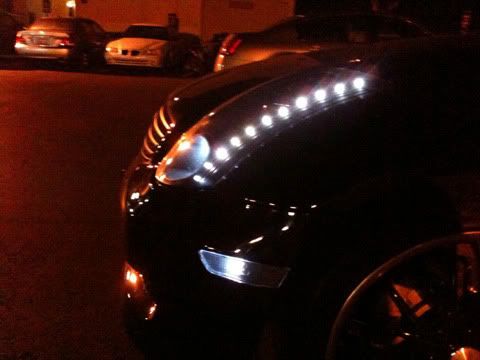
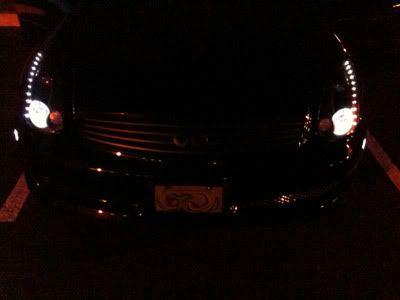
11.) Bake them and put them back on your car. Such a clean look!
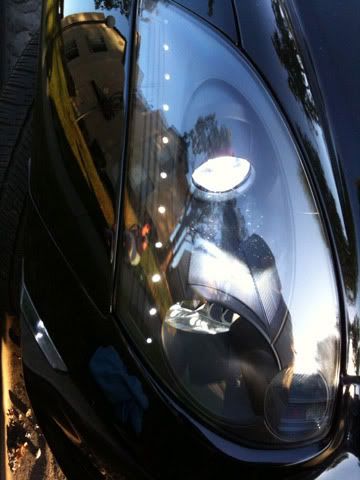
Some night shots
That's it everyone! Please don't steal this, I worked way too hard figuring all this crap out to have my work stolen.
I live in the San Diego and am a fairly nice guy, if you're ever in the area hit me up and for a case of beer I might help you out.
As a precursor, I had ZERO experience with soldering, LEDs, or painting my headlights, I learned this all on my own. So, if I messed up on anything, please let me know and I'll correct it. All I know is I had a wiring guy check it out and he said it was good to go.
---------------------
Equipment:
10mm socket w/ extenders
Soldering gun
Solder (I used 60/40)
5mm super bright LEDs (mine were 3v a piece)
100 ohm resistors
Black and red 22 gauge stranded wire
1.) First step is to pull off your bumper and get your lights out (there's other DIYs for this, so I wont go over it)
REMEMBER TO TAPE YOUR BUMPER!!!!! You WILL scratch it if you don't!! I doubled up the tape because I'm paranoid.
2.) Next is to bake your headlights and pull them apart (There's also another DIY for this as well)
REMEMBER TO REMOVE YOUR HID BALASTS BEFORE BAKING!!! Also, you don't have to remove all your bulbs, go ahead and leave them in.
3.) Here's my housing painted
4.) Next, pick your spot and drill your holes. The picture was my first attempt using graph paper and lining it up along the strip, obviously I wasn't very precise, but I fixed it later.
A lot of people asked me why I didn't put the LEDs IN the strip; first off, I like them better beside it, and also, LED's are directional. The more you cover up on the LED the less you'll be able to see of it unless you're in its line of fire. On the strip, more of the LED was covered up than if I had it beside the strip, showing more light from different angles.
5.) Now you're ready to start running your LEDs.
LEDs are not like regular lights. They need positive to positive and negative to negative, if the polarity is reversed, they simply will not turn on.
Remember, the longer side is the positive and the shorter side is negative.
6.) Next thing you want to do is to solder your 100 ohm resistor on to the positive side of your first LED (I forgot to take a picture of this, I found this picture on the internet, so this may or may not be a 100 ohm resistor in this picture)
7.) Now for the meat of it. You have aprox. a 12v source coming from your battery, with each of my LEDs being 3v a piece, you would connect them in series of 4 (Which means you would do your first LED with the 100 ohm resistor soldered on it as your first LED, then LED 2, 3, and 4 in a series soldered on to each other going positive to negative, positive to negative)
In this picture, I braided the negative wire down the LEDs just to keep a clean look, you don't have to do this, but it does make it cleaner with less wires to get tangled.
I ran two sets of four LEDs (The picture shows my first set of 1, 2, 3, and 4), and my last set was only 3 LEDs. I still used the 100 ohm resistor on the bottom three mostly because those are the forward firing ones and I wanted them the brightest.
So, you'll have how ever many sets of 4 LEDs you chose to do.
FOR EVERY SET OF 4 LEDS, YOU'LL HAVE A POSITIVE AND NEGATIVE WIRE!!! Basically, if you had 3 sets of 4 LEDs, you'd have 3 positive wires and 3 negative wires. Just twist them together and it looks like this:
To keep the LEDs in place, make SURE you use something that you can remove!! Since the LEDs are in series, they are like christmas lights; if one of them goes out, the remaining ones in that series will go out as well! I made the mistake of using silicone the first time and had to cut them all out. I used a velcro strip because its really sticky and will keep them in place, but you can use duct tape or something similar.
8.) I wanted my LEDs to turn on with my city lights, so I tap spliced them into them. For the city light, the yellow/green wire is the positive and the black is the negative
9.) Tap splice them in (or whatever method of getting power to them you want. If you want them to blink, tap splice them into your turn signals)
10.) Test them before you bake them to make sure they work(made this mistake myself the first time). You can test them with a drill battery, that's what I used.
11.) Bake them and put them back on your car. Such a clean look!
Some night shots
That's it everyone! Please don't steal this, I worked way too hard figuring all this crap out to have my work stolen.
I live in the San Diego and am a fairly nice guy, if you're ever in the area hit me up and for a case of beer I might help you out.

cool deal. i was debating on doing a write-up but didnt feel like taking all the pix and notes. lol. nice led location. now im tryna figure out how i wanna run mine for the 2nd time around.


nice, only issue I saw with using resistors is the voltage still fluctuates. I opted for voltage regulators with heatsinks so I had a steady voltage output independent of the cars 13~15 volts
Trending Topics

Nice write up... Some may want to use the pre-wired LEDs if they dont have any experience with soldering as they have the resistors attached and wrapped up on the back...


nice diy but wrong leds to use and also wrong resistor . You need to calculate the Foward current as well as the foward voltage of the leds . Are you running these at 12v ? Also dont say dont steal your work because i alone have done that numerous times so if anything you would be stealing other peoples work .You posted a diy which means for other people to do it themself but then say dont do it lol . You def want to use some vregs too so you have a stable voltage .One other thing why do you have 4 in series and 11 leds . That 3 in series is being way overpowered as you can see by the the brightness and will blow in a week or so .There is a trick us professionals do when you dont have space for the last led .Hide the last led in back of the shroud .All in all you got almost the right idea but the way you did it those leds will NOT last for long
Last edited by the04coupe; Aug 24, 2010 at 05:40 PM.
The04coupe: listen man, you need to chill out a little. First off, I said don't steal my work as in don't take my pictures and wording and rewrite it as your own. I posted a DIY so others can do it themselves, I'm trying to share the information I learned.
I also let others know that I'm not a professional, I learned all I know from reading about LEDs and if I had something incorrect to let me know and I'll fix it. I said I'd leave my last three LEDs at the 100ohm level because I wanted them brighter. I've had this setup for over a year now and nothing has blown. I've had this checked out by a professional and he said everything was good to go.
If you want to troll, please do it somewhere else. I'm just trying to share information.