
PICS of Dash/Spedometer lights in blue/white!


Joined: Aug 2004
Posts: 1,819
Likes: 4
From: Los Angeles / San Jose
temp and ac meter is a bit more tricky since the plastic that you see has its own tint on it. the panel that produces the light behind it isnt really white either. i will work on changing this when i get the time. i managed to do G35lin's. he might have pics.
Wicked - you need to pry off that entire plastic piece that covers the clock and the ac displays. do this by jamming a flat head screwdriver (covered in a thin towel) on each side and pulling out from the top. its kinda tricky, maybe g35lin can describe it better. after that you need to unscrew and unplug the clock. on the back there are two black circles that you twist to pull out. attatched to these two black pieces of plastic are the stock bulbs. yank these out. you will need to sand and maybe scuff two LEDs up so that the light refracts better in the clock housing. i sanded the tip of the LED all the way down so that instead of a dome head it was more like a square head. after that you need to stick two LEDs in these brackets (with the correct resistor) and wrap the leads around the black plastic pieces. slap it all back together and youre done! for the exact voltages resistors and LEDs and stuff, ask rever. hope this helps/gives you a good idea of how to do this.
Wicked - you need to pry off that entire plastic piece that covers the clock and the ac displays. do this by jamming a flat head screwdriver (covered in a thin towel) on each side and pulling out from the top. its kinda tricky, maybe g35lin can describe it better. after that you need to unscrew and unplug the clock. on the back there are two black circles that you twist to pull out. attatched to these two black pieces of plastic are the stock bulbs. yank these out. you will need to sand and maybe scuff two LEDs up so that the light refracts better in the clock housing. i sanded the tip of the LED all the way down so that instead of a dome head it was more like a square head. after that you need to stick two LEDs in these brackets (with the correct resistor) and wrap the leads around the black plastic pieces. slap it all back together and youre done! for the exact voltages resistors and LEDs and stuff, ask rever. hope this helps/gives you a good idea of how to do this.


congrats man! enjoy your new colors! it made my driving experience much better hehehe
__________________
My blue interior lights
https://g35driver.com/forums/lighting/39381-stage-4-done-blue-ac-compass-temp-display.html
'04 TB 6mt nav
__________________
My blue interior lights
https://g35driver.com/forums/lighting/39381-stage-4-done-blue-ac-compass-temp-display.html
'04 TB 6mt nav


Registered User
Joined: Jun 2003
Posts: 383
Likes: 1
From: SoCal
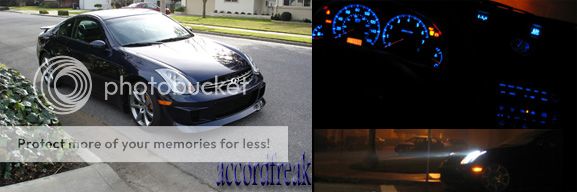
Here's my attempt at the conversion. For the HVAC display, I made a plexiglass piece and used 3 layers of blue tint from Pep Boys. It looks friggin awsome. I also used the blue tint for the gauges. Looks purple in the pics but is really blue in person. The gauges are really hard to see in the daylight, so I'm probably going to remove the tint and leave it white like Alan's.
Can someone clue me in on how to change the odometer?
Can someone clue me in on how to change the odometer?
Registered User
Joined: Jun 2003
Posts: 383
Likes: 1
From: SoCal
Originally Posted by imalazeeass
can u apply the same method of pexiglass and tint to the radio display unit?

Joined: Aug 2004
Posts: 1,819
Likes: 4
From: Los Angeles / San Jose
Originally Posted by skaline
Here's my attempt at the conversion. For the HVAC display, I made a plexiglass piece and used 3 layers of blue tint from Pep Boys. It looks friggin awsome. I also used the blue tint for the gauges. Looks purple in the pics but is really blue in person. The gauges are really hard to see in the daylight, so I'm probably going to remove the tint and leave it white like Alan's.
Can someone clue me in on how to change the odometer?
Can someone clue me in on how to change the odometer?