
DIY: Clutch Fix#1 - pedal travel


Joined: Jan 2004
Posts: 21,095
Likes: 47
From: Toronto, GTA north
DIY: Clutch Fix#1 - pedal travel
OK guys.....
After playing with spacers & double sided tape to minimize clutch pedal travel. (as per the other fix thread)
I came up with a more mechanically sound fix, that gives you adjustment capabilities.
NOTE: This is specific to the 2nd Gen 6MT, our pedal setup is a little different than 1st Gen.
First off after driving with & loving the R&D spacers for a week;
I took them out for the more permanent fix.
With them out, I went for a short drive...... OMG it was AWFUL!!!!!
I couldn't wait to get the fix done.
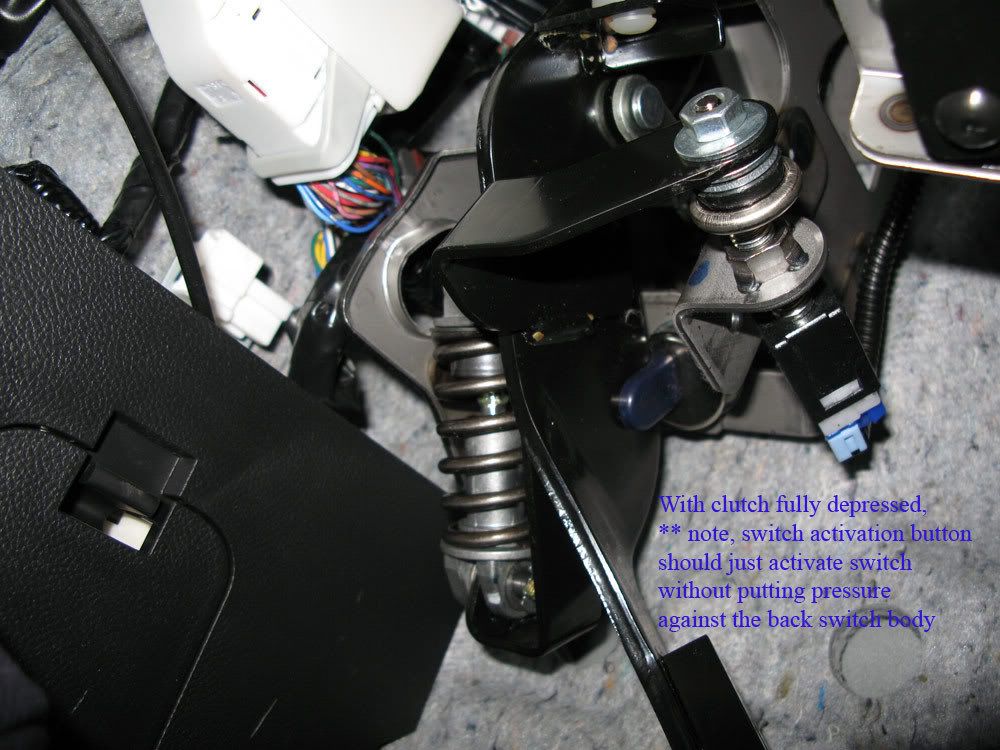
Most of the explanation is right on the pics....
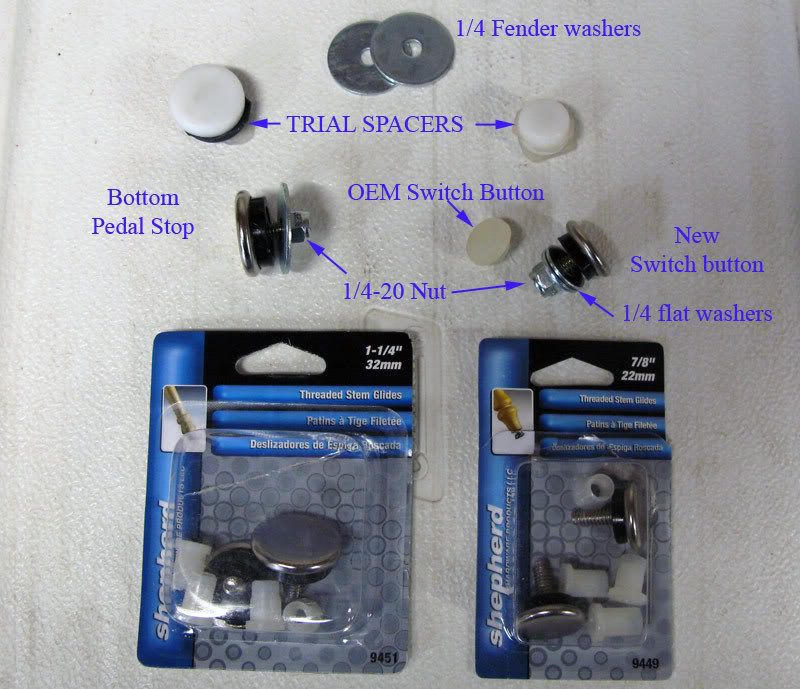
But basically I replaced the spacers with threaded stem guides from Home depot.
They're made for furniture/table legs for leveling them.
In addition to being much more mechanically sound,
the BIG benefit to these is adjustment capabilities.
You can get the pedal position EXACTLY where you want it.
Initially I was going to tap a thread into the back plate, but decided it was much easier to just stack a couple of 1/4" fender washers as spacers.
Fender washers are available in various gauges (thickness) but are nominally about .05"
On my car I tried two, but then took one out to get a tad more travel.
With this set up I now LOVE the clutch in my G.
This setup gave me that added adjustment that spacers & D.sided tape couldn't provide.
The clutch is now consistent, time after time after time.

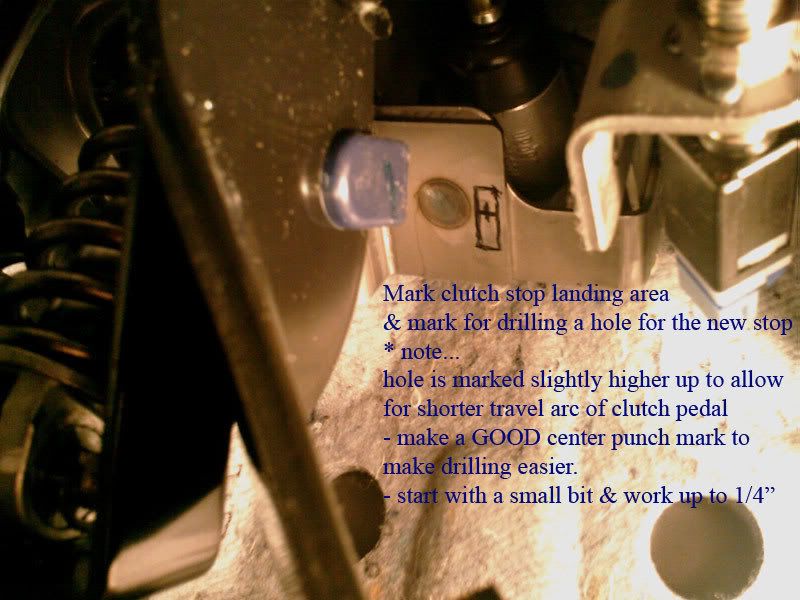
...probably the most tricky part of this mod is drilling the hole in the back plate.
It's hard to get the drill @ 90� to surface, so it is want to walk away.
It is imperative to get a GOOD center punch mark and then start with a small bit.
(the smaller the drill the better as well)
Good luck & enjoy....
This is easily the best mod I've done to the car!!!!
(sorry for the quality of some of these pics, I only had my cell cam at the time)
The parts....
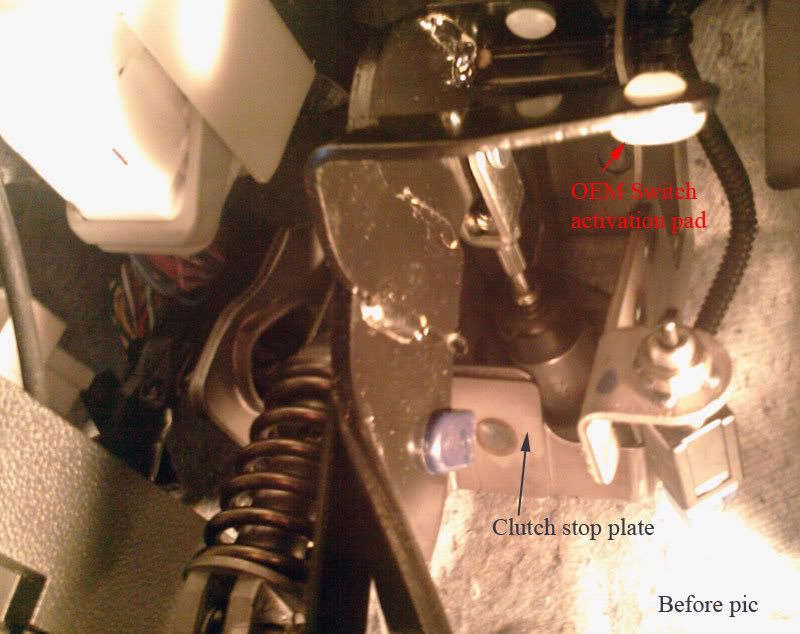
OEM Before.....
Mark the drill hole.....
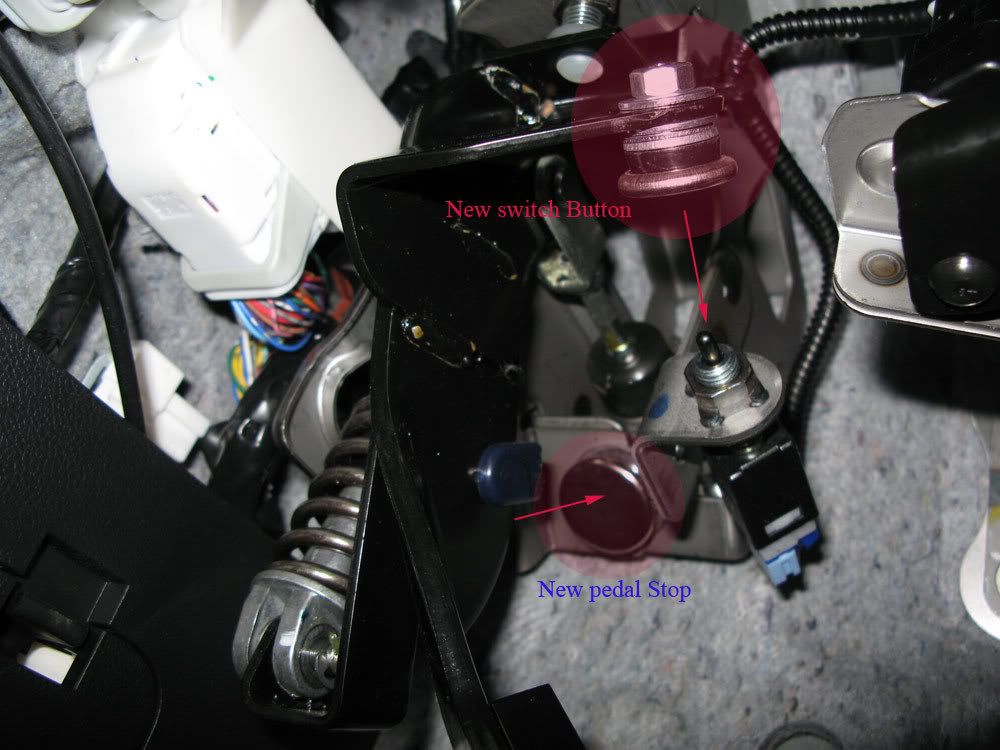
New stops installed, showing travel....
Bottom of travel showing stops mated to pedal....
After playing with spacers & double sided tape to minimize clutch pedal travel. (as per the other fix thread)
I came up with a more mechanically sound fix, that gives you adjustment capabilities.
NOTE: This is specific to the 2nd Gen 6MT, our pedal setup is a little different than 1st Gen.
First off after driving with & loving the R&D spacers for a week;
I took them out for the more permanent fix.
With them out, I went for a short drive...... OMG it was AWFUL!!!!!
I couldn't wait to get the fix done.
Most of the explanation is right on the pics....
But basically I replaced the spacers with threaded stem guides from Home depot.
They're made for furniture/table legs for leveling them.
In addition to being much more mechanically sound,
the BIG benefit to these is adjustment capabilities.
You can get the pedal position EXACTLY where you want it.
Initially I was going to tap a thread into the back plate, but decided it was much easier to just stack a couple of 1/4" fender washers as spacers.
Fender washers are available in various gauges (thickness) but are nominally about .05"
On my car I tried two, but then took one out to get a tad more travel.
With this set up I now LOVE the clutch in my G.
This setup gave me that added adjustment that spacers & D.sided tape couldn't provide.
The clutch is now consistent, time after time after time.
...probably the most tricky part of this mod is drilling the hole in the back plate.
It's hard to get the drill @ 90� to surface, so it is want to walk away.
It is imperative to get a GOOD center punch mark and then start with a small bit.
(the smaller the drill the better as well)
Good luck & enjoy....
This is easily the best mod I've done to the car!!!!
(sorry for the quality of some of these pics, I only had my cell cam at the time)
The parts....
OEM Before.....
Mark the drill hole.....
New stops installed, showing travel....
Bottom of travel showing stops mated to pedal....
Last edited by InTgr8r; Oct 12, 2008 at 02:43 PM.

Wow, thankyou, that looks really nicely done, looks like OEM does not look too modified, judging by your comments it made a huge difference so i might try it. thanks again for taking the time to this and taking pics ill try next weekend...


Joined: Jan 2004
Posts: 21,095
Likes: 47
From: Toronto, GTA north
Originally Posted by jerminator
So this has nothing to do with clutch engagement. It just keeps the clutch pedal from pushing all the way down?
The pedal moves down just enough to completely disengage. (adjustable to suit your preference)

Awesome how-2!
How much offset does this mod make in the pedal travel--1/2"? Also, I could not find the small diameter threaded glides--can I just use a big one for the sensor?
How much offset does this mod make in the pedal travel--1/2"? Also, I could not find the small diameter threaded glides--can I just use a big one for the sensor?
Trending Topics
Registered User
iTrader: (4)
Joined: Aug 2007
Posts: 1,434
Likes: 4
From: Yorba Linda (Orange County)
Originally Posted by KulG35
AMAZING DIY.... SOOOOO EASY AND AWESOME!!! Just did it, can't wait to drive around more tomorrow! Thanks for DIY and parts 
Joined: Jan 2004
Posts: 21,095
Likes: 47
From: Toronto, GTA north
Originally Posted by mishmosh
Awesome how-2!
How much offset does this mod make in the pedal travel--1/2"? Also, I could not find the small diameter threaded glides--can I just use a big one for the sensor?
How much offset does this mod make in the pedal travel--1/2"? Also, I could not find the small diameter threaded glides--can I just use a big one for the sensor?
InTgr8r,
Hey, just did the mod in a few minutes. Hardest part was tightening the nut in back. It took a little bit of driving to get used to the new clutch take up but it is so much more predictable now! Thank you for doing the research into this and for the great how2 and pics!
Hey, just did the mod in a few minutes. Hardest part was tightening the nut in back. It took a little bit of driving to get used to the new clutch take up but it is so much more predictable now! Thank you for doing the research into this and for the great how2 and pics!
Joined: Jan 2004
Posts: 21,095
Likes: 47
From: Toronto, GTA north
Originally Posted by mishmosh
InTgr8r,
Hey, just did the mod in a few minutes. Hardest part was tightening the nut in back. It took a little bit of driving to get used to the new clutch take up but it is so much more predictable now! Thank you for doing the research into this and for the great how2 and pics!
Hey, just did the mod in a few minutes. Hardest part was tightening the nut in back. It took a little bit of driving to get used to the new clutch take up but it is so much more predictable now! Thank you for doing the research into this and for the great how2 and pics!
After you get used to it,
it feels really strange if you ever get the change to drive another G35 MT w/o it.
When I took out the test spacers, I felt like a complete MT noob.


Registered User
Joined: Jun 2007
Posts: 35
Likes: 0
I just did this a few days ago with nickles not the more permanent fasteners and nuts.
Its not a huge improvement as some make it out to be. But is an improvement over the stock clutch travel distance.
This doesnt really change what I dont like about the stock clutch. Out clutch is just seems to be overly sensitive.
I just drove a friends BMW 335 around all day yesterday. Aside from it being an incredible car(WAY better that the G I believe); the clutch is just so much more "forgiving". No wild jerks when your trying to race through the gears.