
DIY: Front Bumper Removal


DIY: Front Bumper Removal
Tools Required:
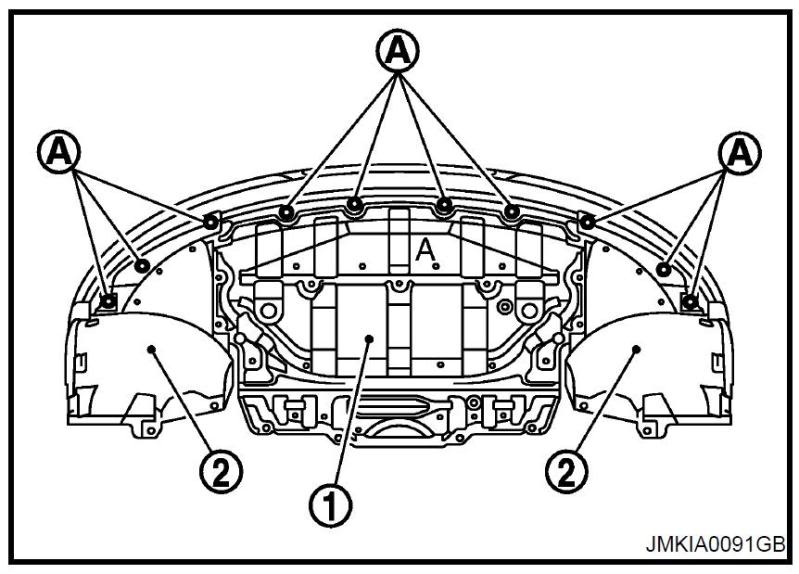
There are a total of 16 bolts and 6 plastic clips holding the bumper.
You don't need to remove or loosen the radiator cover.
There are 10 bolts on the bottom (Marked A) that you will need to remove.
Note: If your car is slammed, you may need to lift the car using ramps or jack and jack stands to access these bolts. Use caution when lifting the car and never work under a car that is only supported by a jack.
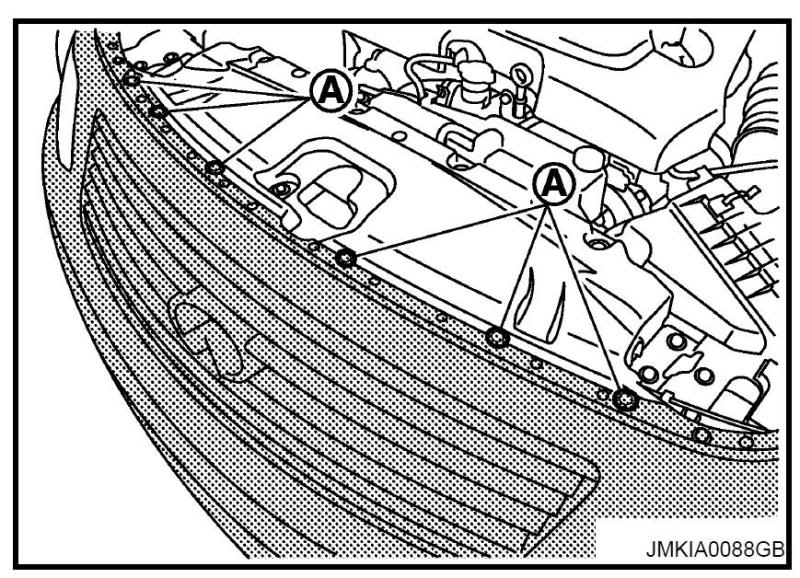
Then there are 6 clips holding the bumper to the radiator cover. remove those with a flat head screwdriver.
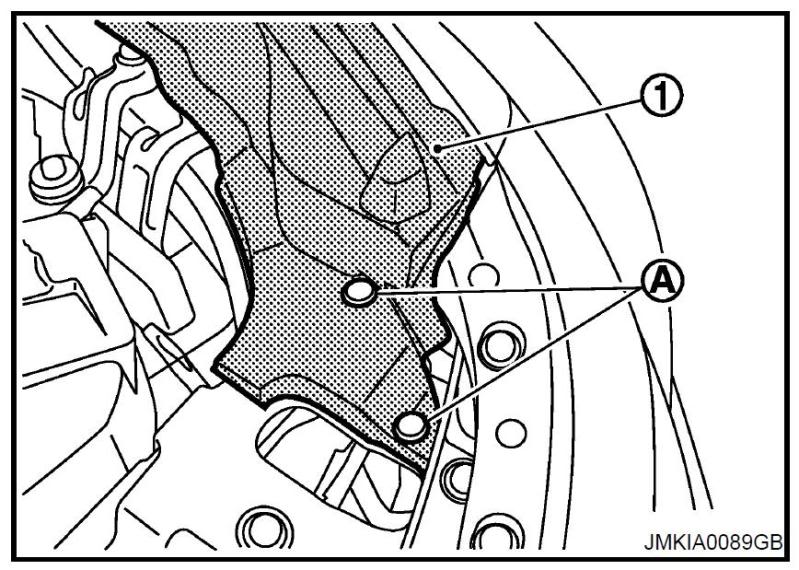
Turn the steering wheel to either side and remove 1 plastic clip on the wheel well lining to access the bolts inside. Once you pull back the lining you will need to use a long extension to remove two 10mm bolts. Do the same for both sides (Marked A)

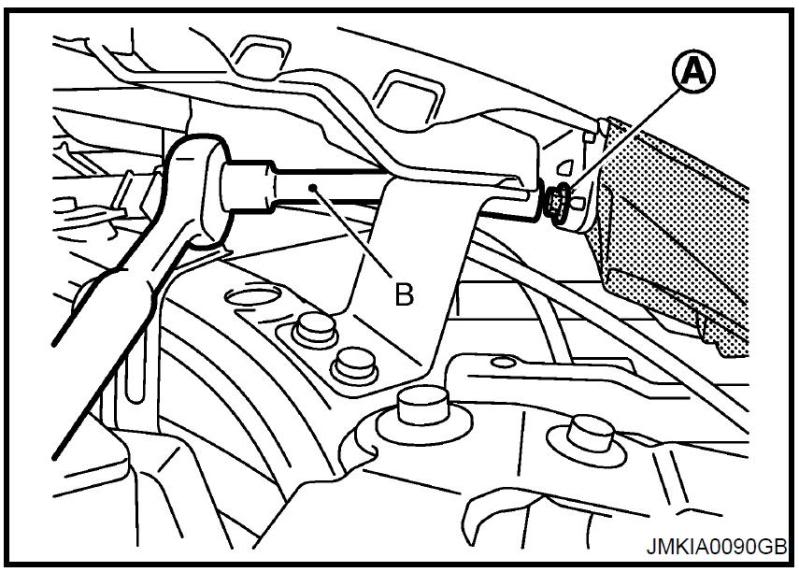
Once that is done, there are 2 more bolts holding the bumper, 1 on each side.
you will need to pull up the rubber seal on the side of the engine bay to access a 10mm bolt as shown below. You will need to use an extension here too. the first pic shows the location of the bolt behind the rubber seal. you don't need to remove the seal, just pull it back until you can stick your wrench in there. Do the same for both sides. (Marked 1)
Take extra care when pulling the bumper out to prevent scratches.
If your car has front parking sensors, pull the bumper out only SLIGHTLY. Just enough so you can access the sensors (4) and unplug them before you remove the bumper completely.
- Flat head screw driver
- 10mm socket wrench
- Socket extension
- Ramps or Jack stands (optional)
There are a total of 16 bolts and 6 plastic clips holding the bumper.
You don't need to remove or loosen the radiator cover.
There are 10 bolts on the bottom (Marked A) that you will need to remove.
Note: If your car is slammed, you may need to lift the car using ramps or jack and jack stands to access these bolts. Use caution when lifting the car and never work under a car that is only supported by a jack.
Then there are 6 clips holding the bumper to the radiator cover. remove those with a flat head screwdriver.
Turn the steering wheel to either side and remove 1 plastic clip on the wheel well lining to access the bolts inside. Once you pull back the lining you will need to use a long extension to remove two 10mm bolts. Do the same for both sides (Marked A)
Once that is done, there are 2 more bolts holding the bumper, 1 on each side.
you will need to pull up the rubber seal on the side of the engine bay to access a 10mm bolt as shown below. You will need to use an extension here too. the first pic shows the location of the bolt behind the rubber seal. you don't need to remove the seal, just pull it back until you can stick your wrench in there. Do the same for both sides. (Marked 1)
Take extra care when pulling the bumper out to prevent scratches.
If your car has front parking sensors, pull the bumper out only SLIGHTLY. Just enough so you can access the sensors (4) and unplug them before you remove the bumper completely.
Last edited by Q8y_drifter; Aug 26, 2010 at 12:21 PM.


That last screw is giving me fits. There is a nut or something that it screws into that is loose. I cannot get it back all the way tight and I cannot get it out. There isn't enough room to get my finger behind it to isolate the nut. Anyone else run into this? Suggestions?
Really long needle nose pliers to hold the nut maybe?
Removing surrounding brackets and such may give you the space you need. I haven't looked in there for a long time now so I can't remember what it looks like.
Removing surrounding brackets and such may give you the space you need. I haven't looked in there for a long time now so I can't remember what it looks like.

use a 10mm hex socket and attach it to a hex screwdriver to hold the bit like this...http://www.craftsman.com/shc/s/p_101...2&blockType=L2
Trending Topics

There's a couple different kinds of tabs used around the car. This is the main one holding the front bumper on top.
http://www.courtesyparts.com/62050e-...-p-615874.html
http://www.courtesyparts.com/62050e-...-p-615874.html

How so?
Here's a pic of a 370Z engine bay. you can see the clips i referred to in the link holding the bumper to the black plastic radiator shroud.

The same clips can be seen here holding the bumper to the CF shroud on a G37. Which are also the same clips marked A in the figure above.

Here's a pic of a 370Z engine bay. you can see the clips i referred to in the link holding the bumper to the black plastic radiator shroud.
The same clips can be seen here holding the bumper to the CF shroud on a G37. Which are also the same clips marked A in the figure above.
I wasn't referring to those clips. I guess the figure uses "A" for different clips. I was referring to these clips:

I believe in the 4th figure, "A" is pointing to those clips.
Sorry I had to use your picture
I believe in the 4th figure, "A" is pointing to those clips.
Sorry I had to use your picture