DIY: Replace Serpentine Belt 07+ G35 (and probably G37)
#1
DIY: Replace Serpentine Belt 07+ G35 (and probably G37)
so i had thought my belt was burning/smoldering a little and i knew it was squeaking so i decided to replace it (it's also about 30k miles overdue according to the owner's manual). i went to nissan and they wanted $60 for the belt but autozone had it for $34 (it had to be ordered but arrived in 2 days). it's a dayco #5070810.
all in all it took me 30 minutes working outside in 4 degree weather, but you could do it in 15 if you wanted, i struggled with getting the belt on the last pulley until i realized the easy way.
full disclaimer, the first 3 photos are from turtleboy on my350z.com. the photos are fairly identical except for the coolant overflow tank but thats minor so i just lifted his pictures.
and also, since i have to say it, do this at your own risk. i am in no way responsible for any injuries or damage you do. sorry, but just covering my butt.
you'll need:
new belt
7mm hex key or similar size
10mm deep socket (or plain 10mm with extension)
1/2 breaker bar for belt replacement (i purchased a 3/8" breaker bar set at autozone some years ago for maybe $20 which had a 1/2" adapter for it and several sockets, well worth it)
here we go....
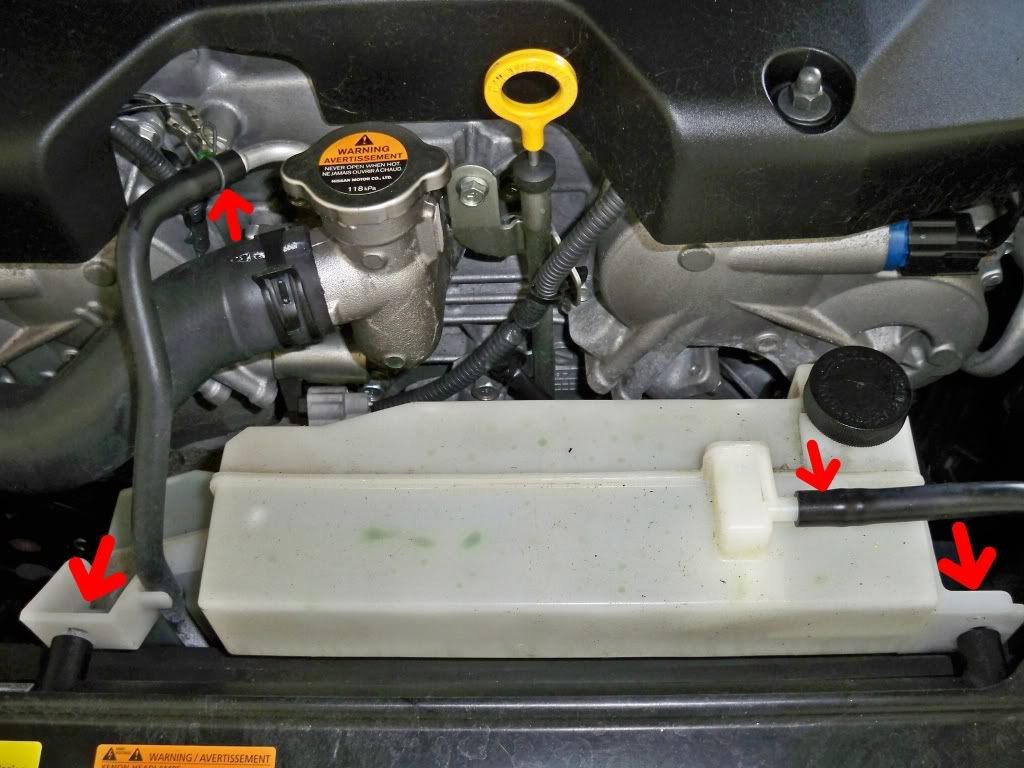
1. get yourself a 10mm socket and remove the bolts for the coolant overflow tank, and detach the two hoses. the only difference for ours is that the bolt heads are facing up, not towards the windshield. remove the tank and put it somewhere out of the way.
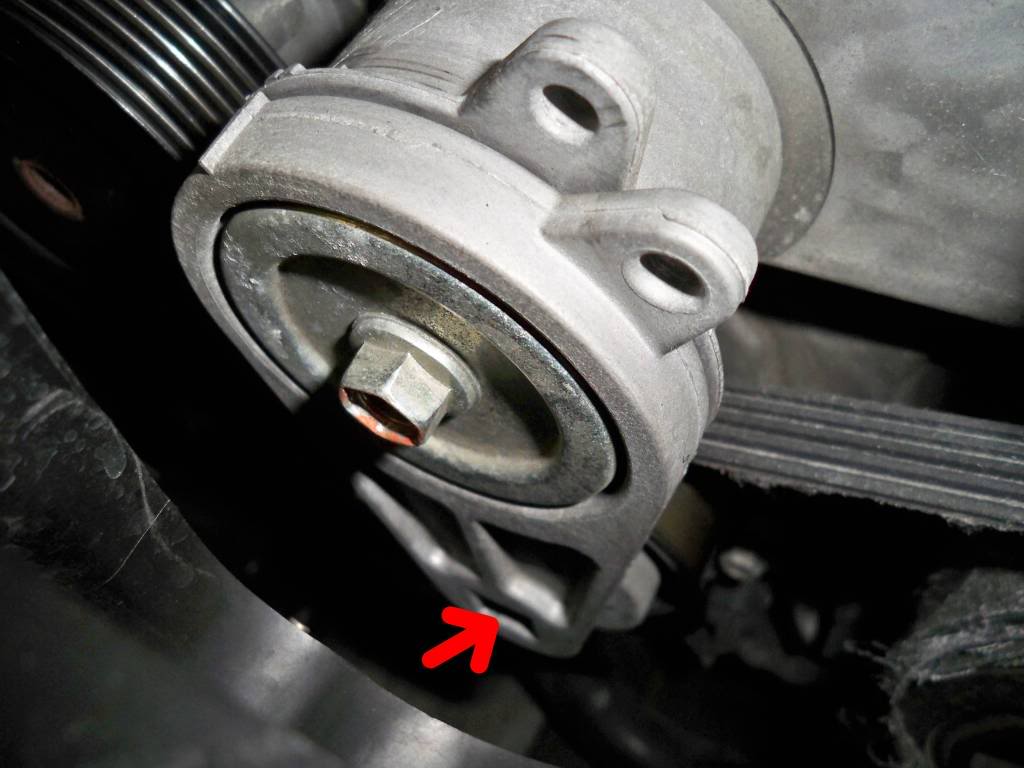
2. slip your half inch breaker bar into the tensioner slot and turn *counter-clockwise to release the tension
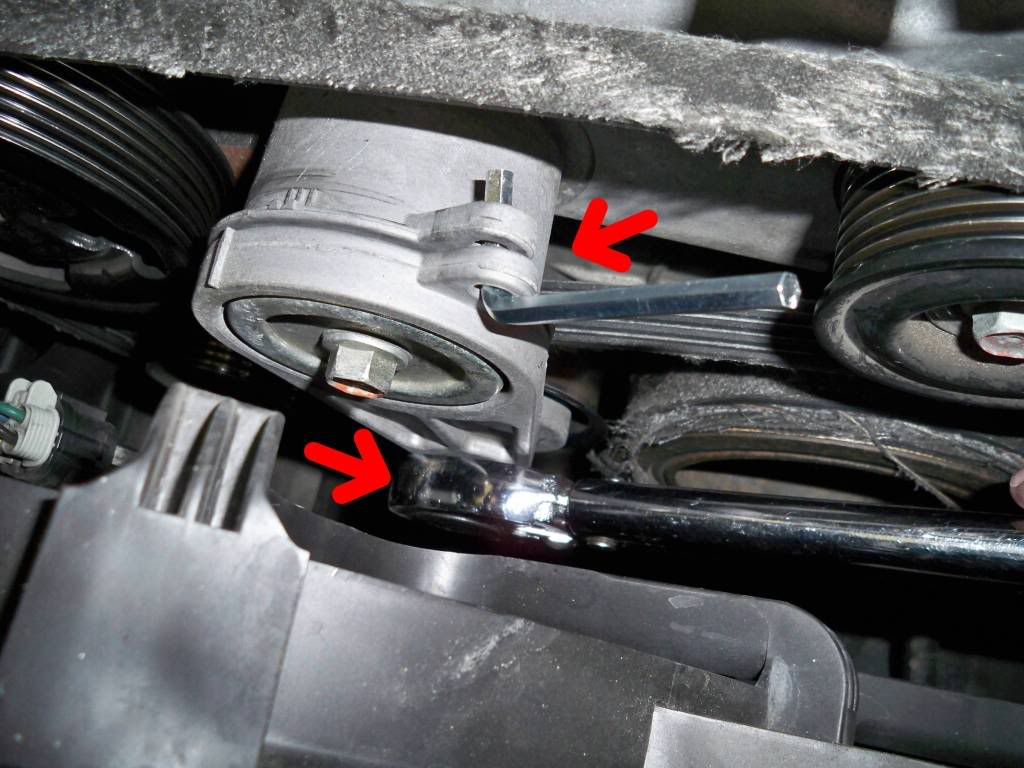
3. stick the hex key in the hole by the top arrow to hold the tensioner. remove the breaker bar now, it will only be in the way.
4. this is the drive belt arrangement for the 08 g35x. it's in the owner's manual, double check if you think yours is different.
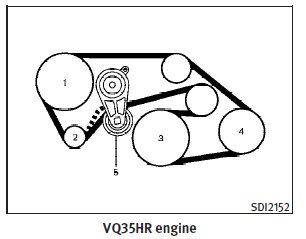
5. pull the old belt off and put the new one on in the configuration shown in the owner manual clip. below is just are two photos of my engine bay for reference. they're not that great but better than nothing.
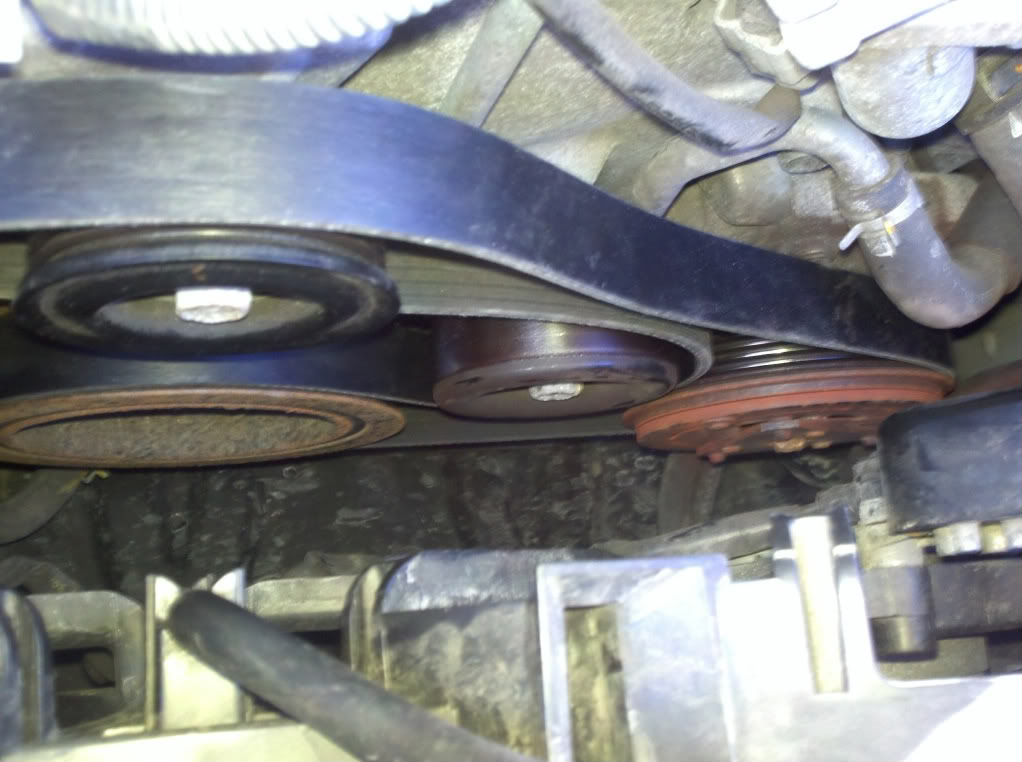
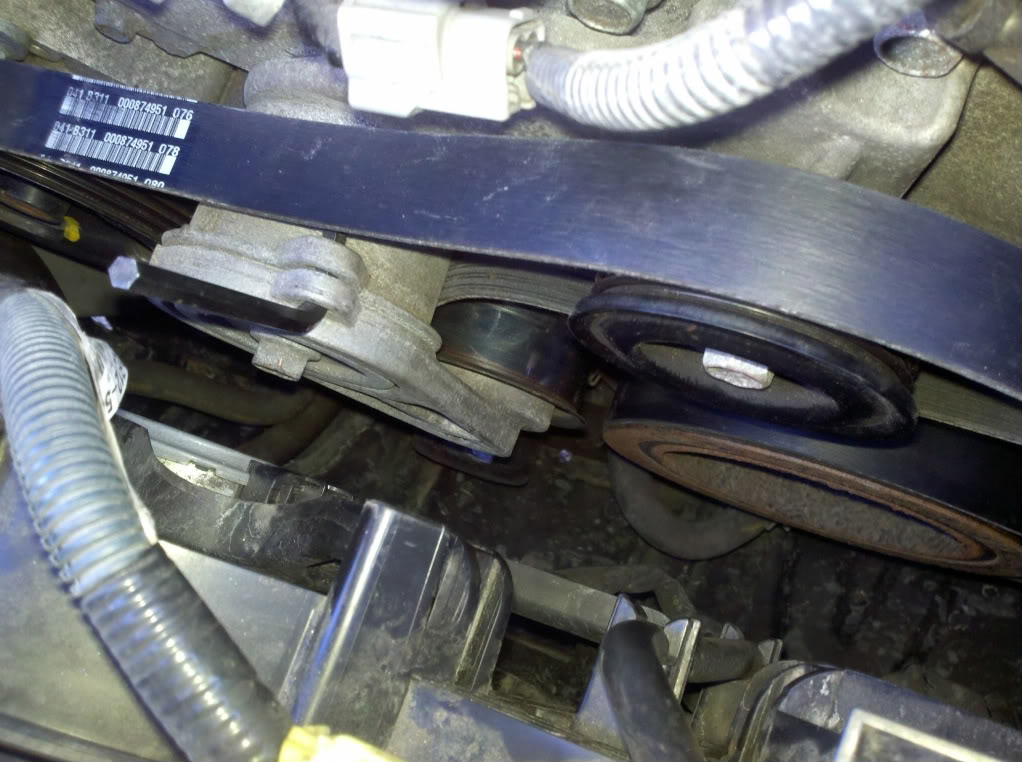
note the pulley in the red circle, do this *last. it made life sooooo much easier. align the belt onto the remaining pulleys then pull it up and onto the final pulley. it will go quite smooth.
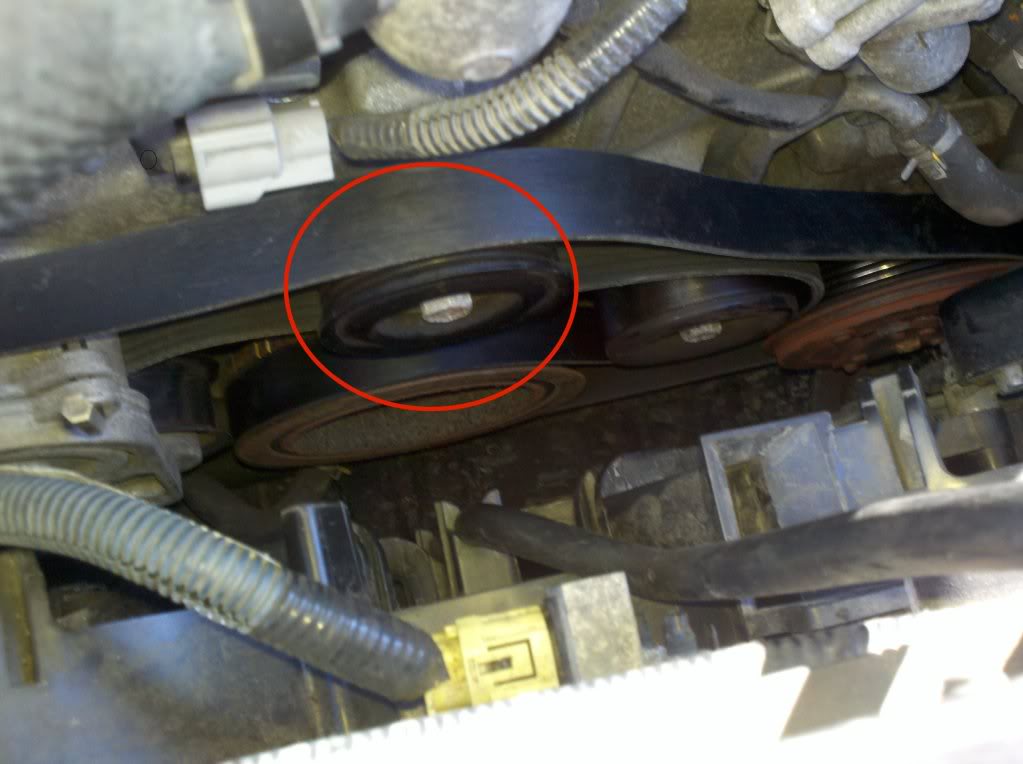
6. next just put the breaker bar back in and once you're sure the belts are properly lined up turn it a little more counter-clockwise to release the hex key then slowly turn it *clockwise to let it re-tension the belts.
7. replace the overflow tank
8. start it up and take a peek to make sure everything is fine.
oddly enough my belt barely looked worn but i suppose it required replacement anyway since i've seen some people eat belts alot earlier than expected on here.
i hope this helps! cheers!
Bob
all in all it took me 30 minutes working outside in 4 degree weather, but you could do it in 15 if you wanted, i struggled with getting the belt on the last pulley until i realized the easy way.
full disclaimer, the first 3 photos are from turtleboy on my350z.com. the photos are fairly identical except for the coolant overflow tank but thats minor so i just lifted his pictures.
and also, since i have to say it, do this at your own risk. i am in no way responsible for any injuries or damage you do. sorry, but just covering my butt.
you'll need:
new belt
7mm hex key or similar size
10mm deep socket (or plain 10mm with extension)
1/2 breaker bar for belt replacement (i purchased a 3/8" breaker bar set at autozone some years ago for maybe $20 which had a 1/2" adapter for it and several sockets, well worth it)
here we go....
1. get yourself a 10mm socket and remove the bolts for the coolant overflow tank, and detach the two hoses. the only difference for ours is that the bolt heads are facing up, not towards the windshield. remove the tank and put it somewhere out of the way.

2. slip your half inch breaker bar into the tensioner slot and turn *counter-clockwise to release the tension

3. stick the hex key in the hole by the top arrow to hold the tensioner. remove the breaker bar now, it will only be in the way.

4. this is the drive belt arrangement for the 08 g35x. it's in the owner's manual, double check if you think yours is different.

5. pull the old belt off and put the new one on in the configuration shown in the owner manual clip. below is just are two photos of my engine bay for reference. they're not that great but better than nothing.


note the pulley in the red circle, do this *last. it made life sooooo much easier. align the belt onto the remaining pulleys then pull it up and onto the final pulley. it will go quite smooth.

6. next just put the breaker bar back in and once you're sure the belts are properly lined up turn it a little more counter-clockwise to release the hex key then slowly turn it *clockwise to let it re-tension the belts.
7. replace the overflow tank
8. start it up and take a peek to make sure everything is fine.
oddly enough my belt barely looked worn but i suppose it required replacement anyway since i've seen some people eat belts alot earlier than expected on here.
i hope this helps! cheers!
Bob
The following 12 users liked this post by RemmyZero:
99zx2turd (10-05-2022),
abrecos (01-24-2017),
ARoss (07-13-2011),
dbretc (03-01-2014),
gnordmeyer (04-25-2019),
and 7 others liked this post.
#4
Barely looked worn???? I looked at the picture, and i dunno, to me it looks really worn.... when the belt gets that "frizzy" thats not badly worn? is this a normal amount of wear? trying to figure out at what stage i should replace my belts..
BTW, great guide for DIY!
#5
they say they are 30k mile belts, some people here have gotten 60k on them (like me) and others have gotten 15k and they self-destructed. if you drive alot of highway miles you're probably fine, if you do alot of mix or stop and go i would personally say spend the $30 and get a new one and just do it by 30-40k at the latest.
Bob
#6
#7
the 07+ only have one belt for all components compared to 2 on the previous gen and has a timing chain taht does not need to be changed for 100k, so you pretty much just need to take care of this belt.
Good share Remmy, i had a looksy on how to do this a while back and it seemed as easy as your DIY, im at over 50k and the belt is fine so far with no real problems but i might be changing it out this spring to be safe since its only $30.
Good share Remmy, i had a looksy on how to do this a while back and it seemed as easy as your DIY, im at over 50k and the belt is fine so far with no real problems but i might be changing it out this spring to be safe since its only $30.
Trending Topics
#8
Nice! One less thing to worry about.... thx for the info
#9
#10
The following users liked this post:
JustinMKN1 (04-30-2014)
#12
Bob
#14
to be fair, i would think that after 100k miles you'd want to at least have the chain inspected if not replaced since failure of a timing chain will basically destroy the engine, and since you have to do all that dis-assembly why not just replace the water pump?
it's very odd that the service manual and owners manual are both silent on these two things.....unless i missed the section entirely. maybe i'm wrong but i would imagine they recommend it around 125k miles at least.
i also just downloaded the service interval manual from infiniti and it doesn't even mention plugs at 105k (although the service manual does) and it stops at 120k so whether they recommend the timing belt after that is unknown. this is very vague....very....


