V36 Interior, Exterior & Lighting Interior & Exterior - Tech, Modifications, Lighting, Gauges and More

Got rid of the egg yokes...

Thread Tools
 
Search this Thread
 
Rate Thread
 
Old Oct 31, 2008 | 08:37 PM
  #1  
InTgr8r's Avatar
Thread Starter
|
Staff ALUMNI (retired)
Staff Alumni
iTrader: (23)
Joined: Jan 2004
Posts: 21,095
Likes: 47
From: Toronto, GTA north
Smile Got rid of the egg yokes...

Finally got a few minutes this afternoon to clean up the egg yokes in the headlights.
...with thanks to those that posted the method of removing the air filter boxes to get at them.
Worked like a charm.

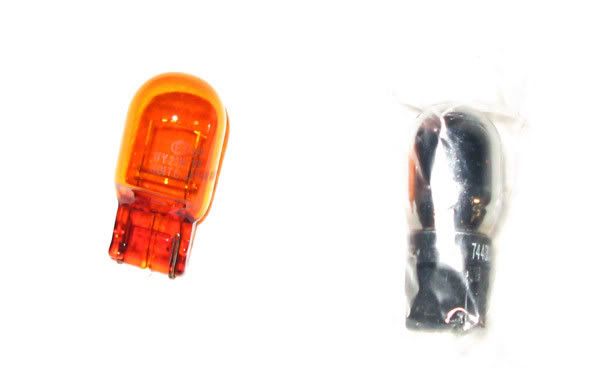
The bulbs. (silvers were still in plastic, that's why it looks a little strange.


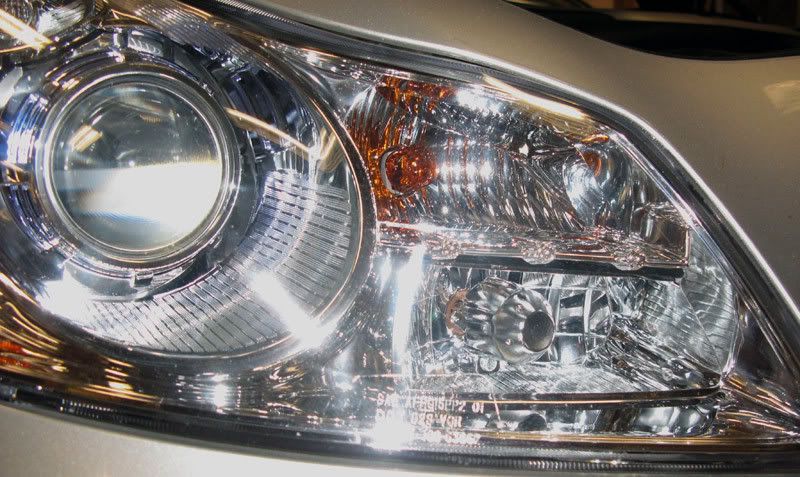
Before, with egg yoke:
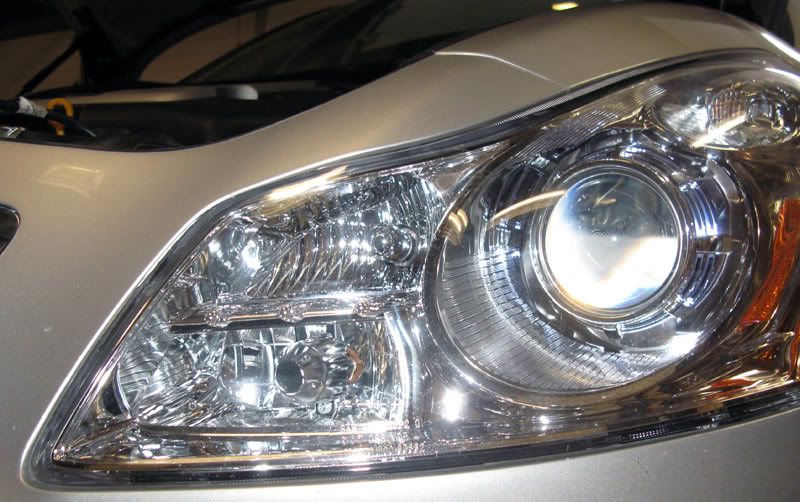

& after w/o
 
Reply
Old Oct 31, 2008 | 08:39 PM
  #2  
Calvin's Avatar
Overglorified Altima
iTrader: (65)
Joined: Jun 2006
Posts: 53,506
Likes: 187
From: Chicago
looks much better. from what i understand, they still light up amber. is that correct?

ps - amber ftw! hyper white ftl!
 
Reply
Old Oct 31, 2008 | 09:08 PM
  #3  
dev1983's Avatar
Registered User
iTrader: (1)
Joined: Nov 2007
Posts: 368
Likes: 3
From: ATL
looks nice!!
 
Reply
Old Oct 31, 2008 | 09:10 PM
  #4  
GEE35FX's Avatar
Registered User
iTrader: (2)
Joined: Nov 2004
Posts: 14,045
Likes: 36
From: Ontario, Canada
Looks good Ian.
 
Reply
Old Oct 31, 2008 | 09:16 PM
  #5  
G35Robby's Avatar
Registered User
Joined: May 2008
Posts: 3,867
Likes: 1
From: SoCal -818-
looks really good
are those the PIAA's?
are some other brand
 
Reply
Old Oct 31, 2008 | 09:33 PM
  #6  
InTgr8r's Avatar
Thread Starter
|
Staff ALUMNI (retired)
Staff Alumni
iTrader: (23)
Joined: Jan 2004
Posts: 21,095
Likes: 47
From: Toronto, GTA north
Originally Posted by Calvin
looks much better. from what i understand, they still light up amber. is that correct?

ps - amber ftw! hyper white ftl!
Yes they still light up amber.
 
Reply
Old Oct 31, 2008 | 09:37 PM
  #7  
InTgr8r's Avatar
Thread Starter
|
Staff ALUMNI (retired)
Staff Alumni
iTrader: (23)
Joined: Jan 2004
Posts: 21,095
Likes: 47
From: Toronto, GTA north
Originally Posted by G35Robby
looks really good
are those the PIAA's?
are some other brand
Not PIAA's
Got them from Xenonmods $12.99 /pr
 
Reply

Trending Topics

Old Oct 31, 2008 | 10:55 PM
  #8  
kool_yaar's Avatar
Registered User
iTrader: (7)
Joined: Oct 2007
Posts: 5,208
Likes: 185
From: Somewhere
got they same ones, they look really nice off and are darker than the OEM when lit, look really nice.
 
Reply
Old Oct 31, 2008 | 11:11 PM
  #9  
MikeYo's Avatar
Registered User
iTrader: (37)
Joined: Dec 2007
Posts: 3,577
Likes: 12
From: South Florida
nifty
 
Reply
Old Oct 31, 2008 | 11:27 PM
  #10  
Csquared's Avatar
Registered User
iTrader: (1)
Joined: Aug 2008
Posts: 1,890
Likes: 1
From: Madison, WI
They fit? the site says they are 7443 i thought our bulbs are 7440s?
 
Reply
Old Nov 3, 2008 | 10:39 AM
  #11  
ovrkast's Avatar
Registered User
Joined: Dec 2007
Posts: 81
Likes: 0
OK...sorry for the stupid question, but I'm not all that great at taking things apart...especially with a new car. Can you take a few pictures and highlight what needs to be unscrewed or taken off to replace those bulbs? I don't like the orange bulbs either. I opened the hood and saw the air filter boxes and it looks like there's only 1 screw to remove?? Once that is removed, how do you remove the box to get to the lights? Please help =(
 
Reply
Old Nov 3, 2008 | 11:04 AM
  #12  
Csquared's Avatar
Registered User
iTrader: (1)
Joined: Aug 2008
Posts: 1,890
Likes: 1
From: Madison, WI
There are several posts about removin the airbox and I think they have pictures. But i'll write something real quick. You also need to unscrew the part the airbox is attached to the rubber tube. The remove the sensors and just pull the airbox out.
 
Reply
Old Nov 3, 2008 | 11:09 AM
  #13  
ovrkast's Avatar
Registered User
Joined: Dec 2007
Posts: 81
Likes: 0
Originally Posted by Csquared
There are several posts about removin the airbox and I think they have pictures. But i'll write something real quick. You also need to unscrew the part the airbox is attached to the rubber tube. The remove the sensors and just pull the airbox out.
Is it really that difficult? When you start talking about sensors...it makes me a little nervous...LOL. I'm more of a visual person, so pictures are more ideal. I did see some of the posts but without pictures, it can get messy. Remember...I'm a noob at all this
 
Reply
Old Nov 3, 2008 | 11:43 AM
  #14  
Csquared's Avatar
Registered User
iTrader: (1)
Joined: Aug 2008
Posts: 1,890
Likes: 1
From: Madison, WI
it's actually really easy. I might do a diy later but i'm really busy at the moment. But it's simple, I'm a total noob as well
 
Reply
Old Nov 3, 2008 | 11:49 AM
  #15  
ovrkast's Avatar
Registered User
Joined: Dec 2007
Posts: 81
Likes: 0
Originally Posted by Csquared
it's actually really easy. I might do a diy later but i'm really busy at the moment. But it's simple, I'm a total noob as well
Thank you so much. I would greatly appreciate that. I'm sorry...I just don't have enough confidence to start tearing things apart, but I greatly appreciate your efforts in helping me out
 
Reply


You have already rated this thread Rating: Thread Rating: 0 votes,  average.


All times are GMT -4. The time now is 06:36 AM.