
Dropped my car on 350 H-Techs myself yesterday.


Registered User
iTrader: (3)
Originally Posted by bikinilust
Do you have to be careful in most driveways ? W/my H&Rs, every freakin speed bump or driveway i have to angle it and go slow
 I see you also have a lip, does it rub?
? W/my H&Rs, every freakin speed bump or driveway i have to angle it and go slow I see you also have a lip, does it rub?Last edited by Sponger; Jan 6, 2007 at 07:39 PM.
Registered User
iTrader: (3)
Originally Posted by G35Pinoy
wait...cal does that mean your selling your h-techs?? let me know how much


The following is a post copied from DRSIFU(moderator on G35driver) who copied from Gsedan35 over in FreshAlloy. He installed Eibach springs. I installed Tein 350Z H-Tech springs on my Coupe. This is specific to the Coupe, this may vary depending on year of car, but for the most part should be the same. I�ve added stuff to the original to make it a little easier from what I�ve experienced.
I did it one tire at a time. Torque spec on tire lugnuts: 80ft/lb.
This is how "I" did it. You can do your own thing where it makes sense to do so.
Tools needed:
factory jack
floor jack
2 Jack stands.
1/2" ratchet (3/8")
misc 1/2" extensions (3/8")
17mm socket
12mm socket
19mm socket
17mm box end wrench
power tool is VERY helpful in removing front strut from spring
torque wrench
spring compressor
******First if you don�t have a spring compressor at home, go to AUTOZONE and rent a �STRUT COIL COMPRESSOR� from them its FREE, you just have to leave a deposit of $40.00 and you get it back when you return the tool.
Rear suspension
1. Jack up the rear of the car and put a jack stand on both side. I lifted both side of the rear so I could finish look at both side to make sure I put everything back on correctly, yes its only 3 bolts but I didn�t know that till I got under there. But it makes the install go more quickly.
2. Remove wheel and tire. *Now when removing aftermarket wheels, some of us have lugnuts that are in deeper. Since I have the Luff M1�s the lugs are deep into the hole. I�ve got Volk extended lugs to try and help. So to make this a little safer get a deep socket and apply a single layer of black electric tape over the outside of the socket. This will do one of two things, 1 show you when socket is touching the rims � time to be more careful, and 2 if it does touch and rub the wheel it wont damage the finish of the rim since it wont be metal on metal. Again time to be more careful. I DON�T recommend using airtools to remove lugs. I suggest using deep sockets and a breaker bar so take them off.
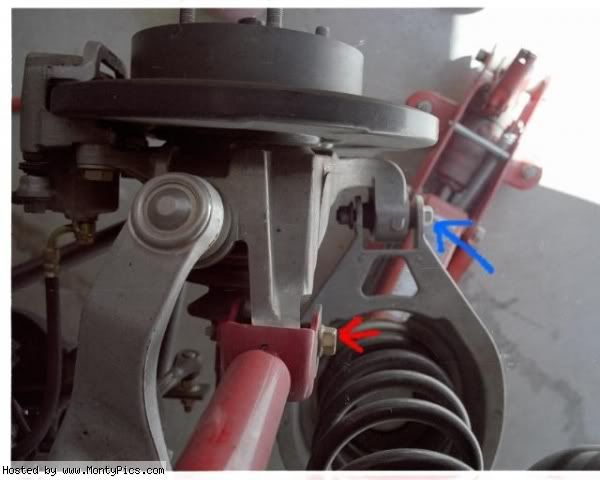
3. Now place floor jack below the rear lower link that the coil spring is located in and use the jack to hold the spring in place, raising it up a 1/8" or so. Refer to the picture I have provided and remove the nut and bolt to the rear lower link (blue arrow). Remove bolt from bottom of strut mount (red arrow). Picture is from above looking down.
NOTE: There is NO need to remove the bolt depicted in red if you are only installing springs.
Picture 1
4. Work out bolt, it will come out without damaging the threads. If you need to tap out the bolt with a push pin and hammer to get it out.
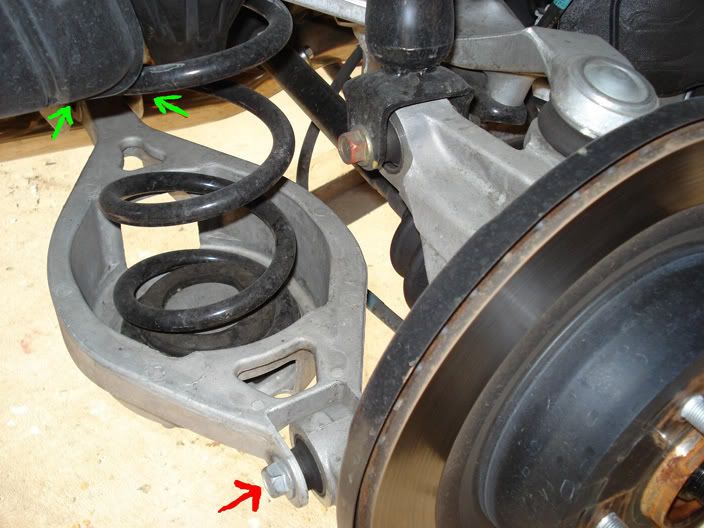
5. Now before you lower it you need to loosen another bolt and nut in picture 2, the bolt and nut are highlighted with green arrows. Just loosen this bolt a little so the rear link is free to move up and down.
Picture 2
6. Now slowly lower the rear lower link, watch the floor jack to see when this suspension part stops going down, make sure the floor jack keeps on touching it. Once the floor jack is all the way down you can remove the coil.
Install in reverse order.
HINT #1: Use your floor jack to raise parts up to match up various bolt holes. Repeat process on other side of rear suspension.
Hint #2: Compared to the OEM spring, the upper part of the new spring may or may not be flush depending on what springs you get. the 350z H-tech were flush.
Hint #3: Just ensure the spring is properly seated in the bottom of the suspension member.
Hint #4: When raising the rear link back up after you�ve installed the new coil, if the holes don�t line up or if the connection isn�t lined up, move the floor jack around to get the connection to line up. Some people bang stuff around, all I had to do was move the floor jack around and I could get the bolt back in.
Hint #5: Here are the torque specs for the bolts involved:
1) Bolt depicted in blue: 48-59 ft/lb
2) Bolt depicted in green: 48-59 ft/lb
3) ONLY for those removing the strut, bolt in red: 74-88 ft/lb
FRONT:
Same as rear I put both sides on jack stands but before lifting I used the breaker bar to loosen the lugs a little
1. Unbolt the 3 12mm upper strut mount bolts from under the hood, set them aside as to NOT misplace them.
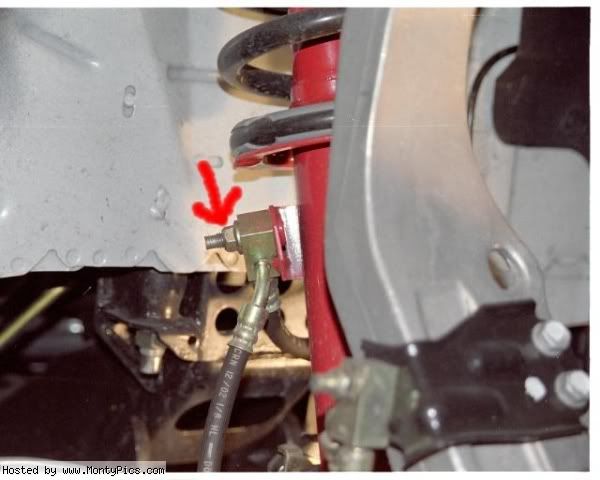
2. Unbolt the 12mm bolt holding the brake line on the strut, set nut aside and pull brake line off the strut. Look at pic with red arrow for brake line location.
Picture 3
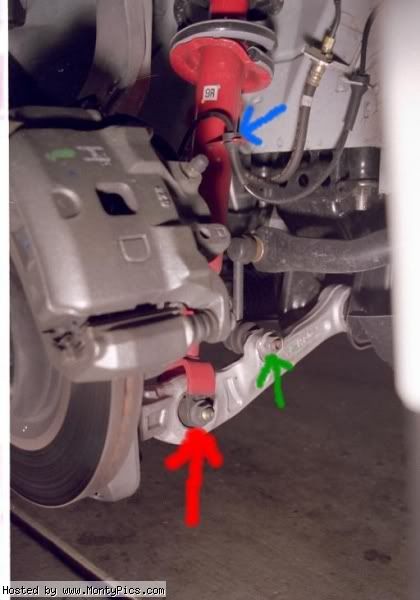
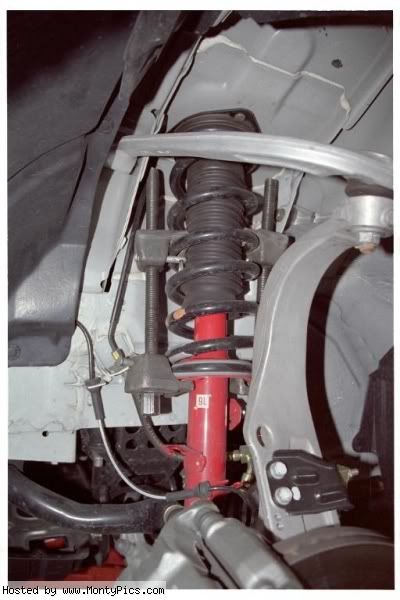
3. Remove the speed sensor line from the strut in the 2 places it attaches to the strut via compression fittings (just pull)(blue arrow)
4. Remove the nut and bolt from the bottom of the strut(red arrow) It will come out, but will be difficult. Use floor jack to line things up.
5. Remove the bolt holding the swaybar end link to the suspension arm(green arrow) NOTE: The bolt for the end link will NOT come out yet, DO NOT TRY!
Picture 4
Now you get to use the spring compressor. Your goal will be to compress enough of the spring so that you can remove the sway bar end link bolt (hard work, need to bang it out). Once your able to do that you should have enough clearance to be able to remove the whole spring/strut/spring compressor assembly. NOTE BE CAREFUL, watch out for the speed sensor line, DO NOT tear it appart. Trying to make space to remove this assembly is gonna give you a headache. Keep perservering.
6. Make sure the the turning part of the compressor is facing down (I mean the part that you are physically turning with a wrench). Also make sure that one of the �hooks� of the spring compressor is on the perch (lip of the strut) and the other is on one of the upper coils.
Hint#1 When compressing the spring keep switching from one side to the other to evenly compress it, otherwise the strut will start to lean more to one side and make it more difficult to take out.
7. Once the spring is compressed you can remove the sway bar link. Once that is out you will notice that the brake and rotor can be pushed down to give a little more room to pull out the strut. If you can have someone help out to push down on the brake and rotor, you should have room to pull out the strut. REMEMBER be careful with the speed sensor line.
Picture 5
8. If only installing springs Leave the compressor on and remove the center bolt from the top of the strut/spring assembly. This is were having a power tool helps. I removed the bolt with hand tools. BE CAREFUL.
9. Once that bolt is out you can loosen the compressor remember to switch from side to side as you loosen it so that they stay even with each other. Once they both come off you can take the coil off of the strut.
10. Install your new springs ensuring everything sits properly. There are grooves in the rubber upper seat that should match up with the spring. Ensure everything is lined up. Now depending on what spring you have you might be able to push down on the mounting insulator and install the center bolt. Since I have the Tein H-techs I had to put the spring on the strut and compress it a little to get the mounting insulator back on.
Tighten as much as possible. Don�t worry about tightening it too much because this bolt can be tighten later after the assembly is installed and the car is lowered. Just put a few turns on it so it doesn�t come off.
HINT#1 make sure that when you put the mounting insulator on that it is mounted in the correct direction. Look at how the strut is supposed to be facing on the car and where the 3 bolts are supposed to line up. Try and get it as close as possible to being lined up. After the top bolt is on it�s kinda hard to rotate it to make it fit and line up.
Install everything back in the reverse order. You might need someone again to push down on the brake and rotor to get it back in place. putting back this assembly is also a pain in the butt. The springs may be shorter than OEM, but still a pain.
11. Once the strut is on the arm bolt it up loosely and put a jack under it to lift it up and into place to get the 3 bolt through on the top. Once those are in put the 3 nuts on and tighten the bolt at the bottom of the strut.
12. Put the sway bar bolt back in. use the floor jack to help line it up. It might need a couple taps with a hammer to get it all the way back in.
13. Once that is in torque the all the bolts to spec.
HINT #1: Be Patient. Removing and installing the spring/strut assembly is difficult. HINT #2: The bump stops (the rubber cushions that fit around the top of each spring) on the front of the OEM springs should be taken off and placed on the new springs.
HINT #3: Again, use your factory jack to line up parts with bolts.
HINT #4: Torque Spec for bolts:
1)3 12 mm upper strut mount bolts: 26-30 ft/lb
2)12 mm bolt for brake line: Can't find, but probably 10 ft/lb
3)Bolt from bottom of strut (Pic 4 red arrow): 52-62 ft/lb
4)Bolt connect sway bar end link to suspension arm (Pic 4 green arrow): 59-70 ft/lb
5)Center bolt of strut/spring assembly: 40-47 ft/lb
I hope this helps someone as much as Drsifu�s and Gsedan35's original instructions helped me. His pictures are what made it easier.
And remember torque the bolts on the lugs when you put the wheel back on. Go for a drive around the block, park and torque the bolts AGAIN.
I did it one tire at a time. Torque spec on tire lugnuts: 80ft/lb.
This is how "I" did it. You can do your own thing where it makes sense to do so.
Tools needed:
factory jack
floor jack
2 Jack stands.
1/2" ratchet (3/8")
misc 1/2" extensions (3/8")
17mm socket
12mm socket
19mm socket
17mm box end wrench
power tool is VERY helpful in removing front strut from spring
torque wrench
spring compressor
******First if you don�t have a spring compressor at home, go to AUTOZONE and rent a �STRUT COIL COMPRESSOR� from them its FREE, you just have to leave a deposit of $40.00 and you get it back when you return the tool.
Rear suspension
1. Jack up the rear of the car and put a jack stand on both side. I lifted both side of the rear so I could finish look at both side to make sure I put everything back on correctly, yes its only 3 bolts but I didn�t know that till I got under there. But it makes the install go more quickly.
2. Remove wheel and tire. *Now when removing aftermarket wheels, some of us have lugnuts that are in deeper. Since I have the Luff M1�s the lugs are deep into the hole. I�ve got Volk extended lugs to try and help. So to make this a little safer get a deep socket and apply a single layer of black electric tape over the outside of the socket. This will do one of two things, 1 show you when socket is touching the rims � time to be more careful, and 2 if it does touch and rub the wheel it wont damage the finish of the rim since it wont be metal on metal. Again time to be more careful. I DON�T recommend using airtools to remove lugs. I suggest using deep sockets and a breaker bar so take them off.
3. Now place floor jack below the rear lower link that the coil spring is located in and use the jack to hold the spring in place, raising it up a 1/8" or so. Refer to the picture I have provided and remove the nut and bolt to the rear lower link (blue arrow). Remove bolt from bottom of strut mount (red arrow). Picture is from above looking down.
NOTE: There is NO need to remove the bolt depicted in red if you are only installing springs.
Picture 1
4. Work out bolt, it will come out without damaging the threads. If you need to tap out the bolt with a push pin and hammer to get it out.
5. Now before you lower it you need to loosen another bolt and nut in picture 2, the bolt and nut are highlighted with green arrows. Just loosen this bolt a little so the rear link is free to move up and down.
Picture 2
6. Now slowly lower the rear lower link, watch the floor jack to see when this suspension part stops going down, make sure the floor jack keeps on touching it. Once the floor jack is all the way down you can remove the coil.
Install in reverse order.
HINT #1: Use your floor jack to raise parts up to match up various bolt holes. Repeat process on other side of rear suspension.
Hint #2: Compared to the OEM spring, the upper part of the new spring may or may not be flush depending on what springs you get. the 350z H-tech were flush.
Hint #3: Just ensure the spring is properly seated in the bottom of the suspension member.
Hint #4: When raising the rear link back up after you�ve installed the new coil, if the holes don�t line up or if the connection isn�t lined up, move the floor jack around to get the connection to line up. Some people bang stuff around, all I had to do was move the floor jack around and I could get the bolt back in.
Hint #5: Here are the torque specs for the bolts involved:
1) Bolt depicted in blue: 48-59 ft/lb
2) Bolt depicted in green: 48-59 ft/lb
3) ONLY for those removing the strut, bolt in red: 74-88 ft/lb
FRONT:
Same as rear I put both sides on jack stands but before lifting I used the breaker bar to loosen the lugs a little
1. Unbolt the 3 12mm upper strut mount bolts from under the hood, set them aside as to NOT misplace them.
2. Unbolt the 12mm bolt holding the brake line on the strut, set nut aside and pull brake line off the strut. Look at pic with red arrow for brake line location.
Picture 3
3. Remove the speed sensor line from the strut in the 2 places it attaches to the strut via compression fittings (just pull)(blue arrow)
4. Remove the nut and bolt from the bottom of the strut(red arrow) It will come out, but will be difficult. Use floor jack to line things up.
5. Remove the bolt holding the swaybar end link to the suspension arm(green arrow) NOTE: The bolt for the end link will NOT come out yet, DO NOT TRY!
Picture 4
Now you get to use the spring compressor. Your goal will be to compress enough of the spring so that you can remove the sway bar end link bolt (hard work, need to bang it out). Once your able to do that you should have enough clearance to be able to remove the whole spring/strut/spring compressor assembly. NOTE BE CAREFUL, watch out for the speed sensor line, DO NOT tear it appart. Trying to make space to remove this assembly is gonna give you a headache. Keep perservering.
6. Make sure the the turning part of the compressor is facing down (I mean the part that you are physically turning with a wrench). Also make sure that one of the �hooks� of the spring compressor is on the perch (lip of the strut) and the other is on one of the upper coils.
Hint#1 When compressing the spring keep switching from one side to the other to evenly compress it, otherwise the strut will start to lean more to one side and make it more difficult to take out.
7. Once the spring is compressed you can remove the sway bar link. Once that is out you will notice that the brake and rotor can be pushed down to give a little more room to pull out the strut. If you can have someone help out to push down on the brake and rotor, you should have room to pull out the strut. REMEMBER be careful with the speed sensor line.
Picture 5
8. If only installing springs Leave the compressor on and remove the center bolt from the top of the strut/spring assembly. This is were having a power tool helps. I removed the bolt with hand tools. BE CAREFUL.
9. Once that bolt is out you can loosen the compressor remember to switch from side to side as you loosen it so that they stay even with each other. Once they both come off you can take the coil off of the strut.
10. Install your new springs ensuring everything sits properly. There are grooves in the rubber upper seat that should match up with the spring. Ensure everything is lined up. Now depending on what spring you have you might be able to push down on the mounting insulator and install the center bolt. Since I have the Tein H-techs I had to put the spring on the strut and compress it a little to get the mounting insulator back on.
Tighten as much as possible. Don�t worry about tightening it too much because this bolt can be tighten later after the assembly is installed and the car is lowered. Just put a few turns on it so it doesn�t come off.
HINT#1 make sure that when you put the mounting insulator on that it is mounted in the correct direction. Look at how the strut is supposed to be facing on the car and where the 3 bolts are supposed to line up. Try and get it as close as possible to being lined up. After the top bolt is on it�s kinda hard to rotate it to make it fit and line up.
Install everything back in the reverse order. You might need someone again to push down on the brake and rotor to get it back in place. putting back this assembly is also a pain in the butt. The springs may be shorter than OEM, but still a pain.
11. Once the strut is on the arm bolt it up loosely and put a jack under it to lift it up and into place to get the 3 bolt through on the top. Once those are in put the 3 nuts on and tighten the bolt at the bottom of the strut.
12. Put the sway bar bolt back in. use the floor jack to help line it up. It might need a couple taps with a hammer to get it all the way back in.
13. Once that is in torque the all the bolts to spec.
HINT #1: Be Patient. Removing and installing the spring/strut assembly is difficult. HINT #2: The bump stops (the rubber cushions that fit around the top of each spring) on the front of the OEM springs should be taken off and placed on the new springs.
HINT #3: Again, use your factory jack to line up parts with bolts.
HINT #4: Torque Spec for bolts:
1)3 12 mm upper strut mount bolts: 26-30 ft/lb
2)12 mm bolt for brake line: Can't find, but probably 10 ft/lb
3)Bolt from bottom of strut (Pic 4 red arrow): 52-62 ft/lb
4)Bolt connect sway bar end link to suspension arm (Pic 4 green arrow): 59-70 ft/lb
5)Center bolt of strut/spring assembly: 40-47 ft/lb
I hope this helps someone as much as Drsifu�s and Gsedan35's original instructions helped me. His pictures are what made it easier.
And remember torque the bolts on the lugs when you put the wheel back on. Go for a drive around the block, park and torque the bolts AGAIN.

 (Brain fart)


Originally Posted by Sponger
Hey, thanks. Zhtechs and 20s make a pretty good combo while being able to align within spec. The ride is not bouncy at all, just a little firmer than stock. My wife and kids don't complain Most of all, the springs handle pretty well.
Most of all, the springs handle pretty well.

ok, so by the numbers the 350 H techs should be softer than the sport pkg in the rear. however, are the posted numbers the initial rate, are they progressive? anyone that started w/ the sprot pkg have any input?