When you click on links to various merchants on this site and make a purchase, this can result in this site earning a commission. Affiliate programs and affiliations include, but are not limited to, the eBay Partner Network.
Gas gauge would not go past the 1/2 mark, knowing it was a little below 1/4. Tried filling up the car and only let me put in 5 gallons, filling it to the 3/4 mark, or so it showed. I drove around for another 5 mins and came back and was able to fill the car up all the way, with another 6 gallons. After driving around for a couple days,gauge got stuck at 3/4 and the tank was actually a little less than 1/2, but still showing at 3/4.
My buddy is an mechanic and says replacing the whole fuel pump would be better than just replacing the fuel senders,and I agree after reading some on here not having any luck with just the senders replacement. Not sure if this will solve the issue. I filled the car up all the way with chevron as always and threw in some seafoam as a last prayer.
Taking it in next week, everything will be checked, Ill post back hopefully with good news. What a pain.
05 coupe, 115k mileage
Last edited by Djholmez64; 10-09-2015 at 07:12 PM.
Something similar happened to me, but mine still kinda worked.
My guage has always acted kinda funny, going up and down a little bit and whatever, but at least it was consistent in where/how it did this. Then one day I reset the comp (battery disconnect method) and it just screwed it all up. It would be fine down to a half a tank then just stay there no matter how long I drove, then just drop to empty out of no where. After a couple tanks of gas, this somehow corrected itself and now it works more perfectly than it ever has. Completely accurate, linear and consistent.
Basically, I think the things just a piece of crap and its gonna do what it wants regardless of your efforts.
Youright peace of crap. Mine jumps also up and down especcially with around 1/4 tank.
Mine wasn't showing fully filled up when I first bought the car, wasn't sure if I was fully filling the car or not. Took a road trip, filled the car each time, and each time full showed higher on the gauge. Now when I fill it up the needle goes just above the full line like every other car I've owned and now it seems pretty accurate.
I'm wondering if the issue was caused by people not filling their cars up all the way when gas prices got really high and the float was never going up very high and started sticking? Our cars are old enough now I'm guessing most of us here aren't the original owners and don't know if the car was filled up each time the original owner got gas or they just put $10 or $20 in each time. Not sure how the sensor is set up so can't be sure that's even possible to be an issue. All I know is consistently filling my car up every time I get gas has my gauge reading properly now.
First of all thanks to people sharing their experience and efforts! It was good to read.
Having the same problem on my 2005 G35x... I'm also becoming mileage based fueling guru ))))) mine recently has got stuck mostly on 3/4 mark when going down below the half...
Yesterday I'm disassembled both sensors and clean very thoroughly and the checked resistance with ohmmeter. It was good and according to manual (see the page attached)
The electric scheme is very simple and it is clear that the problem is from fuel gauge.
So the next step I will do is to remove the DIS and Fuel gauge. I don't think it has any chip inside and the problem could be just a resistor or any other simple detail. Don't think it worth to pay $100 to buy replacement. I'll keep you posted on how it went
So frustrating. New here but I see this is a common problem. Just cleaned both units today with no luck. Fuel gauge doesn't go above 1/2 tank. Going to try the gauge test procedure and hopefully I don't need a new cluster.
First of all thanks to people sharing their experience and efforts! It was good to read.
Having the same problem on my 2005 G35x... I'm also becoming mileage based fueling guru ))))) mine recently has got stuck mostly on 3/4 mark when going down below the half...
Yesterday I'm disassembled both sensors and clean very thoroughly and the checked resistance with ohmmeter. It was good and according to manual (see the page attached)
The electric scheme is very simple and it is clear that the problem is from fuel gauge.
So the next step I will do is to remove the DIS and Fuel gauge. I don't think it has any chip inside and the problem could be just a resistor or any other simple detail. Don't think it worth to pay $100 to buy replacement. I'll keep you posted on how it went
Let us know any info on taking out the cluster! Seems like this is the solution for most.
Thought I�d post here instead of starting a new thread, bit long.
Similar gas gauge issues but going back about 2yrs ago, I noticed my gas gauge was acting a little funny and not really telling me what I had left for gas. For example I would travel over 100 miles and the gauge would still be at the "full" mark. We eventually ran out of gas on a back highway in Maine with the gauge holding steady at half tank after my wife (who's from Maine) told me there was a better priced gas station two miles down the road and to skip the one I had stopped at. Well, we made it 3 miles down the road before the car gave up - gas station was actually 6 miles away.
I went through the usual stuff documented here- the "q-tip" cleaning, replacing both fuel sending units, one at a time to see if this would fix the issue ( It didnt and as it turned out, there was nothing wrong with the old units) The only other solution to this was to replace the odometer, but at 1k a pop from the dealer, which wasnt even a guaranteed fix, I decided to start doing math using the mileage to decide when to fuel up. Then I saw the ad below on ebay a few months ago, vendor Ezelectronics201, he�s in NJ.
You have to pull your odometer, send it to him, he fixes it and sends it back- which is fine but I was skeptical; from potentially 1k to $120? Seemed like throwing good money after bad. I saved the ad and came back to it two weeks ago. I finally looked at his reviews for that particular service and noticed he had actually fixed a couple of G�s ( I just never saw them). I pulled the trigger, pulled the odometer and sent it to him last Monday, go it back on Thursday and installed it as soon as I got home. Based off my calculations, I thought I had about a half tank and sure enough, as soon as I turned it on, gauge went up and stopped at about the half way mark. I did two mini fill ups before two 100 mile drives over the weekend and watched the gauge steadily come down (which it wasn�t doing before) and got very excited when my �low fuel� light finally came on. The skeptic in me is going to keep an eye on it over the next few weeks but I would say the issue is fixed
One thing I would suggest before spending $200 on two new fuel sending units: get a multi-meter, grab the FSM to see what your resistance ranges should be and test the ones you have. There�s a chance there�s nothing wrong with them.
If you decide to use this guy, he is quick. I dropped mine off with Fedex on Monday at 1p here in Boston and FedEx delivered to him in NJ at 10a on Tuesday. At 3.30p same day, he sent me an email telling me he fixed everything and gave me a USPS tracking number. As I said, quick.
So I have used two different people on eBay (the one in NJ mentioned above and the one in Texas) to fix a cluster and both did not do a very satisfactory job in my opinion and I have found that the solution to fix this problem and some other problems like dim led lights (very common with the odometer LCD display) are quite simple if you know how to carefully remove the cluster from the car, disassemble it correctly and have decent soldering skills, which neither of the other guys seem to possess, in my opinion after inspecting their work. I also don't like people taking advantage of other people's troubles and pains when they know the fix, but will not share it with the thousands if not 100 of thousands G35 owners having the exact same problem because Infiniti / Nissan had obvious manufacturing problems with their clusters. I will not go into the details about their work, but I can tell you based on my experience that both did not seem to know their way around the G35 cluster as you would expect and based on their claims within their postings. If you want to tackle this on your own read on because I will tell you the exact resistor contacts that you should inspect and re-solder. I am not going to go through all the specifics on how to remove the cluster from the car or disassemble the cluster because there are videos out there that already cover those two items. I am going to show you the cluster's circuit board and the soldering locations. A few notes first though, you will need the following tools before you get started:
phillips screwdriver (used to disassemble the cluster)
fine flat trim tool to separate the plastic gauge material from the board (flat head screw driver will work also if you are careful)
good soldering iron with a very small tip (and steady hands)
a magnifying glass because the soldering points are very small at least the led odometer ones are.
So here's the moment you have all been waiting for so lets get right to the point.
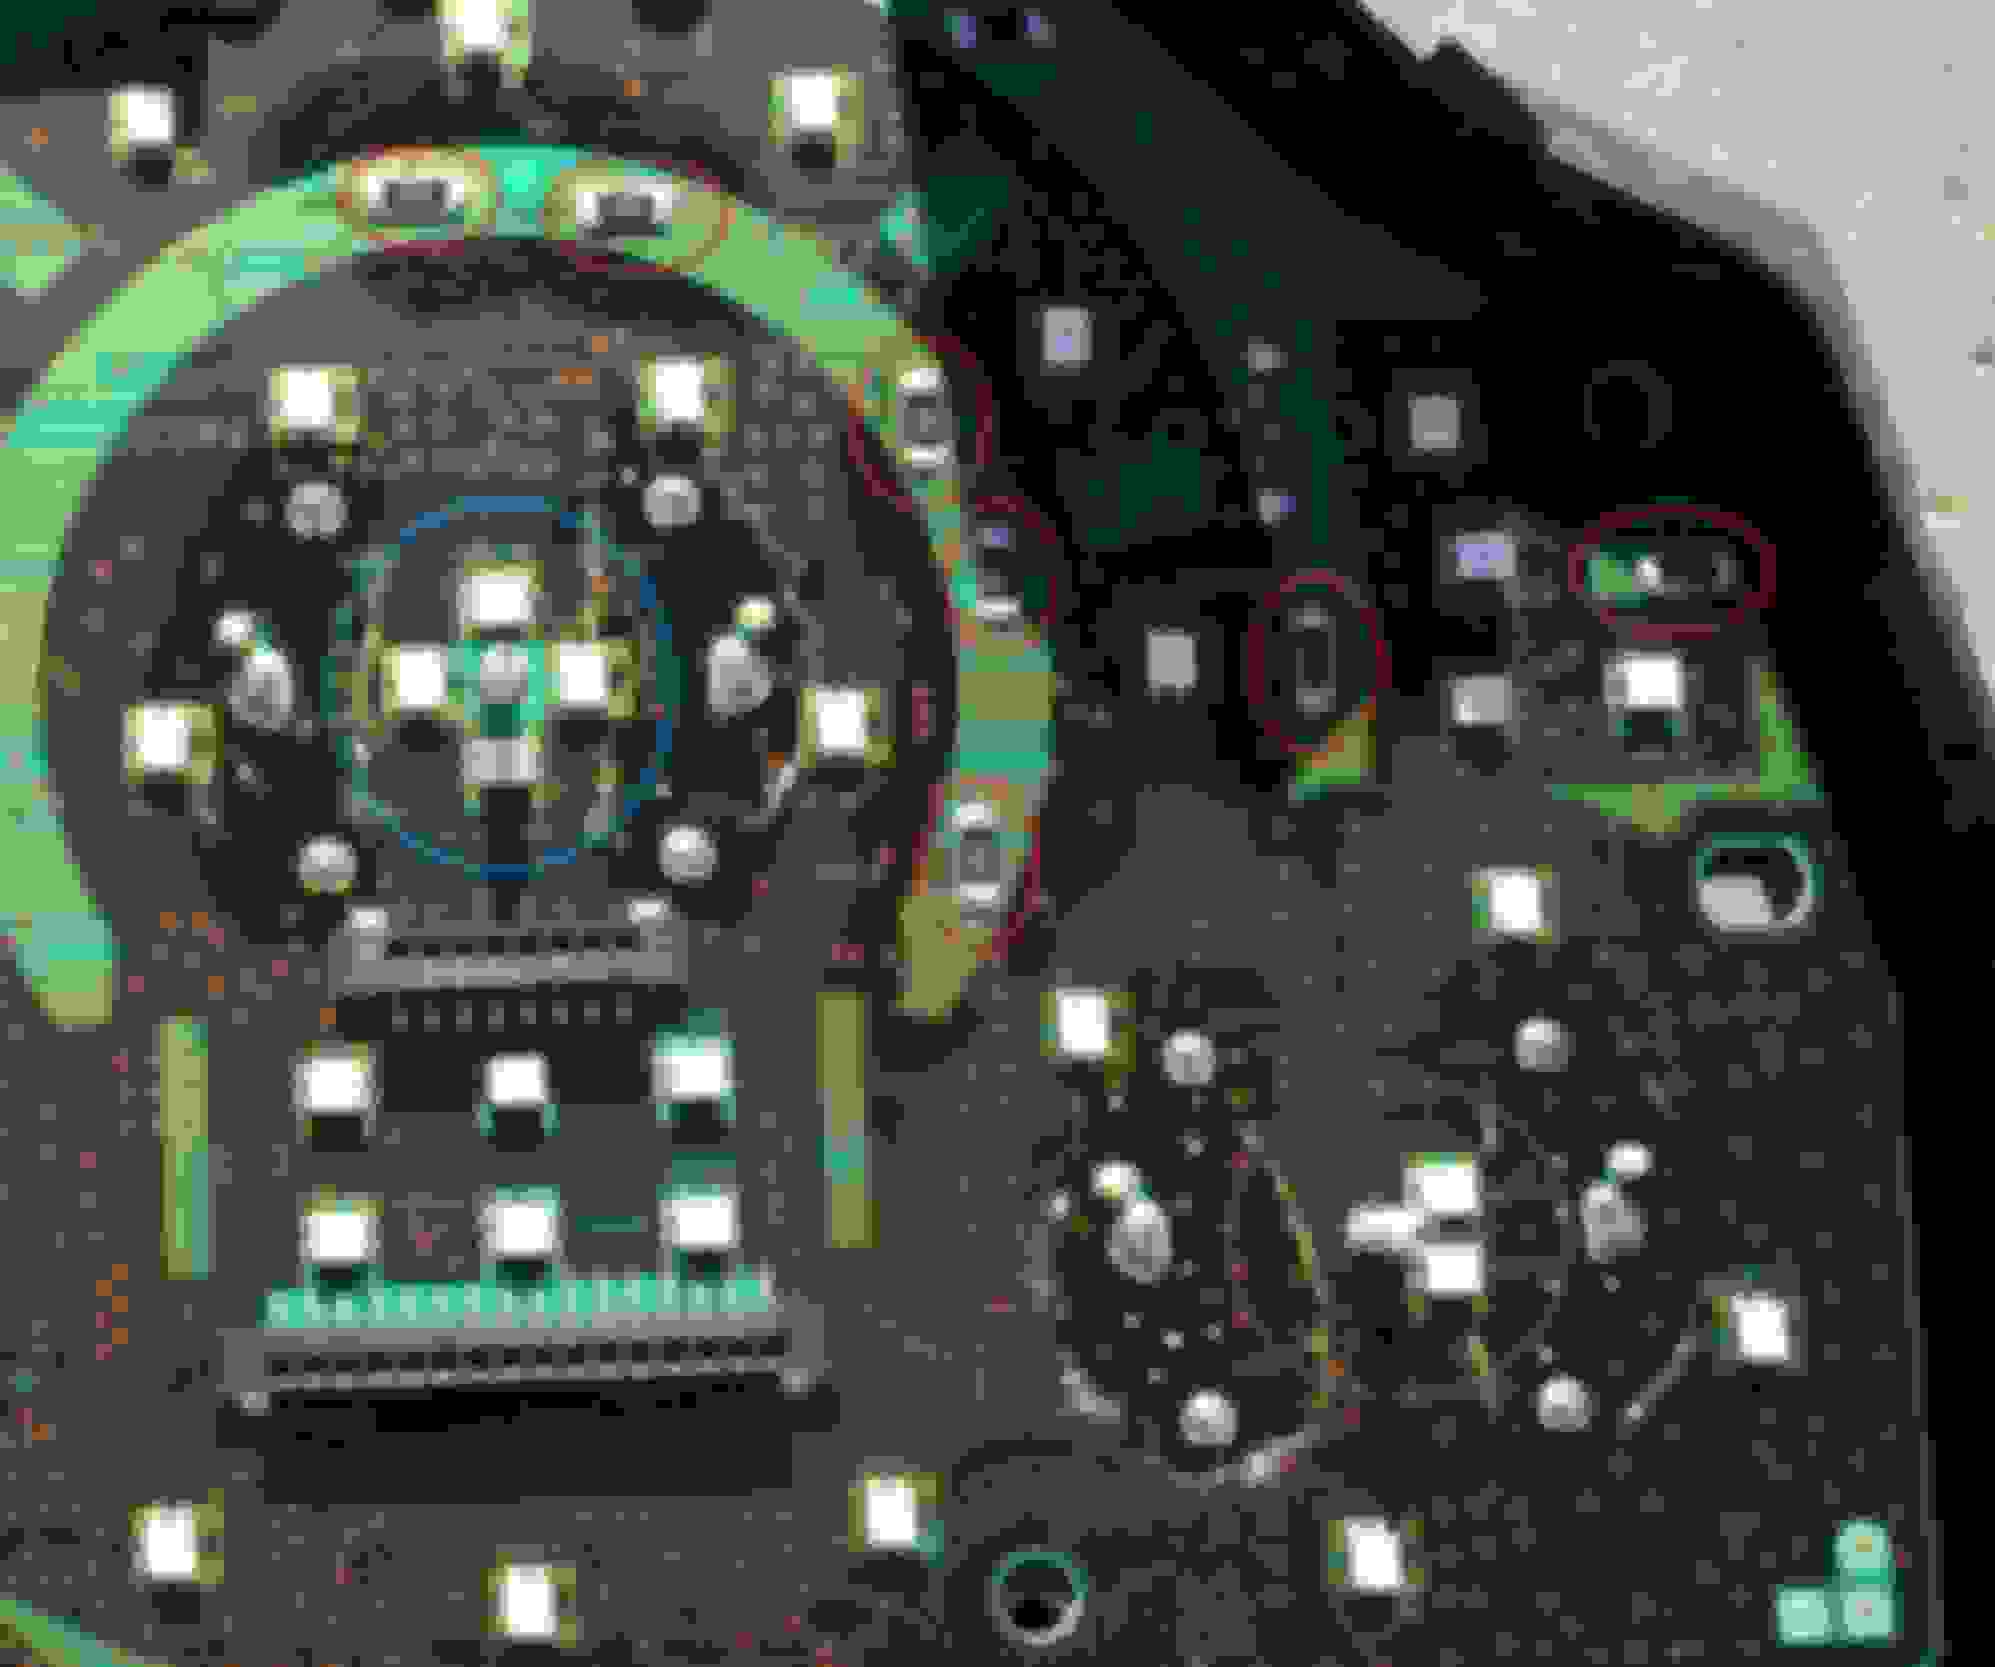
Here's a picture of the front right side of the cluster board (2006 G35). All the points circled in red show the resistors where the solder joints can go bad and separate from the board causing the erratic problems with the fuel gauge. As a reference I have circled the MPH gauge motor in blue and the fuel gauge motor in purple.So there you have it, very simple and easy, but not for the faint of heart because you can easily ruin a cluster if you do not have the proper patience and skills.
So now lets get to the led lights for the odometer display issues - dimming, flickering, or just completely not working.
This is the back left side of the board, which is a little bit easier to get to because you do not need to remove the two LCD displays to fix it. On the back side of the board on the bottom left side where you see the pins from the odometer LCD display sticking through you will see a lot of small (smaller than the front side shown above for the fuel gauge fix) resistors that need to be re-soldered to fix the cold joints. All the resistors in the red rectangle should be re-soldered if your odometer display is not lit up like it should be.
Soldering hints: Because one side of the resistor may not be attached (the very problem described here), it is possible for the resistor to move / shift while trying to re-solder it. It is best to apply light pressure and maybe even hold the resistor with a small tool that would not damage the resistor while trying to solder the first side you are working on. This happened to me twice while I was repairing a board so I started to hold them in place when re-soldering the first side. It shouldn't happened on the second side because your new soldering joint (if done correctly) will hold it in place.
After you are done, you and your G35 will be able to enjoy the good life again.
If you need the proper method for disassembling the cluster, let me know so you don't end up doing stupid things like the person in Texas who thinks you have to drill through the plastic to remove the screw underneath it. like in the following picture: It may be hard to see in the picture, but it is quite obvious when looking at it directly. He drilled through the plastic cover to unscrew the screw underneath it. This is not necessary because you should remove the whole plastic display piece then you unscrew the screws to get to the board. He obviously was clueless on how to work on the G35 cluster. He then covers the hole with black electrical tape like that is professional work, not. Please don't do stupid things like this idiot.
I hope you enjoyed this post and good luck, if you decide to tackle this on your own. I spent way too many hours and money trying to research and fix this problem so I thought I would share it so you wouldn't have to go through the same thing I went through.
Last edited by Riche; 02-22-2018 at 08:32 PM.
Reason: Added the hint
Hey Riche, have you or any one used this seller before for an instrument cluster repair service? He's from Austin, TX. I need to fix the infamous p0462 code in order to pass emissions. https://m.ebay.com/itm/INFINITI-G35-...E/252800968828
I tried cleaning the floats and pulled both and checked for the proper ohms. NG.
Found a local speedometer shop and dropped it off. They fixed the issue. No more checking mileage for fill ups.
the second one came in, but wont have time to install til the weekend, well i do have time to install but i cant afford screwing up and not going to work morrow.
Where did you get the fuel pump assembly and the sender unit for the other side from? I have looked online and the Hitachi or any other brand fuel pump I find is not the same as the one I have on the 2005 G35 Sedan. Mine is exactly the same as the one on the 1st post here. The only place I have found the same fuel pump assembly is USED at eBay and other places, but not new. I bought a Hitachi pump, though it looked different it said it was for the 2005 Sedan, but it wont fit and the float arm is too close to the pump that it seems like it would get stuck on the base where the assembly goes in. Also the connection for the Jet Pump is larger.
 10-09-2015, 07:03 PM