
Infi's Audio Upgrade


Thread Starter
|
Registered User
Joined: Jan 2007
Posts: 69
Likes: 1
From: NoVA
Infi's Audio Upgrade
Overview
I was never really pleased with the Bose system, and after adding a CarPC, my audio got even worse! So I decided to replace all of the factory audio equipment and get my sound back in check.
I decided on:
I went with Sound Ordnance speakers because they are priced well and should offer me a good bang for my buck. They are Crutchfield's store brand and I do trust them - so hopefully they will work out well for me.
I chose the JBL amp because it is very versatile regarding how it is configured and hooked up, and it is easy to tune. This amp has 5-channel input but can run off of two. You can hook up only the left channels and then set the right and sub channels to run off of the left channel input - convenient! Also, it accepts three levels of input: low, hi and hi-er. This will be good for me since the signal is coming from a PC output. I should be able to get rid of my LOC. The amp also has a cool feature which helps to get it setup just right. They give you a CD that you can play at full volume and then you turn on the gain LEDs and can adjust the gain on each channel until the "GOOD" LED is illuminated. That way there should be no guess work with the gain control.
The Alpine sub was picked because it has a shallow install depth but still packs a punch (hopefully). I am installing it in the factory sub location so an 8" sub is all that I have room for.
KnuKonceptz, I read, sells great wiring kits so I ordered a 4g kit and this wire is THICK. It looks high quality and should do the trick!
While I'm ripping my interior apart, I will be applying poor man's sound deadener - Peel & Seal from Lowes. I hope it will tighten things up a bit.
Speaker Installation: Front Door(s)

Trim panel removed, factory speaker removed.

Inner panel removed!

Peel & Seal applied.

Designed and 3D-printed a custom tweeter bracket to replace the factory bracket.

New bracket installed - fits perfect!
Speaker Installation: Rear Door(s)

Trim panel removed.

Peel & Seal applied and speaker installed.

Close-up of rear speaker, installed.
Tearing the Car Apart

Rear seat removed. Now time for the shelf.

Rear shelf removed. Dusty!
Wiring

Getting ready for the new wire harness (pre-solder).

New wire harness ready!

Factory and new wire harness.
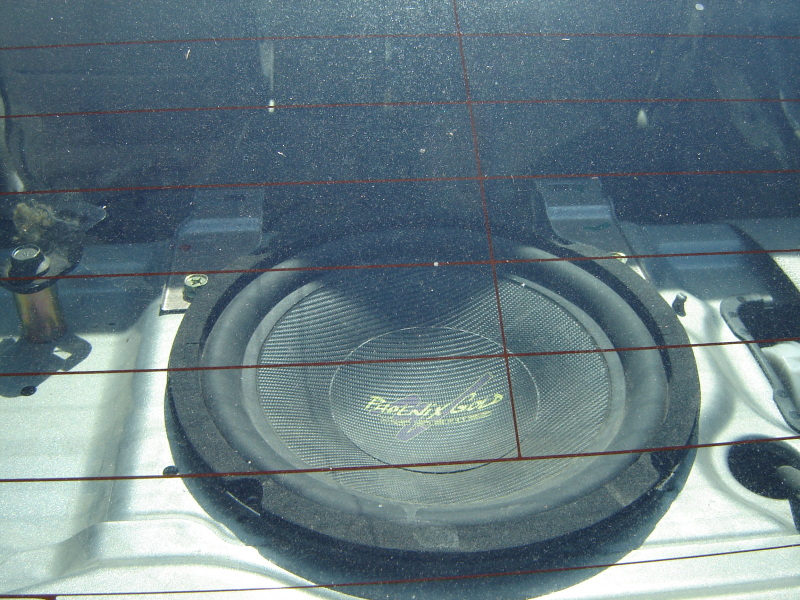
Installing Sub

Sub fits PERFECT. can't even wiggle it. I bolted it down with some #10 bolts and locking washers.

Sub from below. I was worried the interior trim wouldn't fit but it did (you'll see soon).

Sub from above. (+Gary Johnson)
Installing Amp

Amp hooked up in its temporary location - inside the spare tire.

Power and ground running behind the seat to the amp on the other side.
Finished!

Everything's put back together!

Amp mounted + CarPC. Wires visible :-( maybe I will fix it later...probably not!

Removed the Bose tag from the sub grille.
I was never really pleased with the Bose system, and after adding a CarPC, my audio got even worse! So I decided to replace all of the factory audio equipment and get my sound back in check.
I decided on:
I went with Sound Ordnance speakers because they are priced well and should offer me a good bang for my buck. They are Crutchfield's store brand and I do trust them - so hopefully they will work out well for me.
I chose the JBL amp because it is very versatile regarding how it is configured and hooked up, and it is easy to tune. This amp has 5-channel input but can run off of two. You can hook up only the left channels and then set the right and sub channels to run off of the left channel input - convenient! Also, it accepts three levels of input: low, hi and hi-er. This will be good for me since the signal is coming from a PC output. I should be able to get rid of my LOC. The amp also has a cool feature which helps to get it setup just right. They give you a CD that you can play at full volume and then you turn on the gain LEDs and can adjust the gain on each channel until the "GOOD" LED is illuminated. That way there should be no guess work with the gain control.
The Alpine sub was picked because it has a shallow install depth but still packs a punch (hopefully). I am installing it in the factory sub location so an 8" sub is all that I have room for.
KnuKonceptz, I read, sells great wiring kits so I ordered a 4g kit and this wire is THICK. It looks high quality and should do the trick!
While I'm ripping my interior apart, I will be applying poor man's sound deadener - Peel & Seal from Lowes. I hope it will tighten things up a bit.
Speaker Installation: Front Door(s)
Trim panel removed, factory speaker removed.
Inner panel removed!
Peel & Seal applied.
Designed and 3D-printed a custom tweeter bracket to replace the factory bracket.
New bracket installed - fits perfect!
Speaker Installation: Rear Door(s)
Trim panel removed.
Peel & Seal applied and speaker installed.
Close-up of rear speaker, installed.
Tearing the Car Apart
Rear seat removed. Now time for the shelf.
Rear shelf removed. Dusty!
Wiring
Getting ready for the new wire harness (pre-solder).
New wire harness ready!
Factory and new wire harness.
Installing Sub
Sub fits PERFECT. can't even wiggle it. I bolted it down with some #10 bolts and locking washers.
Sub from below. I was worried the interior trim wouldn't fit but it did (you'll see soon).
Sub from above. (+Gary Johnson)
Installing Amp
Amp hooked up in its temporary location - inside the spare tire.
Power and ground running behind the seat to the amp on the other side.
Finished!
Everything's put back together!
Amp mounted + CarPC. Wires visible :-( maybe I will fix it later...probably not!
Removed the Bose tag from the sub grille.
Last edited by jsm11482; Oct 20, 2012 at 09:49 PM.


Thread Starter
|
Registered User
Joined: Jan 2007
Posts: 69
Likes: 1
From: NoVA
Peel & Seal (link in original post). It is a roofing product that some say works well for the price as a sound deadener. We'll see.


Thread Starter
|
Registered User
Joined: Jan 2007
Posts: 69
Likes: 1
From: NoVA
Hopefully you're not anywhere that it gets hot. That stuff is not made to hold its weight in any way, so you could end up with a lump of tar and metal in the bottom of your doors. It's fine for doing floors where gravity works for it, but I'd go with some quality CLD tiles from www.sounddeadenershowdown.com any day.
Thread Starter
|
Registered User
Joined: Jan 2007
Posts: 69
Likes: 1
From: NoVA
None taken - I know they're cheap. If I'm not happy with them I'll just switch 'em out later.
I don't think anything I can put in my car audio-wise would be worse than what I'm replacing since I don't have a HU with preamp-out, I was underpowering the Bose amp which gave me very flat music. After getting the new amp installed and the new speakers properly powered, it will sound better than what I had. I plan on posting before/after sound clips.
Have you used this brand before or are you speaking from the specs?
Last edited by jsm11482; Oct 15, 2012 at 06:30 PM.
Trending Topics

Registered User
Joined: Aug 2012
Posts: 10
Likes: 2
From: Alberta, Canada
I'm interested in how well the Alpine 8" will work free air. Also wonder how well the sub will fit in the stock deck hole.
I put a PG sub as an experiment in my rear deck. The sub worked decent for the brief period it lasted. I'll be putting a JBL GTO 804 in the deck soon, but right now am using an 10" Alpine Type R/sealed box in the trunk.
I put a PG sub as an experiment in my rear deck. The sub worked decent for the brief period it lasted. I'll be putting a JBL GTO 804 in the deck soon, but right now am using an 10" Alpine Type R/sealed box in the trunk.
Last edited by EndurAl; Oct 20, 2012 at 04:07 AM.
Thread Starter
|
Registered User
Joined: Jan 2007
Posts: 69
Likes: 1
From: NoVA
I got it wired up last night and tested it although it's not completely secured yet. For an 8" sub it sounds like it packs a lot of punch! The sub is solid and very heavy, feels like great quality.
It fits like a glove. It slides in easy and there is no wiggle room. The only problem is mounting it, you have to drill new holes - from the bottom. I did it and my alignment was off so I need to widen the holes and then use bolts instead of screws to secure it. I haven't put the trim back in the trunk or on top of the shelf. I think the shelf trim will fit fine but the trunk "ceiling" trim may hit the underside of the sub - we'll see.
It fits like a glove. It slides in easy and there is no wiggle room. The only problem is mounting it, you have to drill new holes - from the bottom. I did it and my alignment was off so I need to widen the holes and then use bolts instead of screws to secure it. I haven't put the trim back in the trunk or on top of the shelf. I think the shelf trim will fit fine but the trunk "ceiling" trim may hit the underside of the sub - we'll see.
Registered User
Joined: Aug 2012
Posts: 10
Likes: 2
From: Alberta, Canada
Install sounds pretty much the same as the PG sub I put in. Fit great in the deck but getting the sub mounted was a colossal PITA. I also used bolts to mount mine.
Last edited by EndurAl; Oct 20, 2012 at 04:08 AM.
Thread Starter
|
Registered User
Joined: Jan 2007
Posts: 69
Likes: 1
From: NoVA
Cool, I'll post pics when I finish securing it...probably tomorrow. I worry about fixing rattles now!
Registered User
Joined: Aug 2012
Posts: 10
Likes: 2
From: Alberta, Canada
I also ended up installing my amp (PDX 5) in the same location. I wish the PDX had all the adjustment ***** on top of the amp like the JBL. All the PDX controls are tiny and located on the side of the amp. - makes changing settings a real chore.
I wish the PDX had all the adjustment ***** on top of the amp like the JBL. All the PDX controls are tiny and located on the side of the amp. - makes changing settings a real chore.