
DIY: Rim Refinishing/Resurfacing Reloaded


DIY: Rim Refinishing/Resurfacing Reloaded
I know that there's a post about rim refinishing just below (which I didn't see before starting my project) but the difference here is that I did a LOT of wetsanding between coats. If nothing else, treat this as a supplement to express705's article.
Inspiration was provided by this Autopia article "Repairing Scratched Alloy Rims & Rim Damage". Where this article attempts to colour match and only "touch-up" the scratched/curbed portion of the rim I decided to refinish the entire rim.
Overview
Refinishing rims yourself is a cost-effective but time intensive undertaking. It took me the better part of a month including a few 4-5 hour Saturdays to do all 4. Wetsanding is the major time killer. The upside with copious wetsanding is that you won't get orange-peel, paint runs and only minor pits.
If you're not concerned with orange-peel, runs or pit marks you can skip sanding and polishing and you'll be done in an afternoon. Here is a DIY Article on the G35 Driver Forum that doesn't go as **** on the sanding and I found after I'd finished.
Here's another article where these acura rims were only sanded prior to priming.
The other concern with doing this yourself is around the durability of the paint. It's obviously not going to be even close a powdercoat finish. I haven't driven on them yet (more on that later) but I suspect that rocks will chip the paint.
Full picture set on Flickr.
Here's what you need:
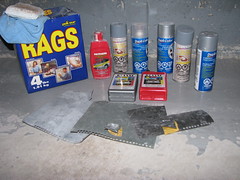
Duplicolor filler primer
Duplicolor silver wheel paint
Duplicolor clear wheel paint
Klasse Paint Polish and Glaze sealant (I love this stuff, but any car polish and wax will do)
400, 800 and 100 grit 3M wet sand paper
Box of rags
Microfiber clothe (for polishing)
Cotton applicator pad (for polishing)
Not pictured is the Varsol Paint Thinner and the 200 grit dry sand paper.
I purchased everything from Canadian Tire except the Klasse, which I got from an online store.
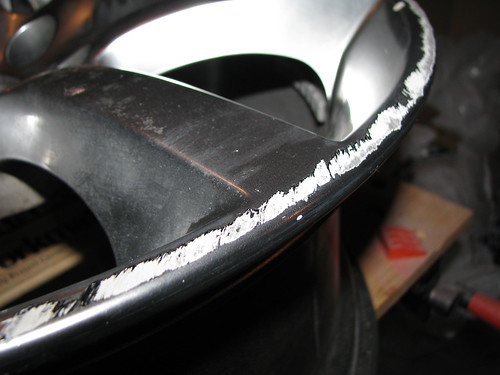
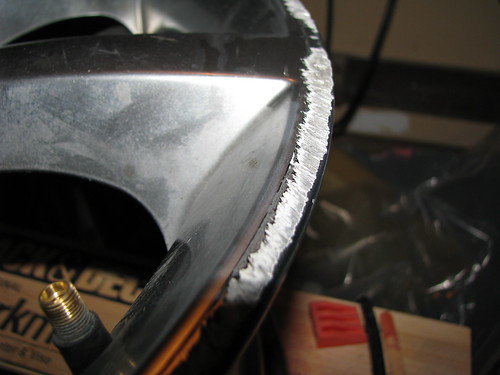
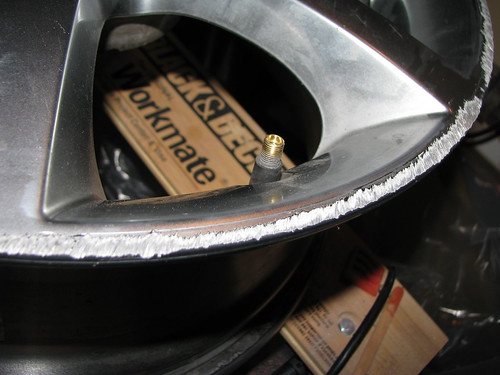
Before:
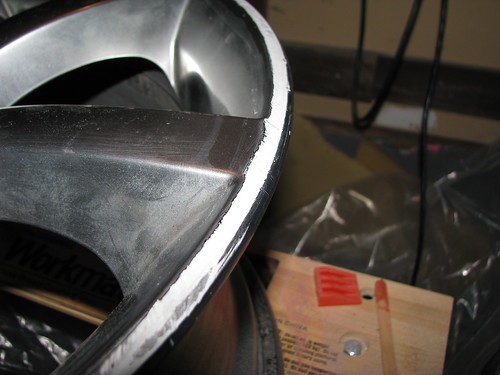
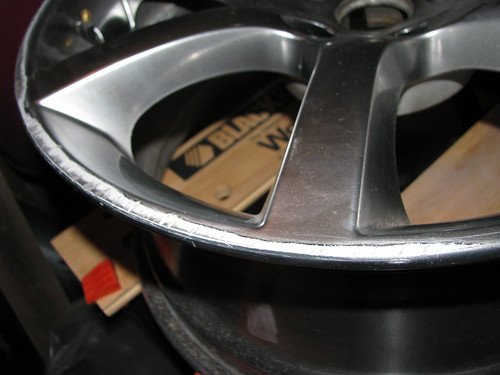
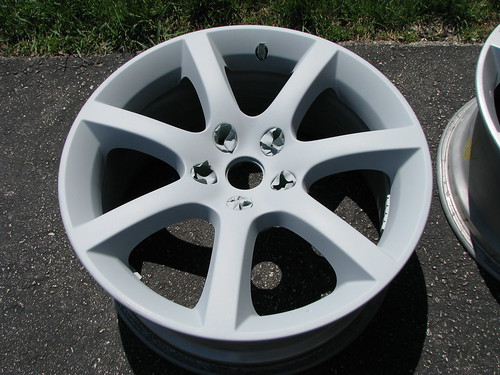
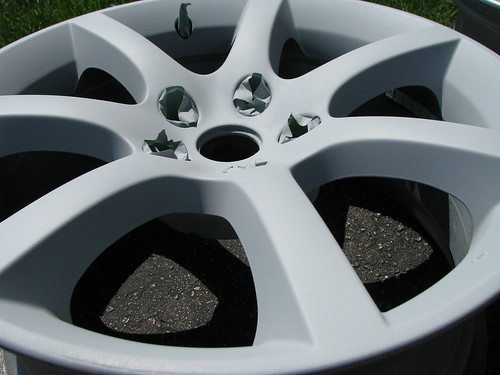
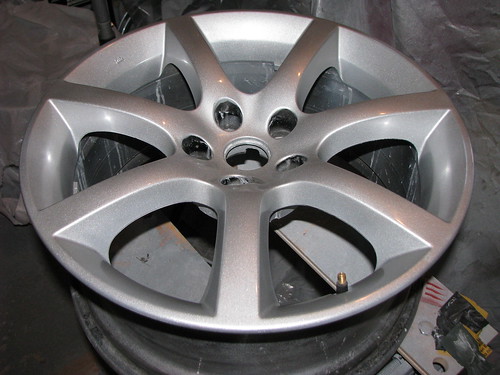
Here's what the rims looked like prior to me working on them. All 4 rims were damaged like this with the curb rash going around almost the entire lip of the rim. Incidentally, notice that these factory G35 Coupe 18" rims have a nice grey factory finish on them that with a black primer and a white primer under. The scratches are deep and the bare metal has deep gouges in it.

Step 1: Dry Sand
I used 200 grit dry sand paper to sand down the scratches as smooth as possible. I didn't go too deep or you'd take out too much of the metal but as you can see it is a relatively smooth progression from an undamaged section to the curb rash.
Also, not clearly pictured, I used the 200 grit to lightly sanded the entire rim to promote paint adhesion.
Finally, in this step I wiped down the rim 2 or 3 times with a clean rag and the paint thinner.
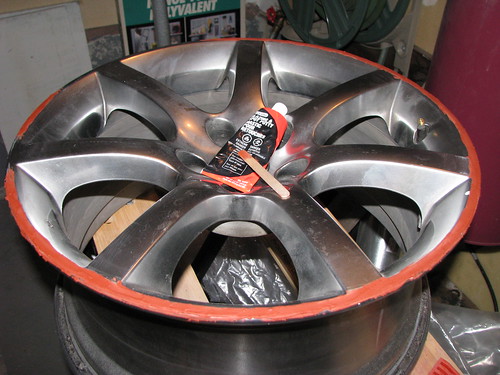
Step 2: Bondo!!
Every car guy's friend is Bondo. Pictured here is 2 coats of Bondo spot putty which I applied with a popsicle stick. Apply this stuff to all damaged areas. Don't worry about applying a decent coat as most of it will come off. This was done in the same session as the Step 1 and I let it dry overnight.
Not pictured is the sanding process of the Bondo where I took off almost all the Bondo but what was in the gouged areas. I used 400 grit dry sanding for the Bondo.
Wipe it down with paint thinner but don't get too aggressive cuz the paint thinner will strip the Bondo.
Let it dry/cure overnight and that's the end of this session.
Step 3: Mask and Prime
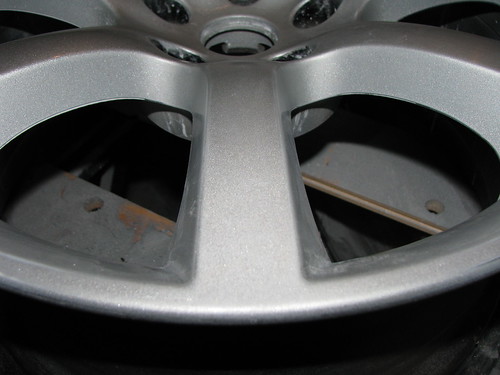
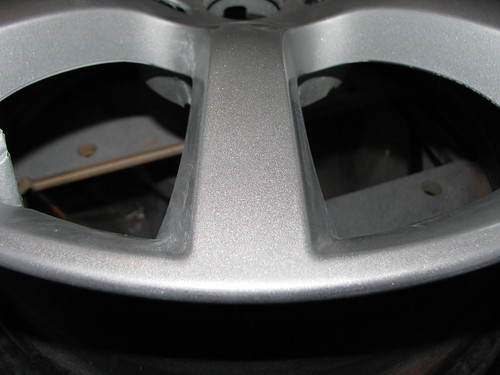
This step took me 3 sessions. In the first session I masked off the lug holes and valve stem using paint masking tape (the green stuff). Then in my garage with some plastic put up around stuff I didn't want to get painted I sprayed a total of 2 coats on the rim. Leaving a drying time of about 10 minutes. No sanding between. I let it cure overnight.
In the next session I wet sanded the entire rim with 800 grit. This stage is important with the sanding because any imperfections here will be magnified when you get the colour and clear on. After sanding I cleaned with thinner (not too much) and sprayed another 2 coats of primer. Again another overnight cure.
Final primer session is to wet sand it smooth again with 800 grit. You can proceed to the next step right away.
Note: Remember that rattle-can spray painting yields best results if you start the spray off the subject, move the spray in 1 direction evenly across the subject and stop the spray off the subject. That prevents large blobs and helps get the paint even.
Step 4: Colour
This takes another 3 sessions. The first session is continued from where we left off in step 3, I sprayed 2 coats of silver wheel paint on the rim trying my best to keep the coat even. Invariably I messed up and got splotches or sections where it wasn't enough but that's life. Let it cure overnight again.
In the next session I wetsanded with 800 again. This was the 4th rim I did so I was getting really tired of sanding by this point. But the care that's put in here will make the rim look really good later. So I sucked it up and carefully sanded it knowing there'd be lots more in store ahead. After sanding I sprayed another 2 coats of colour then let it cure overnight.
In the last session of this step I 800 wetsanded and sprayed another 2 coats. I supposed if I repeated this step several more times a) my hands would have fallen off from all the sanding and b) I'd have a much nicer base of colour paint. Due to laziness I proceeded to Step 5.


Continued in the next post.
Inspiration was provided by this Autopia article "Repairing Scratched Alloy Rims & Rim Damage". Where this article attempts to colour match and only "touch-up" the scratched/curbed portion of the rim I decided to refinish the entire rim.
Overview
Refinishing rims yourself is a cost-effective but time intensive undertaking. It took me the better part of a month including a few 4-5 hour Saturdays to do all 4. Wetsanding is the major time killer. The upside with copious wetsanding is that you won't get orange-peel, paint runs and only minor pits.
If you're not concerned with orange-peel, runs or pit marks you can skip sanding and polishing and you'll be done in an afternoon. Here is a DIY Article on the G35 Driver Forum that doesn't go as **** on the sanding and I found after I'd finished.
Here's another article where these acura rims were only sanded prior to priming.
The other concern with doing this yourself is around the durability of the paint. It's obviously not going to be even close a powdercoat finish. I haven't driven on them yet (more on that later) but I suspect that rocks will chip the paint.
Full picture set on Flickr.
Here's what you need:
Duplicolor filler primer
Duplicolor silver wheel paint
Duplicolor clear wheel paint
Klasse Paint Polish and Glaze sealant (I love this stuff, but any car polish and wax will do)
400, 800 and 100 grit 3M wet sand paper
Box of rags
Microfiber clothe (for polishing)
Cotton applicator pad (for polishing)
Not pictured is the Varsol Paint Thinner and the 200 grit dry sand paper.
I purchased everything from Canadian Tire except the Klasse, which I got from an online store.
Before:
Here's what the rims looked like prior to me working on them. All 4 rims were damaged like this with the curb rash going around almost the entire lip of the rim. Incidentally, notice that these factory G35 Coupe 18" rims have a nice grey factory finish on them that with a black primer and a white primer under. The scratches are deep and the bare metal has deep gouges in it.
Step 1: Dry Sand
I used 200 grit dry sand paper to sand down the scratches as smooth as possible. I didn't go too deep or you'd take out too much of the metal but as you can see it is a relatively smooth progression from an undamaged section to the curb rash.
Also, not clearly pictured, I used the 200 grit to lightly sanded the entire rim to promote paint adhesion.
Finally, in this step I wiped down the rim 2 or 3 times with a clean rag and the paint thinner.
Step 2: Bondo!!
Every car guy's friend is Bondo. Pictured here is 2 coats of Bondo spot putty which I applied with a popsicle stick. Apply this stuff to all damaged areas. Don't worry about applying a decent coat as most of it will come off. This was done in the same session as the Step 1 and I let it dry overnight.
Not pictured is the sanding process of the Bondo where I took off almost all the Bondo but what was in the gouged areas. I used 400 grit dry sanding for the Bondo.
Wipe it down with paint thinner but don't get too aggressive cuz the paint thinner will strip the Bondo.
Let it dry/cure overnight and that's the end of this session.
Step 3: Mask and Prime
This step took me 3 sessions. In the first session I masked off the lug holes and valve stem using paint masking tape (the green stuff). Then in my garage with some plastic put up around stuff I didn't want to get painted I sprayed a total of 2 coats on the rim. Leaving a drying time of about 10 minutes. No sanding between. I let it cure overnight.
In the next session I wet sanded the entire rim with 800 grit. This stage is important with the sanding because any imperfections here will be magnified when you get the colour and clear on. After sanding I cleaned with thinner (not too much) and sprayed another 2 coats of primer. Again another overnight cure.
Final primer session is to wet sand it smooth again with 800 grit. You can proceed to the next step right away.
Note: Remember that rattle-can spray painting yields best results if you start the spray off the subject, move the spray in 1 direction evenly across the subject and stop the spray off the subject. That prevents large blobs and helps get the paint even.
Step 4: Colour
This takes another 3 sessions. The first session is continued from where we left off in step 3, I sprayed 2 coats of silver wheel paint on the rim trying my best to keep the coat even. Invariably I messed up and got splotches or sections where it wasn't enough but that's life. Let it cure overnight again.
In the next session I wetsanded with 800 again. This was the 4th rim I did so I was getting really tired of sanding by this point. But the care that's put in here will make the rim look really good later. So I sucked it up and carefully sanded it knowing there'd be lots more in store ahead. After sanding I sprayed another 2 coats of colour then let it cure overnight.
In the last session of this step I 800 wetsanded and sprayed another 2 coats. I supposed if I repeated this step several more times a) my hands would have fallen off from all the sanding and b) I'd have a much nicer base of colour paint. Due to laziness I proceeded to Step 5.
Continued in the next post.
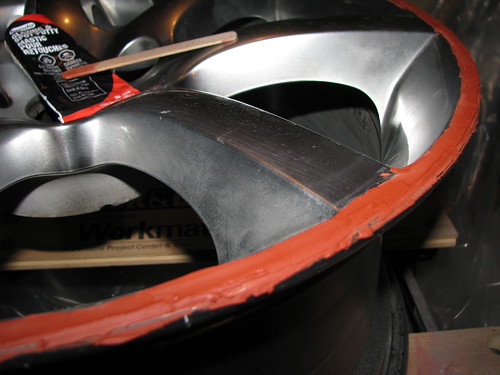
Step 5: Clear
Hey did I mention that I wet sanded with 800 grit? From the last step with the colour coat I had to sand it again. The process with the clear is the same except the last session. After sanding and cleaning I sprayed with the clear 2 coats. Cure overnight and the next session 800 wetsanded and another 2 coats.
I could have repeated but I didn't. 4 coats is enough for me. So I let it cure overnight again and then wet sanded with 800 grit and 1000 grit. There is a dramatic difference with the 1000 and it really helps with the next step.
And don't be a bonehead like me and go crazy with the 800 as I sanded through to the primer in some spots. I was too lazy to go back and repaint it so I just left it as is.
4 coats of clear, not sanded.


Final sanding with 1000. Notice how it looks dull.
Step 6: Polish and Wax
In the same session we left off with Step 5 where we 800 and 1000 wetsanded I proceeded to use the Mother's scratch remover polish. It's a less abrasive/cut polishing compound that I find safer than a true polish. You can notice that it really brings out a shine and when felt the surface feels very smooth.
Finally, because I love this process so much I want to drag it out longer, I used Klasse polish and glaze sealant to give it that extra shine and protection.
Conclusion
Boy oh boy do I wish I could throw in a few more steps of wetsanding but alas the process is complete. The finished product is below and you can compare the before and after shot.
Let's be honest here, it's not as good as the factory finish in some respects. There's a speckled look to the paint due to the rattle-can treatment. And the factory finish is likely more resistant to chipping and damage. Obviously nothing can stand up to a match against a curb but everyday it's probably better than the DIY stuff.
But if you're happy enough with the finished product, have some time on your hands and about $50 for all the stuff I highly recommend it.
Before:
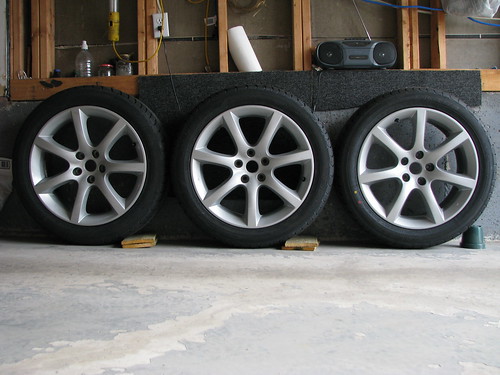
And the Finished product:
Tire Mounting
I had tires mounted on the rims the other day and I'm happy to say that the finish held up quite well. There's one spot where the mounting clamps scuffed the finish and some of the bondo is showing through but I'm not too concerned about it. As I haven't had my wetsanding fix for the past couple of days maybe I'll touch that part up.


Here you can see the mounting machine chipped the paint and now the bondo is showing through.

Version History:
15-Apr 2008 - initial version.
15-Apr 2008 - added post mounting info
Hey did I mention that I wet sanded with 800 grit? From the last step with the colour coat I had to sand it again. The process with the clear is the same except the last session. After sanding and cleaning I sprayed with the clear 2 coats. Cure overnight and the next session 800 wetsanded and another 2 coats.
I could have repeated but I didn't. 4 coats is enough for me. So I let it cure overnight again and then wet sanded with 800 grit and 1000 grit. There is a dramatic difference with the 1000 and it really helps with the next step.
And don't be a bonehead like me and go crazy with the 800 as I sanded through to the primer in some spots. I was too lazy to go back and repaint it so I just left it as is.
4 coats of clear, not sanded.
Final sanding with 1000. Notice how it looks dull.
Step 6: Polish and Wax
In the same session we left off with Step 5 where we 800 and 1000 wetsanded I proceeded to use the Mother's scratch remover polish. It's a less abrasive/cut polishing compound that I find safer than a true polish. You can notice that it really brings out a shine and when felt the surface feels very smooth.
Finally, because I love this process so much I want to drag it out longer, I used Klasse polish and glaze sealant to give it that extra shine and protection.
Conclusion
Boy oh boy do I wish I could throw in a few more steps of wetsanding but alas the process is complete. The finished product is below and you can compare the before and after shot.
Let's be honest here, it's not as good as the factory finish in some respects. There's a speckled look to the paint due to the rattle-can treatment. And the factory finish is likely more resistant to chipping and damage. Obviously nothing can stand up to a match against a curb but everyday it's probably better than the DIY stuff.
But if you're happy enough with the finished product, have some time on your hands and about $50 for all the stuff I highly recommend it.
Before:
And the Finished product:
Tire Mounting
I had tires mounted on the rims the other day and I'm happy to say that the finish held up quite well. There's one spot where the mounting clamps scuffed the finish and some of the bondo is showing through but I'm not too concerned about it. As I haven't had my wetsanding fix for the past couple of days maybe I'll touch that part up.
Here you can see the mounting machine chipped the paint and now the bondo is showing through.
Version History:
15-Apr 2008 - initial version.
15-Apr 2008 - added post mounting info


Apparently I should have asked them to put the rim in the machine face down, that way it would not have scratched. But it's a small repair compared to refinishing the whole thing.

Registered User
Joined: Sep 2012
Posts: 38
Likes: 0
From: Long Island, NY
any reason why you plugged up the holes for the lug nuts when painting and priming? I have seen others not cover them. I was thinking about doing this to mine as i have 1 rim with a good amount of curb rash. I figure might as well do all of them and make them gunmetal.
Great write-up btw! If you still have the rims how have they held up?
Great write-up btw! If you still have the rims how have they held up?
Trending Topics


Thread
Thread Starter
Forum
Replies
Last Post
inexorable
17 Inch
0
Sep 24, 2015 10:43 AM