
DIY 2003 G35 Sedan Rear Rotor Replacement


DIY 2003 G35 Sedan Rear Rotor Replacement
As an effort to give back to the community I'm posting up a DIY about replacing the rear rotors on my G35 Sedan. The InfinitiHelp video is much better but if you're not allowed to watch vids at work, this might help in a pinch 
http://imclumzy.wordpress.com/2009/0...r-replacement/
Lots of pics on the site but I've excerpted the text so you don't have to click through if you don't want to.
http://imclumzy.wordpress.com/2009/0...r-replacement/
Lots of pics on the site but I've excerpted the text so you don't have to click through if you don't want to.
WARNING: This is for informational purposes only. Working on your car may be dangerous and may result in injury or death. The author accepts no liability for any injury or death, intentional or unintentional, resulting from this guide. You have been warned, proceed at your own personal risk.
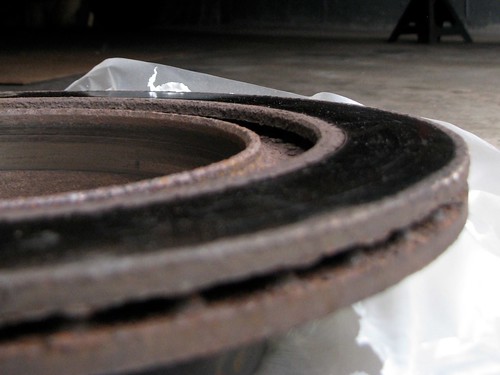
As you can see my rear rotors were certainly getting to the end of their miserable and thoroughly abused life. You know your rotors are bad when they�re a big ridge between the shiny and rust parts as well the face of the rotor has deep scores (valleys).
Weapons Required:
* 1/2″ drive Rachet set with 12mm, 19mm and 21mm sockets and a few extenstions
* 1/2″ drive Breaker bar
* Anti-seize compound
* Brake slider compound
* Lever
* Hammer
Getting Setup
Using the breaker bar and a 21mm socket, loosen the lugnuts on your rear wheels. Chock your front wheels, jack the G from the rear diff as high as possible and get those jack stands under there. Check and double-check your jack stands that they�re on nice and solid. Remove your rear wheels and set them aside.
Caliper Bolt, Caliper and Pads
Remove the top caliper slider bolt that is pictured to the left, with a 12mm socket. This sucker is usually on pretty tight so you might want to use a breaker bar. Remember lefty loosey but this bolt is facing the other way, so you�ll need to go RIGHTY � loosey.
Loosen the slider bolt all the way out. Mine was stuck in there very tight so I had to use a lever and hammer to tap it out. You don�t need to remove the bottom caliper slider bolt, and in fact you can�t so don�t bother.
Now rotate the caliper down and remove the brake pads.
Torque Member Bolts and Caliper Assembly
Use your 19mm (I think) to loosen the top and bottom torque member bolts. These suckers are on tight as they attach the caliper to the knuckle. In the picture I�ve already removed the top bolt and I had to use an extension to clear the lower control arm. I was able to use the rachet to loosen mine but you may have to get under the car and use that breaker bar. Once you break the initial torque, you can loosen them by hand until they are fully out.
Now carefully take the caliper and assembly that is still attached to the rubber brake lines and put it on the upper control arm out of the way. Feel free to use a bungy cord and make sure it doesn�t fall off or rest on the brake line.
Replace the Rotor and Install Caliper
Loosen the rotor by tapping it on opposing sides with your hammer. The rotor can be seized on a bit so wack it with the hammer until it breaks the rust and slides off.
Now that the rotor is off this might be a good time to adjust the brake shoes used by your parking brake � did you know that you had brake shoes? I�m not sure it�s necessary but used some anti-seize compound on the face of the hub.
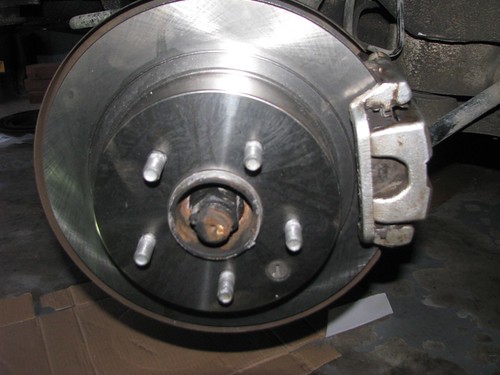
From your rotor move over the rubber nub that I�ve pictured here. Take your new rotors and slide them over the lug bolts and onto the hub like so. Looks good huh? These are Raybestos rotors about $50 a piece.
Now you�ll have to reinstall the caliper the reverse of the removal. Use anti-seize compound on the torque member bolts and brake slider grease on the slider. I should note that on mine the rubber gasket on the end of my slider bolt is stuck at the back of the caliper. That�s not good and I should somehow remove it but I haven�t figured a way to do so as yet. I suppose I need one of those dentist pick kind of tools to extract it. The good thing is that it�s oriented properly and should squeeze on okay.
Reinstall your pads as removed. If they�re well worn you�ll want to replace them. Mine are Hawk HPS and I�m not a huge fan but they do for street driving.
Once you�re done it should look like this. Put your wheel on and pat yourself on the back again that you saved a bunch (a bit) of cash paying a mechanic.
Additional Reference:
The G35 community is pretty awesome with very organized and nice resources. If you don�t mind watching the video here is a tutorial on this same topic here.
http://www.infinitihelp.com/diy/gsed..._procedure.htm
This DIY is very simple and much like most other cars out there, but I hope it was helpful for you.
As you can see my rear rotors were certainly getting to the end of their miserable and thoroughly abused life. You know your rotors are bad when they�re a big ridge between the shiny and rust parts as well the face of the rotor has deep scores (valleys).
Weapons Required:
* 1/2″ drive Rachet set with 12mm, 19mm and 21mm sockets and a few extenstions
* 1/2″ drive Breaker bar
* Anti-seize compound
* Brake slider compound
* Lever
* Hammer
Getting Setup
Using the breaker bar and a 21mm socket, loosen the lugnuts on your rear wheels. Chock your front wheels, jack the G from the rear diff as high as possible and get those jack stands under there. Check and double-check your jack stands that they�re on nice and solid. Remove your rear wheels and set them aside.
Caliper Bolt, Caliper and Pads
Remove the top caliper slider bolt that is pictured to the left, with a 12mm socket. This sucker is usually on pretty tight so you might want to use a breaker bar. Remember lefty loosey but this bolt is facing the other way, so you�ll need to go RIGHTY � loosey.
Loosen the slider bolt all the way out. Mine was stuck in there very tight so I had to use a lever and hammer to tap it out. You don�t need to remove the bottom caliper slider bolt, and in fact you can�t so don�t bother.
Now rotate the caliper down and remove the brake pads.
Torque Member Bolts and Caliper Assembly
Use your 19mm (I think) to loosen the top and bottom torque member bolts. These suckers are on tight as they attach the caliper to the knuckle. In the picture I�ve already removed the top bolt and I had to use an extension to clear the lower control arm. I was able to use the rachet to loosen mine but you may have to get under the car and use that breaker bar. Once you break the initial torque, you can loosen them by hand until they are fully out.
Now carefully take the caliper and assembly that is still attached to the rubber brake lines and put it on the upper control arm out of the way. Feel free to use a bungy cord and make sure it doesn�t fall off or rest on the brake line.
Replace the Rotor and Install Caliper
Loosen the rotor by tapping it on opposing sides with your hammer. The rotor can be seized on a bit so wack it with the hammer until it breaks the rust and slides off.
Now that the rotor is off this might be a good time to adjust the brake shoes used by your parking brake � did you know that you had brake shoes? I�m not sure it�s necessary but used some anti-seize compound on the face of the hub.
From your rotor move over the rubber nub that I�ve pictured here. Take your new rotors and slide them over the lug bolts and onto the hub like so. Looks good huh? These are Raybestos rotors about $50 a piece.
Now you�ll have to reinstall the caliper the reverse of the removal. Use anti-seize compound on the torque member bolts and brake slider grease on the slider. I should note that on mine the rubber gasket on the end of my slider bolt is stuck at the back of the caliper. That�s not good and I should somehow remove it but I haven�t figured a way to do so as yet. I suppose I need one of those dentist pick kind of tools to extract it. The good thing is that it�s oriented properly and should squeeze on okay.
Reinstall your pads as removed. If they�re well worn you�ll want to replace them. Mine are Hawk HPS and I�m not a huge fan but they do for street driving.
Once you�re done it should look like this. Put your wheel on and pat yourself on the back again that you saved a bunch (a bit) of cash paying a mechanic.
Additional Reference:
The G35 community is pretty awesome with very organized and nice resources. If you don�t mind watching the video here is a tutorial on this same topic here.
http://www.infinitihelp.com/diy/gsed..._procedure.htm
This DIY is very simple and much like most other cars out there, but I hope it was helpful for you.

Registered User
Joined: Mar 2013
Posts: 2
Likes: 0
So the Infiniti Dealer in Bloomington MN said they needed to replace the rear brakes calipers and rotors for a wonderful price of 800$ so yeah I will be doing this later I appreciate this Video!! Thank You!!!!!!!!!!!!!!!!


Thread
Thread Starter
Forum
Replies
Last Post
Hasanbaloch
Engine, Drivetrain & Forced-Induction
15
Feb 29, 2024 08:45 PM
TWASkyliner
G35 Coupe V35 2003 - 07
26
Feb 8, 2020 08:00 PM