
Group Buy: GTspec Fender Reinforcement Brace


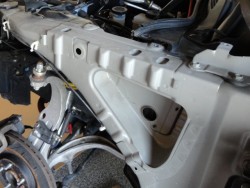
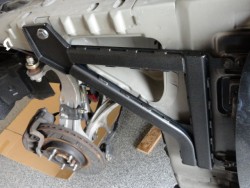
I took some pictures when I installed the fender braces yesterday. The threaded insert worked like a charm. After hitting the installer piece with an impact wrench, the threaded holes felt strong enough to be able to suspend most of the front end weight of the car (not that you ever would.)
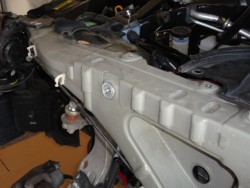
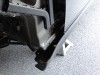
The only problem came when reinstalling my fender and I found that there wasn't enough clearance at the front corner of the brace. The In the later pictures you can see how much material I had to remove to get the fender to fit without touching the braces. Its possible my car is just different, but i'm surprised that this wasn't noticed during the test fittings before shipping. Not difficult to remedy, just took a lot of back and fourth between shaving and testing.
The threaded inserts seem really useful for projects like this. Anyone know what they are officially called, or where inserts of different sizes can be bought?
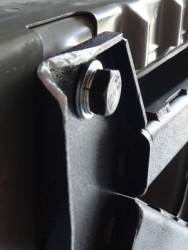
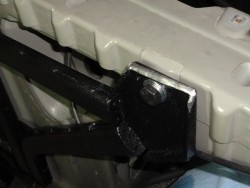

Registered User
iTrader: (2)
Joined: Apr 2005
Posts: 276
Likes: 13
From: Ft. Benning, TX; Atlanta, GA; Shelby, NC
Boog did your insert piece just slide in? It looks like yours is in already before you use the impact gun so I guess I'm confuse on how it is supposed to work.

Registered User
iTrader: (3)
Joined: Oct 2010
Posts: 597
Likes: 46
From: Minne(too.much.salt.on.the.roads)sota
I'm going to tackle this tomorrow and try to do a step by step walk through for anyone who still needs help or hasnt installed them yet.
But I do have a question, do the side skirts need to come off to get the fenders off? I havent looked at the mounting points yet to see what I'm working with.
But I do have a question, do the side skirts need to come off to get the fenders off? I havent looked at the mounting points yet to see what I'm working with.
DIY:
1. Jack up your car
2. remove wheels
3. remove under tray
4. remove fender splash guards
5. remove front bumper and grill
6. remove headlights
7. remove side skirts
8. remove battery cover
9. remove fenders (don't forget the bolt that you have to open the door all the way to get to)
10. remove bolts on door hinges (just one on each set)
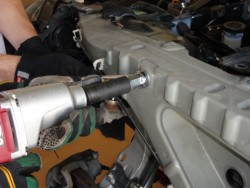
11. install the crush socket for the front of the fender brace to mount to (YOU NEED A DECENT IMPACT WRENCH)
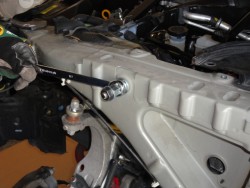
12. install the fender braces
13. put everything back together.
1. Jack up your car
2. remove wheels
3. remove under tray
4. remove fender splash guards
5. remove front bumper and grill
6. remove headlights
7. remove side skirts
8. remove battery cover
9. remove fenders (don't forget the bolt that you have to open the door all the way to get to)
10. remove bolts on door hinges (just one on each set)
11. install the crush socket for the front of the fender brace to mount to (YOU NEED A DECENT IMPACT WRENCH)
12. install the fender braces
13. put everything back together.
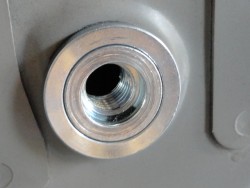
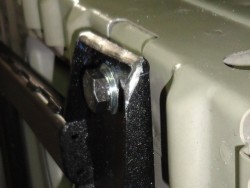
The insert was slightly smaller than the hole in the frame, so I just made sure to keep it pressed tightly to the frame while using the impact driver. After the driver stopped turning (rated at 230ft-lbs but I cant imagine it puts out over 150) the insert was fully collapsed around the sheet metal.
For the side skirts to give some clearance I needed to remove the two end screws, the bottom plastic push pin, the first three bottom bolts, and pull the skirts away to pop the front two clips.
Edit: To clarify, the bottom two fender bolts and behind the side skirts. It might be possible to remove the fender without removing the front of the side skirts but it would be way more trouble than its worth.
Last edited by Boog; Jun 10, 2012 at 11:49 PM.
yeah you probably don't have to remove the headlights, but its so easy I did it just to have more room.
also I think my aftermarket sides blocked the fender bolts, or just made it where I didn't want to mess with working around them.
also I think my aftermarket sides blocked the fender bolts, or just made it where I didn't want to mess with working around them.

Registered User
Joined: Dec 2010
Posts: 1,426
Likes: 27
From: Orlando,FL
DIY:
1. Jack up your car
2. remove wheels
3. remove under tray
4. remove fender splash guards
5. remove front bumper and grill
6. remove headlights
7. remove side skirts
8. remove battery cover
9. remove fenders (don't forget the bolt that you have to open the door all the way to get to)
10. remove bolts on door hinges (just one on each set)
11. install the crush socket for the front of the fender brace to mount to (YOU NEED A DECENT IMPACT WRENCH)
12. install the fender braces
13. put everything back together.
yeah you might be able to get away with not pulling some things off, but for me I felt it was easier to just remove it all. I also wanted to check out some other stuff while I was in there.
Registered User
iTrader: (2)
Joined: Apr 2005
Posts: 276
Likes: 13
From: Ft. Benning, TX; Atlanta, GA; Shelby, NC
The insert was slightly smaller than the hole in the frame, so I just made sure to keep it pressed tightly to the frame while using the impact driver. After the driver stopped turning (rated at 230ft-lbs but I cant imagine it puts out over 150) the insert was fully collapsed around the sheet metal.
It stays after you crush it.

Before trying to crush one I didn't see what would keep both the impact nut and the threaded insert from spinning in the hole, but hand tightening the insert and impact nut assembly gave the impact driver something to start biting against.
Before trying to crush one I didn't see what would keep both the impact nut and the threaded insert from spinning in the hole, but hand tightening the insert and impact nut assembly gave the impact driver something to start biting against.