

Idler Pulley Removal Mod with Pics


Joined: Oct 2002
Posts: 2,474
Likes: 11
From: Vero Beach, FL
Idler Pulley Removal Mod with Pics
This is a very simple mod with no drawbacks! Basically, the idea is to remove one of the idler pulleys and its bracket from the front of the motor. The advantages are that you will remove 3# of weight from the front of the car, and you are eliminating a pulley from the system. (you never know when a bearing failure is around the corner.  )
)
This is a great mod to do anytime; it is especially good to do if it is time to change yoru accesory belts. My belts had over 30,000 miles on them, and they were showing a fair amount of cracking.....So, I bought new belts. This mod requires the use a 1" shorter belt than stock for the Alt and P/S belt. The A/C belt still uses the normal stock length belt.
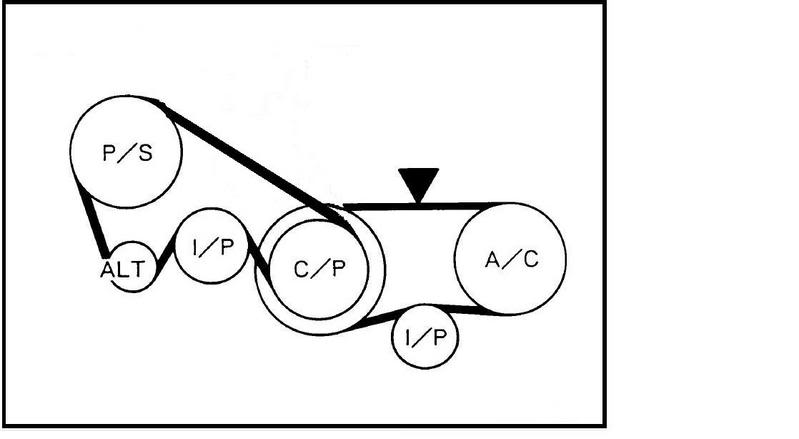
This is how the stock pulleys are arranged.

Here's a pic of Z1Performance's engine. You can see the idler pulley on the front of his motor:

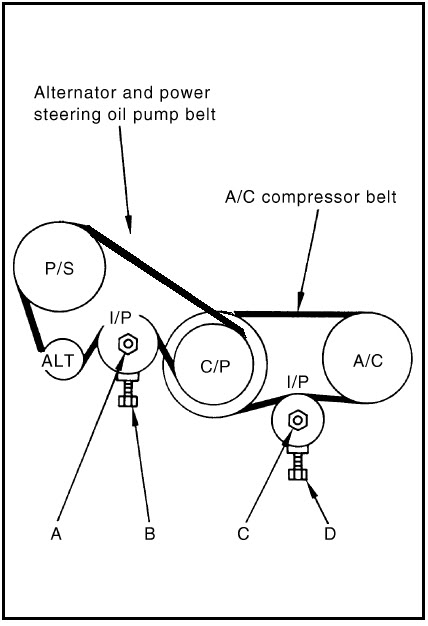
Here is the plan when we are all finished:

Write up and more pics to come............................(I'm writing it now. )
)
)This is a great mod to do anytime; it is especially good to do if it is time to change yoru accesory belts. My belts had over 30,000 miles on them, and they were showing a fair amount of cracking.....So, I bought new belts. This mod requires the use a 1" shorter belt than stock for the Alt and P/S belt. The A/C belt still uses the normal stock length belt.
This is how the stock pulleys are arranged.
Here's a pic of Z1Performance's engine. You can see the idler pulley on the front of his motor:
Here is the plan when we are all finished:
Write up and more pics to come............................(I'm writing it now.
)
Joined: Oct 2002
Posts: 2,474
Likes: 11
From: Vero Beach, FL
Start by removing both drive belts. To do this, you'll need to jack up the car and secure it with jack stands or some other sort of safety device!!!!!
Once secure, remove the underbelly pan. You'll need to use a 10mm socket to drop the pan.
When the belly pan is removed, you will have access to both belt tensioners. Each tensioner pulley has a locking nut on the face of the pulley. Use a 14mm socket to loosent he nut. Once the nuts are loose, you can then use the adjuster bolts. They are on the underside of the pulley and the bolt head face straight down toward the ground. Turn the adjuster bolts counter clockwose to release the tension on the drive belts. Obviously, you will need to do each belt one at a time.")
Once the tension is released, you can slide the belts off of the pulleys!
Now, it is time to get to the removal of the idler pulley assembly!!!!

As the arrows in the pic show, you need to remove they 4 bolts to remove the pulley from the brakcet. Use a 10mm socket to remove these bolts. It is kind of hard because the pulley wants to turn. I used an air ratchet, and it was no problem. I tried to do this procedure without taking the pulley off, but then you can't get the bracket off...in the next step!
Once the four bolts are out, the pulley just slides right off the nose of the bracket! Ahhh...something easy.
Once secure, remove the underbelly pan. You'll need to use a 10mm socket to drop the pan.
When the belly pan is removed, you will have access to both belt tensioners. Each tensioner pulley has a locking nut on the face of the pulley. Use a 14mm socket to loosent he nut. Once the nuts are loose, you can then use the adjuster bolts. They are on the underside of the pulley and the bolt head face straight down toward the ground. Turn the adjuster bolts counter clockwose to release the tension on the drive belts. Obviously, you will need to do each belt one at a time.
Once the tension is released, you can slide the belts off of the pulleys!
Now, it is time to get to the removal of the idler pulley assembly!!!!
As the arrows in the pic show, you need to remove they 4 bolts to remove the pulley from the brakcet. Use a 10mm socket to remove these bolts. It is kind of hard because the pulley wants to turn. I used an air ratchet, and it was no problem. I tried to do this procedure without taking the pulley off, but then you can't get the bracket off...in the next step!
Once the four bolts are out, the pulley just slides right off the nose of the bracket! Ahhh...something easy.
Joined: Oct 2002
Posts: 2,474
Likes: 11
From: Vero Beach, FL
Now, you should have easy access to the idler pulley bracket. I'll get some better picks tomorrow. (my pulley/bracket are at my shop, and I forgot to snap some pics while I was there.  ) In the man time, I'll continue to use this pic:
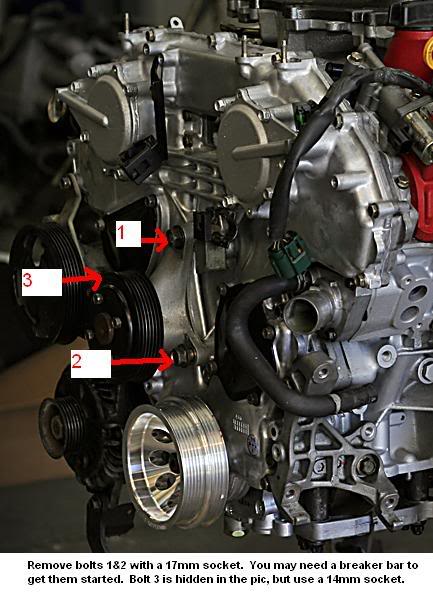
As the pic shows, there are 3 bolts that hold the bracket to the front timing cover. The 2 bolts that you can see in the pic both have a 17mm head on them. I used a 24" breaker bar to get some extra leverage. They are on there pretty tight!. The breaker bar makes tough bolts a snap to loosen.

The other bolt has a 14mm head (can't be seen in the pic.) Use the breaker bar to get this bolt started too. This bolt goes through the Power Steering pump bracket and then into this pulley bracket. More on that later!
Finally, now that all 3 bolts are loose, go ahead and remove all of them. Once the bolts are out, the bracket should slide out (to the right) from under the Power Sterring pump bracket.
Once the idler pulley bracket is out of the engine, you can go ahead and put the 2 17mm bolts (bolts 1&2 in the pic above) back into the timing cover. These bolts will screw all the way back in to the engine. Torque them down to 55 ft-lb.
Now comes the fun part!!!!!..........................
) In the man time, I'll continue to use this pic:As the pic shows, there are 3 bolts that hold the bracket to the front timing cover. The 2 bolts that you can see in the pic both have a 17mm head on them. I used a 24" breaker bar to get some extra leverage. They are on there pretty tight!. The breaker bar makes tough bolts a snap to loosen.
The other bolt has a 14mm head (can't be seen in the pic.) Use the breaker bar to get this bolt started too. This bolt goes through the Power Steering pump bracket and then into this pulley bracket. More on that later!
Finally, now that all 3 bolts are loose, go ahead and remove all of them. Once the bolts are out, the bracket should slide out (to the right) from under the Power Sterring pump bracket.
Once the idler pulley bracket is out of the engine, you can go ahead and put the 2 17mm bolts (bolts 1&2 in the pic above) back into the timing cover. These bolts will screw all the way back in to the engine. Torque them down to 55 ft-lb.
Now comes the fun part!!!!!..........................
Joined: Oct 2002
Posts: 2,474
Likes: 11
From: Vero Beach, FL
UPDATED: now with some pics!
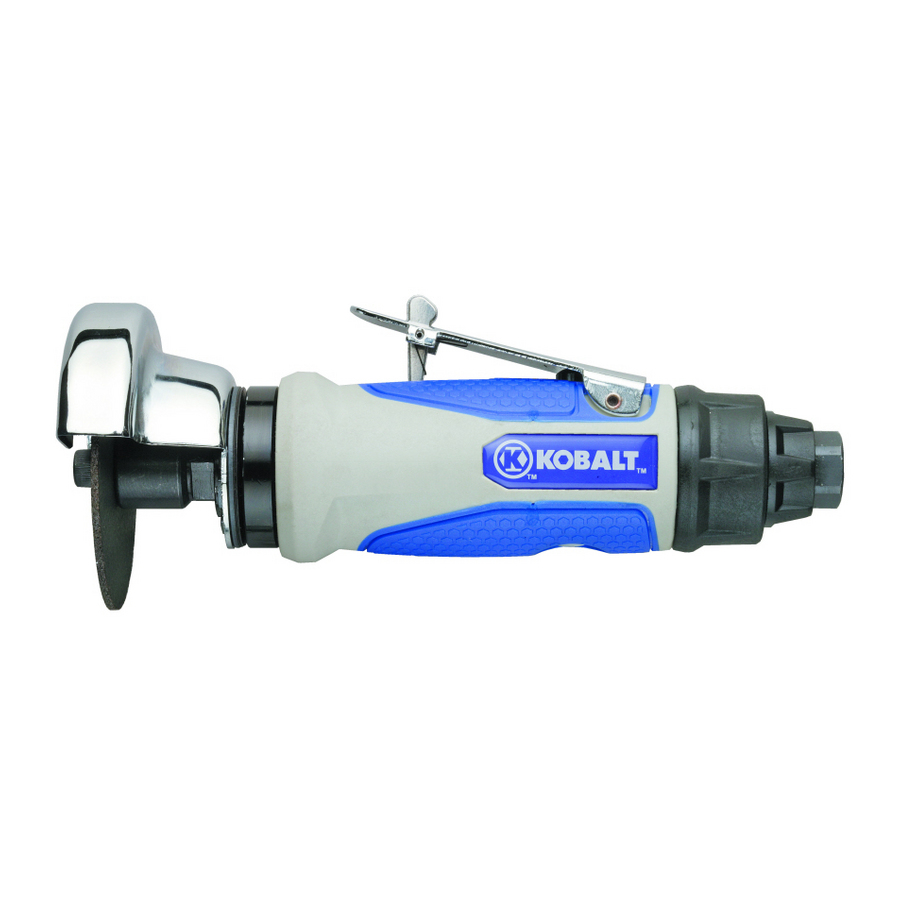
What we have to do is to cut off of of the mounting tabs from the idler pulley bracket. You need to cut off the tab that originally was under the Power Steering Bracket. Because the power steering pump bracket doesn't mount straight to the block, we need to make a spacer to fit between the block and the P/S Pump bracket. To make the spacer, cut off the idler pulley mounting tab with a hack saw (slow) or some sort of power saw. I used an air-powered cut off tool. A dremel may be up to the job, but don't come after me if you smoke your weaksauce Dremel!!!


Here's a closer look at how I cut off the tab:

I used one of these to cut it off:
Cut the mounting tab off so that the original mounting pad in undisturbed. Once you have this small piece, you can choose to make it look nicer by sanding/grinding to it is relatively round.....and looks like a spacer.
Here's mine:

Here's a bigger shot. You can see the spacer hiding in there.....straight down from the green plug.

Obviously, you need to slide the spacer back into the motor. place the spacer between the P/S pump bracket and the block. Then, slide the 14mm bolt back into the P/S pump bracket, though the spacer, and into the block. Tighten it down, and torque it to 45 ft-lbs!
What we have to do is to cut off of of the mounting tabs from the idler pulley bracket. You need to cut off the tab that originally was under the Power Steering Bracket. Because the power steering pump bracket doesn't mount straight to the block, we need to make a spacer to fit between the block and the P/S Pump bracket. To make the spacer, cut off the idler pulley mounting tab with a hack saw (slow) or some sort of power saw. I used an air-powered cut off tool. A dremel may be up to the job, but don't come after me if you smoke your weaksauce Dremel!!!
Here's a closer look at how I cut off the tab:
I used one of these to cut it off:
Cut the mounting tab off so that the original mounting pad in undisturbed. Once you have this small piece, you can choose to make it look nicer by sanding/grinding to it is relatively round.....and looks like a spacer.
Here's mine:
Here's a bigger shot. You can see the spacer hiding in there.....straight down from the green plug.
Obviously, you need to slide the spacer back into the motor. place the spacer between the P/S pump bracket and the block. Then, slide the 14mm bolt back into the P/S pump bracket, though the spacer, and into the block. Tighten it down, and torque it to 45 ft-lbs!
Last edited by QuadCam; Dec 12, 2007 at 09:48 PM.
Joined: Oct 2002
Posts: 2,474
Likes: 11
From: Vero Beach, FL
You are done with the mod!!! Just put your new belts onto the motor.
Here's the belt you'll need. this one is from Napa, but it is essentially a Gates part number:

Use this diagram for routing the belts:
Once the belts are in place, snug up the tensioners and remember to torque down the locking nut on each tensioner pulley to 26 ft-lbs. USe this Diagram for reference.
Button up the belly pan, and lower you car back to the ground. YOU ARE DONE!!!!!
Here's the belt you'll need. this one is from Napa, but it is essentially a Gates part number:
Use this diagram for routing the belts:
Once the belts are in place, snug up the tensioners and remember to torque down the locking nut on each tensioner pulley to 26 ft-lbs. USe this Diagram for reference.
Button up the belly pan, and lower you car back to the ground. YOU ARE DONE!!!!!
Last edited by QuadCam; Dec 12, 2007 at 09:49 PM.
Joined: Oct 2002
Posts: 2,474
Likes: 11
From: Vero Beach, FL
Like I said previously, it is a good mod to do when it comes time to change your belts. Plus, it gets rid of a useless piece of weight on the front of the motor.
Plus, if you have a nice looking powder coated timing cover waiting to go on your engine, this'll just makes everything look better......

Plus, if you have a nice looking powder coated timing cover waiting to go on your engine, this'll just makes everything look better......

Interesting. I'd be curious to see if there are any gains on the dyno. I don't think there would be a whole lot to be found since the pulley isn't driving anything. Unfortunately for us 2003 owners, that idler pulley drive our fan so we're screwed
Trending Topics

Originally Posted by DaveB
Interesting. I'd be curious to see if there are any gains on the dyno. I don't think there would be a whole lot to be found since the pulley isn't driving anything. Unfortunately for us 2003 owners, that idler pulley drive our fan so we're screwed

Joined: Oct 2002
Posts: 2,474
Likes: 11
From: Vero Beach, FL
Originally Posted by DaveB
Unfortunately for us 2003 owners, that idler pulley drive our fan so we're screwed

Photographer
Joined: Nov 2002
Posts: 5,050
Likes: 0
From: St.Pete, FL

Originally Posted by QuadCam
Plus, if you have a nice looking powder coated timing cover waiting to go on your engine, this'll just makes everything look better......
Nice writeup! Always good to get dead weight off the front of the car...
.
Joined: Oct 2002
Posts: 2,474
Likes: 11
From: Vero Beach, FL
Originally Posted by _jb
I think we just found the real reason for this mod... timing cover looks super, Andrew!
Nice writeup! Always good to get dead weight off the front of the car...
.
Nice writeup! Always good to get dead weight off the front of the car...
.
I just like posting pics of my timing cover.....soemday I'll actual build this motor.

plus losing that dead weight on the car means I can eat more donuts.


Originally Posted by godmans
How about 2004? =)
2003.5 and on are ok. Just the 03 with the mech fan.
Thanks Andrew.
It does make me wonder why it is there if we don't need it?