
Oil Cooler Relief valve location?


Oil Cooler Relief valve location?
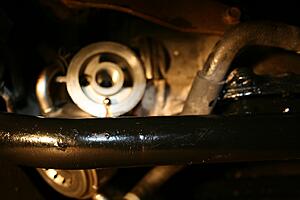
I need help identifying the oil cooler relief valve? In the process of changing the oil cooler gasket. The ball bearing for the oil cooler relief valve fell out. The spring stayed in place.My question is, is the relief valve behind the spring or in front of it. Did I lose it during the oil change? The FSM does not show the sequence of the ball bearing,spring and valve. It just shows the relief valve.


Registered User
Joined: May 2006
Posts: 57
Likes: 3
From: Poughkeepsie NY
can you give me a little info here? I think this is where my oil leak is coming from. part of it at least. I'm trying to find a little info on replacing it. thank you!
https://g35driver.com/forums/drivetr...oler-help.html
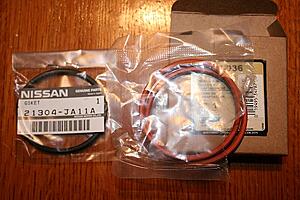
Posting this up just to clarify the relief valve part number and identification, the FSM is pretty vague. I want to give Greg at Sewell Infiniti a plug for getting me the right part .The O Ring part number OEM 21304-JA11A or Dorman part 917-036 (Dorman come 3 in a box and can get it at any parts store)
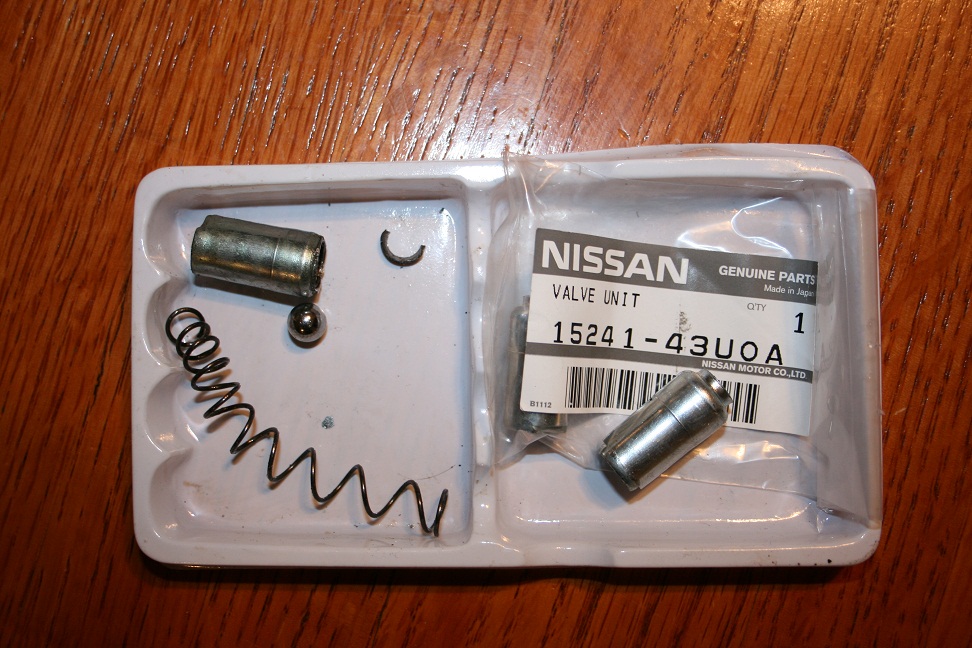
My problem was I also had a broken relief valve? One man show here, pretty tough holding the camera and trying to hold that bearing in place.
Part Number for relief valve 15241-43UOA, you can see the broken one on the left I stretched the spring trying to unseat it. You can also see half of the ridge that retains the spring and ball bearing which cracked off. Over tightening the oil filter,metal fatigue(200K) ? It comes assembled in the new relief valve.

.The O Ring part number OEM 21304-JA11A or Dorman part 917-036 (Dorman come 3 in a box and can get it at any parts store)
My problem was I also had a broken relief valve? One man show here, pretty tough holding the camera and trying to hold that bearing in place.

Part Number for relief valve 15241-43UOA, you can see the broken one on the left I stretched the spring trying to unseat it. You can also see half of the ridge that retains the spring and ball bearing which cracked off. Over tightening the oil filter,metal fatigue(200K) ? It comes assembled in the new relief valve.
Trending Topics

Registered User
Joined: Nov 2012
Posts: 3
Likes: 0
Oil Cooler O-Ring and Relief Valve Replacement
Just wanted to thank you for posting this fix for the oil cooler on a G35. The part numbers were a huge help as it is often not available and you waist lots of time trying to get them. Removing the oil pressure relief valve required some thinking in order not to scratch the mating surfaces of the oil cooler itself.
I found a bolt with course threads that would actually start threading itself inside the ball bearing side of the valve. Once I had made about 2 turns of the bolt and knew it was securely inside the valve, I place a crescent wrench behind the head of the bolt and closed the jaws of the crescent wrench. I gave the wrench a few taps and the valve came out very easily and without and damage to the surface of the oil cooler.
I aligned the new valve correctly and used a 6 or 8 mm deep well socket to tap the new valve back in to place until it bottomed out. I cleaned both mating surfaces well and installed the new o-ring with fresh clean oil on it in order to make sufficent contact. I installed the oil filter bolt with 36 lbs of ft, torque and installed a new oil filter.
It could not have been a better out come. I saved lots and lots of $$ and my car has not leaked another drop of oil. I have always been one to over tighten and years of changing the oil and filter caused this oil leak without a doubt. Never again will I go past 2/3 or 3/4 turn after contact again.
Thanks for all of your help.
Steve
Registered User
Joined: Nov 2012
Posts: 3
Likes: 0
Just wanted to thank you for posting this fix for the oil cooler on a G35. The part numbers were a huge help as it is often not available and you waist lots of time trying to get them. Removing the oil pressure relief valve required some thinking in order not to scratch the mating surfaces of the oil cooler itself.
I found a bolt with course threads that would actually start threading itself inside the ball bearing side of the valve. Once I had made about 2 turns of the bolt and knew it was securely inside the valve, I place a crescent wrench behind the head of the bolt and closed the jaws of the crescent wrench. I gave the wrench a few taps and the valve came out very easily and without and damage to the surface of the oil cooler.
I aligned the new valve correctly and used a 6 or 8 mm deep well socket to tap the new valve back in to place until it bottomed out. I cleaned both mating surfaces well and installed the new o-ring with fresh clean oil on it in order to make sufficent contact. I installed the oil filter bolt with 36 lbs of ft, torque and installed a new oil filter.
It could not have been a better out come. I saved lots and lots of $$ and my car has not leaked another drop of oil. I have always been one to over tighten and years of changing the oil and filter caused this oil leak without a doubt. Never again will I go past 2/3 or 3/4 turn after contact again.
Thanks for all of your help.
Steve[/QUOTE]

Registered User
Joined: Dec 2014
Posts: 1
Likes: 0
Thanks so much to all who contributed to this post!! I was going crazy trying to figure out where a ball fell from when replacing my gasket! My Nissan dealer was even saying they had no clue about the ball, and nothing in the FSM about it.
I was so happy when I saw the picture of the ball in the tray!
I just got my new valve unit from PartsForNissans.com (great service). My question is, should the end with the ball bearing be on the bottom when I push it into the block? I’m assuming so, since it fell out, but would like to double check. For clarity, in the picture above, the part I’m thinking that should be point toward the ground is point toward the U0A of the part number on the packaging.
Thanks!!!!

Thread
Thread Starter
Forum
Replies
Last Post
Greg Huston
General Tech Questions
6
Sep 25, 2016 11:36 PM