
DIY: hardwire droid or any other USB device


Thread Starter
|
Registered User
Joined: Oct 2010
Posts: 804
Likes: 12
From: LONG
DIY: hardwire droid or any other USB device
I originally thought I could just buy an invisicord, and solder it onto a micro USB plug and hardwire it directly into my droidx car mount. After doing some research, i realized that USB runs on 5v, while the homelink mirror runs on 12v. So had i plugged it in, my phone would have blown up....
I searched for DIYs everywhere on how to hook up a micro/mini/usb device such as a phone using the homelink mirror, and could not find any.
So here is what i did for those of you interested (btw, just covering my *** here but i am NOT responsible if you screw something up or if this did not work out for you. I am no engineer, i did watch every MacGyver episode ever made AND stayed at a holiday inn express, but that doesnt make me a engineer):
1. Find the appropriate cord for your device. Mine was a droid x, which runs on a micro USB cable. I took this one from an old blackberry i had.

Uploaded with ImageShack.us
2. Take the green and white cables, which are for USB data, and connect them together to complete a circuit (expose the metal in the cables and twist them together). By doing this, the phone will recognize the cable as a CHARGING cable, not a sync cable. Tape up the green and white cable so they do not touch the red or black cable.

Uploaded with ImageShack.us
3. you need one of these :
this is what actually takes the 12v power source from the homelink mirror and turns it down to 5v so your phone doesnt short out. It comes with one end exposed with a red and black cable, and the other end that has a mini usb. we need to remove the mini usb since the droid uses a micro USB.
4. solder the miro usb cable into the charging unit. make sure you use electrical tape to tape up both the red and black cables seperately so they cannot touch or conduct electricity together. After this is done, wrap the whole thing with tape to give it strength

Uploaded with ImageShack.us
5. This is for the SOURCE of the power. the ends that go into the homelink mirror. 12v goes into this, and comes out as 5v through the micro USB end. I was too cheap to get invisicord, so i just took some copper cables and soldered it.

Uploaded with ImageShack.us
6. Tape up the copper wires so they cannot touch each other while plugged into the mirror.

Uploaded with ImageShack.us
7. This is what the final product looks like

Uploaded with ImageShack.us
8. stick the BLACK wire (ground) first into the black wire on the homelink mirror. Take the RED wire (hot) into the brown wire on the homelink mirror.

Uploaded with ImageShack.us
9. I velcroed the unit to my ez pass tag, so that its shielded from the sun. I dunno how this will be in the summer heat, for but now it works just fine. I tested the whole thing with a multimeter and had my friend who is an engineer help me, he said it should all be fine, and i see that its charging correctly. I will post pics soon.


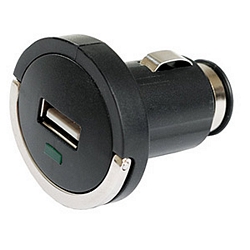
 It was 6 bucks at frys electronics. It is retractable and also has an extra USB slot.

Thread Starter
|
Registered User
Joined: Oct 2010
Posts: 804
Likes: 12
From: LONG
Yeah but I have a car mount .... the whole point is not to have wires in the middle getting in the way... with both of these options u still have wires all over the place and for that, I have my car charger

Thread
Thread Starter
Forum
Replies
Last Post
Mad A
Not G35 Related
4
Dec 8, 2015 01:45 PM
1Typhoon
Audio, Video & Electronics
9
Sep 25, 2015 08:45 PM
AuAltima3.5
Audio/Video/Electronics
4
Sep 13, 2015 11:48 AM