
Nismo Sedan Rear Lip Install (Lots of pics)

Joined: Feb 2010
Posts: 1,698
Likes: 34
From: Bowling Green Ky (Home of the Corvette)
Nismo Sedan Rear Lip Install (Lots of pics)
This is a DIY for installing an OEM Aero rear lip for the 03-04 sedans. I've included PDF files of the actual instructions that come in the box, as well as pics I took that may help explain what the drawings in the instructions cannot.
Here are the templates that are included in the kit:
Sedan Rear Lip Template.pdf
Page 1- Sedan Rear Lip Instructions pg 1.pdf
Product info, hardware include and tools needed:
Page 2- Sedan Rear Lip Instructions pg 2.pdf
Precautions and cutting out templates.

Place a piece of masking tape along the center line (on the inside) of the rear lip and wrapping it over to the outside to show where the center of the lip is. In my opinion, this is a wasted step, since I did not actually have to line it up with anything. If you place the templates on the bumper correctly and drill the holes where they show to drill, it will bolt up properly.
You should see a faint verticle line on the backside center of the lip.

Run a piece of masking tape along the line with extra to wrap around to frontside.

Wrap the tape over the top, keeing it straight to illustrate the center line without marking on the paint.


Unpeal the portion that was stuck to the inside and carefully cut that part off leaving the rest stuck on the outside. The right edge of the tape is my center line (mental note).


Page 3- Sedan Rear Lip Instructions pg 3.pdf
Position template 9-a around the hole behind the license plate (remove license plate first, duh) and secure it w/ masking tape. This gives you the centerline from where you measure from to locate holes that you will have to (gulp) drill into your bumper.

Using a piece of masking tape, run it down the center line of the template to extend down the bumper. You might even draw an arrow to which side you are using as a center line so you won't screw up your measurements (I did not do this, but thought of it later and it seemed like a good idea).

Measure off the center line and mark points @ 160mm and 480mm (to the left and right of center). I marked directly on the bumper, but if you want to stick a piece of masking tape at those locations and mark on the tape, that should be fine. I used either a ruler or a soft measuring tape for these measurements. It's up to you, but the soft measuring tape works well for the slight curve of the rear bumper.


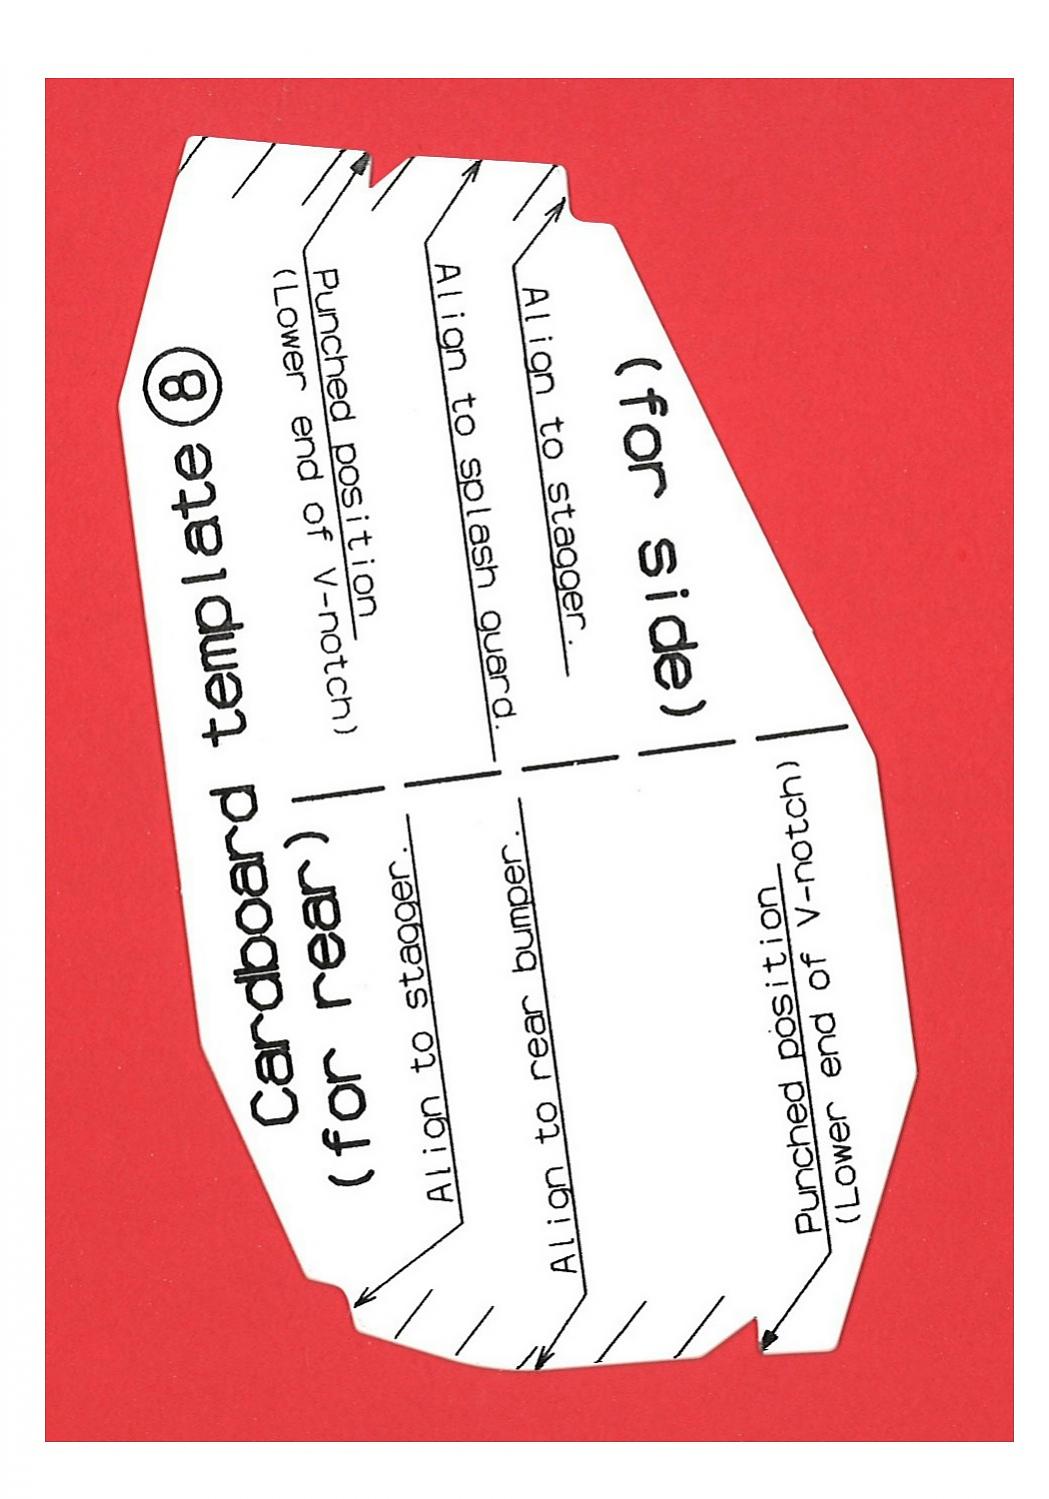
Note: The instructions refers to a "stagger" which is the transition of the painted portion of the bumper to the non-painted (black) portion. So the "stagger" is the step down. Remember this when using the cardboard template #8.
On each marked points (160mm and 480mm), position the cardboard template #8 (using the "for rear" side) vertically and up against the "stagger". Make a center punch point on the bumper at the lower portion of the V-notch as shown.


Here are the templates that are included in the kit:
Sedan Rear Lip Template.pdf
Page 1- Sedan Rear Lip Instructions pg 1.pdf
Product info, hardware include and tools needed:
Page 2- Sedan Rear Lip Instructions pg 2.pdf
Precautions and cutting out templates.
Place a piece of masking tape along the center line (on the inside) of the rear lip and wrapping it over to the outside to show where the center of the lip is. In my opinion, this is a wasted step, since I did not actually have to line it up with anything. If you place the templates on the bumper correctly and drill the holes where they show to drill, it will bolt up properly.
You should see a faint verticle line on the backside center of the lip.
Run a piece of masking tape along the line with extra to wrap around to frontside.
Wrap the tape over the top, keeing it straight to illustrate the center line without marking on the paint.
Unpeal the portion that was stuck to the inside and carefully cut that part off leaving the rest stuck on the outside. The right edge of the tape is my center line (mental note).
Page 3- Sedan Rear Lip Instructions pg 3.pdf
Position template 9-a around the hole behind the license plate (remove license plate first, duh) and secure it w/ masking tape. This gives you the centerline from where you measure from to locate holes that you will have to (gulp) drill into your bumper.
Using a piece of masking tape, run it down the center line of the template to extend down the bumper. You might even draw an arrow to which side you are using as a center line so you won't screw up your measurements (I did not do this, but thought of it later and it seemed like a good idea).
Measure off the center line and mark points @ 160mm and 480mm (to the left and right of center). I marked directly on the bumper, but if you want to stick a piece of masking tape at those locations and mark on the tape, that should be fine. I used either a ruler or a soft measuring tape for these measurements. It's up to you, but the soft measuring tape works well for the slight curve of the rear bumper.
Note: The instructions refers to a "stagger" which is the transition of the painted portion of the bumper to the non-painted (black) portion. So the "stagger" is the step down. Remember this when using the cardboard template #8.
On each marked points (160mm and 480mm), position the cardboard template #8 (using the "for rear" side) vertically and up against the "stagger". Make a center punch point on the bumper at the lower portion of the V-notch as shown.
Last edited by 19kdrill; Nov 25, 2012 at 11:58 AM.
Joined: Feb 2010
Posts: 1,698
Likes: 34
From: Bowling Green Ky (Home of the Corvette)
Work in progress:
Page 4- Sedan Rear Lip Instructions pg 4.pdf
Template 9b goes on the side of the bumper right where the bumper cover meets the mudguard. Secure this template at the corner of the bumper cover w/ masking tape. Use your center punch to located the next drill hole. This template will be resused on the other side (RH) of your bumper and you have to flip it over. Since you already poked a hole through it, just center punch through the hole again, since there will be no print on that side. Be careful pulling the tape off and try not to tear it.

Measure 185mm from the v-notch or center punch hole over to the mudguard and mark it:

Were gonna use our cardboard template again (for side) to locate our center punch hole at the lower end of the v-notch (similar to doing the "for rear" side).

Page 5- Sedan Rear Lip Instructions pg 5.pdf
Align the templates 9c, 9e and 9d to the underside of the bumper cover and secure w/ masking tape. Center punch holes in there respective locations:


Now it's time to start drilling. I waited to get all of my punch marks before drilling and I used a step-drill bit, which works great, since the factory directions want you to start with a 1/8" bit and work up to a 5/16".
NOTE: The four holes being drilled into the back of the bumper facing are suppose to be 1/2" (per the directions), but I only went up to 5/16" for a tighter fit. I didn't see the need to go that big. Matter of fact, 5/16" was the largest I drilled ANY hole w/ the exception of the large 7/8" holes to the undersides of the mudguards (you'll see this later).
Page 6- Sedan Rear Lip Instructions pg 6.pdf
Start drilling! I drew a line around my 5/16" step on the drill bit w/ a marker to make sure I didn't go too far:


Now it's time to remove the mudguards. They are secured by two screws in the fender well and one 10mm/phillips screw head combo underneath:


Once you have those screws removed, slide the mudguard forward (towards the wheel) to release it from the plastic pop clip holding it in the middle:
Still clipped in, slide it toward the wheel:

You can see the clip removed:

Now, take a straight edge and mark a line along the edge of the recessed box that houses the bottom mountin screw. This is a reference line ONLY! Then measure 12mm down from each end of the line you just drew and make a new line that parallels your first line (so now you have two lines, parallel that are 12mm apart).

Mark holes along the second line according to the diagram in the instructions. One should be 30mm back from the edge of the recessed box, one is 40mm forward of the recessed box and the other is 19mm forward of the 40mm mark. Go ahead and center punch these three marks. The middle mark (the 40mm one) will be a 5/16" hole, while the other two (the two outside ones) will be drilled out to 7/8" (you'll need a hole saw for this).

NOTE: You'll notice that the above pic does not have the third hole drilled (the other 7/8" hole). I was skeptical of the purpose of this hole, but found out later in the directions what it was for, so I drilled it out later. Here's what it looks like:


Now, using template 9f, hold it to the wheel well side of the mudguard and center punch your hole (Sorry, forgot to take a pic of this while doing the driver's side, so I took a pic later when doing the passenger side to illustrate the template attached to the fender well side of the mudguard:

Page 7- Sedan Rear Lip Instructions pg 7.pdf
Slide the J-nut clip from the large 7/8" hole in the mudguard over to where the threading straddles the 5/16" hole:


Drill your 5/16" hole in the wheel well side center punch, then attach j-nut clip:

Attach another J-nut clip to the pre-existing hole on the underside of the bumper cover:

Page 8- Sedan Rear Lip Instructions pg 8.pdf
Attach the real lip to your rear bumper by inserting the stud bolts (of the rear lip) into the holes you drilled in the back of your bumper. Make sure it lines ups (should have a little wiggle room). Bolt up the bottom side of the lip to the under part of your bumper (don't tighten all the way yet) and let the sides hang (we'll have to remove the bumper partially to get the nuts and washers on the studs).


Apply some masking tape to your fender (and bumper if needed) to keep the stud bolts from scuffing your paint while your moving the rear lip and rear bumper around.

Page 4- Sedan Rear Lip Instructions pg 4.pdf
Template 9b goes on the side of the bumper right where the bumper cover meets the mudguard. Secure this template at the corner of the bumper cover w/ masking tape. Use your center punch to located the next drill hole. This template will be resused on the other side (RH) of your bumper and you have to flip it over. Since you already poked a hole through it, just center punch through the hole again, since there will be no print on that side. Be careful pulling the tape off and try not to tear it.
Measure 185mm from the v-notch or center punch hole over to the mudguard and mark it:
Were gonna use our cardboard template again (for side) to locate our center punch hole at the lower end of the v-notch (similar to doing the "for rear" side).
Page 5- Sedan Rear Lip Instructions pg 5.pdf
Align the templates 9c, 9e and 9d to the underside of the bumper cover and secure w/ masking tape. Center punch holes in there respective locations:
Now it's time to start drilling. I waited to get all of my punch marks before drilling and I used a step-drill bit, which works great, since the factory directions want you to start with a 1/8" bit and work up to a 5/16".
NOTE: The four holes being drilled into the back of the bumper facing are suppose to be 1/2" (per the directions), but I only went up to 5/16" for a tighter fit. I didn't see the need to go that big. Matter of fact, 5/16" was the largest I drilled ANY hole w/ the exception of the large 7/8" holes to the undersides of the mudguards (you'll see this later).
Page 6- Sedan Rear Lip Instructions pg 6.pdf
Start drilling! I drew a line around my 5/16" step on the drill bit w/ a marker to make sure I didn't go too far:
Now it's time to remove the mudguards. They are secured by two screws in the fender well and one 10mm/phillips screw head combo underneath:
Once you have those screws removed, slide the mudguard forward (towards the wheel) to release it from the plastic pop clip holding it in the middle:
Still clipped in, slide it toward the wheel:
You can see the clip removed:
Now, take a straight edge and mark a line along the edge of the recessed box that houses the bottom mountin screw. This is a reference line ONLY! Then measure 12mm down from each end of the line you just drew and make a new line that parallels your first line (so now you have two lines, parallel that are 12mm apart).
Mark holes along the second line according to the diagram in the instructions. One should be 30mm back from the edge of the recessed box, one is 40mm forward of the recessed box and the other is 19mm forward of the 40mm mark. Go ahead and center punch these three marks. The middle mark (the 40mm one) will be a 5/16" hole, while the other two (the two outside ones) will be drilled out to 7/8" (you'll need a hole saw for this).
NOTE: You'll notice that the above pic does not have the third hole drilled (the other 7/8" hole). I was skeptical of the purpose of this hole, but found out later in the directions what it was for, so I drilled it out later. Here's what it looks like:
Now, using template 9f, hold it to the wheel well side of the mudguard and center punch your hole (Sorry, forgot to take a pic of this while doing the driver's side, so I took a pic later when doing the passenger side to illustrate the template attached to the fender well side of the mudguard:
Page 7- Sedan Rear Lip Instructions pg 7.pdf
Slide the J-nut clip from the large 7/8" hole in the mudguard over to where the threading straddles the 5/16" hole:
Drill your 5/16" hole in the wheel well side center punch, then attach j-nut clip:
Attach another J-nut clip to the pre-existing hole on the underside of the bumper cover:
Page 8- Sedan Rear Lip Instructions pg 8.pdf
Attach the real lip to your rear bumper by inserting the stud bolts (of the rear lip) into the holes you drilled in the back of your bumper. Make sure it lines ups (should have a little wiggle room). Bolt up the bottom side of the lip to the under part of your bumper (don't tighten all the way yet) and let the sides hang (we'll have to remove the bumper partially to get the nuts and washers on the studs).
Apply some masking tape to your fender (and bumper if needed) to keep the stud bolts from scuffing your paint while your moving the rear lip and rear bumper around.
Last edited by 19kdrill; Nov 25, 2012 at 12:34 PM.
Joined: Feb 2010
Posts: 1,698
Likes: 34
From: Bowling Green Ky (Home of the Corvette)
If you haven't removed your taillights already, you'll need to remove the inner trunk liner for the backside of the trunk and undo the nuts that secure the taillights to the trunk and drop the rear bumper down a little bit (to access the rear lip stud bolts).


Page 9- Sedan Rear Lip Instructions pg 9.pdf
This sections talks about attaching the mudguard to the lip before re-installing the mudgard to the car. You can do it this way, but you'll have to do a final adjustment of the lip later. I went ahead and installed the mudguard to the car and finished attaching the lip to it:


After you attach the nuts and washers to the rear lip stud bolts (not pictured), make sure you push up on the rear lip so that it overlaps the staggered portion of the rear bumper to cover up the black (unpainted) lower section, then tighten the nuts down snug.
Page 10- Sedan Rear Lip Instructions pg 10.pdf
Reinstall your taillights, tighten up all the nuts, bolts and screws on the rear lip and put your trunk back together.
If you need to remove the rear lip at a later date, you'll first have to stick a long screwdriver in that second 7/8" hole (remember the one I decided to drill out later) and pop the body clip off which is mounted to the mudguard, then remove the bolts from the underside and drop your bumper down a little to remove the nuts off the stud bolts.
Finished product should look something like this:


Page 9- Sedan Rear Lip Instructions pg 9.pdf
This sections talks about attaching the mudguard to the lip before re-installing the mudgard to the car. You can do it this way, but you'll have to do a final adjustment of the lip later. I went ahead and installed the mudguard to the car and finished attaching the lip to it:
After you attach the nuts and washers to the rear lip stud bolts (not pictured), make sure you push up on the rear lip so that it overlaps the staggered portion of the rear bumper to cover up the black (unpainted) lower section, then tighten the nuts down snug.
Page 10- Sedan Rear Lip Instructions pg 10.pdf
Reinstall your taillights, tighten up all the nuts, bolts and screws on the rear lip and put your trunk back together.
If you need to remove the rear lip at a later date, you'll first have to stick a long screwdriver in that second 7/8" hole (remember the one I decided to drill out later) and pop the body clip off which is mounted to the mudguard, then remove the bolts from the underside and drop your bumper down a little to remove the nuts off the stud bolts.
Finished product should look something like this:
Last edited by 19kdrill; Nov 25, 2012 at 12:55 PM.
Joined: Feb 2010
Posts: 1,698
Likes: 34
From: Bowling Green Ky (Home of the Corvette)
thanks guys. I've gone as far as I can for now. It will be a few days or so before I can finish it up. Car will be in the body shop getting the bumper repaired where I was rear ended last week. Once it's back, I'll go ahead and complete the install w/ moar pics!!!
Rob, thanks for writing this DIY up. This should be a good reference, especially for those planning to install the Ionic Nismo rear replica lip 
Trending Topics
Joined: Feb 2010
Posts: 1,698
Likes: 34
From: Bowling Green Ky (Home of the Corvette)
Hope so. I emailed the instructions to Jose (Ionic) a while back. Don't know if he incorportated them in his kit. They do mount a little differently, but whatever I can do to help!
For the Ionic Nismo replica lip, the mounting hardware are 6 bolts/nuts, 2 push-in clips and 2 self-tapping Philips screws. Even though no installation instructions are included with the kit, I'm pretty 100% sure that the lip bolts to the bottom of the bumper cover and screws in at the mudguards of the cover.
Unlike the install instructions for the OEM Nismo rear lip, there is no drilling needed at the front portion of the black part of the rear bumper cover for Ionic Nismo replica. I'm trying to understand what is the purpose of the drilling for that part on the OEM Nismo?
Unlike the install instructions for the OEM Nismo rear lip, there is no drilling needed at the front portion of the black part of the rear bumper cover for Ionic Nismo replica. I'm trying to understand what is the purpose of the drilling for that part on the OEM Nismo?

Joined: Feb 2010
Posts: 1,698
Likes: 34
From: Bowling Green Ky (Home of the Corvette)
It's not as bad as it looks. The drawings in the instructions are a little confusing because there is no depth in the pics, but it's basically measuring, marking and punching holes. Not bad at all. It just took me a while because I was documenting and taking pics as I went along.
YOU CAN DOOOET!
YOU CAN DOOOET!
