Picture Share Pics of your or others' rides!

Engine Bay Pics*Post here*

Thread Tools
 
Search this Thread
 
Rating: Thread Rating: 2 votes, 5.00 average.
 
  #2056  
Old 08-22-2010 | 12:49 AM
SxExCx's Avatar
Former G35driver Vendor
iTrader: (307)
Joined: May 2005
Posts: 9,562
Likes: 458
From: SoCal
True, not cutting or extending...just lots of unwrapping and unplugging.
 
  #2057  
Old 08-22-2010 | 02:57 PM
marcellsr's Avatar
Registered User
iTrader: (12)
Joined: Dec 2005
Posts: 402
Likes: 0
From: Riverside
Thanks for the feedback guys, as always it's very helpful.
 
  #2058  
Old 08-22-2010 | 07:05 PM
marcellsr's Avatar
Registered User
iTrader: (12)
Joined: Dec 2005
Posts: 402
Likes: 0
From: Riverside
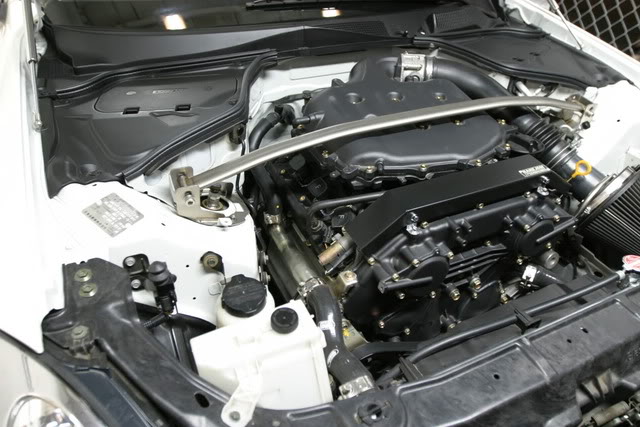
See my pic below when i did the mrev2 mod. For the wire tuck mod, where's the best place to lay the main harness, in between that gray wire in the pic and the valve cover or ??

 
  #2059  
Old 08-23-2010 | 06:36 AM
HotRodG35's Avatar
Registered User
iTrader: (12)
Joined: Mar 2010
Posts: 670
Likes: 105
From: Seneca, SC
Originally Posted by marcellsr
Hey Sean thanks for the feedback, I think i'm going to go with the main harness between the Plenum and timing cover. To do the full tuck will i have to cut and extend wires just to get them behind the engine ? If not I may try behind the engine.
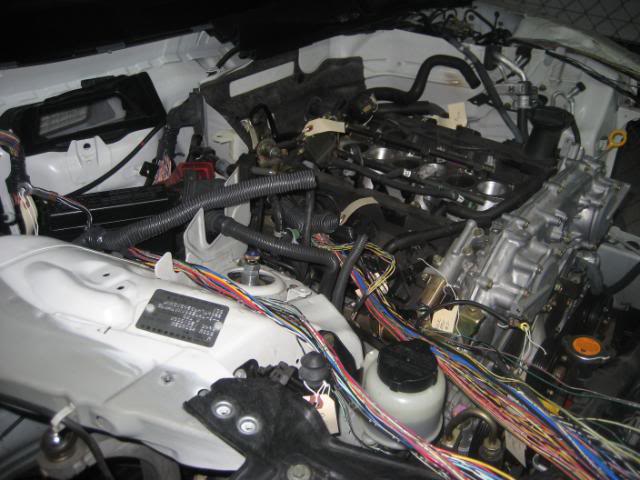
The only wires I needed to extend were for the drivers side headlight. Like Sean mentioned thiers alot of seperating and rebundling wires. I left the excessive engine harness wires coiled behind engine. Did not cut any of the sensor wires. Full wire tuck is relatively easy just time consuming. Makes a remarkable improvement for a small investment.
 

Last edited by HotRodG35; 08-23-2010 at 06:40 AM.
  #2060  
Old 08-23-2010 | 02:35 PM
SxExCx's Avatar
Former G35driver Vendor
iTrader: (307)
Joined: May 2005
Posts: 9,562
Likes: 458
From: SoCal
Marcell, you just lay it in front of the front-most injector plug. You will need to pull off the hose that runs between the left/right valve cover, push the harness down below, and then reconnect the hose over it. On the driver side, just pull the harness up and behind the oil filler neck. To do this you will have to unsnap a few of the clips that tie the harness down.
 
  #2061  
Old 08-23-2010 | 02:36 PM
SxExCx's Avatar
Former G35driver Vendor
iTrader: (307)
Joined: May 2005
Posts: 9,562
Likes: 458
From: SoCal
Marcell. I think you have my number so feel free to call me. There are a few other things that may need to be clarified to make the harness reach.
 
  #2062  
Old 08-25-2010 | 01:39 AM
marcellsr's Avatar
Registered User
iTrader: (12)
Joined: Dec 2005
Posts: 402
Likes: 0
From: Riverside
Yep i sure do and will use it when needed, thanks for the help.
 
  #2063  
Old 08-30-2010 | 12:44 PM
HotRodG35's Avatar
Registered User
iTrader: (12)
Joined: Mar 2010
Posts: 670
Likes: 105
From: Seneca, SC
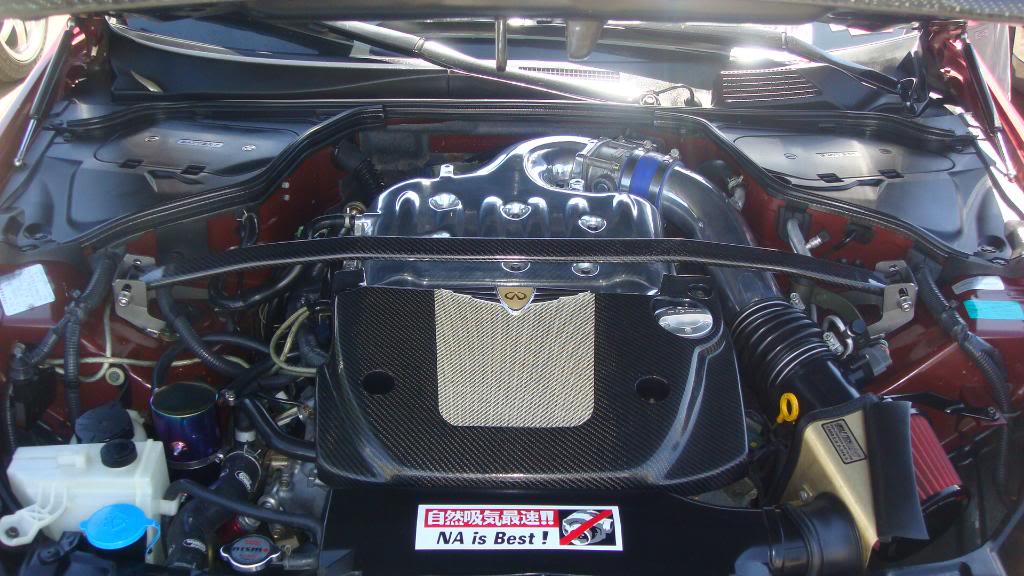
Figured I post my work in progress, started dismantling in prep for pulling engine to smooth and repaint engine bay and add custom stainless overlays. Pull motor after I finish CUX350Z TT swap labor day weekend.

Since pictures taken I've added custom vortech billet idler pulleys (seen on RRYDE and Big C G's ) and 1 piece stainless intake charge pipe.
 
Attached Thumbnails Engine Bay Pics*Post here*-539a.jpg   Engine Bay Pics*Post here*-100_0523.jpg   Engine Bay Pics*Post here*-100_0528.jpg   Engine Bay Pics*Post here*-517a.jpg   Engine Bay Pics*Post here*-538a.jpg  

  #2064  
Old 08-30-2010 | 01:28 PM
andrewyfang's Avatar
Registered User
iTrader: (2)
Joined: Mar 2010
Posts: 439
Likes: 1
From: Cupertino, CA
That looks insane man!
 
  #2065  
Old 09-07-2010 | 02:10 AM
marcellsr's Avatar
Registered User
iTrader: (12)
Joined: Dec 2005
Posts: 402
Likes: 0
From: Riverside
I took everything off today preparing for my wire tuck. For the driver side I'm cool with what i need to do. However the passenger side i'm not sure. I'm thinking to just take the wrapping off, give enough slack for those connections and then move the harness up over on top of the valve cover ? Need some advice from those who have already done this.

Any help will be appreciated, no rush since this isn't my DD, but would like to be done before the Riverside Meet, yeah !!!


  #2066  
Old 09-09-2010 | 10:54 AM
PhantomIPG's Avatar
Registered User
iTrader: (1)
Joined: Jan 2010
Posts: 87
Likes: 1
From: SoCal
Here's what's in those "bundles"!

Take your time and be very careful!

Name:  IMG_0084.jpg
Views: 135
Size:  51.1 KB

Name:  IMG_0085.jpg
Views: 162
Size:  58.1 KB

...and what it'll look like when your finished!

Name:  IMG_1625.jpg
Views: 206
Size:  77.9 KB
 
  #2067  
Old 09-09-2010 | 02:06 PM
marcellsr's Avatar
Registered User
iTrader: (12)
Joined: Dec 2005
Posts: 402
Likes: 0
From: Riverside
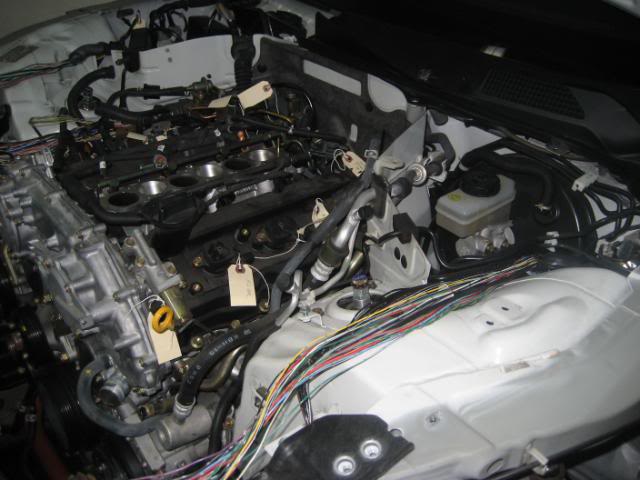
Hey Phantom thanks for that information, advice and pics. I did some more searching and found post #1728 pg 116 of this thread shows how it goes under the fender (always wonder where those dam wires went LOL!!). Think i'm gonna go for the full tuck. The only pic i haven't seen yet is how the harness (wires) are tucked behind the engine.

Thanks agin for your help.
 
  #2068  
Old 09-20-2010 | 12:31 AM
SDGenius's Avatar
Registered User
iTrader: (15)
Joined: Jan 2008
Posts: 12,810
Likes: 911
From: Oside, SoCal
need a wire tuck BAD!!!
Name:  DSC05232.jpg
Views: 183
Size:  119.2 KB
 
  #2069  
Old 09-20-2010 | 12:36 AM
CandlestickPark's Avatar
ill Sedan
Staff Alumni
iTrader: (87)
Joined: Jun 2007
Posts: 23,261
Likes: 2,687
From: Long Beach, SoCal
Premier Member
DO-ET Mark!
 
  #2070  
Old 09-20-2010 | 12:54 AM
speedraver's Avatar
wassupMyNinjas! (^_^)
iTrader: (12)
Joined: Jan 2005
Posts: 5,080
Likes: 102
From: Manhattan Beach, California
Premier Member
Updated engine bay, sorry for the crappy pix.


You have already rated this thread Rating: Thread Rating: 2 votes, 5.00 average.

Quick Reply: Engine Bay Pics*Post here*


All times are GMT -4. The time now is 06:10 PM.