
My 09 G37xS (AWD) Lowered on Tanabe - Droopy Bum fix too!(PICS)
#31
 06-01-2015 | 10:03 PM

Registered User
Joined: Dec 2011
Posts: 52
Likes: 1
From: Rochester, NY
The other thing to check is to make sure that the spring itself is rotated properly in the spring seat in the aluminum lower control arm. There is a ledge of sorts that the lower most coil should butt up against but not sit on. If it is sitting up on it you will essentially be making that spring almost the thickness of the coil longer.
Here, this pic might not show it as well, but I'm quite sure the lower spring is where it needs to be in the bucket.

Well, not entirely. Not sure what you're saying about the upper seat metal tabs. Because although I was there for the install, I didn't audit everything that was going on. If I do that, my mechanic might start charging me extra for "helping", LOL.
#32
06-01-2015 | 10:11 PM
Registered User
Joined: Dec 2011
Posts: 52
Likes: 1
From: Rochester, NY
Today I received the 3/8" bushings in the mail, and am holding on to those as a potential option, swapping one or both in to replace the 5/8" bushings... although I still need to customize them into the top-seats.
I think I need to take a step back. Bring the car to a few different "flat" locations, and take measurements. Then turn the car around in the same spot, and take measurements again.
Don't mind saying this, but life was easier when I didn't obsess over this crap. And I clearly see why people get pulled into coilovers just for ride height considerations, when they never intended to go there. (sigh)
2GoRNot2G, your comments and advice are appreciated. Thanks.
#33
06-02-2015 | 05:50 AM

Hah Rochester, you are completely right. Once you lower you are always thinking about it. I constantly adjust my coilovers and am satisfied with the height only to find the adjustment bug 3 months later again. For me its a battle between fenders rubbing (aggressive spacers) and a clean no-gap look.
#34
06-02-2015 | 02:11 PM
Registered User
Joined: Nov 2008
Posts: 2,588
Likes: 24
From: SoCal

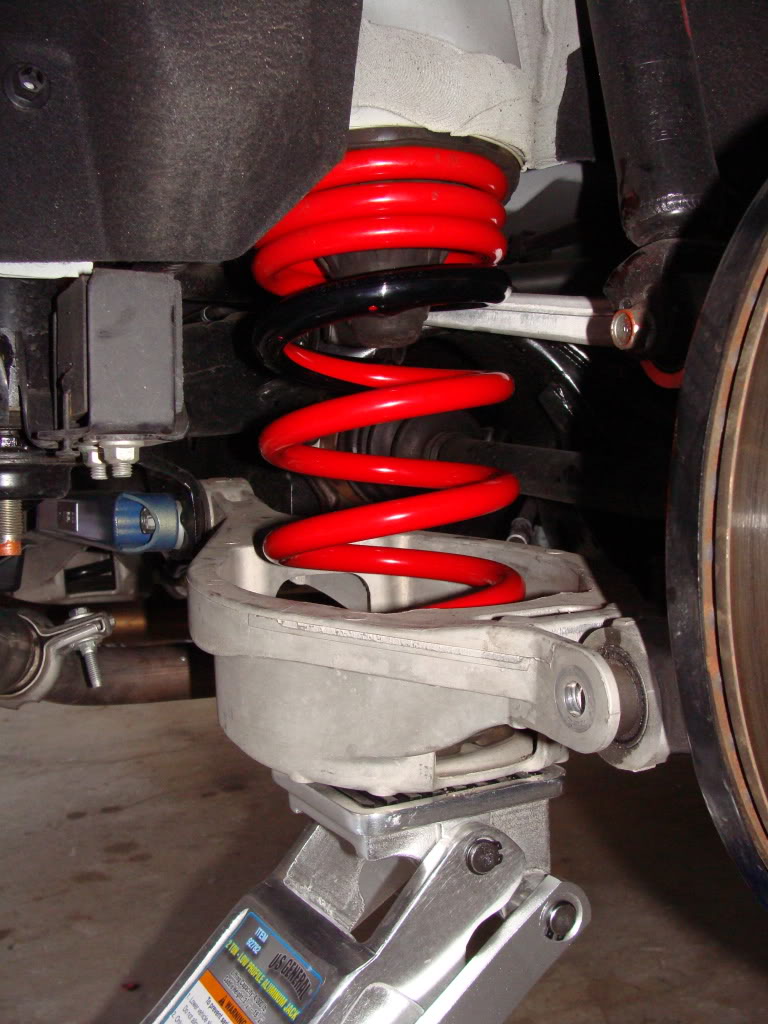
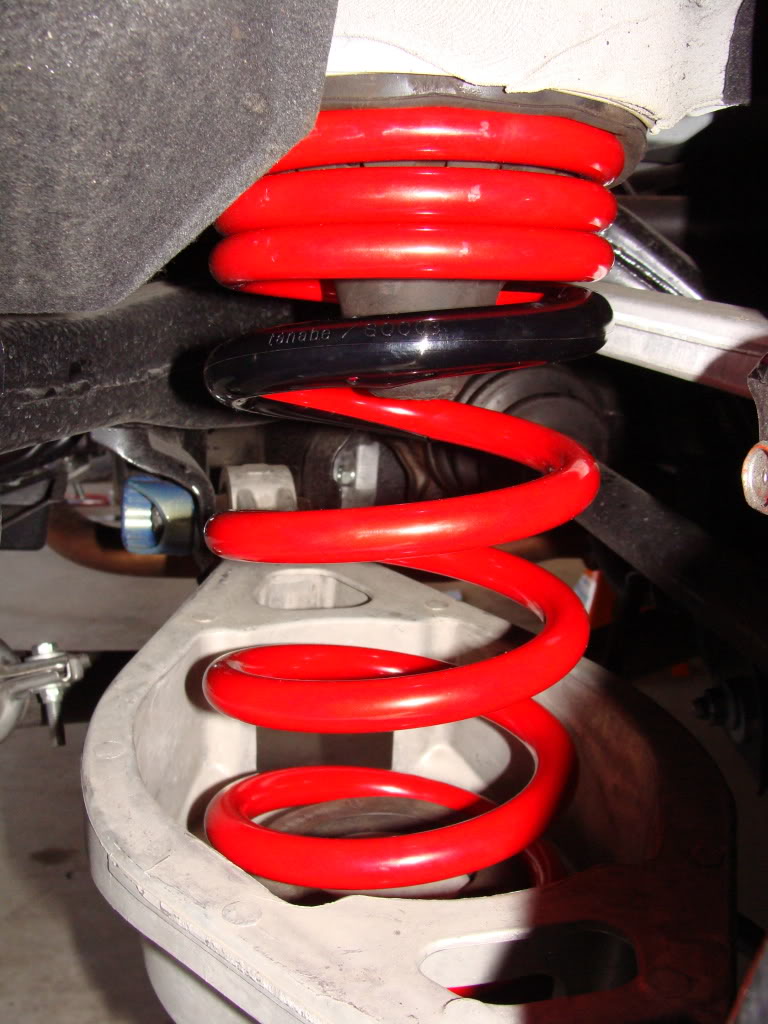
A few more pics of the rear coil-over install that I took.


Last edited by 2GoRNot2G; 06-02-2015 at 02:20 PM.
#35
06-02-2015 | 02:30 PM
Registered User
Joined: Nov 2008
Posts: 2,588
Likes: 24
From: SoCal
Today I received the 3/8" bushings in the mail, and am holding on to those as a potential option, swapping one or both in to replace the 5/8" bushings... although I still need to customize them into the top-seats.
I think I need to take a step back. Bring the car to a few different "flat" locations, and take measurements. Then turn the car around in the same spot, and take measurements again.
Don't mind saying this, but life was easier when I didn't obsess over this crap. And I clearly see why people get pulled into coilovers just for ride height considerations, when they never intended to go there. (sigh)
2GoRNot2G, your comments and advice are appreciated. Thanks.
I think I need to take a step back. Bring the car to a few different "flat" locations, and take measurements. Then turn the car around in the same spot, and take measurements again.
Don't mind saying this, but life was easier when I didn't obsess over this crap. And I clearly see why people get pulled into coilovers just for ride height considerations, when they never intended to go there. (sigh)
2GoRNot2G, your comments and advice are appreciated. Thanks.
Good luck with everything!
#36
06-02-2015 | 03:31 PM
Registered User
Joined: Dec 2011
Posts: 52
Likes: 1
From: Rochester, NY
Hey, you guys are being very helpful. I understand now what was meant by "tabs" in the upper seat.
Over the next few days, I'm taking floor-2-fender measurements of all four corners at various locations, and turning the car around at each location, to account for variations in pitch. I've taken two sets of measurements so far, and am starting to think of a better scenario which explains things.
1. The variation between each side is actually an artifact of whatever surface I'm on, and the pitch of that surface. Very few places are truly, 100% level, and level to all four corners. I suppose a cement parking garage basement would be the best best. Don't have ready access to something like that.
2. The rear is actually higher than the front now with the 5/8" bushings. That didn't seem possible at first, hence my confusion, but I suspect the reason for that is the polyurethane bushings are far less forgiving than the rubber upper seats. So although the bushing is 5/8" thick, I'm actually adding an inch to the height.
If that's true, then I suspect replacing the 5/8" bushings for the 3/8" bushings would be a viable solution to my problem... but I still need to gather more statistics to get to that point. In addition to giving up a 1/4", they're more flexible because they're more thin.
Last edited by Rochester; 06-02-2015 at 03:56 PM.
#37
06-03-2015 | 09:03 PM
Registered User
Joined: Dec 2011
Posts: 52
Likes: 1
From: Rochester, NY
This was interesting. Before installing these 5/8" bushings, I very clearly had a droopy bum. At least a half inch lower than the front. You'll have to take that at face value... otherwise, why go through all this effort, right?
Anyway, after installing the 5/8" bushings, it just didn't look right. I waited a couple of weeks for things to "settle", and stated looking at the problem more seriously. At first, I thought it was just one rear corner. But with some help here and on myG37.com, I came to thinking it was both rear corners.
So I took a bunch of measurements. Found three very level locations, and took floor to fender measurements (in inches). At each location, I flipped the car around and did it over again. Then I calculated an average measurement for each location, and a final average of all three.
The result: my rear end is actually *HIGHER* than the front now, by an average 0.6".
So in review: my rear was (approximately) 1/2" or more lower than the front before the bushings, and now it's 1/2" or more higher than the front, after the bushings. Essentially, adding the 5/8" bushings increased the height well over an inch. That's messed up.
Why did this happen? I'm assuming because the polyurethane has almost zero give to the material, whereas the upperseat is made of a softer rubber, and absorbs the shape of the spring better.
Anybody have any thoughts? Here are my measurements:
#38
06-04-2015 | 08:35 PM
Registered User
Joined: Nov 2008
Posts: 2,588
Likes: 24
From: SoCal
I think you are actually on the right track with your assumptions. I can tell you that my factory rubber upper spring isolators actually have indentions formed into them where the spring has actually pressed into the rubber and formed an indention for the step in the coil. This is part of what happens when your car settles after changing your springs and/or doing suspension work. But when your upper spring coils are sitting against the much harder polyurethane material the spring can't compress into the material and basically wants to sit against it and since these springs aren't flat (due to the step on the coil) the step on the coil actually pushes the spring off the isolator slight and deforms the mounting surface... you can even see this happening in one of the pictures you posted.

I imagine this could actually cause the rear to be lifter as much as the thickness of the actual coil itself. Maybe you could notch the poly isolator slightly for the step in the coil to sit in to help minimize this.
I imagine this could actually cause the rear to be lifter as much as the thickness of the actual coil itself. Maybe you could notch the poly isolator slightly for the step in the coil to sit in to help minimize this.
#39
06-04-2015 | 08:45 PM
Registered User
Joined: Dec 2011
Posts: 52
Likes: 1
From: Rochester, NY
However, every time I tweak things means another hour's labor at the mechanic. So the next time I do this, I'd like it to be my last. At the moment, I have two 3/8" bushings in my hands, and am considering notching the the inner edge of the top seat cone to 90*, so the bushing fits on the flats. (Follow?) This instead of beveling the inner edge of the bushings, because there's just not enough material in the 3/8" version to support that.
That would reduce the height 1/4" over the current 5/8" bushing. And the thinner material *might* have more give to it, allowing for a little bit of settle. Maybe another 1/8". Which would put me pretty close.
Another option would be to shave 1/4" off the bottom of the top-seat. Any reason why I couldn't do that?
I was also thinking about putting the bushing under the top-seat against the frame, but IDK how deep those three tabs go into the middle. Doing so would mean cutting the lip off the bushing... no biggie. What are your thoughts about that?
Dude, you are very helpful. Thanks again.
#40
06-04-2015 | 08:51 PM
Registered User
Joined: Nov 2008
Posts: 2,588
Likes: 24
From: SoCal
OK, here are some pictures I ran across from my original Tanabe spring install I did years ago. Hope this helps.
Here's a picture that shows a little of the indentation the spring coil has made in the factory rubber upper spring isolator bushing.
Here's a picture showing the large step in the lower rubber bushing.
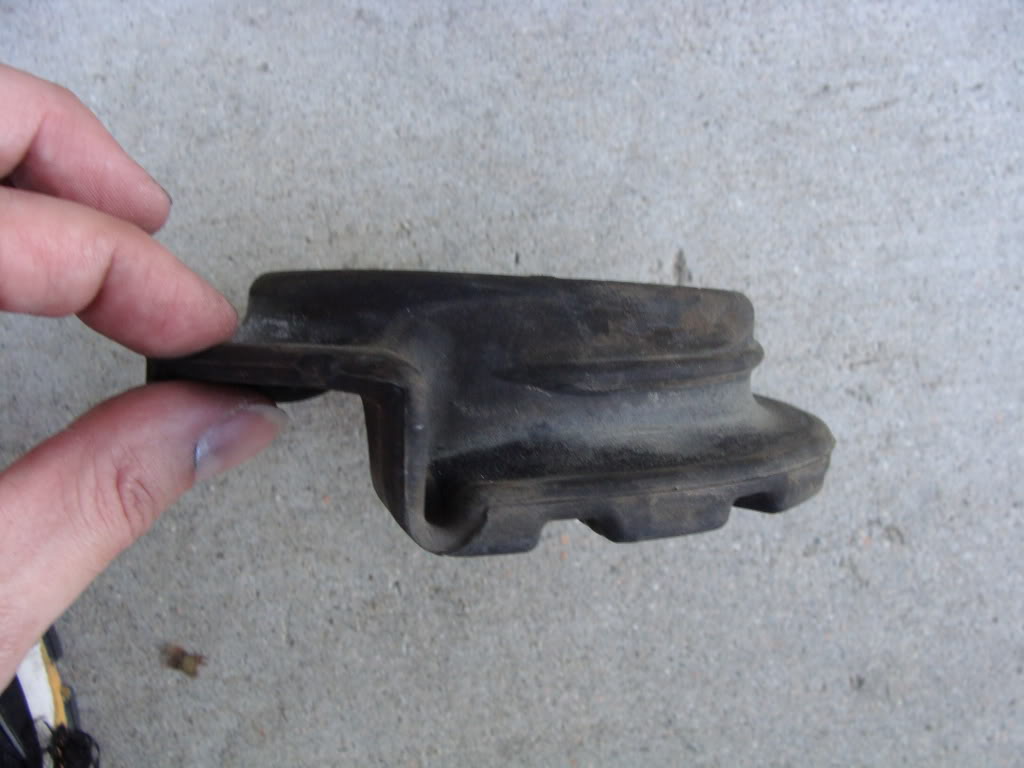
And a couple of pics showing how nice the springs sit in the factory rubber upper bushing.
Here's a picture that shows a little of the indentation the spring coil has made in the factory rubber upper spring isolator bushing.

Here's a picture showing the large step in the lower rubber bushing.

And a couple of pics showing how nice the springs sit in the factory rubber upper bushing.


#41
06-04-2015 | 09:02 PM
Registered User
Joined: Nov 2008
Posts: 2,588
Likes: 24
From: SoCal
I thought of doing that, and in fact my mechanic mentioned that as well.
However, every time I tweak things means another hour's labor at the mechanic. So the next time I do this, I'd like it to be my last. At the moment, I have two 3/8" bushings in my hands, and am considering notching the the inner edge of the top seat cone to 90*, so the bushing fits on the flats. (Follow?) This instead of beveling the inner edge of the bushings, because there's just not enough material in the 3/8" version to support that.
That would reduce the height 1/4" over the current 5/8" bushing. And the thinner material *might* have more give to it, allowing for a little bit of settle. Maybe another 1/8". Which would put me pretty close.
Another option would be to shave 1/4" off the bottom of the top-seat. Any reason why I couldn't do that?
I was also thinking about putting the bushing under the top-seat against the frame, but IDK how deep those three tabs go into the middle. Doing so would mean cutting the lip off the bushing... no biggie. What are your thoughts about that?
Dude, you are very helpful. Thanks again.


#42
06-04-2015 | 09:02 PM
Registered User
Joined: Dec 2011
Posts: 52
Likes: 1
From: Rochester, NY
(sigh)
I'm not sure having the 3/8" shaved partially and not seated completely against the factory bushing is the best way to go. This could cause the poly bushing to possibly pivot or rotate slightly on the conical section of the factory bushing. I think ideally you really want it them to sit flat against one another.
#43
06-04-2015 | 09:11 PM
Registered User
Joined: Nov 2008
Posts: 2,588
Likes: 24
From: SoCal
It's no problem, man. Suspension is my thing. I've had different coil springs and three different set of coil overs on my G, not to mention various control arms, braces, and sway bars.... I've had the suspension apart on my G at least 20 or 25 times in the 6 - 7 years I've owned it. It's really too bad you live ~3000 miles away, otherwise I could help you knock this off in a couple of hours on a Saturday afternoon.
Anyway, my ideal solutions for you (other than going with a set of coil overs) would be to have a machine shop make you a couple of upper mounting cups out of aluminum for your upper bushings to install on. These would be made the thickness you want to raise your rear (i.e. 5/16" thick) same outer diameter as the bushing with and inner "post" that is the same inner diameter as the bushing so the bushing could just slide over it. This would be machine out in the back so that it can fit over the factory mounting tabs and simply act as a spacer for the factory bushing, but the factory bushing is still the only piece utilized with no poly bushing.
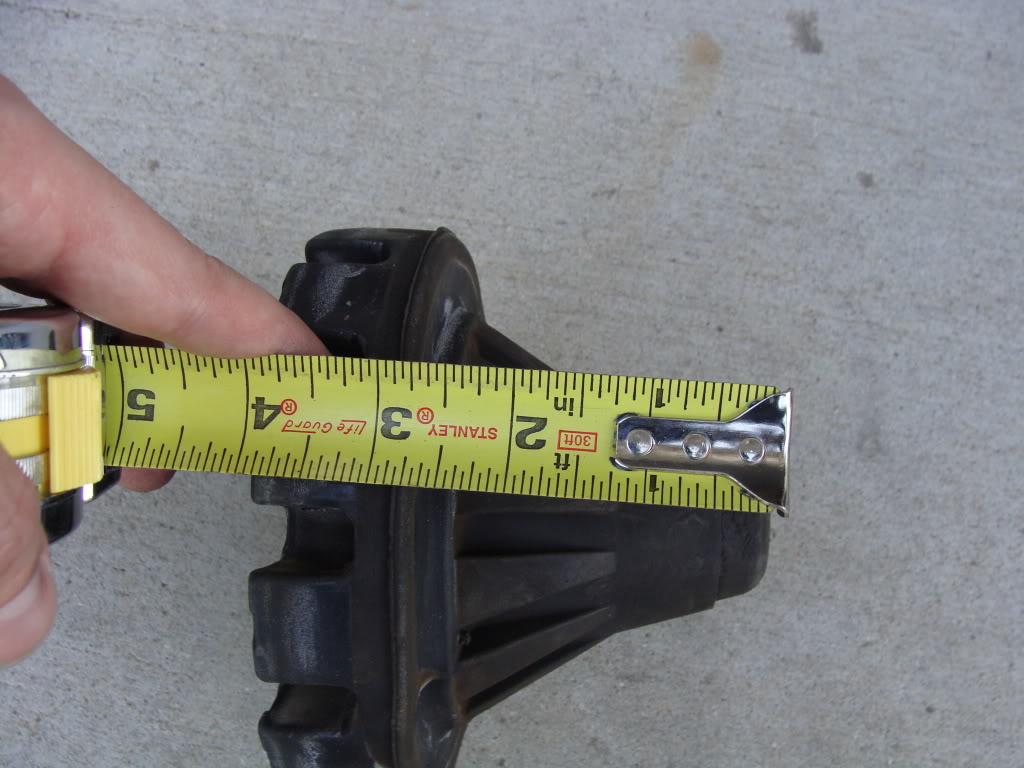
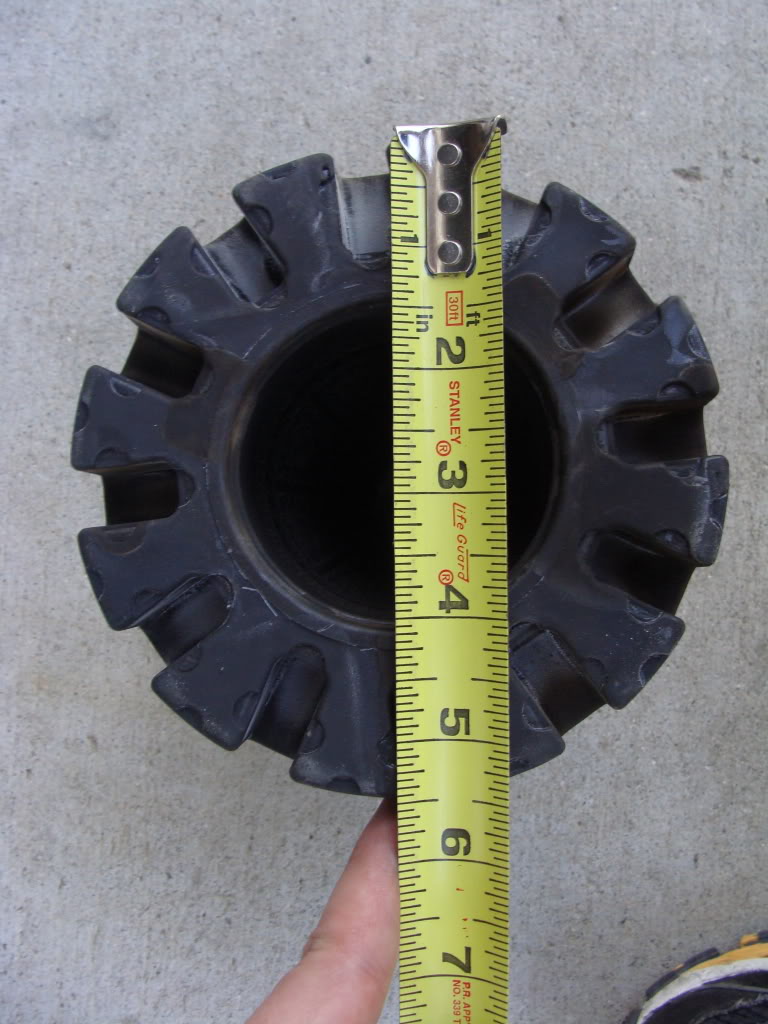
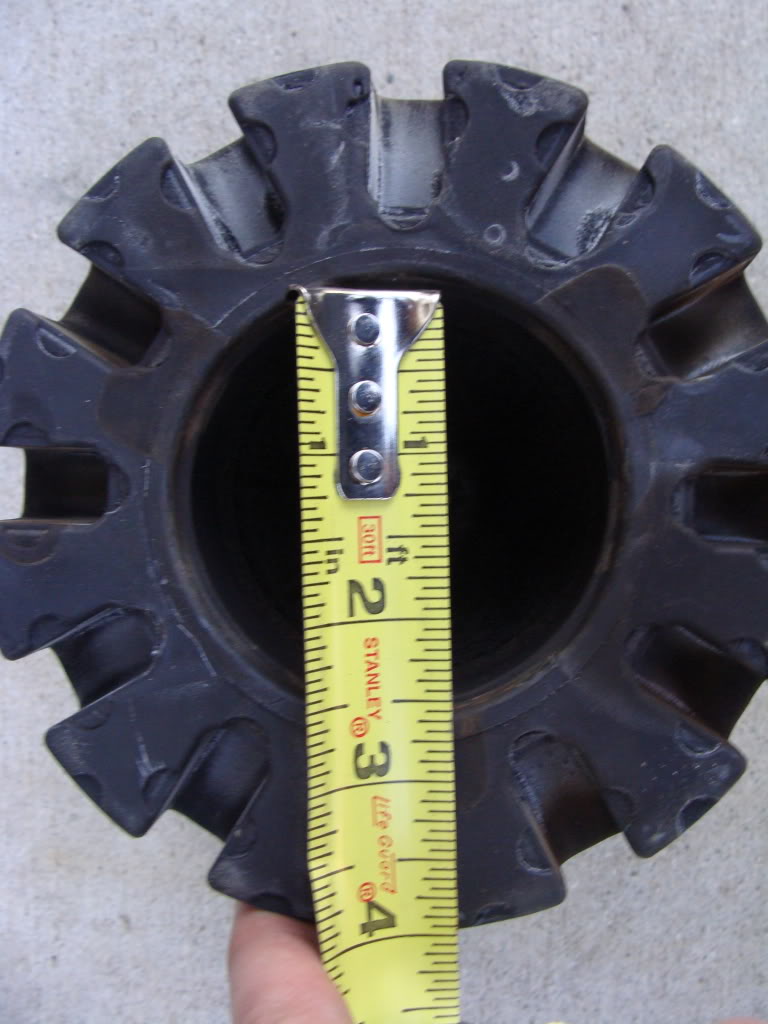
Below are a couple of pics of the measurements off the factory upper bushing.
Anyway, my ideal solutions for you (other than going with a set of coil overs) would be to have a machine shop make you a couple of upper mounting cups out of aluminum for your upper bushings to install on. These would be made the thickness you want to raise your rear (i.e. 5/16" thick) same outer diameter as the bushing with and inner "post" that is the same inner diameter as the bushing so the bushing could just slide over it. This would be machine out in the back so that it can fit over the factory mounting tabs and simply act as a spacer for the factory bushing, but the factory bushing is still the only piece utilized with no poly bushing.
Below are a couple of pics of the measurements off the factory upper bushing.


#44
06-04-2015 | 09:21 PM
Registered User
Joined: Nov 2008
Posts: 2,588
Likes: 24
From: SoCal
It helps in that it tells me very clearly that the softer rubber top seat is made of a material that is intended to absorb the spring. And that process contributes to what people refer to as "settling in". It starting to make me think this whole poly bushing idea might not be such a good one after all.
(sigh)
No, I think you misunderstood. If I could diagram what I'm thinking. The 5/8" bushing I beveled the inner edge to match the angle of the top seat, just like the OP did here at the top of the thread. However, there's not enough poly material with the 3/8" version, so in order to be flat against the top-seat, I'd have to knotch the 45* angle of the cone to 90" at only 1/4" into the cone. Follow?
#45
06-04-2015 | 10:23 PM
Registered User
Joined: Dec 2011
Posts: 52
Likes: 1
From: Rochester, NY
Yeah, I follow you now. Your talking about modifying the factory rubber bushing by notching it instead of modifying the poly bushing. The only issue I see with this is that the spring will still be seated against the poly bushing and probably won't want to sit flat... like you said, it may be better with the slightly thinner poly bushing, but I doubt the change will be significant. I will also mention that once you modify the factory bushing then you are stuck with the changes and no going back. I'm no sure how inexpensive these are to replace, but you might want to look into that before modifying the factory part.
At a minimum, the change to the 3/8" bushing would be a 1/4" improvement, although if you looked at the measurement averages I did the other day, the rear is currently 0.6" (or approx 5/8") higher than the front...
...which means the thinner bushing may just have to be good enough until the day comes when I ditch these springs for a CO setup.
Here's what it looked like last Fall, before the bushing was installed this Spring. I had just removed the summer rims for the season, swapping in the duckfeet, snow tires and a set of 15mm spacers for Winter. I gamma-corrected the image so you can see into the shadows and get a perspective on the gap front to back. Granted, the snow tire tread make the analysis kind of strange, but it's a good shot anyway of the droopy bum.

And here's a close-up of the droopy bum, accentuated on a very uneven surface. To be honest, it's more droopy than typical in this picture:

Last edited by Rochester; 06-05-2015 at 12:23 PM.