

I always take picss while I install things just so I know how to undo it if needed. Anyway, since I had so many pics and notes, I thought I'd post my DIY experience. Every DIY that I read was helpful in different ways so hopefully someone finds this helpful. This one is specific to AWD models which has a "fork" strut support and you also have a drive axle up front that you need to maneuver around.
Vehicle: 2007 G35x Sedan
Springs: Eibach Pro-kit Part #6399.140
This was my first every attempt at installing springs on any car. If you are a newb like me, I would not recommend you try this if you don't have air tools. Honestly, I'm not sure how people do this with just hand tools. I used an Ingersoll Rand 231g with a Dewalt 55168 compressor. I bought these items specifically for changing tires and doing this install plus some other work I need to do on another car. I did this install myself but it would of been helpful to have another pair of hands.
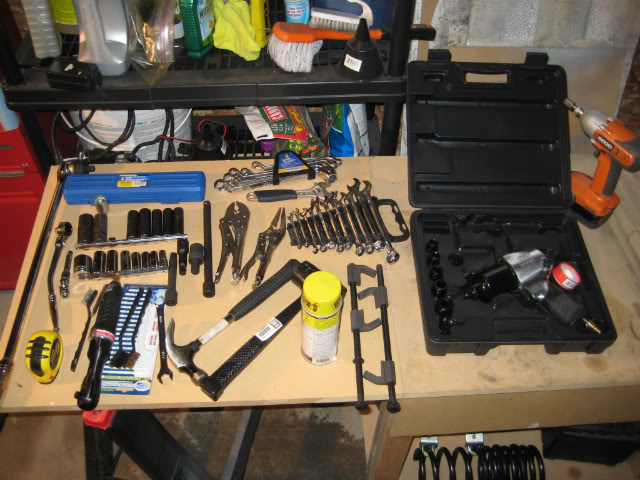
First off, get the car safely off the ground and on jack stands - parking brake on and wheels chocked of course. You'll need an assortment of wrenches and sockets (12mm, 14mm, 17mm are the sizes I recall). Socket extensions and a universal joint were also helpful. Here's a pic of the tools I broke out for this job.
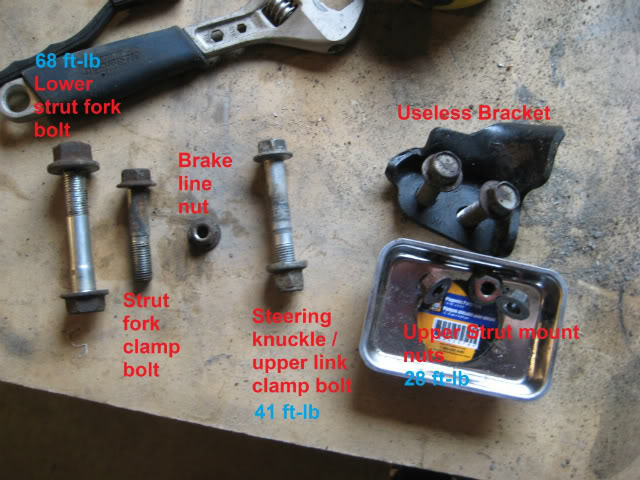
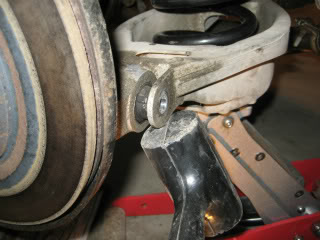
Next, here are 4 photos of the bolts you need to take off to get the shock out.
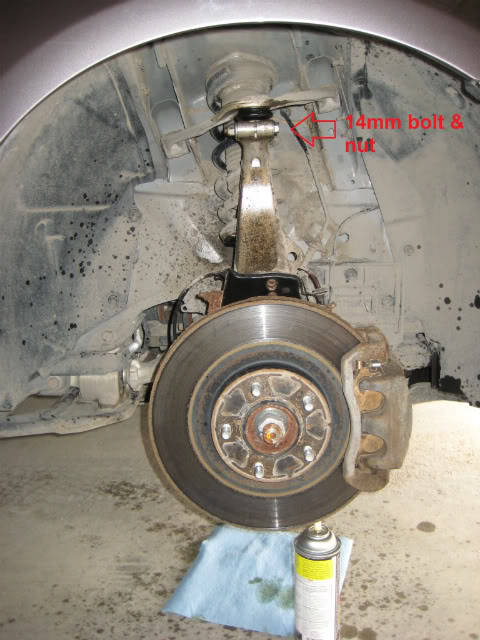
1st pic - 14 mm bolt and nut that holds the upper link to the steering knuckle
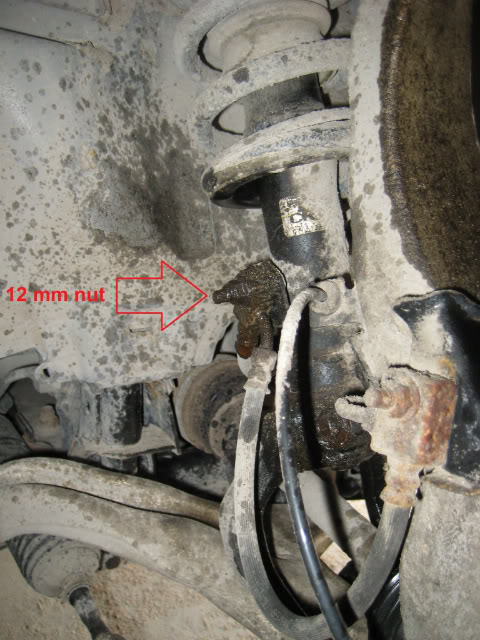
2nd pic - 12 mm nut that holds the brake line to the shock
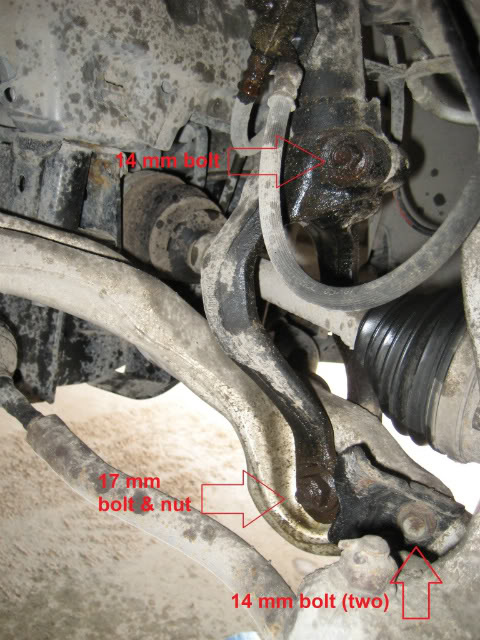
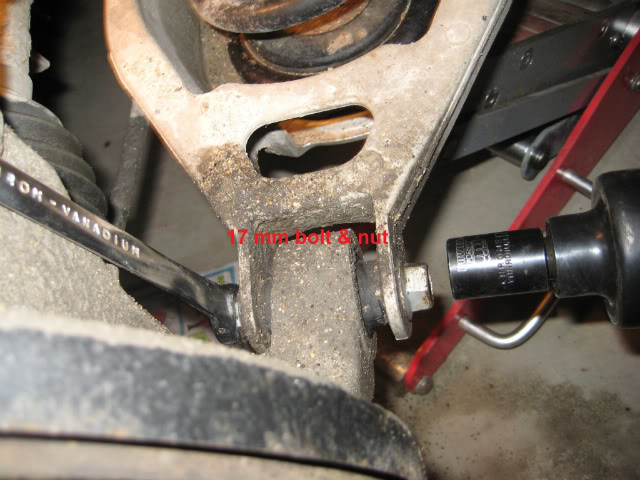
3rd pic - 14 mm clamp bolt that holds the strut fork to the actual strut; 17 mm nut and bolt that holds the strut fork to the transverse link; 2x14 mm bolts that hold a metal bracket to the transverse link (I don't know what this bracket actually does...appears to do nothing.)
4th pic - is just a summary of the nuts and bolts that will be removed once you have the strut/spring assembly out.
Note: there's no need to touch the stabilizer bar end link nuts. Others disconnected the stabilizer bar from the transverse link but for the X, you don't need to.
Next I'll describe the process I used to get the front strut out. I soaked all the bolts in PB blaster over night and again 30 min before starting. I also recommend taking a wire brush to the nuts and bolt heads to clean them so your sockets can fit firmly on them - less chance of stripping things.
First I broke loose the 17mm bolt and nut that connects the strut fork to the transverse link and same for the 14 mm bolt that clamps the fork to the strut body. Don't remove them yet...just make sure you can get them loose or there's not point in going further.
Next go under the hood and loosen the three 12mm nuts at the top of the strut. Loosen these three nuts as much as you can with out taking them off. You don't want the strut to drop out unexpectedly later, you just want the ability to wiggle it later.
Remove the 12 mm bolt that holds the brake line in place and remove the ABS sensor lines that are connected to the strut body
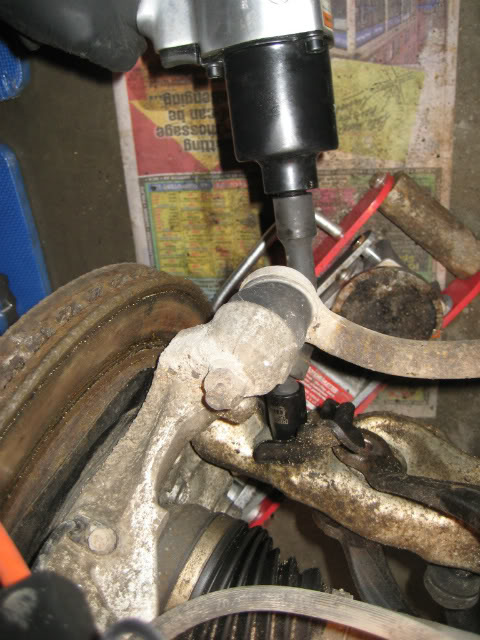
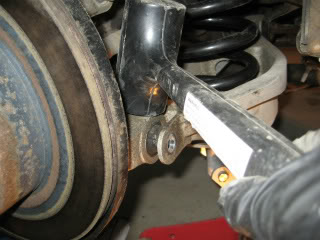
Next, support the transverse link and remove the 14 mm bolt and nut that clamps the upper link to the steering knuckle. I used my impact gun and box end wrench. Do this carefully as the the disc brake / steering knuckle assembly will now be free and can drop. It won't drop to the ground though cuz the stabilizer bar is still supporting it. Once you do this, swing the steering knuckle toward the front of the car as shown in the pic below.

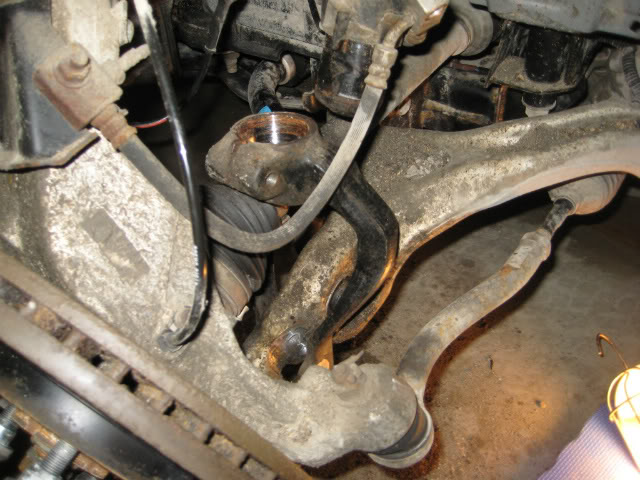
With the steering knuckle moved forward, you will now have access to remove the "useless" bracket I mentioned above. This bracket, if left in place, prevents you from moving the strut fork enough to get it off the strut. Here's a pic of me removing the "useless" bracket...I needed to use an extension and universal joint. The photo is looking down and the bracket faces the back end of the car.
With this bracket removed, you can now take out the 14 mm bolt that clamps the strut fork to the strut body. Now, you can proceed to removed the 17 mm nut and bolt that holds the strut fork to the transverse link. There should be ample room to remove the strut fork now so with two hands grab the fork like a wish bone and jiggle and pull it loose from the strut body. The strut will still hang there cuz you didn't completely remove the three 12mm bolts in the hood yet. See pic. Notice the tab on the strut body...this is important as you will have to line this tab up with gap in the fork when you re-assemble.
Next take two of the three 12mm nuts off under the hood. Before you take the third on out, reach in the wheel well with one hand and hold up the strut (so it does fall and damage any lines). Take out the third nut and the strut/spring assembly is good to go.
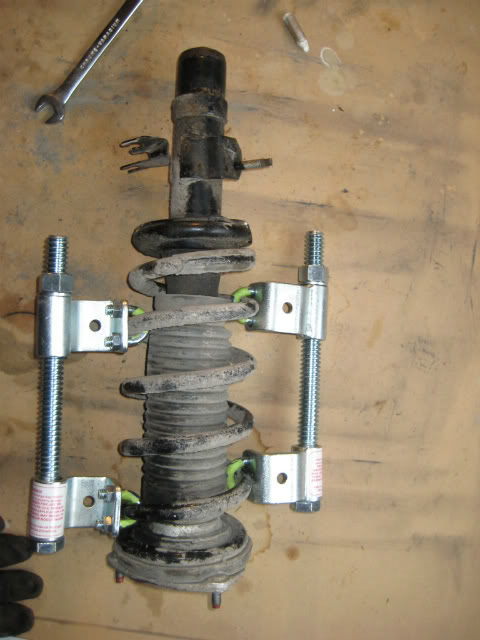
I tried two types of spring compressors and could not get the Eibach spring compressed enough, not in a safe manner anyway. I decided to cough up $75 and let a shop do them both. It's up to you whether you want to try to compress the spring or not. Honestly, I'd recommend that you don't attempt this.
Once you have the new Eibach spring on the strut, just reinstall in reverse.
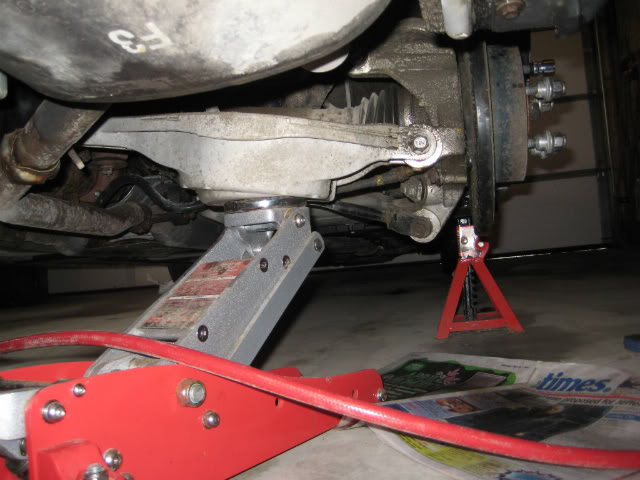
For the rears, its simple but there are some things worth pointing out. Start with getting the rear end up on jack stands - parking brake and chock the front wheels. Support the spring bucket as shown.
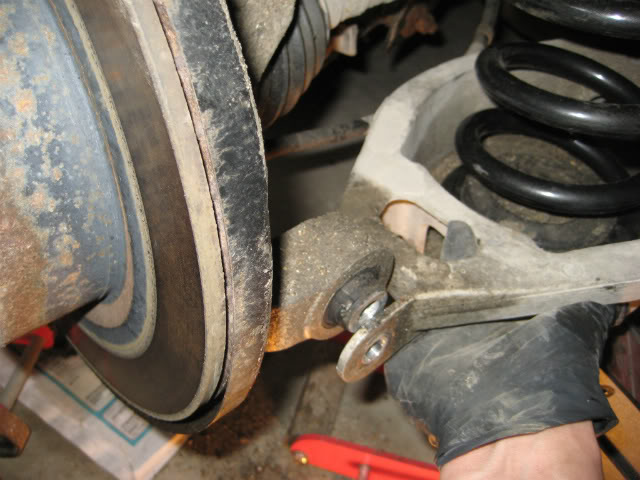
With a 17 mm socket and box end wrench, remove the bolt as shown. Note that once you remove this bolt, the disc brake assembly will start to float upwards (slowly) so be sure your not in the way of it. The shock pulls it up...it doesn't happen quick or suddenly so don't worry
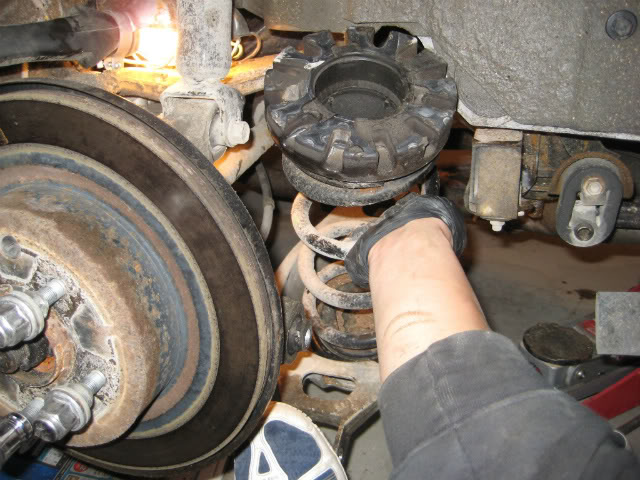
Lower the spring bucket and get the trolly jack out of the way. The spring wont pop out by itself...it will stay wedged in the spring bucket and under side of the car. With your foot pushing down on the spring bucket and two hands on the upper part of the spring, yank it out along with the rubber cone thing
Install the new spring and start jacking up the spring bucket. To line the bolt holes up, you have to grab the spring bucket and yank it so it lines up...other wise you will end up just jacking the whole car up.
I found it necessary to smack various points with a mallet (plastic) to get it lined up precisely. I really didn't want to cross thread anything so I made sure it was perfectly aligned.
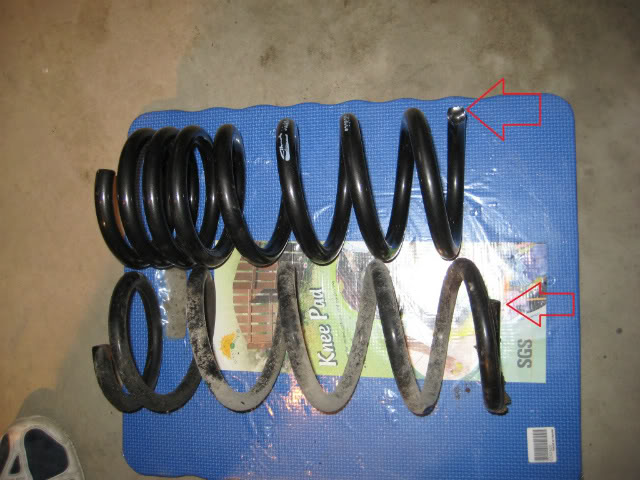
That's basically it. Took me 6 hrs which included a trip to the shop to get the front springs mounted on the strut. One odd thing is that ends of the Eibach springs (front and rears) don't match with the OEM ones. I was confused how the fronts would work but they did...here's a photo of the rears to explain what i mean. The spring end on the left of the pic is place at relatively the same position (say this is 12 o'clock) but if you look at the right end, the OEM is at the floor (6 o'clock) while the Eibach is at the 9 o'clock position.
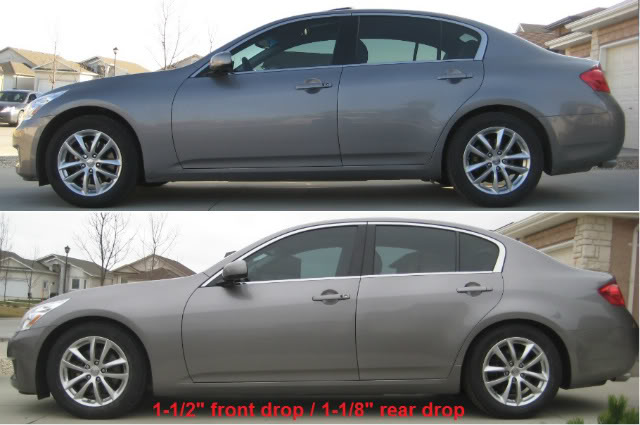
This is what you end up with. Its a pretty subtle drop which is what I wanted. I just wanted a more even look and to get rid of the "SUV" look. The drop is pretty much as spec'd by Eibach. My measurements are in the photo...I did this with a simple tape measure so my accuracy is not great
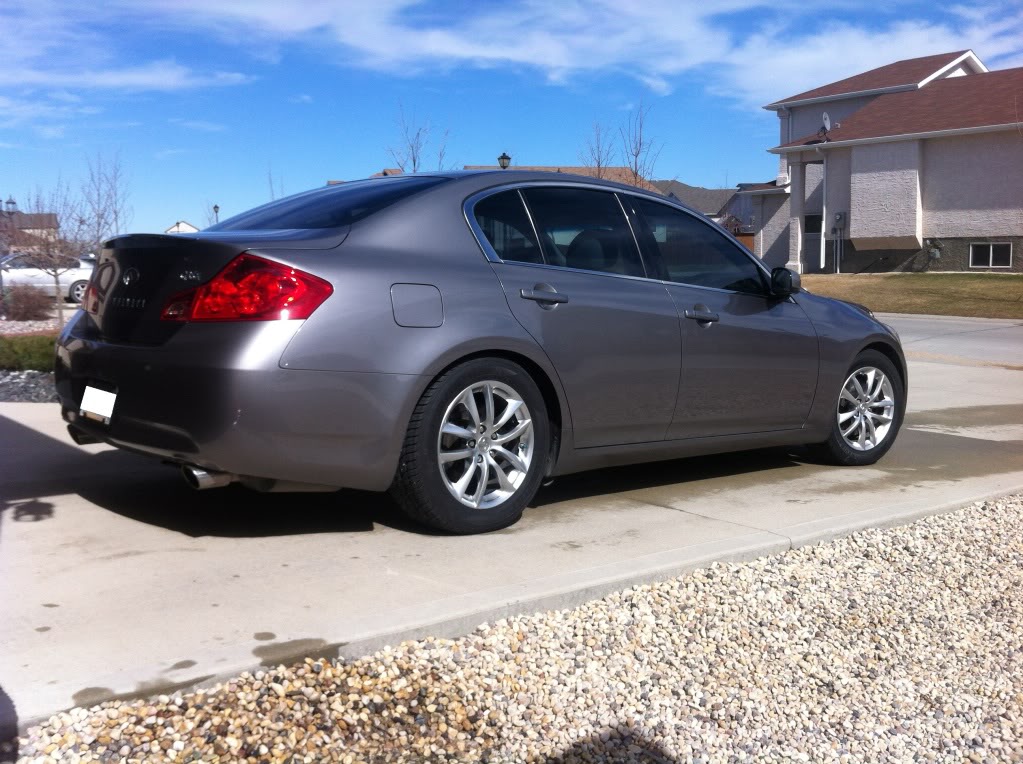
Final verdict after two days of driving....THIS IS THE WAY IT SHOULD OF CAME FROM THE FACTORY. The handling is noticeably better. Feels tighter, less roll. The ride is not harsh at all. It still feels comfortable and with better "road" feel. I'm 100% happy with this. If you're looking for better handling and a slightly sportier looking stance, then go for it. If you looking for a slammed drop, then these probably are not for you. ENJOY
Vehicle: 2007 G35x Sedan
Springs: Eibach Pro-kit Part #6399.140
This was my first every attempt at installing springs on any car. If you are a newb like me, I would not recommend you try this if you don't have air tools. Honestly, I'm not sure how people do this with just hand tools. I used an Ingersoll Rand 231g with a Dewalt 55168 compressor. I bought these items specifically for changing tires and doing this install plus some other work I need to do on another car. I did this install myself but it would of been helpful to have another pair of hands.
First off, get the car safely off the ground and on jack stands - parking brake on and wheels chocked of course. You'll need an assortment of wrenches and sockets (12mm, 14mm, 17mm are the sizes I recall). Socket extensions and a universal joint were also helpful. Here's a pic of the tools I broke out for this job.
Next, here are 4 photos of the bolts you need to take off to get the shock out.
1st pic - 14 mm bolt and nut that holds the upper link to the steering knuckle
2nd pic - 12 mm nut that holds the brake line to the shock
3rd pic - 14 mm clamp bolt that holds the strut fork to the actual strut; 17 mm nut and bolt that holds the strut fork to the transverse link; 2x14 mm bolts that hold a metal bracket to the transverse link (I don't know what this bracket actually does...appears to do nothing.)
4th pic - is just a summary of the nuts and bolts that will be removed once you have the strut/spring assembly out.
Note: there's no need to touch the stabilizer bar end link nuts. Others disconnected the stabilizer bar from the transverse link but for the X, you don't need to.
Next I'll describe the process I used to get the front strut out. I soaked all the bolts in PB blaster over night and again 30 min before starting. I also recommend taking a wire brush to the nuts and bolt heads to clean them so your sockets can fit firmly on them - less chance of stripping things.
First I broke loose the 17mm bolt and nut that connects the strut fork to the transverse link and same for the 14 mm bolt that clamps the fork to the strut body. Don't remove them yet...just make sure you can get them loose or there's not point in going further.
Next go under the hood and loosen the three 12mm nuts at the top of the strut. Loosen these three nuts as much as you can with out taking them off. You don't want the strut to drop out unexpectedly later, you just want the ability to wiggle it later.
Remove the 12 mm bolt that holds the brake line in place and remove the ABS sensor lines that are connected to the strut body
Next, support the transverse link and remove the 14 mm bolt and nut that clamps the upper link to the steering knuckle. I used my impact gun and box end wrench. Do this carefully as the the disc brake / steering knuckle assembly will now be free and can drop. It won't drop to the ground though cuz the stabilizer bar is still supporting it. Once you do this, swing the steering knuckle toward the front of the car as shown in the pic below.
With the steering knuckle moved forward, you will now have access to remove the "useless" bracket I mentioned above. This bracket, if left in place, prevents you from moving the strut fork enough to get it off the strut. Here's a pic of me removing the "useless" bracket...I needed to use an extension and universal joint. The photo is looking down and the bracket faces the back end of the car.
With this bracket removed, you can now take out the 14 mm bolt that clamps the strut fork to the strut body. Now, you can proceed to removed the 17 mm nut and bolt that holds the strut fork to the transverse link. There should be ample room to remove the strut fork now so with two hands grab the fork like a wish bone and jiggle and pull it loose from the strut body. The strut will still hang there cuz you didn't completely remove the three 12mm bolts in the hood yet. See pic. Notice the tab on the strut body...this is important as you will have to line this tab up with gap in the fork when you re-assemble.
Next take two of the three 12mm nuts off under the hood. Before you take the third on out, reach in the wheel well with one hand and hold up the strut (so it does fall and damage any lines). Take out the third nut and the strut/spring assembly is good to go.
I tried two types of spring compressors and could not get the Eibach spring compressed enough, not in a safe manner anyway. I decided to cough up $75 and let a shop do them both. It's up to you whether you want to try to compress the spring or not. Honestly, I'd recommend that you don't attempt this.
Once you have the new Eibach spring on the strut, just reinstall in reverse.
For the rears, its simple but there are some things worth pointing out. Start with getting the rear end up on jack stands - parking brake and chock the front wheels. Support the spring bucket as shown.
With a 17 mm socket and box end wrench, remove the bolt as shown. Note that once you remove this bolt, the disc brake assembly will start to float upwards (slowly) so be sure your not in the way of it. The shock pulls it up...it doesn't happen quick or suddenly so don't worry
Lower the spring bucket and get the trolly jack out of the way. The spring wont pop out by itself...it will stay wedged in the spring bucket and under side of the car. With your foot pushing down on the spring bucket and two hands on the upper part of the spring, yank it out along with the rubber cone thing
Install the new spring and start jacking up the spring bucket. To line the bolt holes up, you have to grab the spring bucket and yank it so it lines up...other wise you will end up just jacking the whole car up.
I found it necessary to smack various points with a mallet (plastic) to get it lined up precisely. I really didn't want to cross thread anything so I made sure it was perfectly aligned.
That's basically it. Took me 6 hrs which included a trip to the shop to get the front springs mounted on the strut. One odd thing is that ends of the Eibach springs (front and rears) don't match with the OEM ones. I was confused how the fronts would work but they did...here's a photo of the rears to explain what i mean. The spring end on the left of the pic is place at relatively the same position (say this is 12 o'clock) but if you look at the right end, the OEM is at the floor (6 o'clock) while the Eibach is at the 9 o'clock position.
This is what you end up with. Its a pretty subtle drop which is what I wanted. I just wanted a more even look and to get rid of the "SUV" look. The drop is pretty much as spec'd by Eibach. My measurements are in the photo...I did this with a simple tape measure so my accuracy is not great
Final verdict after two days of driving....THIS IS THE WAY IT SHOULD OF CAME FROM THE FACTORY. The handling is noticeably better. Feels tighter, less roll. The ride is not harsh at all. It still feels comfortable and with better "road" feel. I'm 100% happy with this. If you're looking for better handling and a slightly sportier looking stance, then go for it. If you looking for a slammed drop, then these probably are not for you. ENJOY

Registered User
Nice DIY and pics. I think you'll find that it'll be even lower once things settle--at least it did for me. This thread also might be better in the DIY section for people that are looking for it.

Quote:
Haha, sorry bud. It is University of Toronto but I'm back in Winnipeg now, graduated in 2004.Originally Posted by cpr
UofT...does that mean University of Toronto. Would you do this again if I paid ya? =)
I probably wouldnt do this for cash anyway lol. It's just something I wanted to try for the heck of it. Plus I wanted to justify buying some nice tools! I like working on my own car but not so much on other peoples rides, haha.


Quote:
Good point...Mods, please feel free to move to Brake & Suspension DIY section if you like. Sorry. Sort of new to the forum and I dont know the sections that well.Originally Posted by mishmosh
Nice DIY and pics. I think you'll find that it'll be even lower once things settle--at least it did for me. This thread also might be better in the DIY section for people that are looking for it.

Registered User
To be quite honest, that's really impressive if this is your first time doing that. However, I would've saved the frustration and went to the shop to do it and get it aligned, and I think you forgot to get and install camber kits on the rear... lowering without camber kits would wear your tires unevenly.
Quote:
Hey, thanks. It wasn't frustrating at all, I like working on my own car. With the right tools and research, this install is not that hard.Originally Posted by G35XX
To be quite honest, that's really impressive if this is your first time doing that. However, I would've saved the frustration and went to the shop to do it and get it aligned, and I think you forgot to get and install camber kits on the rear... lowering without camber kits would wear your tires unevenly.
I wanted to drive a week before I got it aligned. It settled a 1/4" after 24hrs (55 km of driving). The measurements in my pic above was after this 1/4" settling. Hasn't settled since. I have an appointment tomorrow to get an alignment. As for the camber kit, I asked a few X drivers here about it and they've said they're fine without one and one guy with the camber kit (front and rear) even said he realigned his car with some negative camber just because it drove better. I think its really the toe that kills your tires and the alignment should get that back to spec if its out. The eibach drop is so mild on the X that it doesn't put you too far out from specs:
http://performance-suspension.eibach...frontend_print
I took a slight gamble not buying them but if I see uneven tire wear, I may get it next year.

Registered User
Very nice. Which vendor did you actually purchase the springs from?
If I remember, I think some others have tried installing these and ended up with a slightly saggy rear.
If I remember, I think some others have tried installing these and ended up with a slightly saggy rear.
Quote:
If I remember, I think some others have tried installing these and ended up with a slightly saggy rear.
Got these from a vendor local in Winnipeg.Originally Posted by machochino
Very nice. Which vendor did you actually purchase the springs from?If I remember, I think some others have tried installing these and ended up with a slightly saggy rear.
I think people got saggy rears when they installed eibach springs that were not meant for the X. Eibach only released theses a couple years ago so before that, guys with X's were installing springs meant for regular G35's
Registered User
Mmn, I remember a few posts were people were complaining specifically about the new 6399.140. Maybe its when G37x drivers use this spring, as it is meant for 07-08 G35x?
You're drop looks perfect so I may give it a try. Thanks for a great post btw. Springs n struts are tricky and it's definitely something you gotta do right!
You're drop looks perfect so I may give it a try. Thanks for a great post btw. Springs n struts are tricky and it's definitely something you gotta do right!
Quote:
You're drop looks perfect so I may give it a try. Thanks for a great post btw. Springs n struts are tricky and it's definitely something you gotta do right!
Yeah maybe your right. I love the drop! Gives it a nice look and no issues with driveways or bumps so far. Hopefully it's the same result on your S model. Originally Posted by machochino
Mmn, I remember a few posts were people were complaining specifically about the new 6399.140. Maybe its when G37x drivers use this spring, as it is meant for 07-08 G35x?You're drop looks perfect so I may give it a try. Thanks for a great post btw. Springs n struts are tricky and it's definitely something you gotta do right!
Can't wait til my VMR V710's arrive!!